Without a doubt, Vercel is the ideal platform for deploying a Next.js app. This makes sense, since Vercel created Next.js. And while it offers a generous free plan, things can get expensive quickly as your app grows. Depending on your situation, Vercel may end up being less cost-effective compared to other options.
This tutorial will explore how to build and deploy a Next.js app to Cloudflare Workers. We’ll also cover how to configure GitHub integration for CI/CD and optimize images using Cloudflare Images. With the final setup, you can enjoy Vercel-like performance with more flexibility and lower costs, especially at scale.
To follow along with the tutorial, you’ll need a Cloudflare account. Sign up here if you don’t have one yet.
The Replay is a weekly newsletter for dev and engineering leaders.
Delivered once a week, it's your curated guide to the most important conversations around frontend dev, emerging AI tools, and the state of modern software.
For this tutorial, we’ll create a simple product display application that uses a Next.js API route to fetch products from the Fake Store API. Then, on the homepage, we’ll make a request to that API route and display the products in a list.
To get started, run the command below to scaffold a new app using the OpenNext adapter:
npm create cloudflare@latest -- my-next-app --framework=next --platform=workers
This command sets up a Next.js project configured to run on Cloudflare Workers. During setup, you’ll be asked to customize the project like a typical create-next-app flow. However, once the project is created, the following new files will be added by OpenNext:
Wrangler.json – This file includes configurations for how Cloudflare Workers should deploy your app, such as the deployment name, environment variables, build settings, and the location of your build outputOpennext.config.mjs – Handles how OpenNext builds and serves your appTo proceed, navigate to pages/api/ directory, create a new file called store.js, and paste the following code into it:
export default async function handler(req, res) {
  try {
    const response = await fetch("https://fakestoreapi.com/products/");
    const products = await response.json();
    res.status(200).json(products);
  } catch (error) {
    res.status(500).json({ error: "Failed to fetch products" });
  }
}
The code above simply creates an API route that returns product data from fakestoreapi.com.
Next, open the default pages/index.js file and replace its contents with the following code:
import { useState, useEffect } from "react";
import { Geist } from "next/font/google";
import Image from "next/image";

const geist = Geist({
  subsets: ["latin"],
  variable: "--font-geist",
});

export default function Home() {
  const [products, setProducts] = useState([]);
  const [loading, setLoading] = useState(true);

  useEffect(() => {
    fetch("/api/store")
      .then((res) => res.json())
      .then((data) => {
        setProducts(data);
        setLoading(false);
      });
  }, []);

  if (loading) {
    return (
      <div className="flex justify-center items-center min-h-screen text-gray-600 text-lg">
        Loading...
      </div>
    );
  }

  return (
    <div
      className={`${geist.className} max-w-7xl mx-auto px-4 sm:px-6 lg:px-8 py-12`}
    >
      <h1 className="text-4xl font-bold text-gray-900 mb-12">Fake Store</h1>
      <div className="grid grid-cols-1 md:grid-cols-2 lg:grid-cols-3 gap-8">
        {products.map((product) => (
          <article
            key={product.id}
            className="bg-white rounded border-2 border-gray-200 overflow-hidden hover:shadow-xl transition-shadow duration-300"
          >
            <div className="relative h-64 w-full">
              <Image
                src={product.image}
                alt={product.title}
                fill
                className="object-contain p-4"
              />
            </div>
            <div className="p-6">
              <div className="flex items-center justify-between mb-4">
                <span className="text-lg font-semibold text-gray-900">
                  ${product.price}
                </span>
                <div className="flex items-center">
                  <span className="text-yellow-400">★</span>
                  <span className="ml-1 text-sm text-gray-600">
                    {product.rating.rate} ({product.rating.count})
                  </span>
                </div>
              </div>
              <h2 className="text-lg font-semibold text-gray-900 mb-2 line-clamp-2">
                {product.title}
              </h2>

              <div className="mt-4">
                <span className="inline-block bg-gray-100 rounded-full px-3 py-1 text-sm font-semibold text-gray-600">
                  {product.category}
                </span>
              </div>
            </div>
          </article>
        ))}
      </div>
    </div>
  );
}
This code updates the homepage to fetch and display a list of products using the API we just created. Also, since we’re loading images from the Fake Store API, we need to allow that external domain in the images config of Next.js. To do this, update your next.config.mjs file to match the one below:
/** @type {import('next').NextConfig} */
const nextConfig = {
  reactStrictMode: true,
  images: {
    domains: ["fakestoreapi.com"],
  },
};

export default nextConfig;

// added by create cloudflare to enable calling `getCloudflareContext()` in `next dev`
import { initOpenNextCloudflareForDev } from "@opennextjs/cloudflare";
initOpenNextCloudflareForDev();
Now, run the app locally:
npm run dev
You should see a list of fake products on your homepage, as shown in the image below: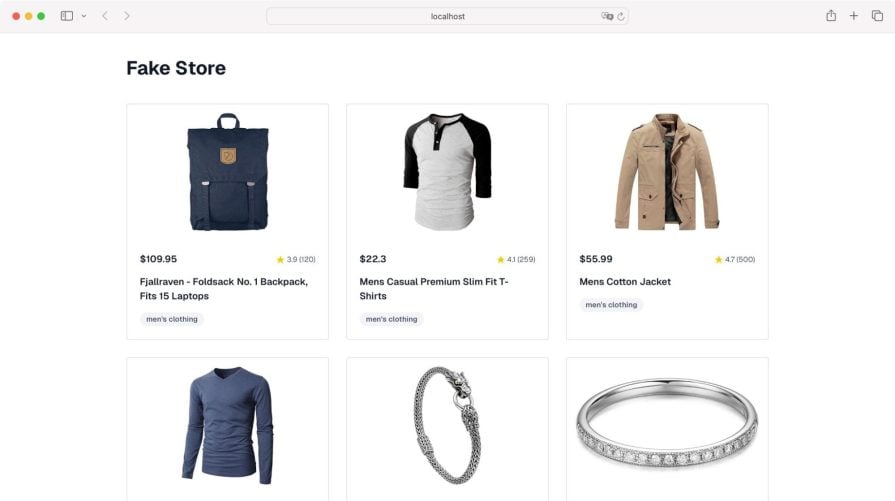
As mentioned earlier, the wrangler.json file lets you customize your app’s deployment settings. You can easily change the app name before deployment by updating the name field. In my case, I’m changing the name to storeapp, as shown below:
{
  "$schema": "node_modules/wrangler/config-schema.json",
  "name": "storeapp", // Update this to the name of your project
  "main": ".open-next/worker.js",
  . . .
}
Next, deploy your app by running:
npm run deploy
If you’re running the command for the first time, Cloudflare will prompt you to authenticate. Once you’ve done that, it will build and deploy the app to your Cloudflare Workers account.
In some cases, you might run into a TypeScript build error. You can fix this by installing TypeScript and the required type definitions:
npm install --save-dev typescript @types/react @types/node
After that, try running the deploy command again, and it should work without issues.
Cloudflare lets you set up GitHub integration to automatically build and deploy your app every time you push changes to your Git repository.
To get started, create a new repo for your project. Once the repo is created, copy the remote URL, then open your project folder locally and run the following commands to initialize Git and push your code:
git init
git remote add origin <your-remote-repo-url>
git add .
git commit -m "Initial commit"
git push -u origin main
Make sure to replace <your-remote-repo-url> with the actual URL of your GitHub repository. Once the project is pushed to GitHub, go back to the app you created earlier in your Cloudflare dashboard and navigate to its settings section. Here, under Build & Deploy, you’ll see an option to connect a Git provider:
Select the GitHub option and authorize your GitHub account. Once the authorization is successful, choose the repo you just pushed. Now, every time you push to this repo, Cloudflare will automatically build and deploy your app.
Next.js has a built-in <Image> component that automatically optimizes images for faster page loads. You can also pass a custom loader to this component, for example, to generate signed URLs, serve images from a custom CDN, or integrate with services like Cloudflare Images.
To use a custom loader with Cloudflare Images, create a new file called imageLoader.ts in the root of your project (same level as package.json) and add the following code:
import type { ImageLoaderProps } from "next/image";

const normalizeSrc = (src: string) => {
  return src.startsWith("/") ? src.slice(1) : src;
};

export default function cloudflareLoader({
  src,
  width,
  quality,
}: ImageLoaderProps) {
  if (process.env.NODE_ENV === "development") {
    return src;
  }
  const params = [`width=${width}`];
  if (quality) {
    params.push(`quality=${quality}`);
  }
  const paramsString = params.join(",");
  return `/cdn-cgi/image/${paramsString}/${normalizeSrc(src)}`;
}
Now, update your next.config.mjs to register the custom loader:
/** @type {import('next').NextConfig} */
const nextConfig = {
  reactStrictMode: true,
  images: {
    domains: ["fakestoreapi.com"],
    loader: "custom",
    loaderFile: "./imageLoader.ts",
  },
};

export default nextConfig;

// added by create cloudflare to enable calling `getCloudflareContext()` in `next dev`
import { initOpenNextCloudflareForDev } from "@opennextjs/cloudflare";
initOpenNextCloudflareForDev();
With this update, Next.js will use your custom loader for all images, allowing you to serve optimized images directly from Cloudflare’s CDN, which improves load times and reduces bandwidth costs.
Beyond pricing, Cloudflare might be a better alternative to Vercel in other scenarios, too. For example, Cloudflare’s edge network and performance at scale can be more robust than what Vercel offers, especially for global audiences or apps that rely heavily on server-side logic at the edge.
The table below also provides a high-level overview to help you decide which platform might suit your needs better:
| Feature | Vercel | Cloudflare (Workers + OpenNext) |
|---|---|---|
| Developer Experience | Excellent with zero-config for Next.js | Good. More setup required, but getting better |
| Performance | Great, with built-in edge functions | Top-tier, with global edge by default |
| Pricing | Can get expensive quickly (especially for Pro/Team plans or high traffic) | Much cheaper at scale, generous free tier, pay-as-you-go |
| Image Optimization | Built-in with <Image /> | Needs manual setup (e.g. Cloudflare Images + custom loader) |
| Customizability | Limited and mostly within Vercel’s ecosystem | High with full control over routing, caching, edge logic |
| Use Case | Best for fast Next.js projects with minimal config | Great for advanced/edge-heavy apps and cost efficiency |
In this article, we explored how to build and deploy a Next.js application to Cloudflare Workers using the OpenNext adapter. We walked through setting up the project, creating a simple API route, enabling image optimization with Cloudflare Images, and configuring GitHub for automatic deployments. You can also find the complete code used in this tutorial on GitHub, and preview the final app deployed on Cloudflare here.
Should you switch from Vercel to Cloudflare? If Vercel is working fine and you value ease of use, you can definitely stick with it. However, if you’re running into cost issues or need more control and edge-level performance, Cloudflare is definitely worth considering.
Debugging Next applications can be difficult, especially when users experience issues that are difficult to reproduce. If you’re interested in monitoring and tracking state, automatically surfacing JavaScript errors, and tracking slow network requests and component load time, try LogRocket.
LogRocket captures console logs, errors, network requests, and pixel-perfect DOM recordings from user sessions and lets you replay them as users saw it, eliminating guesswork around why bugs happen — compatible with all frameworks.
LogRocket's Galileo AI watches sessions for you, instantly identifying and explaining user struggles with automated monitoring of your entire product experience.
The LogRocket Redux middleware package adds an extra layer of visibility into your user sessions. LogRocket logs all actions and state from your Redux stores.


Modernize how you debug your Next.js apps — start monitoring for free.

Learn what vinext is, how Cloudflare rebuilt Next.js on Vite, and whether this experimental framework is worth watching.

Memory leaks in React don’t crash your app instantly, they quietly slow it down. Learn how to spot them, what causes them, and how to fix them before they impact performance.
Build agent-ready websites with Google Web MCP. Learn how to expose reliable site actions for AI agents with HTML and JavaScript.
Build a CRUD REST API with Node.js, Express, and PostgreSQL, then modernize it with ES modules, async/await, built-in Express middleware, and safer config handling.
Hey there, want to help make our blog better?
Join LogRocket’s Content Advisory Board. You’ll help inform the type of content we create and get access to exclusive meetups, social accreditation, and swag.
Sign up now
