Building and deploying web applications can become challenging when setting up, provisioning, maintaining, and scaling the underlying infrastructure. However, we can use the Serverless Framework to make things much easier.

In this tutorial, we’ll learn how to build a serverless blog application in NestJS using DynamoDB and the Serverless Framework. The code for this tutorial is available on GitHub. Let’s get started!
NestJS is a Node.js framework for building TypeScript-based server-side applications that are fast, tested, scalable, and loosely-linked. NestJS uses solid HTTP server frameworks like Express or Fastify, offering an overlay to abstract them and expose their APIs directly to developers. This gives developers the ability to leverage the plethora of third-party modules available for the underlying platform.
NestJS supports database management systems like PostgreSQL, MySQL, and, in this tutorial, YugabyteDB. NestJS also includes dependency injections out of the box.
As part of the Amazon Web Services portfolio, Amazon offers DynamoDB, a fully managed, proprietary NoSQL database service that supports key-value and document data formats. DynamoDB presents a data architecture comparable to Dynamo, taking its name from it, although DynamoDB has a distinct underlying implementation.
The Serverless Framework is an open source CLI that allows you to design, deploy, debug, and protect serverless apps with minimum complexity and expense while providing infrastructure resources from AWS, Azure, and Google.
The Serverless Framework offers out-of-the-box structure, automation, and best practices support, allowing you to focus on developing sophisticated, event-driven, serverless systems made up of functions and events.
To start building and deploying AWS serverless functions, you need to set up an AWS account. Then, set up your credentials by running the command below:
aws configure
The setup above is required if you wish to deploy your functions to AWS. Next, install the Serverless Framework globally with the command below:
npm install -g serverless
Then, install the NestJS CLI:
npm i -g @nestjs/cli
Create a NestJS application with the command below:
nest new nest-serverless && cd nest-serverless
Now, let’s install the required dependencies with the command below:
npm install aws-lambda aws-serverless-express express aws-sdk --save
At this point, we have the initial setup for our serverless application.
Now, let’s add some actual configurations for our serverless application. Create a serverless.yml file in the project’s root directory with the code snippet below:
  service: nest-serverless
plugins:
  - serverless-plugin-optimize
  - serverless-offline
  - serverless-dynamodb-local

functions:
 app:
   handler: dist/main.handler
   events:
     - http:
         method: any
         path: /{any+}

provider:
    name: aws
    runtime: nodejs14.x
    apiGateway:
      shouldStartNameWithService: true

    environment:
      AWS_NODEJS_CONNECTION_REUSE_ENABLED: 1
      NODE_OPTIONS: --enable-source-maps --stack-trace-limit=1000
    iam:
      role:
        statements:
            - Effect: 'Allow'
              Action:
                - 'dynamodb:DescribeTable'
                - 'dynamodb:Query'
                - 'dynamodb:Scan'
                - 'dynamodb:GetItem'
                - 'dynamodb:PutItem'
                - 'dynamodb:UpdateItem'
                - 'dynamodb:DeleteItem'

              Resource: arn:aws:dynamodb:us-west-2:*:table/BlogsTable

custom:
    esbuild:
      bundle: true
      minify: false
      sourcemap: true
      exclude: aws-sdk
      target: node14
      define: 'require.resolve: undefined'
      platform: node
      concurrency: 10

    dynamodb:
      start:
        port: 5000
        inMemory: true
        migrate: true

      stages: dev

resources:
    Resources:
      TodosTable:
        Type: AWS::DynamoDB::Table
        Properties:
          TableName: BlogsTable
          AttributeDefinitions:
              - AttributeName: id
                AttributeType: S

          KeySchema:
              - AttributeName: id
                KeyType: HASH

          ProvisionedThroughput:
            ReadCapacityUnits: 1
            WriteCapacityUnits: 1
In our serveless.yml file, we specified the version of the Serverless Framework that our project is running on in FrameworkVersion. In our case, we use version 3, which is the latest release at the time of writing.
We specify which plugins are required to replace or enhance the functionality of our project in Plugins. We have two plugins, serverless-esbuild and Serverless Offline, which allow us to execute our code locally. DynamoDB can be operated locally with serverless-dynamodb-local.
In Provider, we configure the cloud provider for our project. To provide our Lambda functions with reading and writing access to our DynamoDB resource table, we set various cloud provider characteristics, like the name, runtime, apiGateway, and iam statements
In Resources, we populate our DynamoDB database using our cloudFormation resource templates. In this section, we declare specific characteristics like the tableName, AttributeDefinitions, where we specify our table’s primary key ID, and ProvisionedThroughput, where we describe the number of units our database can read and write in one second.
We create our own configuration in Custom. For our DynamoDB database, we set port 5000. Finally, in Functions, we configure our Lambda functions, routes, and route handlers.
To enable us to run our application locally on our computer, we need to install the following plugins:
serverless -dynamodb-local: Connects to DynamoDB locally on our computerserverless-offline: Starts the application locallyserverless-plugin-optimize: Enables us to run the application locallyRun the command below to install the plugins above:
serverless plugin install -n serverless-plugin-optimize
serverless plugin install -n serverless-dynamodb-local
serverless plugin install -n serverless-offline
Finally, let’s install DynamoDB locally with the command below:
serverless dynamodb install
We’ll convert our NestJS application to an AWS Lambda function in our src/main.ts file. First, we need to map our application to an Expess app with the code snippet below:
import { NestFactory } from '@nestjs/core';
import { ExpressAdapter } from '@nestjs/platform-express';
import { INestApplication } from '@nestjs/common';
import { AppModule } from './app.module';
import { Express } from 'express';
import { Server } from 'http';
import { Context } from 'aws-lambda';
import { createServer, proxy, Response } from 'aws-serverless-express';
import * as express from 'express';
let cachedServer: Server;
async function createExpressApp(
  expressApp: Express,
): Promise<INestApplication> {
  const app = await NestFactory.create(
    AppModule,
    new ExpressAdapter(expressApp),
  );
  return app;
}
...
Then, we’ll convert our Express application into an AWS Lambda function so that we can run our applications as Lambda functions:
async function bootstrap(): Promise<Server> {
  const expressApp = express();
  const app = await createExpressApp(expressApp);
  await app.init();
  return createServer(expressApp);
}
export async function handler(event: any, context: Context): Promise<Response> {
  if (!cachedServer) {
    const server = await bootstrap();
    cachedServer = server;
  }
  return proxy(cachedServer, event, context, 'PROMISE').promise;
}
At this point, we can run our NestJS application as an AWS Lambda function. Now, let’s create our app services to add some records to our DynamoDB database.
Let’s create the CRUD operations for our blog API. First, open up the src/app.service.ts file and replace the code with the following imports in the code snippet below:
import { Injectable, InternalServerErrorException } from '@nestjs/common';
import { v4 as uuid } from 'uuid';
import * as AWS from 'aws-sdk';
import Blog from './interface';
In the code snippet above, we imported the AWS SDK to interact with our DynamoDB, uuid to generate random strings for our blog ID, and the blog interface, which we’ll create later.
To know which endpoint to connect DynamoDB to, we’ll check the environment in which our application is running:
...
const dynamoDB = process.env.IS_OFFLINE
  ? new AWS.DynamoDB.DocumentClient({
      region: "localhost",
      endpoint: process.env.DYNAMODB_ENDPOINT,
    })
  : new AWS.DynamoDB.DocumentClient();
 ...
We’ll use the AWS.DynamoDB.DocumentClient method to create our CRUD operations with the code snippets below:
@Injectable()
export class AppService {
  async getBlogs(): Promise<any> {
    try {
      return dynamoDB
        .scan({
          TableName: "BlogsTable",
        })
        .promise();
    } catch (e) {
      throw new InternalServerErrorException(e);
    }
  }

  async createBlog(blog: Blog): Promise<any> {
    const blogObj = {
      id: uuid(),
      ...blog,
    };
    try {
      return await dynamoDB
        .put({
          TableName: "BlogsTable",
          Item: blogObj,
        })
        .promise();
    } catch (e) {
      throw new InternalServerErrorException(e);
    }
  }

  async getBlog(id: string): Promise<any> {
    try {
      return await dynamoDB
        .get({
          TableName: process.env.USERS_TABLE_NAME,
          Key: { id },
        })
        .promise();
    } catch (e) {
      throw new InternalServerErrorException(e);
    }
  }

  async deleteBlog(id: string): Promise<any> {
    try {
      return await dynamoDB
        .delete({
          TableName: "BlogsTable",
          Key: {
            todosId: id,
          },
        })
        .promise();
    } catch (e) {
      throw new InternalServerErrorException(e);
    }
  }
Now, create an interface.ts file in the src folder and add the code snippet below:
export default interface Blog {
  title: string;
  coverImage: String;
  body: string;
  createdBy: string;
  dateCreated: string;
}
With our blog services created, let’s define the endpoints to access those services. First, open the src/app.controller.ts file and replace the current code with the code snippet below:
import { Controller, Get, Post, Delete, Body, Param } from '@nestjs/common';
import { AppService } from './app.service';
import Blog from './interface';
Then define the blog routes with the code snippet below:
@Controller('blogs')
export class AppController {
  constructor(private readonly appService: AppService) {}

  @Get()
  async getTodos(): Promise<Blog[]> {
    return await this.appService.getBlogs();
  }

  @Post()
  async createTodo(@Body() blog: Blog): Promise<Blog> {
    return await this.appService.createBlog(blog);
  }

  @Post(':id')
  async getTodo(@Param() id: string): Promise<Blog> {
    return await this.appService.getBlog(id);
  }

  @Delete(':id')
  async deleteTodo(@Param() id: string): Promise<any> {
    return await this.appService.deleteBlog(id);
  }
}
With our blog routes set up, let’s build and run the application.
Let’s run our application with the command below. Since our handler points to the dist folder, we need to build the application before running it:
npm run build && serverless offline start
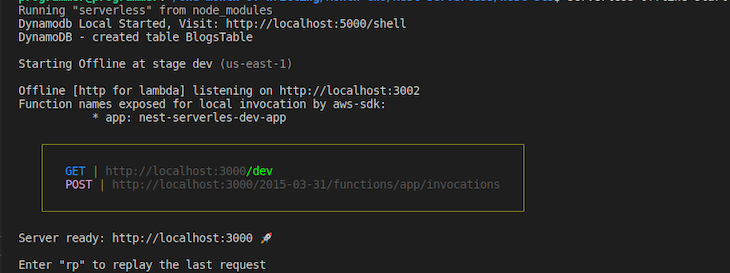
If everything goes well, you’ll see the following output on the console, as shown below:
Now that we have tested the application locally, let’s deploy it. You can deploy your serverless applications using many methods.
This is the main and most commonly used method for deploying serverless applications. When you’ve updated your function, event, or resource configuration in serverless.yml and want to deploy that change (or multiple changes at once) to Amazon Web Services, use this method. To deploy the application using this method, run the command below:
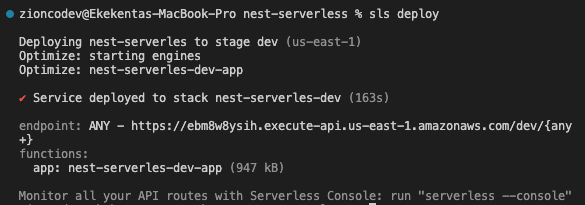
serverless deploy
Once the deployment is completed, you should see the output below your terminal.
This is a faster method of deploying serverless functions. According to the Serverless developers, this will be the default deployment method in Serverless 4. Add the configuration below to your serverless.yml file:
provider:
    ...
    deploymentMethod: direct
This method’s default settings are dev stage and us-east-1 region. You can change the default stage and region by passing the following flags to the command:
serverless deploy --stage beta --region eu-central-1
You should see the output below.
This is the fastest method of deploying serverless functions. It simply overwrites the current function’s zip file on AWS without modifying the AWS CloudFormation stack:
serverless deploy function --function funtionToDeploy
In this tutorial, we learned how to build a NestJS Serverless application on AWS with DynamoDB. First, we reviewed the Serverless Framework, NestJS, and DynamoDB. Then, we created a Blog Lambda function for the demonstrations.
To learn more about the Serverless Framework, be sure to check out the official documentation. I hope you enjoyed this article, and be sure to leave a comment if you have any questions.
Install LogRocket via npm or script tag. LogRocket.init() must be called client-side, not
server-side
$ npm i --save logrocket

// Code:

import LogRocket from 'logrocket';
LogRocket.init('app/id');
// Add to your HTML:

<script src="https://cdn.lr-ingest.com/LogRocket.min.js"></script>
<script>window.LogRocket && window.LogRocket.init('app/id');</script>

A guide for using JWT authentication to prevent basic security issues while understanding the shortcomings of JWTs.

Discover how to build, render, and automate product demo videos with Remotion, replacing traditional screen recordings with reusable React code.

Chrome’s Modern Web Guidance embeds modern web platform skills into AI coding agents, helping them choose native HTML, CSS, and browser APIs over legacy patterns.

Learn how to use Fallow to analyze AI-generated code, detect dead code, duplicate logic, and complexity issues, and integrate automated code quality checks into your AI-assisted development workflow.
Would you be interested in joining LogRocket's developer community?
Join LogRocket’s Content Advisory Board. You’ll help inform the type of content we create and get access to exclusive meetups, social accreditation, and swag.
Sign up now

