Often, when building applications that interface with a backend, you have to wait for the live data to be available from the backend to continue development. This can lead to reduced productivity and slow turnaround times. Mocking APIs enables you to build the frontend of your application without having to rely on the data from the backend.

In this Mirage JS tutorial, we’ll show you how to build a mock API. We’ll cover the following in detail:
To follow along with this tutorial, you should have:
The Replay is a weekly newsletter for dev and engineering leaders.
Delivered once a week, it's your curated guide to the most important conversations around frontend dev, emerging AI tools, and the state of modern software.
Mirage JS is a JavaScript library that lets you mock APIs that can be used to build, test, and share a full-stack JavaScript application. What makes Mirage JS unique is its ability recreate dynamic scenarios. Other mock API servers, such as JSON Server and MSW, are quite static in nature.
Mirage JS works by intercepting a network request your JavaScript app makes. It lets you mock the response, which enables you to develop and test your app as if you were interfacing with a live server.
Other notable features of Mirage JS include:
To show how API mocking with Mirage JS works, we’ll create a notes application using Create React App, which allows us to bootstrap our project without worrying about the complexities of configuring a React app manually.
Open a terminal and run the command below to create a new React application:
npx create-react-app notes
After the command successfully executes, it initializes a React application called notes. Navigate to the root directory by running the command below:
cd notes
Once you’re in the root directory, run the following:
npm start
This command starts up the development server of our React application.
Before we start mocking out the APIs needed for the application, run the command below to add Mirage JS to the project:
# Using npm
npm install --save-dev miragejs

# Using Yarn
yarn add --dev miragejs
After successfully installing the Mirage JS library, navigate to the src directory and create a file called server.js:
cd src
touch server.js
Open the server.js file in an editor of your choice and paste the code below:
import { createServer } from 'miragejs';
export function makeServer() {
  let server = createServer();
  return server;
}
The createServer function is responsible for creating a new mock server instance. Go to your index.js file in the root directory and refactor it to look like the code below:
import React from 'react';
import ReactDOM from 'react-dom';
import './index.css';
import App from './components/App';
import { makeServer } from './server';

if (process.env.NODE_ENV === 'development') {
  makeServer({ environment: 'development' });
}
ReactDOM.render(
  <React.StrictMode>
    <App />
  </React.StrictMode>,
  document.getElementById('root')
);
In the refactored index.js file, we imported the makeServer function that was created in the server.js file and ran it: makeServer({ environment: 'development' }) Notice a { environment: 'development' } argument was passed to the makeServer function; this allows us to run seeds in the development environment, which we’ll get to later.
We want our application to store data like a real server and also load with some existing data (seeds). We’ll use a Mirage JS data layer called Model to create a notes collection for our application in its “in-memory” database.
Open the server.js file and replace the existing code with the code below:
import { createServer, Model } from 'miragejs';
export function makeServer({ environment = 'test' } = {}) {
  let server = createServer({
    environment,
    models: {
      notes: Model,
    },
    seeds(server) {
      server.create('note', {
        title: 'Nulla sit amet',
        body:
          'Praesent congue erat at massa. Pellentesque habitant morbi tristique senectus et netus et malesuada fames ac turpis egestas. Pellentesque commodo eros a enim. Nunc interdum lacus sit amet orci.',
      });
      server.create('note', {
        title: 'Curabitur suscipit suscipit',
        body:
          'Fusce risus nisl, viverra et, tempor et, pretium in, sapien. Suspendisse pulvinar, augue ac venenatis condimentum, sem libero volutpat nibh, nec pellentesque velit pede quis nunc. In enim justo, rhoncus ut, imperdiet a, venenatis vitae, justo. Praesent nec nisl a purus blandit viverra.',
      });
      server.create('note', {
        title: 'Donec id justo',
        body:
          'Nulla neque dolor, sagittis eget, iaculis quis, molestie non, velit. Curabitur suscipit suscipit tellus. Praesent ac sem eget est egestas volutpat. Pellentesque posuere.',
      });
    }
  return server;
}
The environment option in the createServer function allows us to choose between development and test. If the environment is set to development, Mirage JS will load the seeds and log all its responses to the console. We have set the environment to test by default from the makeServer default parameter, { environment = 'test' } = {}, to run a fresh instance of the server without the seeds every time we need to run a test. We also defined a collection called notes in the models property of the createServer function.
As mentioned earlier, seeds enalbes us to create initial data. The server.create function allows us to create new note records in the notes model we defined. IDs are automatically assigned to the created seeds.
Now that we’ve successfully set up a Mirage JS server with a database and initial seeds, the next step is to create routes. Our notes application will need the following routes:
/api/notes to fetch all note records/api/notes/:id to fetch a single note record/api/notes to create a new note record/api/notes/:id to update an existing note record/api/notes/:id to remove an existing note recordOpen the server.js file and replace the existing code with the following:
import { createServer, Model } from 'miragejs';
export function makeServer({ environment = 'test' } = {}) {
  let server = createServer({
    environment,
    models: {
      notes: Model,
    },
    seeds(server) {
      server.create('note', {
        title: 'Nulla sit amet',
        body:
          'Praesent congue erat at massa. Pellentesque habitant morbi tristique senectus et netus et malesuada fames ac turpis egestas. Pellentesque commodo eros a enim. Nunc interdum lacus sit amet orci.',
      });
      server.create('note', {
        title: 'Curabitur suscipit suscipit',
        body:
          'Fusce risus nisl, viverra et, tempor et, pretium in, sapien. Suspendisse pulvinar, augue ac venenatis condimentum, sem libero volutpat nibh, nec pellentesque velit pede quis nunc. In enim justo, rhoncus ut, imperdiet a, venenatis vitae, justo. Praesent nec nisl a purus blandit viverra.',
      });
      server.create('note', {
        title: 'Donec id justo',
        body:
          'Nulla neque dolor, sagittis eget, iaculis quis, molestie non, velit. Curabitur suscipit suscipit tellus. Praesent ac sem eget est egestas volutpat. Pellentesque posuere.',
      });
    },
    routes() {
      this.namespace = 'api/notes';
      this.get('/', (schema, request) => {
        return schema.notes.all();
      });
      this.get('/:id', (schema, request) => {
        let id = request.params.id;
        return schema.notes.find(id);
      });
      this.post('/', (schema, request) => {
        let attrs = JSON.parse(request.requestBody);
        return schema.notes.create(attrs);
      });
      this.patch('/:id', (schema, request) => {
        let newAttrs = JSON.parse(request.requestBody);
        let id = request.params.id;
        let note = schema.notes.find(id);
        return note.update(newAttrs);
      });
      this.delete('/:id', (schema, request) => {
        let id = request.params.id;
        return schema.notes.find(id).destroy();
      });
    },
  });
  return server;
}
The routes hook is where the routes for our application will be defined. this.namespace = 'api/notes' allows us to define the API namespace so we don’t have to repeat in all the routes of our application, e.g., /api/notes/:id. this.get , this.post, this.patch, and this.delete allow us to mock the various network requests. The schema argument is used to access data from the notes model we created earlier, while the request argument is used to get data from our application.
At this point, we’re done mocking a server and have created mock APIs. The next step is to build a frontend to access the mock APIs we have created.
Open a terminal and navigate to the root directory. Paste the code below to install the libraries we’ll use to show icons and display toast messages in our React application:
npm install react-icons react-toastify
Create a folder called components in the src directory. This folder will house the components we’ll use for our application.
Open the index.css file and paste the code below:
*,
*::before,
*::after {
margin: 0;
padding: 0;
box-sizing: border-box;
}
html {
font-size: 62.5%;
scroll-behavior: smooth;
}
body {
font-family: -apple-system, BlinkMacSystemFont, 'Segoe UI', 'Roboto', 'Oxygen',
'Ubuntu', 'Cantarell', 'Fira Sans', 'Droid Sans', 'Helvetica Neue',
sans-serif;
background-color: #202124;
font-size: 1.6rem;
color: #e8eaed;
}
.container {
padding: 2rem;
max-width: 100rem;
margin: 0 auto;
}
.header {
display: flex;
flex-direction: row;
justify-content: space-between;
align-items: center;
padding: 2rem 0;
}
.btn {
background-color: #41331c;
padding: 1rem 2rem;
color: #e8eaed;
font-size: 1.6rem;
border: 1px solid #41331c;
border-radius: 8px;
cursor: pointer;
font-weight: 700;
display: flex;
justify-content: center;
align-items: center;
transition: all 0.5s;
}
.btn:hover,
.toolbox__btn:hover {
background-color: #b38b4d;
}
.btn__icon {
margin-left: 5px;
}
.notes-container {
display: flex;
flex-direction: row;
align-items: flex-start;
flex-wrap: wrap;
}
.notes-item {
margin: 1rem;
padding: 1.5rem;
border: 1px solid #5f6368;
border-radius: 8px;
color: #e8eaed;
width: 100%;
min-height: 6rem;
cursor: pointer;
}
.notes-item h2 {
margin-bottom: 1rem;
}
.notes-item p {
line-height: 2.5rem;
font-size: 1.4rem;
}
.toolbox {
display: flex;
flex-direction: row;
justify-content: space-between;
align-items: center;
padding: 5px 0;
margin-top: 1rem;
}
.toolbox__btn {
padding: 5px;
border-radius: 50%;
background-color: transparent;
border: 0;
cursor: pointer;
}
.showModal {
display: block;
}
.hideModal {
display: none;
}
.modal {
position: fixed;
z-index: 1;
left: 0;
top: 0;
width: 100%;
height: 100%;
overflow: auto;
background-color: #202124;
padding: 4rem;
}
.go-back-container {
width: 50%;
}
.go-back {
background-color: transparent;
font-size: 1.6rem;
display: flex;
justify-content: center;
align-items: center;
transition: all 0.5s;
color: #e8eaed;
border: 0;
cursor: pointer;
font-weight: 700;
padding: 1rem 0;
}
.go-back span {
margin-left: 1rem;
}
.modal-form {
background-color: transparent;
width: 100%;
margin: 2rem auto;
}
.modal-form-input {
display: block;
margin: 2rem 0;
padding: 1rem;
font-size: 1.8rem;
border: 2px solid #5f6368;
color: #e8eaed;
background-color: #202124;
width: 100%;
border-radius: 8px;
}
@media (min-width: 768px) {
.modal-form {
width: 50%;
}
.notes-item {
max-width: 30rem;
}
}
This file contains the styles we’ll use for the application.
Navigate to the components directory we created and create a file called NoteItem.js. Open the file and paste the code below:
import React from 'react';
import { FaRegEdit, FaRegTrashAlt } from 'react-icons/fa';
const NotesItem = ({ note, getNote, deleteNote }) => {
  return (
    <div className="notes-item" onClick={() => getNote(note.id)}>
      <h2 className="notes-item__title">{note.title}</h2>
      <p>{note.body}</p>
      <div className="toolbox">
        <button className="toolbox__btn" onClick={() => getNote(note.id)}>
          <FaRegEdit color="#e8eaed" size={18} />
        </button>
        <button className="toolbox__btn" onClick={() => deleteNote(note.id)}>
          <FaRegTrashAlt color="#e8eaed" size={18} />
        </button>
      </div>
    </div>
  );
};
export default NotesItem;
This file is a react component for a single note item we will be using in our Notes List. Navigate back to the components directory and create another file called NotesList.js, this file will contain a list of the NoteItems.js components. Open the file and paste the code below
import React from 'react';
import NotesItem from './NotesItem';
const NotesList = ({ notes, getNote, setToggle, deleteNote }) => {
  return (
    <div className="notes-container">
      {notes &&
        notes.map((note) => (
          <NotesItem
            key={note.id}
            note={note}
            getNote={getNote}
            toggleModal={setToggle}
            deleteNote={deleteNote}
          />
        ))}
    </div>
  );
};
export default NotesList;
We now have a component for note items and another component for the lists of note items, now create a Form.js file in the components directory for adding and updating notes. After creating the file, paste the code below in the created file
import React, { useEffect } from 'react';
import { FaArrowCircleLeft } from 'react-icons/fa';
const Form = ({
  showModal,
  toggleModal,
  note,
  addNote,
  updateNote,
  inputs,
  setInputs,
}) => {
  useEffect(() => {
    if (note) {
      setInputs({ title: note.title, body: note.body });
    }
  }, [note, setInputs]);
  const handleSubmit = (event) => {
    event.preventDefault();
    const { title, body } = inputs;
    if (!note.id) {
      addNote(title, body);
      return;
    }
    updateNote(note.id, title, body);
  };
  const handleChange = (event) => {
    event.persist();
    setInputs((inputs) => ({
      ...inputs,
      [event.target.name]: event.target.value,
    }));
  };
  return (
    <div className={`modal ${showModal ? 'showModal' : 'hideModal'}`}>
      <div className="go-back-container">
        <button className="go-back" onClick={() => toggleModal(false)}>
          <FaArrowCircleLeft
            size={32}
            color="#41331c"
            onClick={() => toggleModal(false)}
          />
          <span>Go Back</span>
        </button>
      </div>
      <form className="modal-form" onSubmit={handleSubmit}>
        <input
          type="text"
          className="modal-form-input"
          value={inputs.title}
          onChange={handleChange}
          placeholder="Title"
          name="title"
          required
        />
        <textarea
          rows="10"
          className="modal-form-input"
          value={inputs.body}
          placeholder="Start typing ...."
          onChange={handleChange}
          name="body"
          required
        />
        <button type="submit" className="btn" onClick={handleSubmit}>
          {note.id ? 'Update Note' : 'Add Note'}
        </button>
      </form>
    </div>
  );
};
export default Form;
Move the App.js file to the components directory and replace the code in it with the following:
import React, { useEffect, useState } from 'react';
import { IoAdd } from 'react-icons/io5';
import { ToastContainer, toast } from 'react-toastify';
import 'react-toastify/dist/ReactToastify.css';
import NotesList from './NotesList';
import Form from './Form';
const App = () => {
  const [notes, setNotes] = useState([]);
  const [note, setNote] = useState({});
  const [inputs, setInputs] = useState({ title: '', body: '' });
  const [toggle, setToggle] = useState(false);

  useEffect(() => {
    getNotes();
  }, []);

  const getNotes = () => {
    fetch('/api/notes')
      .then((res) => res.json())
      .then((data) => setNotes(data.notes))
      .catch((error) => console.log('Error fetching notes', error));
  };
  const getNote = (id) => {
    fetch(`/api/notes/${id}`)
      .then((res) => res.json())
      .then((data) => {
        setNote(data.notes);
        setToggle(true);
      })
      .catch((error) => console.log('Note not found', error));
  };
  const addNote = (title, body) => {
    if (!title || !body) {
      toast.error('Please fill all the required input fields');
      return;
    }
    fetch('/api/notes', {
      method: 'POST',
      body: JSON.stringify({
        title: title,
        body: body,
      }),
    })
      .then((res) => {
        console.log(res.json());
        getNotes();
        setToggle(false);
        setInputs({ title: '', body: '' });
        toast.success('Note added successfully');
      })
      .catch((error) => {
        console.log('Error adding note.', error);
        toast.error('Error adding note.');
      });
  };

  const updateNote = (id, title, body) => {
    if (!title || !body) {
      toast.error('Please fill all the required input fields');
      return;
    }
    fetch(`/api/notes/${id}`, {
      method: 'PATCH',
      body: JSON.stringify({
        title: title,
        body: body,
      }),
    })
      .then((res) => {
        getNotes();
        setToggle(false);
        toast.success('Note updated successfully.');
      })
      .catch((error) => {
        console.log('Note not found', error);
        toast.error('Error updating note.');
      });
  };

  const deleteNote = (id) => {
    fetch(`/api/notes/${id}`, { method: 'DELETE' })
      .then((res) => {
        getNotes();
        toast.success('Note deleted successfully');
      })
      .catch((error) => {
        console.log('Note not found', error);
        toast.error('Error deleting note.');
      });
  };

  const handleAdd = () => {
    setInputs({ title: '', body: '' });
    setNote([]);
    setToggle(true);
  };

  return (
    <div className="container">
      <header className="header">
        <h1 className="header__title">Notes</h1>
        <button className="btn" onClick={handleAdd}>
          Add Note <IoAdd className="btn__icon" size="24" />
        </button>
      </header>
      <NotesList
        notes={notes}
        getNote={getNote}
        setToggle={setToggle}
        deleteNote={deleteNote}
      />
      <Form
        showModal={toggle}
        note={note}
        toggleModal={setToggle}
        addNote={addNote}
        updateNote={updateNote}
        inputs={inputs}
        setInputs={setInputs}
      />
      <ToastContainer
        position="bottom-right"
        autoClose={5000}
        hideProgressBar={true}
        newestOnTop={false}
        closeOnClick
      />
    </div>
  );
};
export default App;
The App.js file brings all the components we’ve created together. We also defined functions that make a fetch request to the mock routes we created.
Save the file and open the app in your browser. You should see something like this:
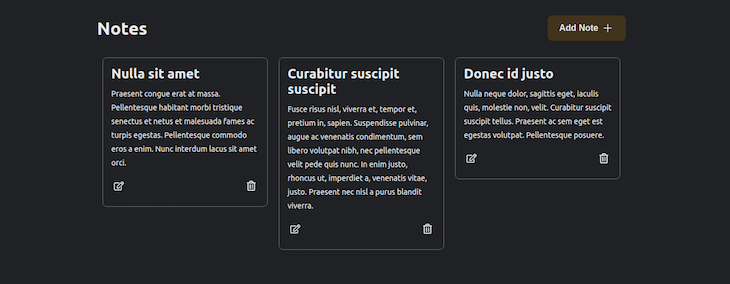
The initial notes displayed are from the seeds in the server.js file. You can add, modify, and delete notes.
In this Mirage JS tutorial, we walked through how to mock APIs with Mirage JS and get data from the APIs in a frontend application. For more information on Mirage JS, check out the official documentation.
The repository for the app we built in this tutorial is available on GitHub. You can also see a working version of the app.
Install LogRocket via npm or script tag. LogRocket.init() must be called client-side, not
server-side
$ npm i --save logrocket

// Code:

import LogRocket from 'logrocket';
LogRocket.init('app/id');
// Add to your HTML:

<script src="https://cdn.lr-ingest.com/LogRocket.min.js"></script>
<script>window.LogRocket && window.LogRocket.init('app/id');</script>

Learn how AI-assisted development governance uses rules, agents, hooks, and protocols to help AI coding tools produce safer, more consistent code.

A step-by-step guide to building your first MCP server using Node.js, covering core concepts, tool design, and upgrading from file storage to MySQL.

Using security headers in your Next.js apps is a highly effective way to secure websites from common security threats.

A deep dive into May 2026’s AI model and tool rankings. We break down performance, usability, pricing, and real-world capabilities across 50+ features to help you pick the right tools for your development workflow.
Would you be interested in joining LogRocket's developer community?
Join LogRocket’s Content Advisory Board. You’ll help inform the type of content we create and get access to exclusive meetups, social accreditation, and swag.
Sign up now

