Microsoft’s Fluid Framework is a new and exciting technology that has recently been open-sourced. Microsoft uses the Fluid Framework in many of its popular apps, including Office 365 and Teams.

The technology’s main use case is enabling collaboration and real-time updates across users. This is different than the classic SignalR technology in that it not only broadcasts real-time updates through WebSockets, but it also maintains those updates in that data through what is called a Distributed Data Structure (DDS).
Now that the Fluid Framework has been open-sourced, the technology can be utilized within client applications both within the Microsoft ecosystem and beyond. Example use cases for the Fluid Framework include:
Fluid’s main goal is to handle the piping and mechanics of real-time updates so that developers can focus on the experience rather than dealing with synchronizing messaging and data. The Fluid Framework provides helper methods and wrappers that enable your applications to have real-time updates.
This post will introduce the Fluid Framework and then walk through a sample application to show how it can be integrated into your projects. For a quick intro to what this technology looks like in action, check out the demo that was shown at Build 2019:
Microsoft Fluid Framework Vision Keynote Demo // Microsoft Build 2019
A sneak preview of how Fluid may change the way you work with Microsoft 365 Apps like Word, Teams, and Outlook, including: * Hyper-fast co-authoring, * AI and Bots that collaborate with you, and * Components that makes it easy to re-use content across tools Learn more: https://www.microsoft.com/en-us/microsoft-365/blog/2019/05/06/build-2019-people-centered-experiences-microsoft-365-productivity-cloud/ Subscribe to Microsoft on YouTube here: https://aka.ms/SubscribeToYouTube Follow us on social: LinkedIn: https://www.linkedin.com/company/microsoft/ Twitter: https://twitter.com/Microsoft Facebook: https://www.facebook.com/Microsoft/ Instagram: https://www.instagram.com/microsoft/ For more about Microsoft, our technology, and our mission, visit https://aka.ms/microsoftstories
As I mentioned in the intro, the Fluid Framework has been around for some time and is present in many Microsoft apps that you see today. We can discuss the mechanics in a general sense, and you can also see it in action if you use apps like Microsoft Teams.
The framework can be explained in the following terms:
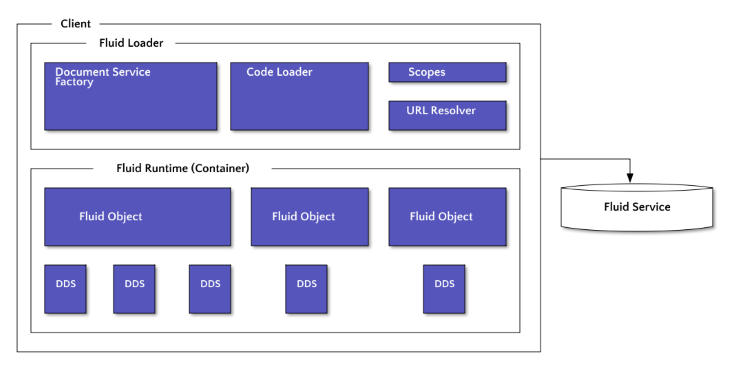
I’m borrowing the following graph from the Fluid Framework docs, and it provides an excellent visual:

When applications use the Fluid Framework, they start with the Fluid Loader. The Fluid Loader wraps a Fluid Container that houses all the mechanisms that allow clients to communicate with the Fluid Framework.
The Fluid Container contains all the logic that communicates with the Fluid Loader, which then communicates back with the Fluid Service. The Fluid Container also contains the Fluid Runtime, which includes Distributed Data Structures (DDS) that persist data to any clients connected to the application.
The Fluid Service takes in any change from the DDS within the client as an op (change). Whenever an op is passed into the Fluid Service, it persists the change within the DDS that it occurred and then propagates the change to any connected clients.
The Fluid Service operates to:
The way that it maintains the data state across any client is through session storage and persistent storage. Session storage is managed by the Fluid Service running on the clients themselves. Persistent storage is a record of ops that is saved outside the Fluid Service (typically in a database or file).
With the Fluid Framework, client code can pull in libraries available on npm that handle all the heavy lifting. One of the best parts of the Fluid Framework is that it will independently work with the most popular UI libraries, including React, Vue.js, and Angular.
This gives teams a lot of flexibility to use the framework of their choice to implement this technology. The developer can focus on their client experience and let the Fluid Framework do the rest of the work for them.
There’s also a server component to the Fluid Service. In order for the client’s ops to be persisted, a server will be necessary for the data to be stored. Microsoft Applications support this with Office 365 in the form of both SharePoint and OneDrive.
If you want to build this yourself, the Fluid Service also can be implemented through Routerlicious, which will handle the exchange of ops between the different clients. This implementation can be used as a local server or you can productionize it for your applications. Check out the Routerlicious README for more info.
If you’d like more info on the overall implementation, I highly recommend watching this video by Nick Simmons and Dan Wahlin:
Fluid Framework Data Libraries and Roadmap
Fluid Framework Data Libraries are now open source. We will start with an overview of the Fluid Framework roadmap and then deep dive into creating collaborative experiences relying on Distributed Data Structures. For more information, visit https://aka.ms/TeamsandM365dev
The Fluid Framework is somewhat similar to the SignalR protocol in that they both enable real-time communication. The key difference between the Fluid Framework and SignalR, however, is that the Fluid Framework orchestrates the communication with the earlier mentioned DDS objects.
SignalR enables direct communication between clients. The Fluid Framework takes the data that to be sent and not only transports it, but also orchestrates it based on the way the DDS objects are set up. For more information on SignalR, check out my blog post on connecting Microsoft SignalR with Angular.
So up to this point, we’ve discussed the technology and how it works. We’ve even gone into the beginning stages of how to use it in your application code.
To better understand how it all fits together, it helps to see it in an example application. Since the Fluid Framework does not rely on any one library for clients, it can be pulled into any of the popular frontend libraries or frameworks to include React, Vue.js, and Angular.
In most cases, if you want to use the Fluid Framework you need a server that is running a Fluid Service and then client applications that are housing Fluid Containers. There are multiple ways to do both of these things, which is one of the most powerful parts of the technology.
If you check out the Get Started section on the Fluid Framework site, you’ll find some great documentation and multiple example projects to help you get started. In the next section of the post, I’m going to walk through the tutorial explained here.

The Dice Roller example application source code can be found in the GitHub repo here.
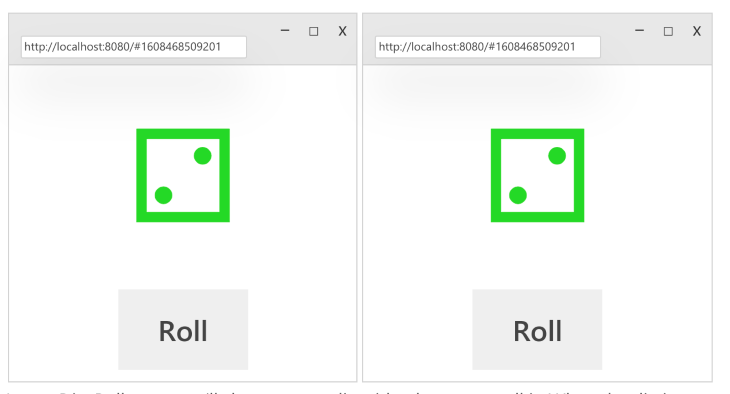
The application itself is very simple and just shows images of dice that are updated when you click Roll. The clients that connect to this application receive real-time updates whenever the dice are rolled via the Fluid Framework.
The application is a great example because it only has one Fluid Container that is then connected to a local server running the Fluid Service.
Before connecting the Fluid Framework to the app, the first step is to define a view of your dice. The major frontend frameworks and libraries do this through different bootstrapping mechanisms. This example is super simple and just leverages TypeScript with webpack, so we can define the initial view as follows:
export function renderDiceRoller(div: HTMLDivElement) {
    const wrapperDiv = document.createElement("div");
    wrapperDiv.style.textAlign = "center";
    div.append(wrapperDiv);
    const diceCharDiv = document.createElement("div");
    diceCharDiv.style.fontSize = "200px";
    const rollButton = document.createElement("button");
    rollButton.style.fontSize = "50px";
    rollButton.textContent = "Roll";

    rollButton.addEventListener("click", () => { console.log("Roll!"); });
    wrapperDiv.append(diceCharDiv, rollButton);

    const updateDiceChar = () => {
        const diceValue = 1;
        // Unicode 0x2680-0x2685 are the sides of a die (⚀⚁⚂⚃⚄⚅).
        diceCharDiv.textContent = String.fromCodePoint(0x267F + diceValue);
        diceCharDiv.style.color = `hsl(${diceValue * 60}, 70%, 50%)`;
    };
    updateDiceChar();
}
If you notice, it just styles a basic div and adds event listeners to react when the Roll button is clicked and the dice are updated.
Since our example is implemented with TypeScript, we can define our app’s behavior using an interface and model implementation of that interface.
The implementation we’ll define in this section will be connected to a running instance of the Fluid Service via one of the Fluid Framework’s helper functions called Tinylicious. If you want to jump ahead to see how it’s bootstrapped, see the src/app.ts file in the project here.
The Dice Roller model we are using in the sample app sends an EventEmitter event whenever a “roll” occurs and is defined as follows:
export interface IDiceRoller extends EventEmitter {
    readonly value: number;
    roll: () => void;
    on(event: "diceRolled", listener: () => void): this;
}
Now if we pull in the Fluid Framework’s DataObject class from its npm module (see here for more), we register dice rolls with a Fluid Container in the following implementation:
export class DiceRoller extends DataObject implements IDiceRoller {
    protected async initializingFirstTime() {
        this.root.set(diceValueKey, 1);
    }

    protected async hasInitialized() {
        this.root.on("valueChanged", (changed: IValueChanged) => {
            if (changed.key === diceValueKey) {
                this.emit("diceRolled");
            }
        });
    }

    public get value() {
        return this.root.get(diceValueKey);
    }

    public readonly roll = () => {
        const rollValue = Math.floor(Math.random() * 6) + 1;
        this.root.set(diceValueKey, rollValue);
    };
}
The root object connects a Fluid Container running the Dice Roller model (in the earlier view) to a Fluid Service. If you notice the initializedFirstTime and hasInitialized methods, they are using the DataObject from the Fluid Framework’s SharedDirectory to register the Fluid Container with a DDS that is then stored in an instance of the Fluid Service.
We wrap all of this into a Factory Method that can then be called by any client with the following:
import { ContainerRuntimeFactoryWithDefaultDataStore } from "@fluidframework/aqueduct";

export const DiceRollerContainerRuntimeFactory = new ContainerRuntimeFactoryWithDefaultDataStore(
    DiceRollerInstantiationFactory,
    new Map([
        DiceRollerInstantiationFactory.registryEntry,
    ]),
);
This method makes use of Fluid Framework’s ContainerRuntimeFactoryWithDefaultDataStore helper method, which defines a container instance. If you want to see the full implementation and where it is in the sample project, check out the src/dataObject.ts file in the GitHub repo.
Now that we’ve defined our view and dice container, we can connect this all with the Tinylicious server I mentioned earlier. If you look at the src/app.ts file, you’ll see all of the bootstrapping that occurs when the app starts.
Pay special attention to the method here:
import { getTinyliciousContainer } from "@fluidframework/get-tinylicious-container";

const container = await getTinyliciousContainer(documentId, DiceRollerContainerRuntimeFactory, createNew);
The imported function getTinyliciousContainer is a helper method from the Fluid Framework’s npm package that allows you start a local server running the Fluid Service. In a production environment, you would connect this with more orchestration, but the helper method here gets you started as an initial introduction.
These are the arguments passed into the function:
documentId – an identifier for the session so that the Fluid Service can properly register the key-value pair to store and publish updatesDiceRollerContainerRuntimeFactory – this was created earlier when we used the Factory Method to wrap creation of the Fluid ContainercreateNew – a Boolean value that lets Tinylicious know whether to start a new session or use an existing sessionWith all of the pieces connected, we just have to modify the view that we created originally to now account for the Fluid Framework. If you modify the original renderDiceRoller function we created earlier it should look like this:
export function renderDiceRoller(diceRoller: IDiceRoller, div: HTMLDivElement) {
    const wrapperDiv = document.createElement("div");
    wrapperDiv.style.textAlign = "center";
    div.append(wrapperDiv);
    const diceCharDiv = document.createElement("div");
    diceCharDiv.style.fontSize = "200px";
    const rollButton = document.createElement("button");
    rollButton.style.fontSize = "50px";
    rollButton.textContent = "Roll";

    // Call the roll method to modify the shared data when the button is clicked.
    rollButton.addEventListener("click", diceRoller.roll);
    wrapperDiv.append(diceCharDiv, rollButton);

    // Get the current value of the shared data to update the view whenever it changes.
    const updateDiceChar = () => {
        // Unicode 0x2680-0x2685 are the sides of a die (⚀⚁⚂⚃⚄⚅).
        diceCharDiv.textContent = String.fromCodePoint(0x267F + diceRoller.value);
        diceCharDiv.style.color = `hsl(${diceRoller.value * 60}, 70%, 50%)`;
    };
    updateDiceChar();

    // Use the diceRolled event to trigger the re-render whenever the value changes.
    diceRoller.on("diceRolled", updateDiceChar);
}
If you notice here we are now passing in the diceRoller value to the function. This is updated by the Fluid Framework and tells the view what to update the image to look like when a Dice is rolled.
To see all of this in action, do a git clone of the project repo here, then open it up in your terminal and first run npm install, then npm run start to start the server. Open up your web browser to localhost:8080, and when you see the dice rendered, copy the URL and open a second tab to watch the Fluid Framework keep both tabs in sync.
The tabs here mimic what you would see if independent clients had connected to an app you had with Fluid Containers and a Fluid Service. See it working in action here:
Dice Roller
Uploaded by Andrew Evans on 2020-12-20.
In this post, we introduced Microsoft’s Fluid Framework and covered how we can use the technology in our applications. We covered how the technology works and the pieces involved, including Fluid Containers and the Fluid Service, walked through the Dice Roller sample project.
This post really just hits the surface of possibilities for this technology. In a time when many people are working remotely and online collaboration is of utmost importance, the Fluid Framework provides a really solid path to enabling this kind of real-time communication.
Microsoft’s success with Teams and Office 365 exemplifies how useful this technology can be. Moreover, the ease with which you can pull in the Fluid Framework and build your own applications is also a great motivation to get started.
Microsoft recently made the Fluid Framework open source (read more on this here). With the source code now available to all developers, this technology has great potential in the future.
I hope you’ve enjoyed this post and are interested in learning more about the Fluid Framework. I highly suggest checking out the Fluid Framework website for more information.
Thanks for reading my post! Follow me on andrewevans.dev and connect with me on Twitter at @AndrewEvans0102.
Install LogRocket via npm or script tag. LogRocket.init() must be called client-side, not
server-side
$ npm i --save logrocket

// Code:

import LogRocket from 'logrocket';
LogRocket.init('app/id');
// Add to your HTML:

<script src="https://cdn.lr-ingest.com/LogRocket.min.js"></script>
<script>window.LogRocket && window.LogRocket.init('app/id');</script>
Hey there, want to help make our blog better?
Join LogRocket’s Content Advisory Board. You’ll help inform the type of content we create and get access to exclusive meetups, social accreditation, and swag.
Sign up now
Not sure if low-code is right for your next project? This guide breaks down when to use it, when to avoid it, and how to make the right call.

Compare Firebase Studio, Lovable, and Replit for AI-powered app building. Find the best tool for your project needs.

Discover how to use Gemini CLI, Google’s new open-source AI agent that brings Gemini directly to your terminal.

This article explores several proven patterns for writing safer, cleaner, and more readable code in React and TypeScript.