
There’s been a lot of debate over the past couple years around microservices. As a result of this debate, all now know the pros and cons surrounding this concept, as well as the consequences of blindly adopting it for every single project.

Well, the same debate exists for micro-frontends. The term itself says a lot: it gives you the ability to break your frontend into smaller pieces that make sense. This will allow you to test, build, develop, and deploy those pieces faster, since they’re independent.
This term first entered the public lexicon in the famous ThoughtWorks Tech Radar in 2016. This extended the concept from the backend to the frontend.
Today, there’s plenty of frontend developers working on the same projects, or projects that must integrate at some point. Ultimately, developers want to be able to use frameworks or libraries that allow you to build a whole application with lots of pieces (components) built by different people.
Rather than components, we have entire applications integrating like pieces of a puzzle.
You can read more on micro-frontends here. For this article, however, we’ll focus on the practical side. In other words, we’ll cover how to create your first micro-fronted app from scratch using single-spa and React.
Single-spa is a JavaScript router for frontend microservices (that’s another common term they’re known by).
It simplifies the construction of your micro-frontends by allowing the integration of multiple applications built on top of all types of frameworks (Vue, Angular, React, plain HTML/JS/CSS, etc.). Let’s take a closer look!
By the end of this article, you’ll be able to build your micro-frontend apps, following up closely the steps presented here.
This is the application we’ll build:
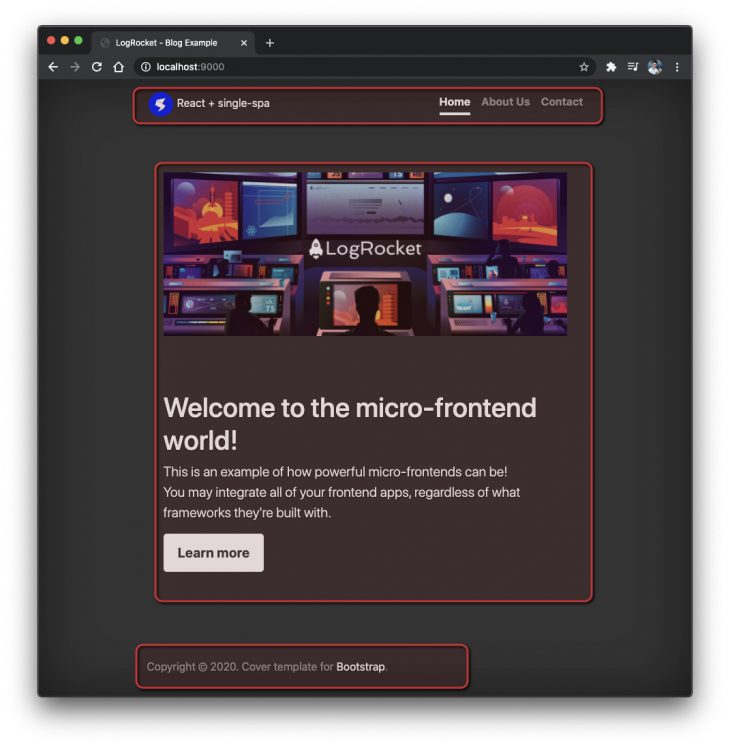
Note that we’ve highlighted the screen into sections — each one corresponds to a different application.
logrocket-single-spa-navbar applicationlogrocket-single-spa-homepage applogrocket-single-spa-aboutpage applogrocket-single-spa-contactpage appThis is a great example to explore the way the framework deals with the integration of many apps into a single app.
The footer of the page won’t change, so we’ll leave it for the root application.
The Replay is a weekly newsletter for dev and engineering leaders.
Delivered once a week, it's your curated guide to the most important conversations around frontend dev, emerging AI tools, and the state of modern software.
We’ll be making use of the create-single-spa CLI tool to autogenerate our single-spa projects. It manages the configurations for Webpack, Babel, Jest, as well as the frontend framework you’re going to work with (React, Angular, etc.).
To install it, run the following command:
npm install --global create-single-spa
Then, create the root project as follows:
// Creating the folder for all projects
mkdir logrocket-single-spa
cd logrocket-single-spa

// Creating the root app folder
mkdir logrocket-single-spa-root
cd logrocket-single-spa-root

// Creating the single-spa app
npx create-single-spa
The root app (also called the container app) is the one responsible for managing how all the others are going to be integrated.
When you run the latest command, a bunch of additional inputs must be provided via the command line. The figure below illustrates each one of the values you may fill in.
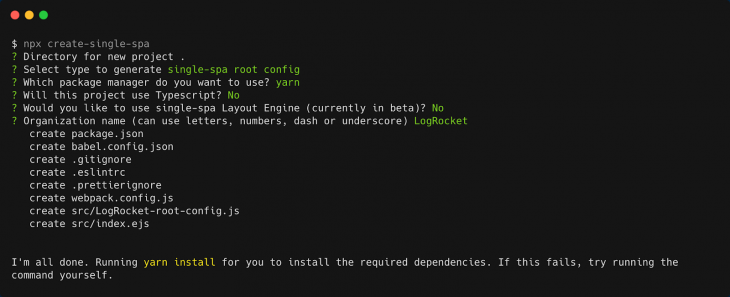
Please pay attention to each one of the options, since they can lead to errors if not selected properly.
The second, for example, is single-spa root config. It should be selected out of three options and states that the current created project is the root config one.
You’ll also notice that the questions change for the other micro-frontend projects when you choose a different option. It works like a real interactive questionnaire.
Pay special attention to the value you’ll provide to the Organization name, since it does differ in your letter casing. Here, we’re capitalizing on the whole word LogRocket.
Now, let’s move back to the root folder, and create the other projects. Here are the commands to create the navbar’s project:
cd ..
mkdir logrocket-single-spa-navbar
cd logrocket-single-spa-navbar
npx create-single-spa
Since they’re not config projects, they need different settings. The figure below will demonstrate the details and what options you must fill in:
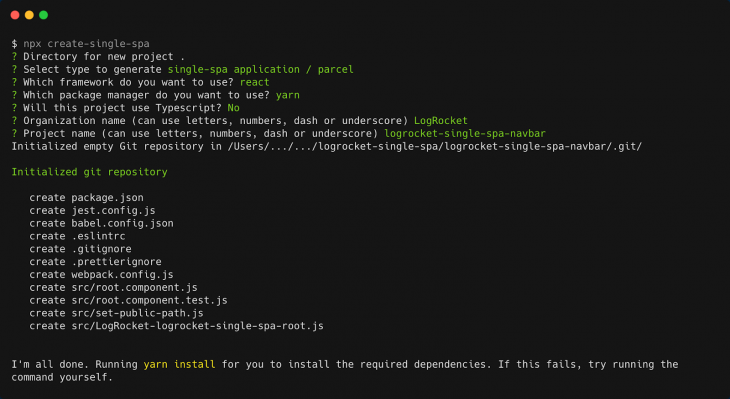
This project setting enables a couple more options than the previous one, like the framework you want to use (React), and the project name, for example. Again, be careful with the differentiation between lower and upper cases.
Before proceeding, make sure to repeat the above steps for the rest of the projects:
logrocket-single-spa-navbarlogrocket-single-spa-homepagelogrocket-single-spa-aboutpagelogrocket-single-spa-contactpageWhen you finish the setup of each project, at the end of the console logs, you get to see the following output:

The logs suggest two tips:
Since single-spa makes use of System.js to create the import map, it allows you to easily import a module over the network and, therefore, map it to variable names.
This way, it knows how to read your whole app contents and preview it:
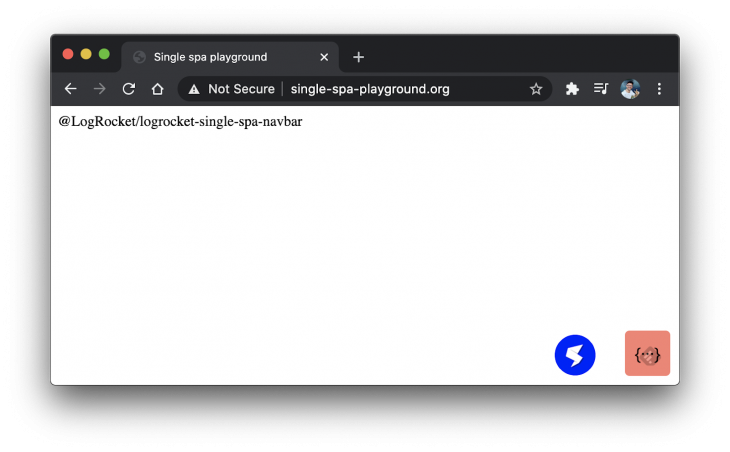
Pay attention to the ports you’ll inform to each app, in order to avoid port conflicts.
Most of our changes are going to take place on the root app. So, open it and head to the file whose name ends with -root-config.js.
You may see some initial configs here, but we’ll change them to the following:
import { registerApplication, start } from "single-spa";

registerApplication({
    name: "@LogRocket/logrocket-single-spa-navbar",
    app: () => System.import("@LogRocket/logrocket-single-spa-navbar"),
    activeWhen: ["/"],
});

registerApplication({
    name: "@LogRocket/logrocket-single-spa-homepage",
    app: () => System.import("@LogRocket/logrocket-single-spa-homepage"),
    activeWhen: [(location) => location.pathname === "/"],
});

registerApplication({
    name: "@LogRocket/logrocket-single-spa-aboutpage",
    app: () => System.import("@LogRocket/logrocket-single-spa-aboutpage"),
    activeWhen: ["/about"],
});

registerApplication({
    name: "@LogRocket/logrocket-single-spa-contactpage",
    app: () => System.import("@LogRocket/logrocket-single-spa-contactpage"),
    activeWhen: ["/contact"],
});

start({
    urlRerouteOnly: true,
});
This is the place where you must register all of your micro-frontend apps. Since we have four, there’s gotta be four registerApplications for each one.
Every app must have a name, a route (via SystemJS, as we’ve talked before), and a condition under which it must be activated or not (activeWhen).
The name usually follows the pattern @OrganizationName/AppName, so be sure to fill in with the same names you’ve provided at the app creation.
The condition usually applies to the URL pathname. That’s why, for the about and contact pages, you only need to provide the pathnames.
However, there are times where you want to define your own conditions as we see on the homepage config. Just make sure to provide a boolean result there.
Moving on to the index.ejs file, open it and add the following code snippet anywhere within the head tag:
<% if (isLocal) { %>
    <script type="systemjs-importmap">
      {
        "imports": {
          "react": "https://cdn.jsdelivr.net/npm/[email protected]/umd/react.development.js",
          "react-dom": "https://cdn.jsdelivr.net/npm/[email protected]/umd/react-dom.development.js",
          "@LogRocket/root-config": "http://localhost:9000/LogRocket-root-config.js",
          "@LogRocket/logrocket-single-spa-navbar": "http://localhost:9001/LogRocket-logrocket-single-spa-navbar.js",
          "@LogRocket/logrocket-single-spa-homepage": "http://localhost:9002/LogRocket-logrocket-single-spa-homepage.js",
          "@LogRocket/logrocket-single-spa-aboutpage": "http://localhost:9003/LogRocket-logrocket-single-spa-aboutpage.js",
          "@LogRocket/logrocket-single-spa-contactpage": "http://localhost:9004/LogRocket-logrocket-single-spa-contactpage.js"
        }
      }
    </script>
  <% } %>
Those are the required imports that single-spa needs to understand which micro-frontends to import into the root app.
They also obey the rule of a name:value, as well as the letter cases.
Note that we’re also importing the React and react-router libs at the beginning. This is to guarantee that the following error won’t happen:

Save all the files, run all of the apps (pay attention to the ports we’ve defined for each one) in different terminals, and start the root one. Then, access the address http://localhost:9000/ to check the following result.
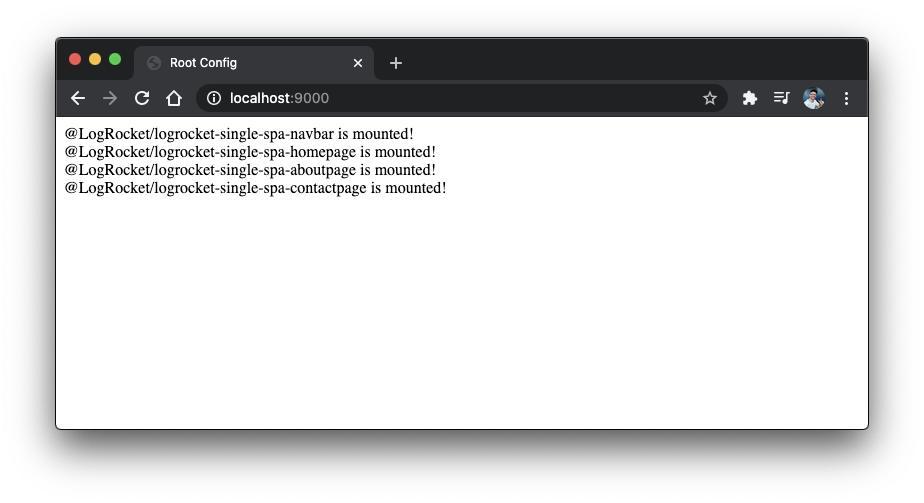
Test it out! If you navigate to other URLs, you may see some of the texts showing up or disappearing.
Now it’s time to set up each one of the app’s contents. Let’s start with the navbar since it is required for the rest of the design.
Open the root.component.js file under the navbar project and change its contents to the following:
import React from "react";

export default function Root(props) {
  return (
    <header className="masthead mb-auto">
      <div className="inner">
        <a className="blog-logo" href="/">
          <img
            style={{ maxWidth: "40px" }}
            src="https://single-spa.js.org/img/logo-white-bgblue.svg"
            alt="LogRocket Blog"
          />{" "}
          React + single-spa
        </a>
        <nav className="nav nav-masthead justify-content-center">
          <a
            className={`nav-link ${location.pathname === "/" && "active"}`}
            href="/"
          >
            Home
          </a>
          <a
            className={`nav-link ${location.pathname === "/about" && "active"}`}
            href="/about"
          >
            About Us
          </a>
          <a
            className={`nav-link ${
              location.pathname === "/contact" && "active"
            }`}
            href="/contact"
          >
            Contact
          </a>
        </nav>
      </div>
    </header>
  );
}
Sound familiar to you? It’s because this code is full React. It is a React component because that’s the tech we’ve chosen from the common line creation setup.
Note that we’re playing around with the location router object. Yes, it is going to be automatically injected within all your React files. This way, we can customize the links of the navbar’s menu.
The following code belongs to the same root component file but, this time, for the homepage project:
import React from "react";

export default function Root(props) {
  return (
    <section>
      <div className="homepage-hero" style={{ margin: "5rem 0" }}>
        <img
          style={{ width: "100%" }}
          src="https://blog.logrocket.com/wp-content/uploads/2019/05/logrocket-blog.jpg"
        />
      </div>
      <h1 className="cover-heading">Welcome to the micro-frontend world!</h1>
      <p className="lead">
        This is an example of how powerful micro-frontends can be!
        <br /> You may integrate all of your frontend apps, regardless of what
        frameworks they're built with.
      </p>
      <p className="lead">
        <a href="#" className="btn btn-lg btn-secondary">
          Learn more
        </a>
      </p>
    </section>
  );
}
Nothing new here — just overall JSX code to a simple and static React component.
The same applies to the about and contact pages. Below, you can find both of their codes:
// About page

import React from "react";

export default function Root(props) {
  return (
    <section>
      <div className="homepage-hero" style={{ margin: "5rem 0" }}>
        <img
          style={{ width: "100%" }}
          src="https://blog.logrocket.com/wp-content/uploads/2019/05/logrocket-blog.jpg"
        />
      </div>
      <h1 class="cover-heading">About Us!</h1>
      <p class="lead">
        Hey, what's up?
        <br />
        This is a page to talk about us.
      </p>
    </section>
  );
}

// Contact page
import React from "react";

export default function Root(props) {
  return (
    <section>
      <div className="homepage-hero" style={{ margin: "5rem 0" }}>
        <img
          style={{ width: "100%" }}
          src="https://blog.logrocket.com/wp-content/uploads/2019/05/logrocket-blog.jpg"
        />
      </div>
      <h1 className="cover-heading">Contact Us</h1>
      <p className="lead">
        Hey, what's up?
        <br />
        This is a page to contact us.
      </p>
    </section>
  );
}
Let’s customize the overall design of the pages. For this, we’ll make use of Bootstrap, since it’s a fast and very straightforward library.
Still within the index.ejs page, add the following two lines to the head tag:
<!-- Bootstrap core CSS -->
<link href="https://stackpath.bootstrapcdn.com/bootstrap/4.5.2/css/bootstrap.min.css" rel="stylesheet" />
<link rel="stylesheet" href="https://getbootstrap.com/docs/4.0/examples/cover/cover.css" />
Those are the CDN links of Bootstrap’s CSS files. For this example, none of the Bootstrap JavaScript files will be needed.
The second CSS file belongs to one of the nice examples provided by Bootstrap, which we’ll use for this app.
It’s time to test the project. Another good feature of single-spa is that the live-reload comes enabled by default, so there’s no need to keep restarting the apps every time you make changes.
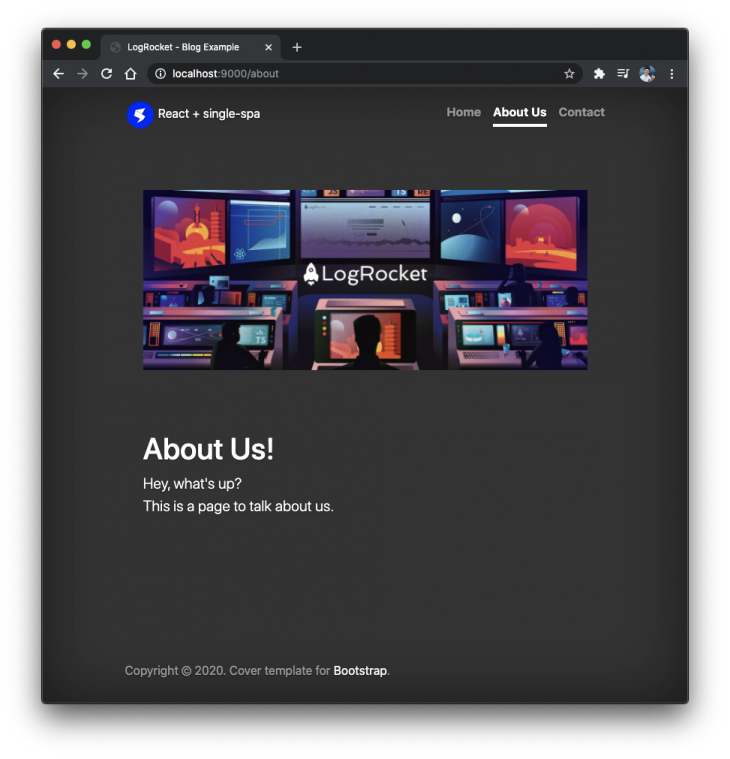
If you go back to your browser, you may see the new design applied as follows:
There’s a lot more you can do with single-spa. The framework comes with some extra nice features like parcels, a framework-agnostic feature that allows manually building chunks of functionalities regardless of which framework you’ve chosen for the development.
The optional single-spa-layout package provides some great routing API controls for top-level routes, apps, and even for your DOM elements.
There’s also support for Angular, AngularJS, Ember, code lazy-loading, easy codebase rewriting, among many others. Due to the broad nature of features, I’d strongly recommend a thorough read over its official docs.
You can access the full source code of this example here. Have a great micro-frontend-programming!
Install LogRocket via npm or script tag. LogRocket.init() must be called client-side, not
server-side
$ npm i --save logrocket

// Code:

import LogRocket from 'logrocket';
LogRocket.init('app/id');
// Add to your HTML:

<script src="https://cdn.lr-ingest.com/LogRocket.min.js"></script>
<script>window.LogRocket && window.LogRocket.init('app/id');</script>

@container scroll-state: Replace JS scroll listeners nowCSS @container scroll-state lets you build sticky headers, snapping carousels, and scroll indicators without JavaScript. Here’s how to replace scroll listeners with clean, declarative state queries.

Explore 10 Web APIs that replace common JavaScript libraries and reduce npm dependencies, bundle size, and performance overhead.

Russ Miles, a software development expert and educator, joins the show to unpack why “developer productivity” platforms so often disappoint.

Discover what’s new in The Replay, LogRocket’s newsletter for dev and engineering leaders, in the February 18th issue.
Hey there, want to help make our blog better?
Join LogRocket’s Content Advisory Board. You’ll help inform the type of content we create and get access to exclusive meetups, social accreditation, and swag.
Sign up now
5 Replies to "Creating micro-frontend apps with single-spa"
Very good tutorial, do you have a code repository somewhere?
Hello Taaniel, that’s great you enjoyed it!
Yep, you can find the source code repo here: https://github.com/diogosouza/logrocket-single-spa
Hi Diogo,
thank you for this example, but it is not working anymore if following this guide step by step.
Here is the error I am getting when running apps and going to localhost:9000: resolve.js:12 Uncaught (in promise) Error: Unable to resolve bare specifier ‘@LogRocket/root-config’ – screenshot https://prnt.sc/x8eiu5
I made everything same way as in your example, even the names of the apps and org, just to be sure. Here is my example code – https://github.com/igorbuts/single-spa-test
What I noticed in my example comparing to yours (from comment above) that all the libraries which name is starting with webpack- differ in major version. Maybe the made some breaking changes….
Because If I clone your example – it is working.
When I try in my example to downgrade libs to the versions of your example I get some new errors.
Hey Igor, that’s really weird.
I’ve cloned your repo and tried to analyze every single file, comparing it with mine, but nothing was different and yet the error persists.
Then, I’ve created another one from scratch following the same steps in the article and, this time, was ok.
I guess something has bugged within the Webpack or config files. Please, try it out too. In another folder, redo the process and let me know if that works.
Cheers.
@Team, Its really a great work you did it. Thanks for the article. I am having one issue in this. Application setup is fine and working. But every navigation it is reloading the page. I don’t want page reloading when we navigate between any routes. Can you please help me to fix this. Please find the attached video for your reference