In this guide, you will learn how to gracefully handle network connection state changes in a React Native app by utilizing NetInfo for information about network connection and axios to make network requests to a public API.

For those of us who are involved in mobile app building, it has rapidly become a priority to consider users who may not have access to the internet or have a poor network connection … but still want to access your application. Making your app resilient in the face of unknown connectivity can greatly improve user experience and consequently, user retention.
Before we can dive into our demo, we must first create a React Native project by running the following command:
npx react-native init MyOfflineApp
In my example, the name of the project is “MyOfflineApp,” but you can change it per your preference.
Next, go into the Project folder and install the required npm packages:
cd MyOfflineApp
npm i --save @react-native-community/netinfo axios react-native-modal
Then, run the following command for iOS for linking libraries using CocoaPods:
npx pod-install
In the following sections, we’ll discuss how to prepare your app and your users for changes in network connectivity.
Most mobile apps require users to have an internet connection to fetch data from an API. However, as a developer, you cannot expect the user to have a stable internet connection all the time. That means that if you want your user to be able to use your mobile app at all times, regardless of connectivity, you need a plan to handle cases where your user’s internet connection goes down while the app is retrieving data from the server.
The first step of this plan should be letting the user know that their device is not connected to the internet; it is also wise to set up a fallback UI until the connection is up again.
NetInfo packageThe NetInfo package provides information about the user’s active network connection and connectivity status of their mobile device. It also identifies the user’s current network type (WiFi, cellular, ethernet, and so on). If the connection is cellular, then netinfo will also return the generation type (2G, 3G, 4G), as well as how expensive the connection is in terms of battery consumption and monetary value.
NetInfoYou can import the NetInfo package into your component file as shown below:
import NetInfo from "@react-native-community/netinfo";
You can subscribe to network state changes using the addEventListener() method:
NetInfo.addEventListener(networkState => {
  console.log("Connection type - ", networkState.type);
  console.log("Is connected? - ", networkState.isConnected);
});
The addEventListener() method will return the reference to the unsubscribe method, which you can use to remove the listener when the component unmounts.
If you require the active network state only once, you can use the fetch() method instead of listening to changes:
NetInfo.fetch().then(networkState => {
  console.log("Connection type - ", networkState.type);
  console.log("Is connected? - ", networkState.isConnected);
});
The network state object has the following shape:
{
  type: "wifi",
  isConnected: true,
  isInternetReachable: true,
  isWifiEnabled: true,
  details: {...}
}
The type key (network type) can be one of the following values.
noneunknowncellularwifibluetoothethernetvpnwimaxotherNote that the details property is different for each value of the type property. You can find more details on the NetInfo API in the documentation.
NetInfo and axios to manage connectivityFor this example, we will create an example app with a list of users that will be fetched from the random user API.
First, import the required packages at the top of your component file:
import React, {useEffect, useState} from 'react';
import axios from 'axios';
import {
  View,
  StyleSheet,
  FlatList,
  Image,
  Text,
  Dimensions,
  SafeAreaView,
} from 'react-native';
Next, create a User component that will display the data for an individual user in the list. This shouldn’t be terribly complex; add an Image component to display the user’s avatar and a couple of Text components to display the user’s name and email:
const User = ({name, email, avatar}) => (
  <View style={styles.user}>
    <Image source={{uri: avatar}} style={styles.avatar} />
    <View style={styles.info}>
      <Text style={styles.name}>{name}</Text>
      <Text style={styles.email}>{email}</Text>
    </View>
  </View>
);
Within the Users component, fetch the data from the API and render the list of users using the FlatList component. To make the network request, use the axios.get() method and pass the API endpoint.
For reference, axios is used to make network requests to a public API. The react-native-modal package will be used to display the connection error notice at the bottom of the screen.
Finally, fetch the users inside the useEffect hook callback and store the results in the users state variable. You will also store the loading state in a isLoading variable to indicate that the data is being fetched.
const Users = () => {
  const [isLoading, setLoading] = useState(false);
  const [users, setUsers] = useState([]);

  useEffect(() => {
    fetchUsers();
  }, []);

  const fetchUsers = () => {
    setLoading(true);

    axios
      .get('https://randomuser.me/api/?results=30')
      .then(({data}) => {
        const {results} = data;
        setUsers(results);
      })
      .finally(() => {
        setLoading(false);
      });
  };

  return (
    <SafeAreaView style={styles.container}>
      <FlatList
        onRefresh={fetchUsers}
        refreshing={isLoading}
        data={users}
        renderItem={({item: user}) => (
          <User
            name={`${user.name.first} ${user.name.last}`}
            email={user.email}
            avatar={user.picture.thumbnail}
          />
        )}
        keyExtractor={(user) => user.login.uuid}
      />
    </SafeAreaView>
  );
};

export default Users;
You can find the styles object for the components below:
const styles = StyleSheet.create({
  container: {
    ...StyleSheet.absoluteFillObject,
  },
  user: {
    width: Dimensions.get('screen').width - 32,
    alignSelf: 'center',
    marginVertical: 8,
    padding: 12,
    borderWidth: 1,
    borderColor: '#eee',
    borderRadius: 6,
    flexDirection: 'row',
    alignItems: 'center',
  },
  info: {
    marginLeft: 10,
  },
  avatar: {
    width: 60,
    height: 60,
    borderRadius: 100,
  },
  name: {
    color: '#424242',
    fontSize: 16,
    fontWeight: '600',
  },
  email: {
    marginTop: 6,
    color: '#888',
  },
});
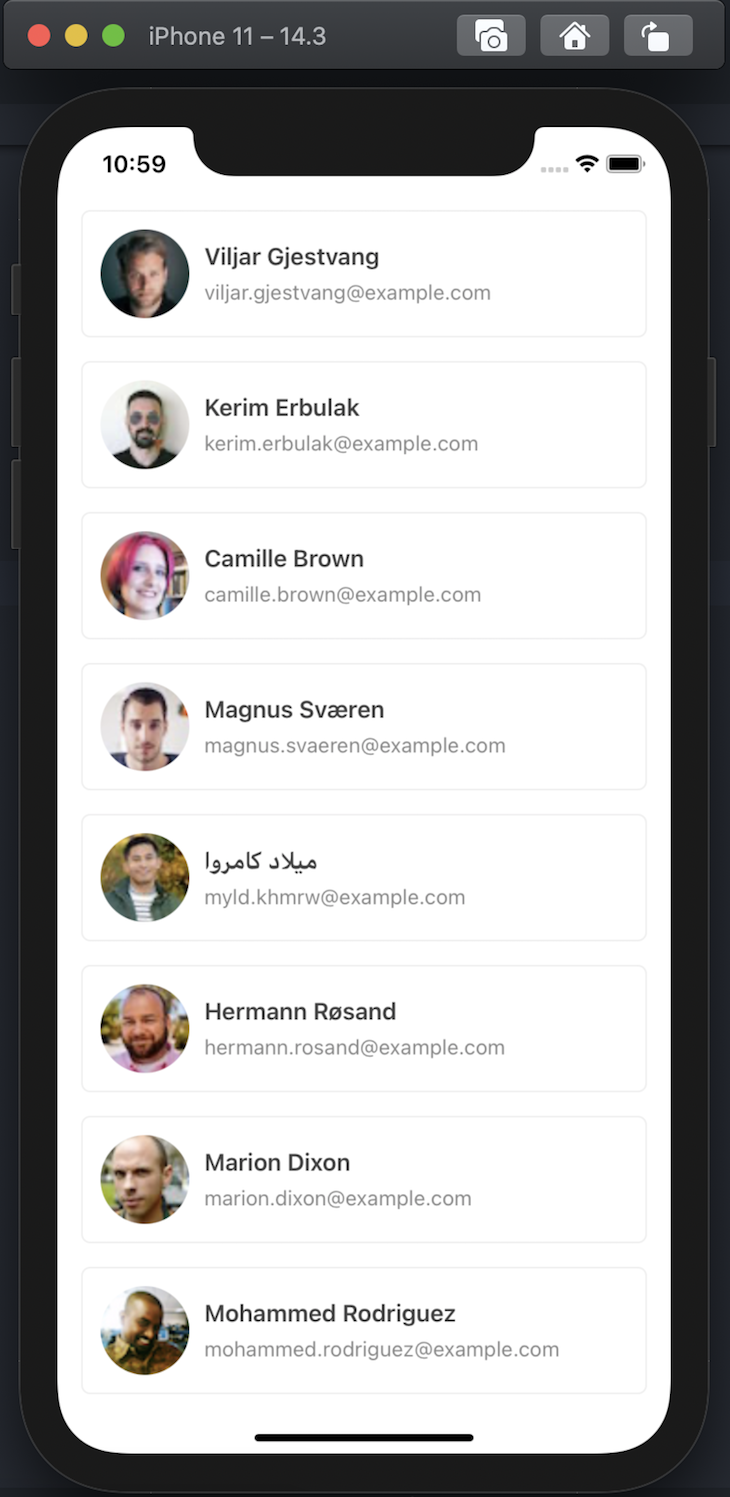
At this point, you should be able to fetch the user data from the API and display it on the screen, as shown in the graphic below.

NetInfo.addEventListenerNext up, we will review how to handle the UI when the user’s internet connection is disrupted.
First, create a isOffline state variable that will hold a boolean value to represent if the user is offline or not. Add NetInfo.addEventListener in the useEffect hook to listen to network changes and update the value of isOffline state.
See below:
const Users = () => {
  // ...

  const [isOffline, setOfflineStatus] = useState(false);

  useEffect(() => {
    const removeNetInfoSubscription = NetInfo.addEventListener((state) => {
      const offline = !(state.isConnected && state.isInternetReachable);
      setOfflineStatus(offline);
    });

    fetchUsers();

    return () => removeNetInfoSubscription();
  }, []);

  // ...
}
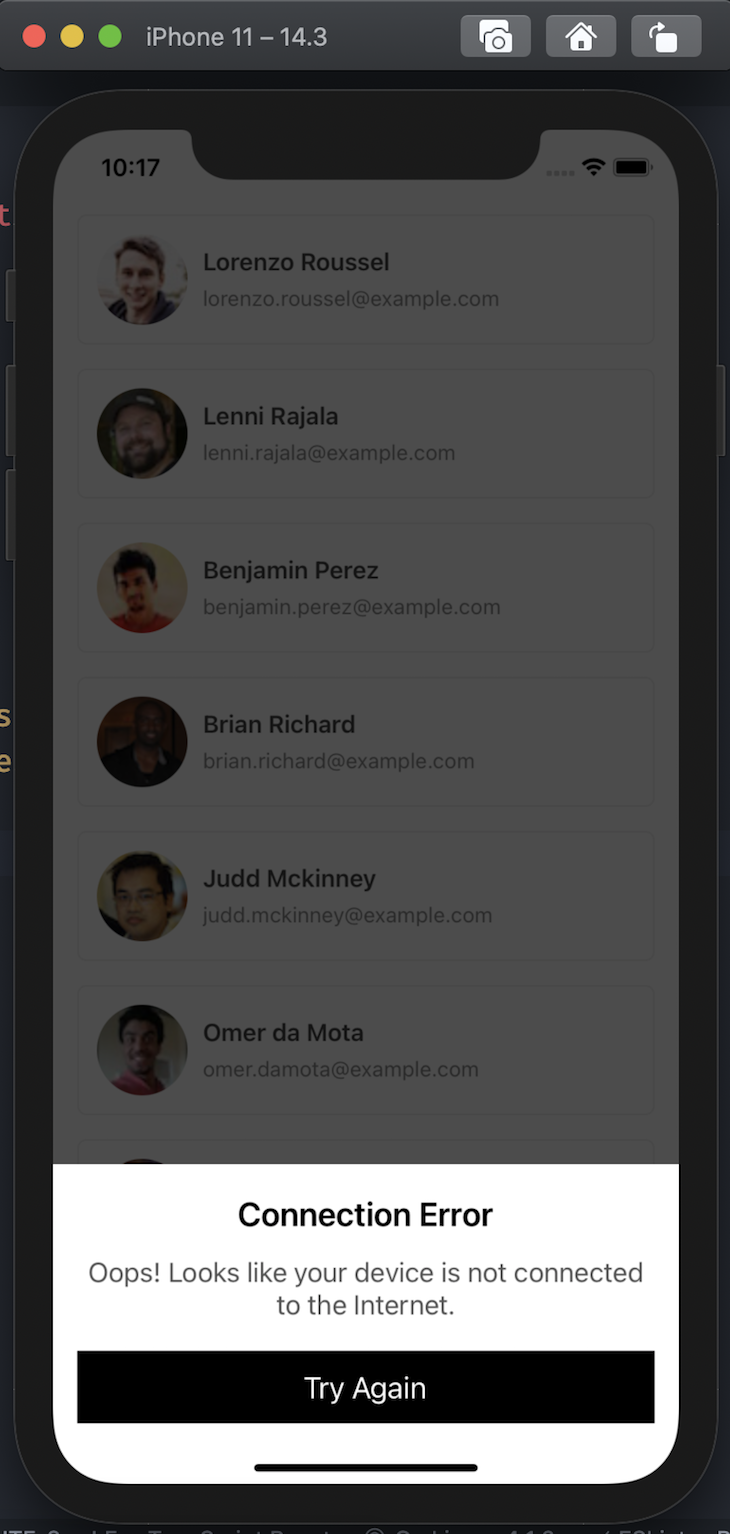
With this setup, whenever the isOffline state is false, a small modal will open up with the error message and a retry button.
When the retry button is pressed, call the fetchUsers() function, and set the isOffline state to false if the request was successful.
const Button = ({children, ...props}) => (
  <TouchableOpacity style={styles.button} {...props}>
    <Text style={styles.buttonText}>{children}</Text>
  </TouchableOpacity>
);

const NoInternetModal = ({show, onRetry, isRetrying}) => (
  <Modal isVisible={show} style={styles.modal} animationInTiming={600}>
    <View style={styles.modalContainer}>
      <Text style={styles.modalTitle}>Connection Error</Text>
      <Text style={styles.modalText}>
        Oops! Looks like your device is not connected to the Internet.
      </Text>
      <Button onPress={onRetry} disabled={isRetrying}>
        Try Again
      </Button>
    </View>
  </Modal>
);

const fetchUsers = useCallback(() => {
  setLoading(true);

  axios
    .get('https://randomuser.me/api/?results=30')
    .then(({data}) => {
      const {results} = data;
      setUsers(results);
      isOffline && setOfflineStatus(false);
    })
    .finally(() => {
      setLoading(false);
    });
}, [isOffline]);

// inside <Users /> component
<NoInternetModal
  show={isOffline}
  onRetry={fetchUsers}
  isRetrying={isLoading}
/>
To test it out, disable your WiFi network and check out the app screen. (If you are having difficulties in getting the expected result on the simulator, try using a real device).

For the same look for the modal as above, you can include the style object below with the styles for the users components.
const styles = StyleSheet.create({
  // ...
  modal: {
    justifyContent: 'flex-end',
    margin: 0,
  },
  modalContainer: {
    backgroundColor: '#fff',
    paddingHorizontal: 16,
    paddingTop: 20,
    paddingBottom: 40,
    alignItems: 'center',
  },
  modalTitle: {
    fontSize: 22,
    fontWeight: '600',
  },
  modalText: {
    fontSize: 18,
    color: '#555',
    marginTop: 14,
    textAlign: 'center',
    marginBottom: 10,
  },
  button: {
    backgroundColor: '#000',
    paddingVertical: 12,
    paddingHorizontal: 16,
    width: '100%',
    alignItems: 'center',
    marginTop: 10,
  },
  buttonText: {
    color: '#fff',
    fontSize: 20,
  },
});
In this guide, we reviewed the NetInfo library and a simple use case for handling network connection state. For further practice, you could look into ways of making the network connection state available to all components (global) using Context API or a third-party library like Redux.
In a more advanced use case, you can let the users browse the app without the internet by caching the data from the server. This is a strategy commonly used by social media apps to increase engagement and discourage users from exiting the app.
I hope you were able to learn something new with this guide. Cheers!

LogRocket's Galileo AI watches sessions for you and and surfaces the technical and usability issues holding back your React Native apps.
LogRocket also helps you increase conversion rates and product usage by showing you exactly how users are interacting with your app. LogRocket's product analytics features surface the reasons why users don't complete a particular flow or don't adopt a new feature.
Start proactively monitoring your React Native apps — try LogRocket for free.
Hey there, want to help make our blog better?
Join LogRocket’s Content Advisory Board. You’ll help inform the type of content we create and get access to exclusive meetups, social accreditation, and swag.
Sign up now
Which AI frontend dev tool reigns supreme in July 2025? Check out our power rankings and use our interactive comparison tool to find out.

Learn how OpenAPI can automate API client generation to save time, reduce bugs, and streamline how your frontend app talks to backend APIs.

Discover how the Interface Segregation Principle (ISP) keeps your code lean, modular, and maintainable using real-world analogies and practical examples.

<selectedcontent> element improves dropdowns
One Reply to "Managing network connection status in React Native"
The netInfo library fires the isConnected=false. The application is unable to use internet after.
Even though other application on my device are able to be connected to internet.
Any fixes or hints of what can be the issue here.