Node.js has long been the go-to tool for developing web applications with intensive I/O-bound operations, thanks to its event loop interface and asynchronous nature, which delegate I/O operations without blocking the main thread.

While this design simplifies development and avoids common threading issues like race conditions and deadlocks, its single-threaded nature presents significant limitations — especially in an era where multi-core processors and computationally intensive applications are standard.
In this article, we’ll discuss the benefits of parallel computing and how to leverage its capabilities in your Node.js applications.
Node.js runs on V8, Google’s JavaScript engine, which executes code in a single thread. By default, all computations happen sequentially in one process, using only a single CPU core.
This model works well for I/O operations but is not as effective for CPU-intensive tasks. Consider this example:
function calculatePrimes(max) {
    const primes = [];
    for (let i = 2; i < max; i++) {
        let isPrime = true;
        for (let j = 2; j < i; j++) {
            if (i % j === 0) {
                isPrime = false;
                break;
            }
        }
        if (isPrime) primes.push(i);
    }
    return primes;
}

calculatePrimes(1000000);
This code will block the event loop when it runs. This is because the event loop in JavaScript relies on asynchronous operations to avoid blocking the main thread.
It does this by offloading I/O-related tasks (e.g., network requests, file system operations) to the operating system. At the same time, the event loop continues to process other tasks as it waits for the I/O operations to complete.
However, the calculatePrimes function in this example is synchronous and executes line-by-line, which means it’ll occupy the thread until completion, thus preventing the event loop from processing other events and blocking the main thread, making the application unresponsive during this time.
To learn more about the event loop, check out our comprehensive article on the topic.
Modern hardware typically comes with multiple CPU cores. Leveraging these cores is crucial for applications to be performant and fast. However, Node.js’ single-threaded design limits it to just one of these cores, which leaves significant processing power untapped.
While this single thread is enough for Node.js to execute I/O operations efficiently, it struggles with tasks like:
Parallel computing allows developers to use the hardware’s multi-core to create and manage multiple threads in parallel within the same Node.js process.
There are several ways to achieve parallel computing but “workers threads” are considered the herald of true parallel computing in Node.js due to their fine-grained and simplified approach to managing threads without the complexities of low-level thread management.
Worker threads were introduced in Node.js v10.5 with the sole purpose of offloading CPU-intensive operations from the event loop. They allow developers to create isolated execution environments that can run simultaneously across different CPU cores.
Essentially, each worker thread is a separate V8 JavaScript runtime that has its own memory space, event loop, and execution context and is completely independent of the main thread.
This way, the worker threads can execute CPU-intensive tasks in their environment and only communicate to the parent thread using a messaging channel without affecting the parent’s usual function or blocking it.
Node.js provides a built-in worker_threads library, which offers high-level methods and functions for effectively implementing and managing worker threads.
This method is used in the main thread to create and manage new workers. It accepts a path to a worker script and an optional object for passing data to the worker:
// index.js : Main Thread

const { Worker } = require('worker_threads');

const worker = new Worker('./worker.js', {
    workerData: { task: 'exampleTask' } // Pass data to the worker
});
The method also listens for messages from the worker using the message event and handles errors and exits with error and exit events:
worker.on('message', (result) => {
  console.log('Worker result:', result);
});

worker.on('error', (err) => {
  console.error('Worker error:', err);
});

worker.on('exit', (code) => {
  console.log(`Worker exited with code ${code}`);
});
workerDataThe workerData method is typically used to pass task-specific configuration or initial parameters from the main thread to the worker thread when the worker is created. This data is available only when the worker is initialized:
// index.js : Main Thread

const { Worker } = require('worker_threads');

const worker = new Worker('./worker.js', {
    workerData: { name: 'Node.js', version: 18 }
});
The data can be accessed in the worker thread via require('worker_threads').workerData in the worker script:
// worker.js

const { workerData } = require('worker_threads');

console.log('Received data:', workerData); // Output: { name: 'Node.js', version: 18 }
parentPortThis method is used within the worker thread to communicate with the main thread. It establishes a two-way messaging channel for sending and receiving messages. The worker thread uses its postMessage method to send data back to the main thread:
// worker.js

const { parentPort } = require('worker_threads');

parentPort.on('message', (message) => {
    console.log('Received from main thread:', message);

    // Process the task and send a result
    const result = message * 2;
    parentPort.postMessage(result);
});
The worker thread then listens for messages from the main thread using the message event:
// main.js
const { Worker } = require('worker_threads');

const worker = new Worker('./worker.js');

worker.on('message', (result) => {
    console.log('Result from worker:', result); // Output: 20 (for input 10)
});

worker.postMessage(10); // Send a task to the worker
Note that the worker.postMessage method is used instead of the workerData method. It is employed when a second argument is not passed to the Worker class during initialization.
To illustrate how you can integrate worker threads into your applications, let’s consider a practical, real-world scenario.
Imagine you need to perform various image transformations such as resizing, grayscaling, and rotation on a large collection of image files. Without worker threads, this would congest the event loop and block the main thread.
By using worker threads, you can distribute these tasks across multiple CPU cores to ensure that your application’s performance remains smooth and responsive while efficiently processing all the images.
I’ll assume you already have a Node.js project set up. If you don’t, you can check out our guide on how to set one up.
Once your project is ready, copy and run the following command in your terminal to install sharp, a high-performance image processing library for Node.js:
npm install sharp
Here is our project structure:
image-processor-project/
│
├── src/
│   ├── imageProcessor.js
│   └── imageWorker.js
│
├── images/
│   ├── image1.jpg
│   ├── image2.png
│   └── image3.jpeg
│
├── package.json
└── index.js
This project structure separates concerns in the application, most especially the worker thread codes from the main thread code. This way we avoid ambiguity and eliminate the need for checks like this:
if (isMainThread){
  // Run main thread code
  }else{
  // Run worker thread code
  }
After setting up the project structure, open the imageProcessor.js file and include the code needed to create workers:
const { Worker } = require("worker_threads");
const path = require("path");

class ImageProcessor {
  constructor(maxConcurrency = require("os").cpus().length) {
    this.maxConcurrency = maxConcurrency;
  }

  async processImages(imagePaths, processingOptions) {
    return new Promise((resolve, reject) => {
      const results = [];
      let activeWorkers = 0;
      let completedWorkers = 0;
      const queue = [...imagePaths];

      const processNextImage = () => {
        if (queue.length === 0 || activeWorkers >= this.maxConcurrency) {
          return;
        }

        const imagePath = queue.shift();
        activeWorkers++;

        const worker = new Worker(path.resolve(__dirname, "imageWorker.js"), {
          workerData: {
            imagePath: imagePath,
            options: processingOptions,
          },
        });

        worker.on("message", (result) => {
          results.push(result);
          activeWorkers--;
          completedWorkers++;

          processNextImage();

          if (completedWorkers === imagePaths.length) {
            resolve(results);
          }
        });

        worker.on("error", (error) => {
          reject(error);
        });
      };

      while (activeWorkers < this.maxConcurrency && queue.length > 0) {
        processNextImage();
      }
    });
  }

  async processBatch(imagePaths, batchSize) {
    const results = [];

    for (let i = 0; i < imagePaths.length; i += batchSize) {
      const batchPaths = imagePaths.slice(i, i + batchSize);
      const batchResults = await this.processImages(batchPaths);
      results.push(...batchResults);
    }
    return results;
  }
}

module.exports = ImageProcessor;
This code defines an ImageProcessor class that takes an optional maxConcurrency argument, which determines the maximum number of workers that can run simultaneously. Inside this class are two methods: processImages and processBatch.
The processImages queues up the images in an array and creates a new Worker for each image using the imageWorker.js script and passes imagePath and processingOptions as workData to the thread.
The ProcessBatch method iterates over the imagePaths in chunks. For each batch, it calls processImages to handle the images and waits (await) for each batch to complete before moving to the next.
Next, go to the imageWorker.js file and add the following code:
const { parentPort, workerData } = require("worker_threads");
const fs = require("fs");
const path = require("path");
const sharp = require("sharp");

async function processImage() {
  const { imagePath, options } = workerData;
  try {

    if (!fs.existsSync(imagePath)) {
      throw new Error(`Image file not found: ${imagePath}`);
    }

    // Read image
    const inputBuffer = fs.readFileSync(imagePath);
    let sharpInstance = sharp(inputBuffer);

    if (options.width || options.height) {
      sharpInstance = sharpInstance.resize({
        width: options.width,
        height: options.height,
        fit: options.fit || "cover",
      });
    }

    if (options.rotation) {
      sharpInstance = sharpInstance.rotate(options.rotation);
    }

    if (options.grayscale) {
      sharpInstance = sharpInstance.grayscale();
    }

    const processedImage = await sharpInstance.toBuffer();

    const outputFilename = `processed_${path.basename(imagePath)}`;
    const outputPath = path.join(path.dirname(imagePath), outputFilename);

    // Save processed image
    await sharp(processedImage).toFile(outputPath);

    // Send processed image details back to main thread
    parentPort.postMessage({
      originalPath: imagePath,
      outputPath: outputPath,
      processedSize: processedImage.length,
      success: true,
    });
  } catch (error) {
    parentPort.postMessage({
      originalPath: imagePath,
      error: error.message,
      success: false,
    });
  }
}

processImage();
This code runs on the worker thread. Upon initialization, the worker immediately executes the main function in the script: processImage. This function uses the sharp library and data sent from the main thread via the workerData function to transform the image located at the specified path. The output file is then generated with the original filename prefixed by "processed_".
When the operation is done, the result is communicated back to the main thread via the parentPort.postMessage method, including the:
// Send processed image details back to main thread
  parentPort.postMessage({
    originalPath: imagePath,
    outputPath: outputPath,
    processedSize: processedImage.length,
    success: true,
  });
If there’s an error, the function sends an error message with details and a failure status via postMessage.
For the final step, go to the index.js file and add the main thread code:
const path = require("path");
const ImageProcessor = require("./src/imageProcessor");

const processor = new ImageProcessor(2); // Limit to 2 concurrent workers

// Get all image files in the images directory
const imagePaths = [
  path.resolve(__dirname, "images/image1.png"),
  path.resolve(__dirname, "images/image2.jpg"),
  path.resolve(__dirname, "images/image3.jpg"),
];

const processingOptions = {
  width: 800,
  height: 600,
  rotation: 90,
  grayscale: true,
  fit: "contain",
};

async function processImageFile() {
  try {
    const results = await processor.processBatch(
      imagePaths,
      imagePaths.length,
      processingOptions
    );
    console.log("Processing Results:", results);
  } catch (error) {
    console.error("Image processing failed:", error);
  }
}

processImageFile().catch(console.error);
Here, an instance of the ImageProcessor class is created with a concurrency limit of 2, meaning only two worker threads will run simultaneously. The main logic is encapsulated in the processImageFile function, which calls the processBatch method of the ImageProcessor instance. This method spawns worker threads to process images concurrently, with a maximum of two threads running at a time.
Like any other tool, parallelism in Node.js is not without its flaws, and implementing it requires careful consideration.
Creating worker threads comes with a cost. Because each thread creates a dedicated instance of the V8 engine, it requires memory allocation and initialization, which can impact performance if threads are frequently created and destroyed. To minimize this overhead, it’s best to use a thread pool or reuse worker threads whenever possible.
Transferring large amounts of data between the worker thread and the main thread can incur significant overhead. This is because data is exchanged through message passing, which requires serialization and deserialization. These operations can be computationally expensive, particularly for large or complex objects.
To optimize performance, consider using transferable objects (such as ArrayBuffer), minimizing the frequency and size of data transfers, and leveraging structured cloning efficiently.
As seen in the image processing example, worker thread code can become complex and ambiguous, often leading to what developers refer to as spaghetti code. This can significantly impact readability and maintainability.
To avoid this, it’s best practice to keep your worker thread code clean, well-structured, and thoroughly documented. This improves understanding and makes future modifications easier.
It is important to prioritize error handling while working with worker threads. This is not just because of the complexity of the code but also because of the complexity of error propagation.
In a single-threaded application, unhandled errors naturally bubble up the call stack and cause the application to crash. However, with worker threads, the process changes. Errors in worker threads don’t directly impact the main thread, which can lead to them being silently ignored, thus making them difficult to detect.
To catch worker errors, you must listen for the error event on the worker object in the main thread:
// Main thread

const worker = new Worker('worker.js');

worker.on('error', (error) => {
  console.error('Worker encountered an error:', error);
});
Another limitation of error handling in worker threads is the restricted stack trace. Because the stack trace is confined to the worker context, it becomes difficult to trace the root cause and fully understand the error’s context.
For example, say you remove the processingOptions parameter from the processBatch method and fail to pass it as an argument to the processImage method, as shown below:
  async processBatch(imagePaths, batchSize) {
    const results = [];

    for (let i = 0; i < imagePaths.length; i += batchSize) {
      const batchPaths = imagePaths.slice(i, i + batchSize);
      const batchResults = await this.processImages(batchPaths);
      results.push(...batchResults);
    }
    return results;
  }
You will get the following error in the console:
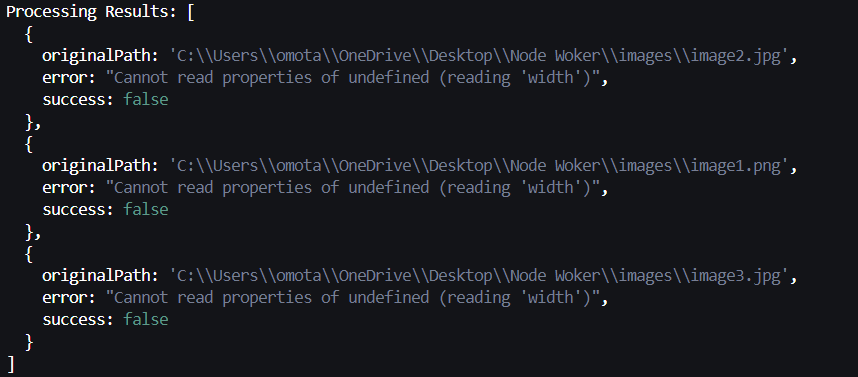
This error provides little to no information, such as the file or line of code where the error originates.
To effectively debug worker threads, you need to:
Parallel computing in Node.js unlocks the potential to handle CPU-intensive tasks efficiently. With worker threads, developers are no longer limited to a single thread and can build scalable, high-performance applications that fully leverage modern hardware capabilities.
 Monitor failed and slow network requests in production
Deploying a Node-based web app or website is the easy part. Making sure your Node instance continues to serve resources to your app is where things get tougher. If you’re interested in ensuring requests to the backend or third-party services are successful, try LogRocket.

LogRocket lets you replay user sessions, eliminating guesswork around why bugs happen by showing exactly what users experienced. It captures console logs, errors, network requests, and pixel-perfect DOM recordings — compatible with all frameworks.
LogRocket's Galileo AI watches sessions for you, instantly identifying and explaining user struggles with automated monitoring of your entire product experience.
LogRocket instruments your app to record baseline performance timings such as page load time, time to first byte, slow network requests, and also logs Redux, NgRx, and Vuex actions/state. Start monitoring for free.

A guide for using JWT authentication to prevent basic security issues while understanding the shortcomings of JWTs.

Discover how to build, render, and automate product demo videos with Remotion, replacing traditional screen recordings with reusable React code.

Chrome’s Modern Web Guidance embeds modern web platform skills into AI coding agents, helping them choose native HTML, CSS, and browser APIs over legacy patterns.

Learn how to use Fallow to analyze AI-generated code, detect dead code, duplicate logic, and complexity issues, and integrate automated code quality checks into your AI-assisted development workflow.
Hey there, want to help make our blog better?
Join LogRocket’s Content Advisory Board. You’ll help inform the type of content we create and get access to exclusive meetups, social accreditation, and swag.
Sign up now

