Developers don’t like writing documentation. We just like to write code — at least, that’s the case for me! Hopefully, I am not alone in this 🙂
But what if you had a tool that allowed you to define an API and then automatically generated the documentation, an SDK, TypeScript types, and everything that makes working with an API interesting?
Fern is a tool that allows you to do that sort of thing. You can easily define an API with Fern and generate SDKs, client libraries, bindings, or wrappers that allow you or other developers to work with the API seamlessly and effectively.
In this guide, I’ll walk you through how to integrate Fern into your workflow to define and document your APIs. We will cover:
To follow along with the examples in this guide, we’ll use Node.js and Express. Note that you don’t need to have any experience with Express to understand this guide, as it will be simple — and yet, thorough.
As of now, Fern supports several languages, including TypeScript, Java, Ruby, Python, Go, and C#. Since this project is quite new and developing quickly, more languages will likely be supported in the future.
Come, let’s ride along!
We’ll build a basic CRUD API for an animal farm. We’ll be able to add, list, retrieve, and delete an animal from the list of animals. We’ll use Express and Node.js to build it in a few lines of code.
In case you don’t have Node.js installed, you can install it for your operating system by visiting the official Node.js documentation. When that is done, you can run the following code to initialize a Node application:
npm init -y
The above code will generate a package.json file. Go ahead and update the package.json file with the code below:
//package.json
{
  "name": "animalfarm",
  "version": "1.0.0",
  "description": "",
  "main": "app.js",
  "scripts": {
    "type-init": "tsc --init",
    "start": "node build/app.js",
    "dev": "nodemon src/app.ts"
  },
  "author": "",
  "license": "ISC",
  "dependencies": {
    "express": "^4.18.2"
  },
  "devDependencies": {
    "@types/express": "^4.17.17",
    "@types/node": "^20.4.5",
    "nodemon": "^3.0.1",
    "ts-node": "^10.9.1",
    "typescript": "^5.1.6"
  }
}
The above JSON file contains all the dependencies we need to run our Node + Express + TypeScript application. Let’s also add the default TypeScript configuration file now, although it’s possible to add this file later by running tsc --init after installing TypeScript globally:
{
  "compilerOptions": {
      "target": "es6",
      "module": "commonjs",
      "outDir": "./build",
      "strict": true,
      "esModuleInterop": true
  },
  "include": ["src/**/*.ts"],
  "exclude": ["node_modules"]
}
Next, run npm install to add all the dependencies. Notice that in the scripts section, we have specified an app.ts file. We’ll create this file shortly, but first, let’s install Fern.
We want to install the Fern CLI globally so we can use it system-wide. Run the command below to install Fern globally:
npm install -g fern-api
Once the installation is complete, run the command fern init to initialize Fern in the current directory. This will generate a ./fern/ directory.
Your directory structure will now look like this:
.
├── fern
│   ├── api
│   │   ├── definition
│   │   │   ├── api.yml
│   │   │   └── imdb.yml
│   │   └── generators.yml
│   └── fern.config.json
└── package.json
Now that the basic project setup is ready with all that we need, let’s start by writing the Express API logic for the CRUD application.
Create the src/app.ts file we specified earlier, which is where we’ll write the server logic:
import express from 'express';
import animalRoute from "./animal";

const app = express();
const PORT = 3000;

app.use("/animals", animalRoute);
app.listen(PORT, () => {
    console.log(`Server is running at http://localhost:${PORT}`);
});
The above code is a basic Express server with a base URL of /animals that is connected to the animalRoute module served on port 3000.
Let’s write the animalRoute module in a new file called src/animal.ts. This file will contain the route we’re interested in defining:
import { Router } from "express";

const route = Router();
let animals = [
    { id: 1, name: 'Cow', type: 'Mammal' },
    { id: 2, name: 'Chicken', type: 'Bird' },
    { id: 3, name: 'Goat', type: 'Mammal' },
    { id: 4, name: 'Raven', type: 'Bird' },
];

interface Animal {
    id: number;
    name: string;
    type: string;
}

// CREATE an Animal
route.post('/', (req, res) => {
    const animal: Animal = req.body;
    animals.push(animal);
    res.send(animal);
});

// READ all animal
route.get('/', (req, res) => {
    res.send(animals);
});

// GET a single animal
route.get('/:id', (req, res) => {
    const id = parseInt(req.params.id);
    const animal = animals.find(animal => animal.id === id);
    if (animal) {
        res.send(animal);
    } else {
        res.sendStatus(404)
    }
});

// UPDATE a single animal based on their Id
route.put('/:id', (req, res) => {
    const id = parseInt(req.params.id);
    const animalIndex = animals.findIndex(animal => animal.id === id);
    if (animalIndex > -1) {
        const updatedAnimal: Animal = req.body;
        animals[animalIndex] = updatedAnimal;
        res.send(updatedAnimal);
    } else {
        res.sendStatus(404);
    }
});

// DELETE a single animal based on their Id
route.delete('/:id', (req, res) => {
    const id = parseInt(req.params.id);
    const animalIndex = animals.findIndex(animal => animal.id === id);
    if (animalIndex > -1) {
        animals.splice(animalIndex, 1);
        res.sendStatus(204);
    } else {
        res.sendStatus(404);
    }
});
export default route;
The above code contains the route and the logic for our CRUD application. We won’t be delving into the details of each route. In the next section, we’ll see how to define all the routes with Fern.
Now that we’ve set up the endpoints, we can fully explore what Fern has to offer.
If you prefer, you can define the endpoints with Fern before you start coding. I chose to write the code first because it’s easier to start with something we are familiar with. This approach makes it simpler to learn how to define the APIs with Fern.
Right now, our directory structure should look like this:
├── fern
│   ├── api
│   │   ├── definition
│   │   │   ├── api.yml
│   │   │   └── imdb.yml
│   │   └── generators.yml
│   └── fern.config.json
├── package.json
└── src
    ├── animal.ts
    └── app.ts
Let’s take a look at the files and understand what they are for, starting with the configuration files.
In the Fern directory that was created when we ran fern init, there’s a sample Fern definition for IMDb movies in the imdb.yml file. Since we’re going to create our own, you can go ahead and delete it.
We’ll store all our API definitions in the fern/api/definition directory.
The fern.config.json file allows you to set your project namespace — or organization name and the version number. We’ll call ours odogwu and set our version number to 0.0.1, since this is our very first version.
It should look like the code below after editing it. At the time of this writing, this is the configuration that goes in this file, but there is some likelihood that I will add more configuration options in the future:
{
    "organization": "odogwu",
    "version": "0.0.1"
}
Next, let’s take a look at the generators.yaml file. This is one of the most important files — you should pay attention to it. It allows you to configure the output you want to get when you run the fern generate command.
The fern generate command allows you to generate the SDK, types, or whatever else is possible with Fern.
Here is an example that allows you to generate types for your Express app, an SDK for the client to interact with your API endpoints, and some relevant OpenAPI documentation:
default-group: local
groups:
  local:
    generators:
      - name: fernapi/fern-typescript-express
        version: 0.7.2
        output:
          location: local-file-system
          path: ../../src/generated
      - name: fernapi/fern-typescript-node-sdk
        version: 0.7.2
        output:
          location: local-file-system
          path: ../../generated/typescript
      - name: fernapi/fern-openapi
        version: 0.0.28
        output:
          location: local-file-system
          path: ../../generated/openapi
The structure is usually the same for most outputs. However, the name and location values are predefined based on the outputs that Fern currently supports. You can refer to the Fern documentation for more information on the supported outputs and necessary keys and values.
For instance, the fernapi/fern-typescript-express name lets you create a TypeScript type for your Express application that will sync with your docs. It’s important that whatever is defined in the Fern definition matches what’s in your code, or else your code won’t compile.
You can also set the version for each generator. The output key lets you choose the location and path for your generator. The location could be your local-file-system, as shown below:
generators:
  - name: fernapi/fern-typescript-express
    version: 0.7.2
    output:
      location: local-file-system
      path: ../../src/generated
The location can also be npm or postman. For example, you might use npm, as shown below, when you need to publish a browser SDK. This SDK could be used across your organization or as an open source library for accessing your API:
- name: fernapi/fern-typescript-browser-sdk
  version: 0.7.2
  output:
    location: npm
    package-name: "@fern-api/animal-farm"
    token: ${NPM_TOKEN}
  config: # optional
    namespaceExport: AnimalFarm
  github:
    repository: fern-api/animal-farm-node
For our example, we’re going to create OpenAPI documentation, a TypeScript type, and a TypeScript Node SDK locally. Our generator.yaml file should look like the below:
default-group: local
groups:
  local:
    generators:
      - name: fernapi/fern-typescript-express
        version: 0.7.2
        output:
          location: local-file-system
          path: ../../src/generated
      - name: fernapi/fern-typescript-node-sdk
        version: 0.7.2
        output:
          location: local-file-system
          path: ../../generated/typescript
      - name: fernapi/fern-openapi
        version: 0.0.28
        output:
          location: local-file-system
          path: ../../generated/openapi
Now that we have the configuration ready, let’s start defining the endpoints. Make an animals.yaml file in the definition directory:
├── fern
│   ├── api
│   │   ├── definition
│   │   │   ├── animals.yaml
The Fern API definition spec is similar to OpenAPI, but it’s not exactly the same. According to our code, we have the Animal type defined with TypeScript. Let’s start by creating a version of that for Fern so we don’t have to define it again in our TypeScript file:
Here is our TypeScript Animal type:
interface Animal {
    id: number;
    name: string;
    type: string;
}
This will now translate to the following for Fern:
types:
  Animal:
    properties:
      id:
        type: integer
      name:
        type: string
      type:
        type: string
We used various properties to define the fields in our object, as shown in the code above. Let’s go ahead and create the TypeScript definition for the “create animal” endpoint below:
// CREATE
route.post('/', (req, res) => {
    const animal: Animal = req.body;
    animals.push(animal);
    res.send(animal);
});
This will translate to the following for Fern:
postAnimals:
  path: /animals
  method: POST
  auth: false
  display-name: Create a new animal
  request:
    body:
      type: Animal
  response:
    docs: Successful operation
    type: Animal
  errors: []
Just like in the actual endpoint Express code, this endpoint definition shows that the request body will accept an Animal type and return an Animal type if it creates an animal successfully. It also lets you specify the message that will appear as the description for the endpoint.
Next up, let’s define the “read-all” Animal endpoint like so:
// READ all animal
route.get('/', (req, res) => {
    res.send(animals);
});
Which will be translated to the following in Fern:
service:
  auth: false
  base-path: ""
  endpoints:
    getAnimals:
      path: /animals
      method: GET
      auth: false
      display-name: Get all animals
      response:
        docs: Successful operation
        type: list<Animal>
      errors: []
In the service section of the Fern configuration, you can set some global configurations for your endpoints. The endpoints themselves are defined as subkeys to the endpoint keys. In the example above, we’ve set the global authentication for all endpoints to false:
auth: false
This means that authentication is not required for any of the endpoints. However, if any endpoints do require authentication, set it to true.
We’ve also set the /animal route authentication to false because this specific route doesn’t need authentication. This setting will be reflected in the documentation and the SDKs you’ll generate, which I think is a pretty neat feature as it adds flexibility.
The base-path: "" sets the base path for all endpoints. In this case, it’s set to the root directory, as indicated by the empty quotes. Your base path might be different depending on your server setup.
The rest of the API endpoints can be defined following the same pattern. For example, the getAnimals endpoint is defined with a path of /animals and a GET method. It also has its own auth: false setting, indicating that it doesn’t require authentication.
I like how Fern defines the response type neatly as type: list<Animal>. This indicates that the endpoint will return a list of Animal objects. It’s very clear and expressive.
So, in simple terms, this configuration defines a service where anyone can retrieve a list of Animal objects from the /animals path, without needing to authenticate, and they’ll receive a message saying “Successful operation” when everything goes well.
Fern has a neat type system that lets you describe your data model in a way that matches the data in your code. It includes some basic types and also lets you create your own types.
The basic types are similar to those found in many programming languages, like integer, double, boolean, long, and so on. Custom types, on the other hand, are types that you’ve defined in your code. For example, the Animal type we created at the start is a custom type.
Fern’s documentation about types is fairly comprehensive, so we won’t go into more detail here. Instead, let’s move on to learning how to import an OpenAPI spec into Fern.
One of the best parts of Fern is its interoperability. You can convert your Fern API definition into an OpenAPI spec, and you can also convert an OpenAPI spec into Fern API definitions.
Let’s explore how you can do both.
Let’s assume you have an existing project that uses the OpenAPI spec for documentation, but you want to benefit from all the cool things that come with Fern. You can use the following command to convert your OpenAPI spec to a Fern definition:
fern init --openapi <url or path to OpenAPI>
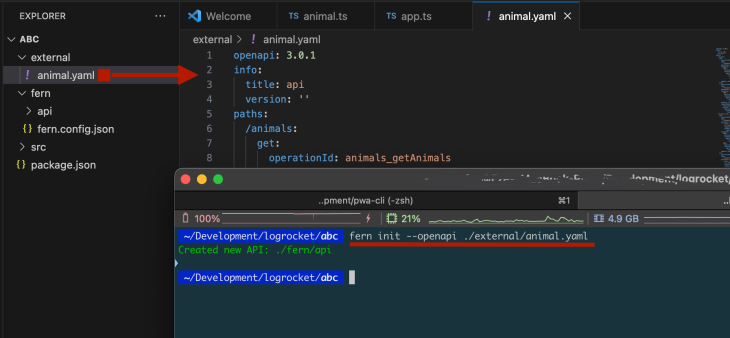
Here is an example where we have the OpenAPI spec in the directory ./external as shown in the image below:
Now, you can go ahead to write the fern generate command to generate the desired output specified in the generators.yml file. Alternatively, you can run fern write-definition and the definitions will be generated for you automatically as shown in the image below:
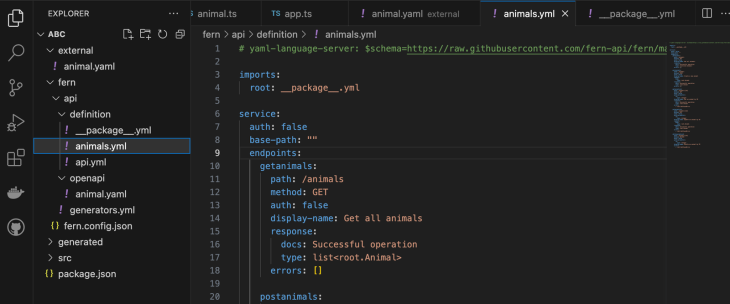
Did you notice the imports key? That’s how you import another file of Fern definitions into your current file. With this setup, going forward with your project, you’ll focus on working on the Fern definition file.
On the other hand, to generate OpenAPI version of a Fern definition, just specify the OpenAPI name in the generator.yaml file as shown below:
    - name: fernapi/fern-openapi
        version: 0.0.28
        output:
          location: local-file-system
          path: ../../generated/openapi
As mentioned before, Fern lets you create artifacts that you can share within your organization or make available to everyone. But how do you do that?
Firstly, make sure you’ve listed all the outputs you want in the generators.yaml file:
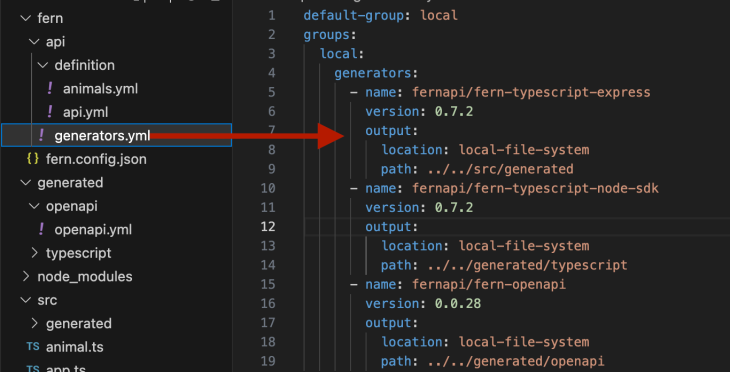
Then go ahead and run the command fern generate to generate all of it. That’s all. You can use the generated source code, documentation, etc. as you wish.
Up until now, we’ve managed to mirror what we have in our TypeScript code using Fern definitions and generated artifacts like the npm package, TypeScript types, and so on.
The next step is to actually use these results. Since we generated a fernapi/fern-typescript-express for our Express app — which lets us use the types from our definition in our Express app — let’s rewrite our app to use it.
We can safely remove the TypeScript type and export the animalService with all the routes, as shown in the code below:
import { Router } from "express";
import { NotFoundError } from "./generated/api";
import { AnimalsService } from "./generated/api/resources/animals/service/AnimalsService";
const route = Router();
let animals = [
    { id: 1, name: 'Cow', type: 'Mammal' },
    { id: 2, name: 'Chicken', type: 'Bird' },
    { id: 3, name: 'Goat', type: 'Mammal' },
    { id: 4, name: 'Raven', type: 'Bird' },
];

export default new AnimalsService({
    getAnimals: async (req, res) => {
        res.send(animals);
    },
    getAnimalsId: (req, res) => {
        const id = req.params.id;
        const animal = animals.find(animal => animal.id === id);
        if (animal) {
            res.send(animal);
        } else {
            throw new NotFoundError("Animal not found")
        }
    },
    postAnimals: (req, res) => {
        const animal = req.body;
        animals.push(animal);
        res.send(animal);
    },
    putAnimalsId: (req, res) => {
        const id = req.params.id;
        const animalIndex = animals.findIndex(animal => animal.id === id);
        if (animalIndex > -1 && animals[animalIndex]) {
            const updatedAnimal = req.body;
            animals[animalIndex] = updatedAnimal;
            res.send(updatedAnimal);
        } else {
            throw new NotFoundError("Animal not found")
        }
    },
    deleteAnimalsId(req, res) {
        const id = req.params.id;
        const animalIndex = animals.findIndex(animal => animal.id === id);
        if (animalIndex > -1) {
            animals.splice(animalIndex, 1);
        } else {
            throw new NotFoundError
        }
    },
});
You might have noticed that we also imported the NotFoundError. This was the error we defined in the Fern Animal description. Fern created the customError method for us, so we can always use it.
You’ll also see that we imported AnimalService, passed in the service methods, and then exported it again to be registered as middleware in Express. Our app.ts file will look like this:
//app.ts
import express from 'express';
import animalRoute from "./animal";
import { register } from './generated';
const app = express();
const PORT = 3000;

register(app, { animals: animalRoute })
app.listen(PORT, () => {
    console.log(`Server is running at http://localhost:${PORT}`);
});
We’ll register the animal service to Express and Fern at the same time so the entire route is synced with our documentation and all the outputs where necessary. Furthermore, the AnimalService will ensure the correct type is used; otherwise, it will throw a compile-time error.
So far, we’ve seen that Fern enables us to build applications that are maintainable, reliable, and predictable. From one codebase, we are able to generate an SDK that can be used in the frontend to access the API along with automatically generating documentation.
We also saw how we can create types that we can use across the organization or publicly and how to start a new Fern project or configure our existing Express app to work with Fern.
There is so much more you can do with Fern that we can’t fit into this one article. We’ve just scratched the surface.
Fortunately, the documentation is simple to follow! The team really did put a lot of thought into creating Fern and writing the documentation. Check out Fern’s documentation to learn more about what you can do with Fern.
Happy hacking!
 Monitor failed and slow network requests in production
Deploying a Node-based web app or website is the easy part. Making sure your Node instance continues to serve resources to your app is where things get tougher. If you’re interested in ensuring requests to the backend or third-party services are successful, try LogRocket.

LogRocket lets you replay user sessions, eliminating guesswork around why bugs happen by showing exactly what users experienced. It captures console logs, errors, network requests, and pixel-perfect DOM recordings — compatible with all frameworks.
LogRocket's Galileo AI watches sessions for you, instantly identifying and explaining user struggles with automated monitoring of your entire product experience.
LogRocket instruments your app to record baseline performance timings such as page load time, time to first byte, slow network requests, and also logs Redux, NgRx, and Vuex actions/state. Start monitoring for free.
Would you be interested in joining LogRocket's developer community?
Join LogRocket’s Content Advisory Board. You’ll help inform the type of content we create and get access to exclusive meetups, social accreditation, and swag.
Sign up now
Learn how OpenAPI can automate API client generation to save time, reduce bugs, and streamline how your frontend app talks to backend APIs.

Discover how the Interface Segregation Principle (ISP) keeps your code lean, modular, and maintainable using real-world analogies and practical examples.

<selectedcontent> element improves dropdowns

Learn how to implement an advanced caching layer in a Node.js app using Valkey, a high-performance, Redis-compatible in-memory datastore.


