Editor’s note: This article was updated on 10 June 2022 to include more efficient use of extensions and more up-to-date information about Jest.

Web developers know that testing is an important part of building applications, as it prevents regression and ensures your code is performing effectively. Using Jest as a test runner is one way to accomplish this. I’ve been a regular user of Jest for quite some time. Originally, I used it like any other test runner, but in some cases, I use it simply because it’s the default testing framework in Create React App.
For a long time, I was not using Jest to its full potential. Now, I want to show you why I think it’s the best testing framework. Ever.
The Replay is a weekly newsletter for dev and engineering leaders.
Delivered once a week, it's your curated guide to the most important conversations around frontend dev, emerging AI tools, and the state of modern software.
Jest is a JavaScript testing framework built by Facebook and primarily designed for React-based applications, but is also used with Babel, JavaScript, Node, Angular, and Vue. It can be used to test NestJS, Next.js, and GraphQL, too. Let’s take a look at some of best features of Jest.
What are snapshots and why they are so handy?
The first time I saw this functionality I thought it was something limited to enzyme and React unit testing. But it’s not! Snapshot is used to track changes in UI. Snapshot testing captures code of a component at a specific time to compare it to a reference snapshot stored alongside the test. You can use snapshots for any serializable object.
Let’s take a look.
Imagine you want to test if a function returns a non-trivial value like an object with some nested data structures. I have found myself writing code like this many times:
const data = someFunctionYouAreTesting()
assert.deepEqual(data, {
  user: {
    firstName: 'Ada',
    lastName: 'Lovelace',
    email: '[email protected]'
  }
  // etc.
})
But, if some nested property is not exactly what you were expecting, you just get an error and you’ll need to find the differences visually:
assert.js:83
  throw new AssertionError(obj);
  ^

AssertionError [ERR_ASSERTION]: { user:
   { firstName: 'Ada',
     lastName: 'Lovelace!',
     email: '[email protected]' } } deepEqual { user:
   { firstName: 'Ada',
     lastName: 'Lovelace',
     email: '[email protected]' } }
If the function you are testing returns something random (for example, when you generate a random API key) you cannot use this mechanism anymore. In that case, you have to manually check field by field:
const data = someFunctionYouAreTesting()
assert.ok(data.user)
assert.equal(data.user.firstName, 'Ada')
assert.equal(data.user.lastName, 'Lovelace')
assert.equal(data.user.email, '[email protected]')
// and it goes on...
This is better from a testing perspective, but it’s a lot more work.
If you find yourself doing these things, you’ll love snapshots! You will write something like this:
const data = someFunctionYouAreTesting()
expect(data).toMatchSnapshot()
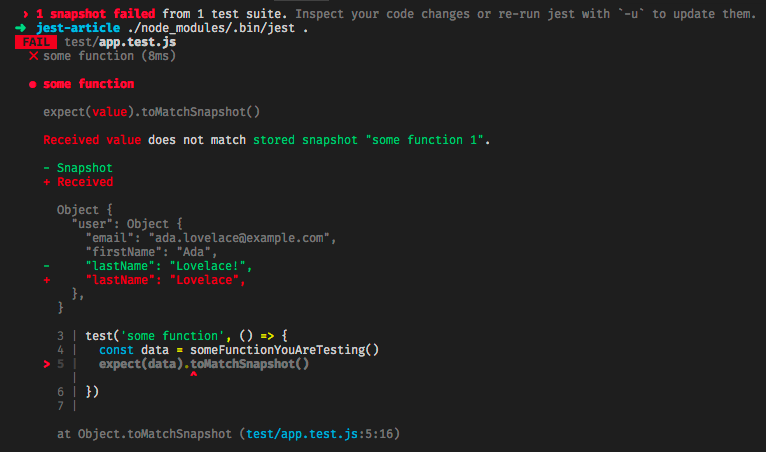
And the first time the test runs, Jest will store the data structure in a snapshot file that you can manually open and validate. Any time you run the test again Jest will load the snapshot and compare it with the received data structure from the test. If there are any differences, Jest will print a colored diff to the output. Awesome!

Now, what if we don’t want to compare the whole structure (because some fields can be dynamic or can change from test to test)? No problem:
const data = someFunctionYouAreTesting()
expect(data).toMatchSnapshot({
  createdAt: expect.any(Date),
  id: expect.any(Number),
})
These are called property matchers.
But there’s more. One problem I found with this way of validating data structures is that the snapshot file is separated from the test code. So sometimes you need to jump from one file to another to check that the snapshot contains what you are expecting.
No problem! If the snapshot is small enough you can use inline snapshots. You just need to use:
const data = someFunctionYouAreTesting()
expect(data).toMatchInlineSnapshot()
And that’s it! Wait… but where’s the snapshot?
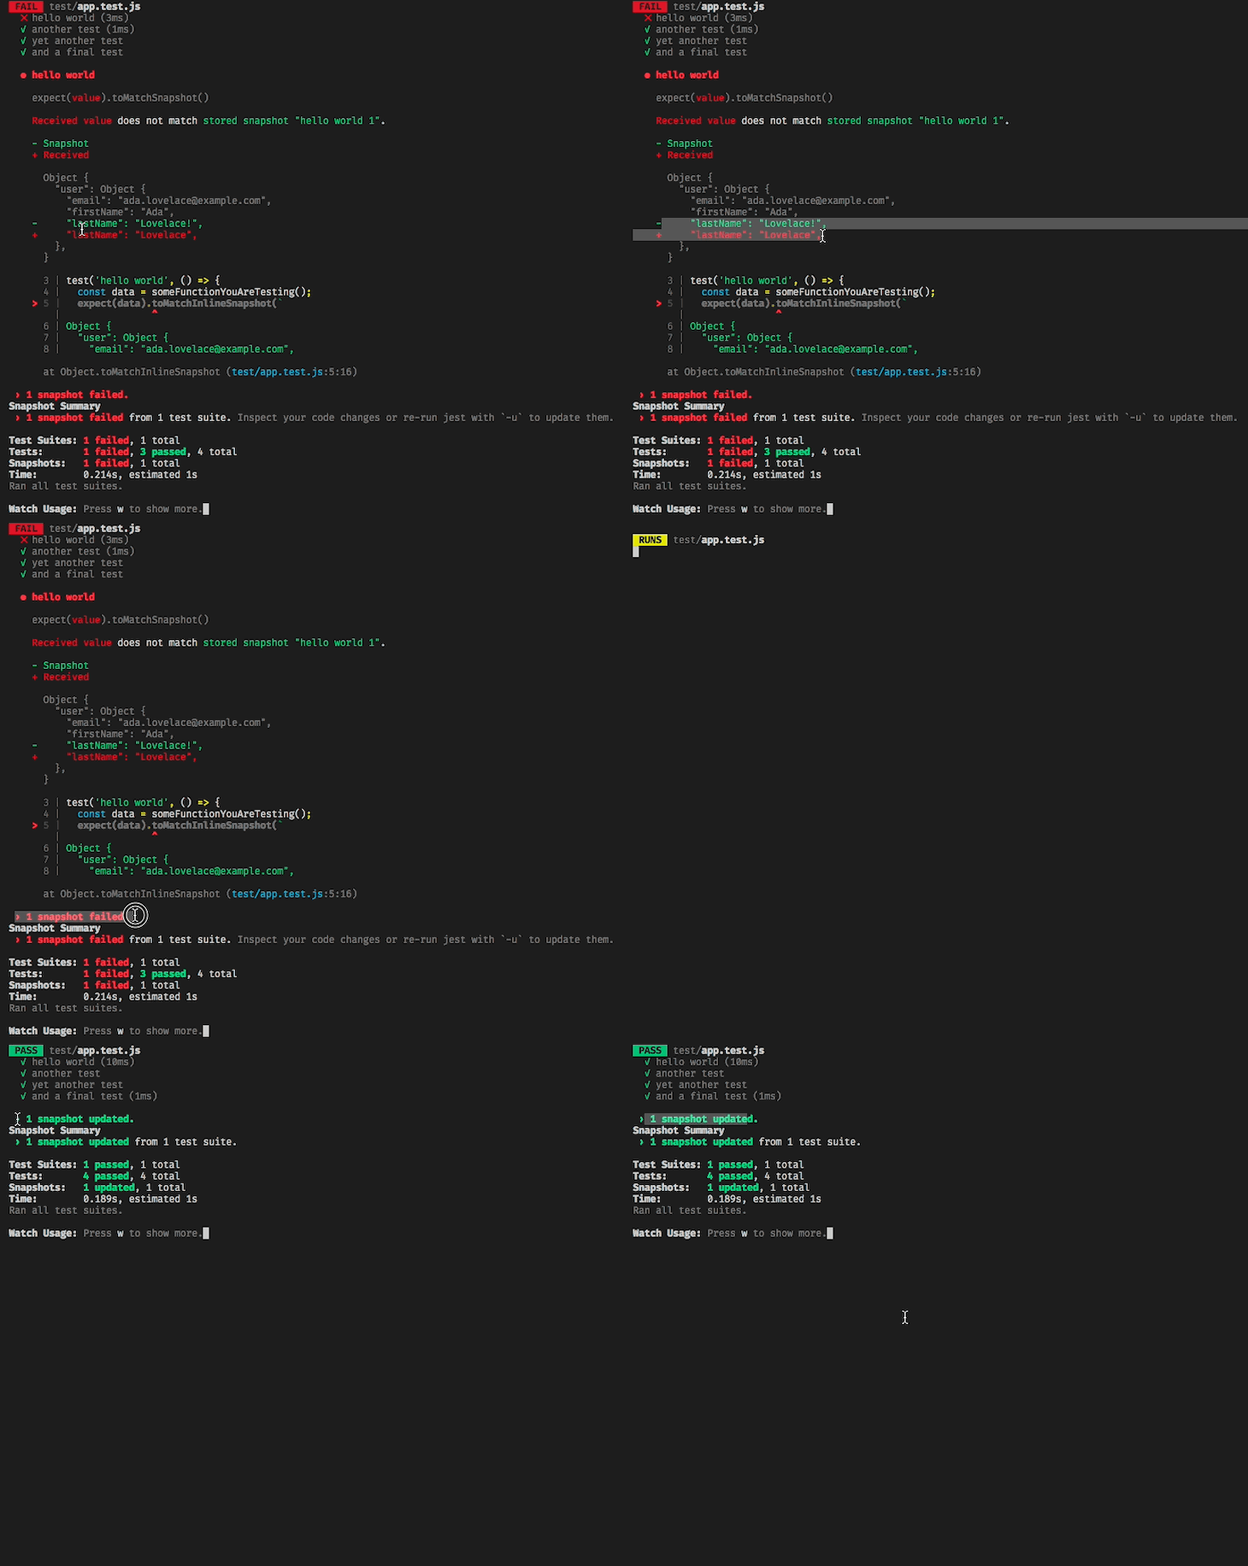
The snapshot is not there yet. The first time you run the test, Jest will accept the data structure and instead of storing it in a snapshot file it will put it in your code.
It will change your testing code, resulting in something like this:
const { someFunctionYouAreTesting } = require("../src/app");
test("hello world", () => {
  const data = someFunctionYouAreTesting();
  expect(data).toMatchInlineSnapshot(`
Object {
  "user": Object {
    "email": "[email protected]",
    "firstName": "Ada",
    "lastName": "Lovelace",
  },
}
`);
});
If the code doesn’t change automatically for you, try reopening the file in your code editor and the changes will be present right there!
This blows my mind, and I love it. A development tool seamlessly changing your code is a simple and elegant solution that would be super useful in other scenarios. Imagine having a React/Angular/Vue development mode where you can visually edit components in the browser and the code is updated for you to match those changes.
By the way, if the test is not small enough to use inline snapshots, you can still get some help. If you use VSCode with this extension you can see an option to view your snapshot. You can also use this extension to automatically run your test, and it provides you with some great IntelliSense entries so that your test development is smooth.
In the beginning, I thought the interactive mode was just a fancy term for the typical watch feature that many CLI applications have. But then I learned a few things.
Jest integrates with Git and Mercurial. By default, the watch mode will run only the tests affected by the changes made since the last commit. This is cool and makes me write more atomic commits, too. If you are wondering how Jest knows what tests are affected by commit changes, you are not alone.
The first thing Jest does is load the tests and thus load the source code of your application, parsing the requires() and imports to generate a graph of interdependencies.
But using Git or Mercurial is not the only thing you can do to limit the number of tests to run every time. When I make changes to the source code and I see many failed tests, I focus on the simplest test that fails. You can do that by using test.only, but there’s a better way (I especially don’t like test.only or test.skip because it’s easy to forget about it and leave it in your code).
The “interactive way” is more elegant and convenient. Without editing your test code you can limit the tests to run in different ways. Let’s take a look.
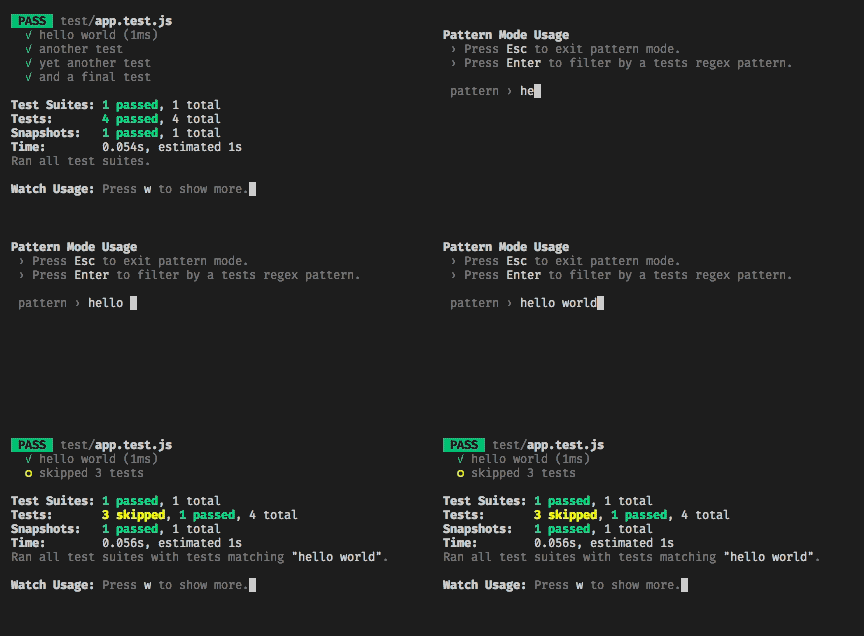
The simplest one is by hitting t and entering the name of the test. If you have test hello world, click t, write hello world, and hit enter.

Well, that works in most cases, if you have a test (hello world 2), it will run, too, because you entered a regular expression. To avoid this, I usually add $ at the end of the pattern.
In projects where there are many integration tests that hit the database, I found that running the tests was still slow. Why?
Filtering by test name does not prevent all of the before() and after() callbacks to be run in all of the other tests. And usually, in integration tests, those callbacks are where you put heavy stuff like opening and closing connections to the database.
So, in order to prevent that I usually also filter by file name. Just hit p (for path) and enter the filename that contains the test. You’ll find that the test runs a lot faster now (to return just click t and clean the filter by hitting enter. Do the same with the filter for file names with p and enter).
Another super handy feature is upgrading. If you see that the new snapshot is fine and the old one is outdated, just hit u (for upgrade) and the snapshot will be overwritten!

Two more useful options are a to run all the tests and f to run the failed tests again.
Another thing that I like is that Jest is a “batteries included” framework, meaning you usually don’t have to add plugins or libraries to add common functionality to it. It just ships with it!
Some examples:
Add coverage when invoking Jest to get coverage reports from your tests with the ability to choose between a few built-in reporters or custom ones. You can even set a coverage threshold so your tests (and your CI) fails if that threshold is not met. This is perfect for keeping up a good test coverage in your code.
Add notify and you’ll receive desktop notifications when the test runner finishes. If you have thousands of tests, they can take a while to finish. You’ll save time just by adding this flag.
You don’t need to add an assertion library to your project in order to start writing powerful and useful assertions. You have an extensive expect functionality already built in and ready to be used with interesting functionality, such as the colored diffing that we also saw in the snapshot functionality.
You don’t need a library to mock functions or services. You have plenty of utilities to mock functions and modules and check how they were invoked.
You don’t need to import any of the Jest features. All the functions you use in your Jest tests need not be imported, as they are made imported by Jest automatically, so you can start writing tests with ease without worrying about importing functions.
With the rise of new VSCode extensions every day, development and testing has become easier than ever. Now you can use different VSCode extensions to run Jest tests without running a command on the terminal.
The Jest extension on the VSCode marketplace has a lot of features to make testing easier. You can:
Despite what many may think, Jest is not just a test runner—it is a complete testing framework that has brought testing to another level. It’s powerful but easy to use, so give it a try. I promise you won’t regret it.
Install LogRocket via npm or script tag. LogRocket.init() must be called client-side, not
server-side
$ npm i --save logrocket

// Code:

import LogRocket from 'logrocket';
LogRocket.init('app/id');
// Add to your HTML:

<script src="https://cdn.lr-ingest.com/LogRocket.min.js"></script>
<script>window.LogRocket && window.LogRocket.init('app/id');</script>

React Server Components and the Next.js App Router enable streaming and smaller client bundles, but only when used correctly. This article explores six common mistakes that block streaming, bloat hydration, and create stale UI in production.

Gil Fink (SparXis CEO) joins PodRocket to break down today’s most common web rendering patterns: SSR, CSR, static rednering, and islands/resumability.

@container scroll-state: Replace JS scroll listeners nowCSS @container scroll-state lets you build sticky headers, snapping carousels, and scroll indicators without JavaScript. Here’s how to replace scroll listeners with clean, declarative state queries.

Explore 10 Web APIs that replace common JavaScript libraries and reduce npm dependencies, bundle size, and performance overhead.
Would you be interested in joining LogRocket's developer community?
Join LogRocket’s Content Advisory Board. You’ll help inform the type of content we create and get access to exclusive meetups, social accreditation, and swag.
Sign up now
One Reply to "Jest testing: Top features and how to use them"
Good post
There is a tool who can help automate testing JSON data
http://www.jestify.me
try it