Editor’s note: This post was updated on 14 March 2024 by Timonwa Akintokun to discuss updates to the Google Maps API and the features they make possible in React apps, as well as to demonstrate an additional, more complex example of how to integrate Google Maps with React. Additionally, a new section was added comparing google-map-react to other, similar libraries. It was previously reviewed and updated on 5 November 2021.

There’s a quote from British science-fiction writer Arthur Charles Clarke that goes, “Any sufficiently advanced technology is indistinguishable from magic.” We might take it for granted, but Google Maps is a modern miracle in many respects.
The possibilities that Google Maps allows for are endless and can provide real value to your business and users. From showing your office location to showing a route a package delivery will take, Google Maps is flexible and powerful enough to handle a wide variety of use cases.
In this tutorial, we’ll see a simple example of how to integrate Google Maps into a React project. However, we’ll start by discussing why you might want to do so and some advanced Google Maps features you can use. If you prefer, you can jump ahead to our tutorial — make sure to check out the demo project’s source code as well.
There are a number of reasons why you may choose to integrate Google Maps into your React app. We’ll be taking a look at one of the most popular ones: displaying your business address. You can then use this as a base for other, more complex cases if you desire.
Because of how incredibly powerful and complex Google Maps is, we’ll need the aptly named google-map-react package to help us integrate it into our React app.
This package is a component written over a small set of the Google Maps API that allows you to render any React component on a Google Map. It’s actively maintained and simple enough to use that it is my go-to for integrating Google Maps in a React project.
Before we start building, let’s discuss some reasons why you may want to put Google Maps on your website or web app:
This is just a small list of features made possible by the Google Maps API, and you may have other business requirements. The google-map-react team has provided a list of examples you can go through in case you require something a bit more advanced.
Google Maps API offers a variety of features that can enhance the functionality and user experience of React applications. Let’s explore some of these features with real-life examples of how they can be used in React applications:
For this guide, we’ll build a contact page that contains a map displaying the address of the business, as this is the most common use case I’ve encountered.
If you would like to code along with me, you’ll need the following:
I have set up a sample repository that you can clone to follow along. Run the following command to clone the repo to your local machine:
git clone https://github.com/Timonwa/google-maps-with-react.git
After cloning, run npm install to install all the project dependencies, then run npm run start to open the project in a new tab. You should see a sample contact page without Google Maps integrated. In the rest of the tutorial, we’ll create a React component to hold the Google Map and embed it into the contact page.
As for the Google Maps API key, you can get one for free by following the instructions on the Google Maps documentation. Note that you will need to set up a billing account to get rid of the limitations and watermark that comes with it.
Once you have all these ready, we can start building. The final version of what we’ll be building looks like this:
To reiterate, I will not go through all the code for the contact page, as this article is focused mainly on integrating Google Map into a React project. Here are the steps we’re going to follow:
Map.jsx React component to hold the mapLocationPin.jsx React component to mark the address on the mapMap.jsx componentRun the command below to create a new file in the /components folder:
mkdir src/components/map && touch src/components/map/Map.jsx
Inside this file, we’ll write the code for the map component and the address pin. Before we start writing any code, though, we have to install the google-map-react package by running the following command:
yarn add google-map-react
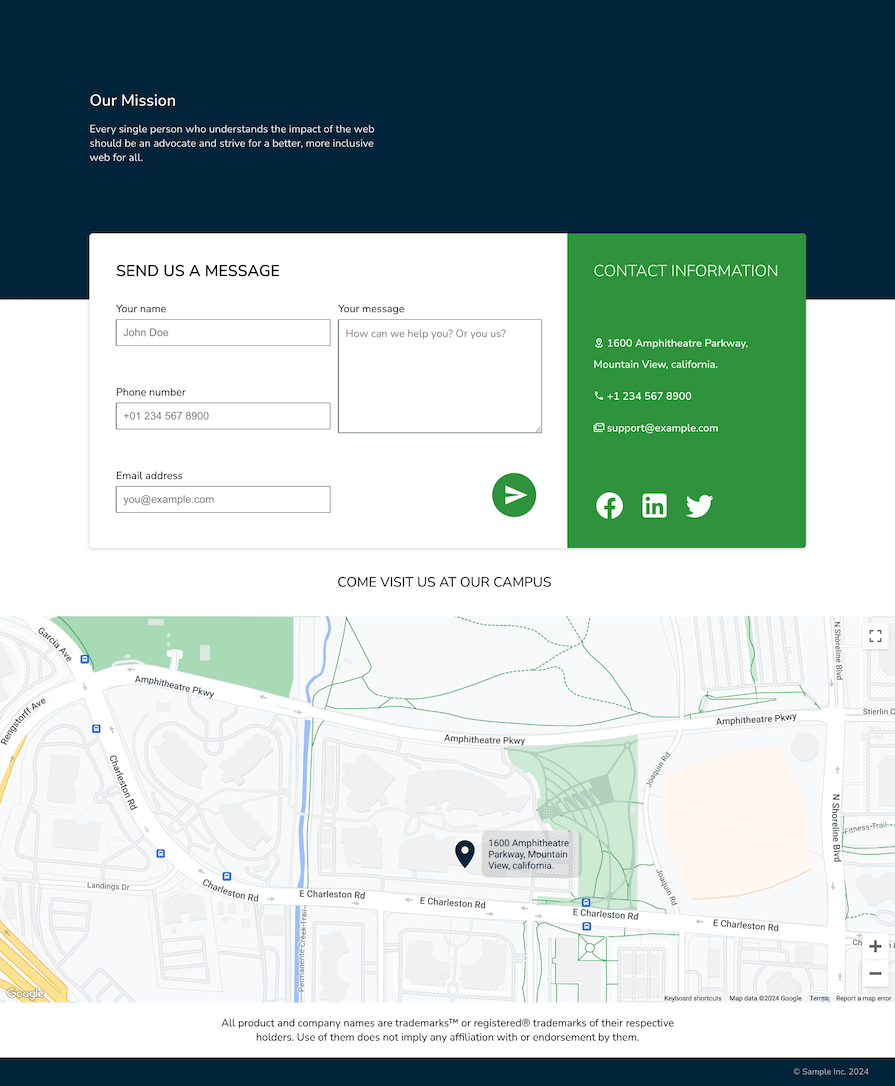
After installing the package, we’ll also need the coordinates of our business address. You can obtain this information with a quick Google search for the longitude and latitude values of your business address. I’m using Google’s Amphitheatre address, so I did a quick search and got the following values:
const location = {
  address: "1600 Amphitheatre Parkway, Mountain View, california.",
  lat: 37.42216,
  lng: -122.08427,
};
The values will be different for your address, of course. Store the values in the object as shown above, and we pass these values to the Map component so we can render a pin on the map. So, to recap, you’ll need the following data:
google-map-react installedBecause we have all this data, we can start building out the Map component. If you want to see the final code, you can check out the add-map branch of the repo you cloned earlier, otherwise, continue with the tutorial to learn how to build it yourself.
Still inside the src/components/map/Map.jsx file, import React, the google-map-package, and the corresponding CSS, like so:
import React from "react";
import GoogleMapReact from "google-map-react";
import "./map.css";
You can get the contents of the map.css file from the repo.
Create a new Map component:
const Map = () => {
  return (
    <div className="map">
      <h2 className="map-h2">Come Visit Us At Our Campus</h2>
      <div className="google-map">
        <GoogleMapReact
          bootstrapURLKeys={{ key: "YOUR_API_KEY" }}
          defaultCenter={location}
          defaultZoom={17}>
          <LocationPin
            lat={location.lat}
            lng={location.lng}
            text={location.address}
          />
        </GoogleMapReact>
      </div>
    </div>
  );
};
Can you guess what the location prop is? It’s the object we created earlier that holds the address, latitude, and longitude values of the location. The defaultZoom is an integer from 0–20 that determines the scale of the map when rendered on the screen.
You’ll notice that the GoogleMapReact component takes in a child, LocationPin, but do note that it can take in any number of children. LocationPin will render the text prop on top of the map at the location we specify with the lat and lng props. We’ll create this component in the next section.
Now let’s examine the props being passed to the GoogleMapReact component to understand what each one does:
bootstrapURLKeys is an object that holds the API key you copied from your Google Console. You can hardcode the key here, but that approach is not recommended for code that gets committed to GitHub or is otherwise publicly accessible. You can check out this discussion on how to secure your API keys on the clientdefaultCenter is simply the center of the map when it loads for the first timedefaultZoom defines the initial scale of the mapThis alone is enough to render a barebones map on the screen, but we need to do something else before we can render this component. We need to write the code for LocationPin and include our address to the code.
LocationPin componentThe LocationPin component can mark wherever we want on the map:
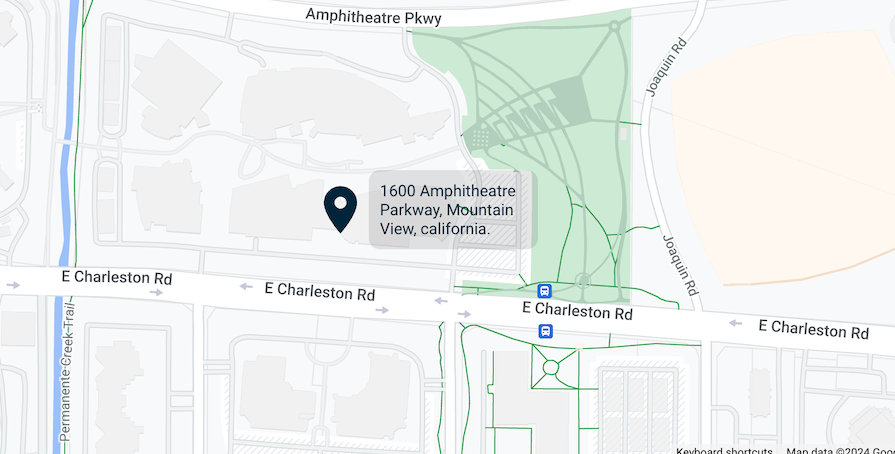
We want a way to call users’ attention to a specific location on the map. Since google-map-react allows us to render any React component on the map, we can create a simple component that displays a pin icon and text.
For the icon, I’ll be using the Iconify library, which is a collection of free SVG icons. Still inside the same file we’ve been working in, import the following packages into the Map.jsx component like so:
import { Icon } from "@iconify/react";
import locationIcon from "@iconify/icons-mdi/map-marker";
Then go ahead and define the LocationPin component above the Map component like so:
const location = {
  address: "1600 Amphitheatre Parkway, Mountain View, california.",
  lat: 37.42216,
  lng: -122.08427,
};

const LocationPin = ({ text }) => (
  <div className="pin">
    <Icon icon={locationIcon} className="pin-icon" />
    <p className="pin-text">{text}</p>
  </div>
);

const Map = () => {
...
};
I’m sure this component is pretty self-explanatory. Note that the styling for LocationPin is already included in map.css, but you can style it however you like.
We’re actually done with this tutorial. All we need to do now is export the Map component and include it on the contact page. At the bottom of the file, export the Map component:
export default Map;
Map componentBecause the Map component is just a React component, we can go ahead and use it anywhere we like. Open src/App.jsx, import the Map component, and include it between ContactSection and DisclaimerSection, like so:
import React from "react";
import "./App.css";
import IntroSection from "./components/intro/Intro";
import ContactSection from "./components/contact-section/ContactSection";
import DisclaimerSection from "./components/disclaimer/Disclaimer";
import FooterSection from "./components/footer/Footer";
import Map from "./components/map/Map";

function App() {
  return (
    <div className="App">
      <IntroSection />
      <ContactSection />
      <Map />
      <DisclaimerSection />
      <FooterSection />
    </div>
  );
}

export default App;
Now start the project by running yarn start in your terminal and navigate to localhost:3000. You should see your contact page with a nice-looking map that pinpoints your business address. Pretty nifty, right?
In scenarios where a business operates from multiple locations, you might want to showcase all addresses on the map. This can be done seamlessly by transforming the location from a single-object format to an array of objects, each representing a distinct address:
const location = [
  {
    address: "Address 1",
    lat: 59.955413,
    lng: 30.337844,
  },
  {
    address: "Address 2",
    lat: 59.724465,
    lng: 30.0801211,
  },
];
To showcase these multiple addresses on the map, adjust the LocationPin component to iterate through the array and display individual pins for each location:
<GoogleMapReact
  bootstrapURLKeys={{ key: "YOUR_API_KEY" }}
  defaultCenter={location[0]}
  defaultZoom={9}>
  {location.map((loc) => (
    <LocationPin lat={loc.lat} lng={loc.lng} text={loc.address} />
  ))}
</GoogleMapReact>
Introducing the key attribute within the LocationPin component ensures that each address is uniquely identified. Additionally, the defaultZoom has been adjusted to provide an optimal view that includes all listed addresses simultaneously on the screen, improving the user experience:
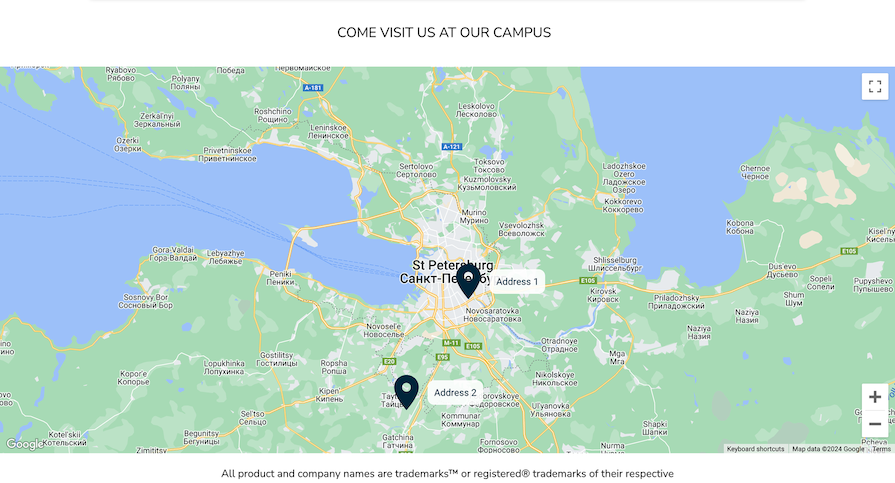
You can view the code in the multi-address branch of the repo.
Developers have several libraries to choose from when integrating Google Maps into React applications. Let’s explore some popular alternatives:
react-google-maps library. It is assumably the most popular among developers and also offers a wide range of features. With its growing popularity, this library is a reliable option for developersThe table below should provide a helpful overview of each library and the features they offer:
| google-map-react | react-google-maps | react-google-maps/api | @vis.gl/react-google-maps | google-maps-react | |
|---|---|---|---|---|---|
| Weekly downloads | 297,290 | 159,044 | 535,427 | 40,421 | 70,966 |
| Last updated | May 2023 | January 2018 | February 2024 | March 2024 | June 2022 |
| Stars | 6.3K | 4.6K | 1.7K | Under 500 | 1.6K |
| Display maps | ✅ | ✅ | ✅ | ✅ | ✅ |
| Display markers | ✅ | ✅ | ✅ | ✅ | ✅ |
| Has autocomplete | ✅ | ✅ | ✅ | ✅ | ✅ |
| Display clusters | ✅ | ✅ | ✅ | ✅ | ✅ |
| Display polylines | ❌ | ✅ | ✅ | ✅ | ✅ |
| Display polygons | ❌ | ✅ | ✅ | ✅ | ✅ |
| Display directions | ❌ | ✅ | ❌ | ✅ | ❌ |
| Display heat maps | ✅ | ✅ | ❌ | ❌ | ✅ |
| Drawing tool | ❌ | ✅ | ✅ | ✅ | ❌ |
| Different map styles | ❌ | ✅ | ✅ | ✅ | ❌ |
| Synchronised maps | ❌ | ❌ | ❌ | ✅ | ❌ |
The table above clearly shows the features each npm package offers. If you are building a map that requires only basic functionalities, using google-map-react is your best bet. But if you need more complex features, you can go for @vis.gl/react-google-maps or react-google-maps/api.
While react-google-maps and google-maps-react are still being used today and have strong community support, if using a package that is still being actively maintained is crucial to you, then the other alternatives are your best options.
Combining Google Maps with React allows developers to add more features to their applications, such as showing addresses, tracking packages, and providing real-time updates. This partnership can improve user engagement by offering additional options, like advanced search, dynamic routes, measuring distance, and using augmented reality.
In essence, integrating Google Maps with React empowers developers to create practical and engaging applications. There are more examples in their documentation for more use cases. I hope this tutorial was helpful to you, and happy coding ❤.
Install LogRocket via npm or script tag. LogRocket.init() must be called client-side, not
server-side
$ npm i --save logrocket

// Code:

import LogRocket from 'logrocket';
LogRocket.init('app/id');
// Add to your HTML:

<script src="https://cdn.lr-ingest.com/LogRocket.min.js"></script>
<script>window.LogRocket && window.LogRocket.init('app/id');</script>

Learn how to build smooth staggered animations in CSS using modern features like sibling-index(), complete with practical examples, fallbacks, and accessibility tips.

Compare the top AI development tools and models of July 2026. View updated rankings, feature breakdowns, and find the best fit for you.

Learn how to detect unused and ghost dependencies in JavaScript projects using Knip, a project-level linter that keeps your dependency graph accurate.

Learn how Storybook MCP enables AI agents to understand your component library, generate accurate UI, and validate code using documentation, stories, and automated tests.
Would you be interested in joining LogRocket's developer community?
Join LogRocket’s Content Advisory Board. You’ll help inform the type of content we create and get access to exclusive meetups, social accreditation, and swag.
Sign up now
