Many of us have probably gotten sucked into particularly captivating videos and posts on social media and don’t want to stop scrolling. When the media algorithm starts recommending less fascinating posts, your best option is likely to swipe to pull down the screen, which initiates a gesture that retrieves new suggested data or posts. If this doesn’t capture your attention, you may repeat the process in some cases until the algorithm meets your satisfaction.

The gesture that initiates the retrieval of your next entertaining post is pull-to-refresh, which we will be discussing throughout the article.
Jump ahead:
The Replay is a weekly newsletter for dev and engineering leaders.
Delivered once a week, it's your curated guide to the most important conversations around frontend dev, emerging AI tools, and the state of modern software.
When the user drags from the top of the page, a loader should appear and should only be visible a bit below the top screen at this point. This entire action indicates to the user that new data is being retrieved.
When the user lets go of the drag triggered by their touch, the loader disappears and at the same time, new data should appear in the feed. At the end of the article, we should have something resembling the GIF below:
This action is carried out by dragging the page’s top, and if there is a fresh update, it displays just immediately. Swiping or pulling makes it easy to retrieve info; this action was created by Loren Brichter in the Tweetie app in 2008, and it quickly became popular like anything excellent would.
Numerous smartphone apps use the pull-to-refresh gesture, which isn’t relatively new. They do so for the following reasons:
The overscroll CSS attribute determines what a browser does when it approaches either the bottom or the top edge of a scrolling zone. By default, the mobile browser tends to refresh a page when the top of the page is reached. In most cases, as a developer intending to implement a custom pull-to-refresh, this default behavior is not desirable, so you can employ the use of overscroll behaviors to override the browser’s default pull-to-refresh gesture.
The code below is a general implementation of overscroll behavior from the MDN docs:
/* Keyword values */
overscroll-behavior: auto; /* default */
overscroll-behavior: contain;
overscroll-behavior: none;

/* Two values */
overscroll-behavior: auto contain;

/* Global values */
overscroll-behavior: inherit;
overscroll-behavior: initial;
overscroll-behavior: revert;
overscroll-behavior: revert-layer;
overscroll-behavior: unset;
To override the browser’s inbuilt pull-to-refresh gesture in our quest to build our own, we’ll use the overscroll-behavior: contain; property. However, because we are aiming for the vertical edge of our scrolling region, the overscroll-behavior in our case will be overscroll-behavior-y: contain.
To use this, we will give the universal selector the overscroll-behavior-y: contain property in our index.css file, and that will be all:
* {
  overscroll-behavior-y: contain;
}
The reason we invest a lot of time in development is to ensure that our end users are completely satisfied. The pull-to-refresh gesture is intended to remain consistent throughout. Although there may be a demand for uniqueness in the animation and SVG style, the pull-to-refresh gesture itself should allow users to refresh whenever they feel the need to do so.
This article will focus on the implementation of custom pull-to-refresh gestures with React and overscroll behavior in CSS. The custom pull-to-refresh gesture should be something that appears at the top of our mobile browser and should only be visible when the user scrolls past the page borders.
You must satisfy these requirements to follow this article properly:
To get our development area up and running, open up your terminal and run the commands:
cd Desktop
npx create-react-app pull-to-refresh
npm start
To install Tailwind, follow these steps from the documentation. At this point, our application should be up and running, and you should clear the app.js file for a clean start.
To be able to implement the pull-to-refresh gesture, we must first acknowledge that this gesture will not be complete until there is first a touch; then a swipe downward, which is the drag; then an end to the drag. These actions are implemented with what we’ll refer to as EventListeners, which will be called whenever an action is delivered to the browser window.
There are a couple of different EventListeners, but only three will get the job done. Those three are:
touchstarttouchmovetouchendtouchstart is only going to trigger when it senses the first touch. touchmove will trigger when the touch is followed by a move or drag. Lastly, touchend will trigger when there are no more touches registered in the window/on screen.
The useEffect Hook will be responsible for adding and removing our event listeners. After importing useEffect(), we can copy and paste the code below into our App.js file:
// add and remove event listeners
  useEffect(() => {
    window.addEventListener("touchstart", pullStart);
    window.addEventListener("touchmove", pull);
    window.addEventListener("touchend", endPull);
    return () => {
      window.removeEventListener("touchstart", pullStart);
      window.removeEventListener("touchmove", pull);
      window.removeEventListener("touchend", endPull);
    };
  });
Since we are dealing with a pull gesture, there will inevitably be a touch to trigger the pull gesture. Therefore, our first concern is to have a state to store the user’s first touch towards the top of the screen.
startPoint and pullChangeFirst things first, we will set the startPoint, which is a state to hold the startPoint’s screenY value when the user’s initial touch is registered.
To create the state, we will need to first import useState() and declare a state using the Hook.
  /**
    state to hold the start point
  */
    const [startPoint, setStartPoint] = useState(0);
The next thing we’ll do is create a state that will calculate how far the user has pulled the screen down — this will be the state that holds the change from the start point to the current point. The pull change will be equivalent to current point - start point; hence, we will refer to this state as the pullChange. The current point is where the user has been able to drag from the startPoint.
/**
   *
    state to hold the change in the start point and current point
    the pull change is equivalent to current point - start point
  */
  const [pullChange, setPullChange] = useState();
We will then need a ref to target the .Refresh-container element in the DOM. We can implement this by first importing useRef() from React and declaring it, as seen below:
 /**
    ref to target the `.refresh-container` element in the DOM
   */
    const refreshCont = useRef(0);
We also need a function to initialize loading and force the page to refresh within a second. This is the right time to create the function called initLoading, which adds the .loading class to the refresh container element to signify the loading state. We’ll also need a setTimeout function, which will reload the page after 1000ms.
const initLoading = () => {
  refreshCont.current.classList.add("loading");
  setTimeout(() => {
    window.location.reload();
  }, 1000);
};
Now, we need a function to listen to the start point state and handle our touchstart event. We will call this function pullStart. This function gets the start point of the user touch gesture and the pull start, which only runs the first time you touch the screen — so the function is very useful for getting the start position.
const pullStart = (e) => {
  const { screenY } = e.targetTouches[0];
  setStartPoint(screenY);
};
As seen in the useEffect() Hook above, the pull function will run when your finger moves on the screen. As you move from the top down to the middle of the screen, it calculates the difference between the current position and the starting position and saves it to our pullChange function.
const pull = (e) => {
  /**
   * get the current user touch event data
   */
  const touch = e.targetTouches[0];
  /**
   * get the touch position on the screen's Y axis
   */
  const { screenY } = touch;
  /**
   * The length of the pull
   *
   * if the start touch position is lesser than the current touch position, calculate the difference, which gives the `pullLength`
   *
   * This tells us how much the user has pulled
   */
  let pullLength = startPoint < screenY ? Math.abs(screenY - startPoint) : 0;
  setPullChange(pullLength);
  console.log({ screenY, startPoint, pullLength, pullChange });
};
As seen in useEffect above, endPull is a function that runs at the end of the touch gesture.
, endPull = (e) => {
  setStartPoint(0);
  setPullChange(0);
  if (pullChange > 220) initLoading();
};

// function to reset the refresh button and start the loading by running the `initLoading()` function when `pullChange` has passed a certain threshold
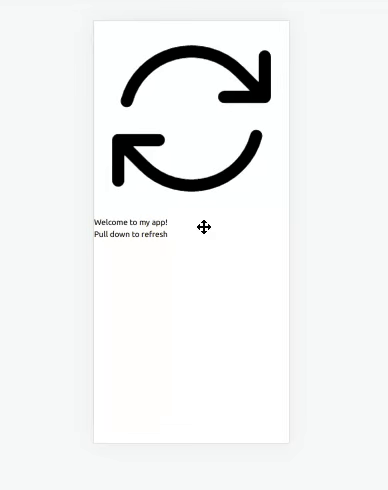
Below, we styled the DOM with Tailwind. We have our ref in the div container, our margin-top will be assigned to pullChange(), and it is divided by an arbitrary value, which makes the drag slower than normal.
The margin-top is responsible for pushing our refresh container down. In our SVG, we also have our spinner. After styling our spinner, we see that the rotate function goes along with pullChange: the spinner rotates as it is being pulled, and by the time it is released, it will add the .loading class.
//Before Tailwind
<div
ref={refreshCont}
className=""
style={{ marginTop: pullChange / 3.118 || "" }}
>
<div className="">
<svg
xmlns="http://www.w3.org/2000/svg"
fill="none"
viewBox="0 0 24 24"
strokeWidth={1.5}
stroke="currentColor"
className=""
style={{ transform: `rotate(${pullChange}deg)` }}
>
<path
strokeLinecap="round"
strokeLinejoin="round"
d="M16.023 9.348h4.992v-.001M2.985 19.644v-4.992m0 0h4.992m-4.993 0l3.181 3.183a8.25 8.25 0 0013.803-3.7M4.031 9.865a8.25 8.25 0 0113.803-3.7l3.181 3.182m0-4.991v4.99"
/>
</svg>
</div>
</div>
<div className="">
<header className="">
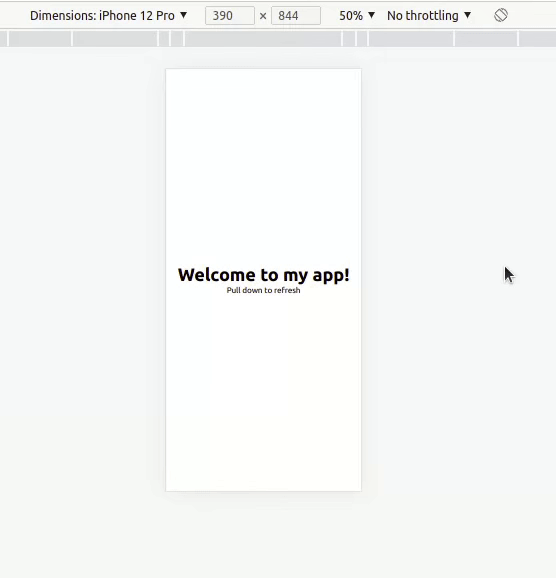
<h1 className="">Welcome to my app!</h1>
<p>Pull down to refresh</p>
</header>
</div>
//After Tailwind
<div
ref={refreshCont}
className="refresh-container w-fit -mt-10 m-auto"
style={{ marginTop: pullChange / 3.118 || "" }}
>
<div className="refresh-icon p-2 rounded-full">
  <svg
    xmlns="http://www.w3.org/2000/svg"
    fill="none"
    viewBox="0 0 24 24"
    strokeWidth={1.5}
    stroke="currentColor"
    className="w-6 h-6"
    style={{ transform: `rotate(${pullChange}deg)` }}
  >
    <path
      strokeLinecap="round"
      strokeLinejoin="round"
      d="M16.023 9.348h4.992v-.001M2.985 19.644v-4.992m0 0h4.992m-4.993 0l3.181 3.183a8.25 8.25 0 0013.803-3.7M4.031 9.865a8.25 8.25 0 0113.803-3.7l3.181 3.182m0-4.991v4.99"
    />
  </svg>
</div>
</div>
<div className="body flex justify-center items-center min-h-screen">
<header className="flex flex-col text-center">
  <h1 className="text-4xl font-bold">Welcome to my app!</h1>
  <p>Pull down to refresh</p>
</header>
</div>
If every step was carefully and consciously followed, we should arrive at a result that looks just like the GIF below:
The gesture is crucial because it adds to the long list of features that let users interact fully with an application. In this tutorial, we went over how to implement pull-to-refresh step by step; it was a quick, seamless process that resulted in a job well done. I’d like to take this opportunity to express my gratitude for sticking with me this far.
Install LogRocket via npm or script tag. LogRocket.init() must be called client-side, not
server-side
$ npm i --save logrocket

// Code:

import LogRocket from 'logrocket';
LogRocket.init('app/id');
// Add to your HTML:

<script src="https://cdn.lr-ingest.com/LogRocket.min.js"></script>
<script>window.LogRocket && window.LogRocket.init('app/id');</script>

I had four weeks to build a complete app from scratch using AI tools like OpenCode and Claude Opus: here’s how it went.
Learn how to build a reusable Vue 3 table engine that powers tables, cards, and lists with shared sorting and pagination logic.
Compare the best React chart libraries for 2026, including Recharts, Nivo, visx, Apache ECharts, MUI X Charts, and more.

Claude Code vs. OpenCode in a real Next.js refactor: benchmark results, mistakes, prompts, and when to use each CLI agent.
Hey there, want to help make our blog better?
Join LogRocket’s Content Advisory Board. You’ll help inform the type of content we create and get access to exclusive meetups, social accreditation, and swag.
Sign up now

