If you’ve ever wondered about implementing 2D or 3D graphics on the web, this tutorial is for you. As the title says, we’ll be implementing a WebAssembly WebGL viewer.

We’ll write a small Rust program that uses WebGL to render a triangle, compile it down to WebAssembly, and then run the program in the browser using JavaScript. By the end of this tutorial, you should understand how to:
You can find the source code for this entire post on my GitHub. Let’s get started!
Jump ahead:
To get the most out of this tutorial, you should already be familiar with the concepts below. However, beginners can also follow along as we’ll be explaining all the concepts as we go along:
.wasm filewasm-packBefore we dive deep, it’s essential to understand that Rust is capable of compiling directly into WebAssembly via the LLVM compiler infrastructure. This process gives Rust the advantages of efficiency and memory safety and is why a lot of developers prefer Rust for graphically or computationally heavy operations like 3D graphics.
An invaluable tool in this process is wasm-bindgen. It’s both a library and a tool that makes the interaction between Rust and JavaScript a breeze. You’ll find wasm-bindgen is indispensable for facilitating high-level interactions between these two languages.
Now, let’s get our hands dirty. We’ll start by writing a simple function in Rust. This can be as straightforward as a function that adds two numbers. Once we have our function ready, we’ll use wasm-pack — another vital tool for rusting to WebAssembly — to compile this function into a .wasm file.
Rename src/main.rs to src/lib.rs, as this is required for libraries. Replace the content with the following:
use wasm_bindgen::prelude::*;

#[wasm_bindgen]
pub fn add(a: i32, b: i32) -> i32 {
    a + b
}
We can compile this function to WebAssembly with the following command:
wasm-pack build --target web
The result is a /pkg folder that contains a bunch of files including a .wasm file that contains our Rust function, compiled and ready for use in the web environment.
You can explore the contents of the other files, especially the .js one, to see how your Rust functions and variables are converted to JavaScript. But how do we actually use this .js file?
The beauty of WebAssembly is that we can load and execute this file directly like a regular JavaScript file. We’ll explore how to do this in detail in the following sections, so stick around.
First things first, we need to set up our development environment. To do this, follow these steps:
wasm-pack by running this command in your terminal. It is an essential tool for building Rust programs that compile into WebAssemblycargo new webassembly-webgl-viewer or clone the tutorial project here and open it in your preferred code editorcargo.toml to indicate that we’re building a dynamic system libraryOpen the cargo.toml file in the project and add the following lines:
...rest of cargo.toml

[lib]
crate-type = ["cdylib"]

[dependencies]
wasm-bindgen = "0.2.86"
js-sys = "0.3"
[dependencies.web-sys]
version = "0.3"
features = [
  'Document',
  'Window',
  'HtmlCanvasElement' ,
  'WebGlRenderingContext',
  'WebGl2RenderingContext',
  'WebGlProgram',
  'WebGlShader',
  'WebGlBuffer',
  'WebGlUniformLocation'
]
Let’s break down the above:
[lib] section with crate-type = ["cdylib"] specifies that the output of the crate will be a dynamic system library (compatible with C)[dependencies] section includes the wasm-bindgen and web-sys crates. The wasm-bindgen crate is a library that facilitates high-level interactions between Rust and JavaScript, and the web-sys crate provides bindings for all Web APIs including WebGLfeatures field under web-sys enables specific Web API functionalities needed for your project. In this case, we’re enabling all the features that will let us render a 2D triangle in an HTML canvasBefore we run the generated .js file we created in the above section, let’s dive into the world of graphics and WebGL for a bit.
Imagine an artist’s canvas: the artist uses this canvas to create beautiful images. Similarly, in the world of WebGL, we have a “canvas,” and this canvas is what we call a “rendering context.” This context gives us a drawable region where we can start to create our 2D and 3D graphics.
WebGL, at its core, relies heavily on something called shaders. In the graphics world, shaders are small but powerful programs that run on a graphics processing unit (GPU). These shaders are tasked with calculating rendering effects, which influence the final visuals you see on the screen.
You can think of shaders like the directors of a play: they’re in charge of telling everyone (in this case, each pixel on your screen) what to do.
In WebGL, there are two main types of shaders:
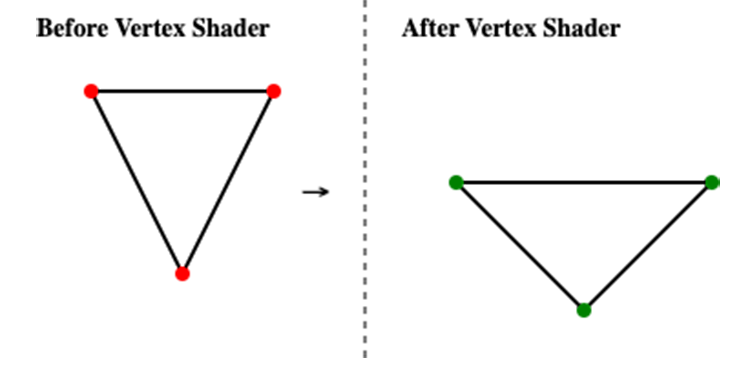

Together, these shaders work in tandem to draw and color both 2D and 3D objects on your screen.
Now that we understand the two critical concepts of WebGL, rendering context and shaders, it’s time for some action! We’re going to dive into writing our very first WebGL program.
Let’s start by tweaking our Rust function in src/lib.rs to accept and use a WebGL rendering context. With Rust’s type safety and the wasm-bindgen library, we can ensure that our operations are both safe and efficient.
Replace the content in src/lib.rs with the following:
use wasm_bindgen::prelude::*;
use wasm_bindgen::JsCast;
use web_sys::{WebGlRenderingContext, WebGlShader, WebGlProgram};
extern crate js_sys;

pub fn init_webgl_context(canvas_id: &str) -> Result<WebGlRenderingContext, JsValue> {
    let document = web_sys::window().unwrap().document().unwrap();
    let canvas = document.get_element_by_id(canvas_id).unwrap();
    let canvas: web_sys::HtmlCanvasElement = canvas.dyn_into::<web_sys::HtmlCanvasElement>()?;
    let gl: WebGlRenderingContext = canvas
        .get_context("webgl")?
        .unwrap()
        .dyn_into::<WebGlRenderingContext>()
        .unwrap();

    gl.viewport(
        0,
        0,
        canvas.width().try_into().unwrap(),
        canvas.height().try_into().unwrap(),
    );

    Ok(gl)
}
Take some time to go through each line of code here to really understand what we’re doing. Let’s go through it line by line:
use statements to tell Rust which packages, methods, and types we’ll be using in the rest of the fileinit_webgl_context function that accepts a canvas_id argument. This function uses this argument as well as the web_sys library to create an HTML document context and canvas to setup a gl WebGL instanceNow that we have our WebGL context set up, it’s time to bring our canvas to life by creating and manipulating 3D objects.
Firstly, let’s set up our shaders. We’ll need both a vertex shader and a fragment shader. As we discussed above, the vertex shader will handle our object’s vertices, while the fragment shader will manage the color of the pixels between the vertices.
For simplicity, let’s say our vertex shader just passes through the position and our fragment shader uses a uniform variable for color.
In the src/lib.rs file, create the below function after the init_webgl_context function:
pub fn create_shader(
    gl: &WebGlRenderingContext,
    shader_type: u32,
    source: &str,
) -> Result<WebGlShader, JsValue> {
    let shader = gl
        .create_shader(shader_type)
        .ok_or_else(|| JsValue::from_str("Unable to create shader object"))?;

    gl.shader_source(&shader, source);
    gl.compile_shader(&shader);

    if gl
        .get_shader_parameter(&shader, WebGlRenderingContext::COMPILE_STATUS)
        .as_bool()
        .unwrap_or(false)
    {
        Ok(shader)
    } else {
        Err(JsValue::from_str(
            &gl.get_shader_info_log(&shader)
                .unwrap_or_else(|| "Unknown error creating shader".into()),
        ))
    }
}
Take some time to go through the code and/or read the breakdown below:
create_shader takes three parameters:
gl: the WebGL contextshader_type: the type of shader we want to createsource: the source code of the shadergl.create_shader. If the creation fails (returns None), we return an error message using JsValue::from_strgl.shader_source and compile it using gl.compile_shaderget_shader_parameter and WebGlRenderingContext::COMPILE_STATUS. If it is true, the shader compiled successfully, so we return the shader objectgl.get_shader_info_log; if the log is empty, we return a generic error message. Otherwise, we return the shader info log as an error message using JsValue::from_strWe will use this create_shader function to set up the shaders in the next section. Next, create a new function that takes in a WebGL rendering context as the only argument and paste in the following like so:
pub fn setup_shaders(gl: &WebGlRenderingContext) -> Result<WebGlProgram, JsValue> {
    let vertex_shader_source = "
        attribute vec3 coordinates;
        void main(void) {
            gl_Position = vec4(coordinates, 1.0);
        }
        ";

    let fragment_shader_source = "
        precision mediump float;
        uniform vec4 fragColor;
        void main(void) {
            gl_FragColor = fragColor;
        }
        ";

    let vertex_shader = create_shader(
        &gl,
        WebGlRenderingContext::VERTEX_SHADER,
        vertex_shader_source,
    )
    .unwrap();
    let fragment_shader = create_shader(
        &gl,
        WebGlRenderingContext::FRAGMENT_SHADER,
        fragment_shader_source,
    )
    .unwrap();

    let shader_program = gl.create_program().unwrap();
    gl.attach_shader(&shader_program, &vertex_shader);
    gl.attach_shader(&shader_program, &fragment_shader);
    gl.link_program(&shader_program);

    if gl
        .get_program_parameter(&shader_program, WebGlRenderingContext::LINK_STATUS)
        .as_bool()
        .unwrap_or(false)
    {
        gl.use_program(Some(&shader_program));
        Ok(shader_program)
    } else {
        return Err(JsValue::from_str(
            &gl.get_program_info_log(&shader_program)
                .unwrap_or_else(|| "Unknown error linking program".into()),
        ));
    }
}
Again, take some time to go through the code and/or read the breakdown below. Or, if you’d prefer, skip to the next section:
setup_shaders is defined and accepts a reference to a WebGlRenderingContext (representing the WebGL context we are drawing onto) and returns a Result type with either a WebGlProgram or a JsValue (used for error handling)vertex_shader_source and fragment_shader_source) are defined. These contain the GLSL (OpenGL Shading Language) source code for the vertex and fragment shaders, respectivelycoordinates, and sets the position (gl_Position) of the vertex to be these coordinates with a w component of 1.0gl_FragColor) to be the value of the uniform fragColorcreate_shader function is called twice to create the vertex and fragment shaders, passing in the WebGlRenderingContext, the shader type, and the source codegl.link_programget_program_parameter), it is set as the active program for the WebGL context using gl.use_program, and the function returns Ok(shader_program). If there’s an error, a JsValue containing the error message is returnedSo, essentially, this function creates a WebGL program, attaches the vertex and fragment shader to it, checks for any errors, and then returns the created program (or an error message).
Now that we have a function to set up our shaders, we need to set up the vertices for the triangles. These are basically mappings in 3D space that correspond to where we want the triangle to appear.
Add a new function and paste in the following below:
pub fn setup_vertices(gl: &WebGlRenderingContext, vertices: &[f32], shader_program: &WebGlProgram) {
    let vertices_array = unsafe { js_sys::Float32Array::view(&vertices) };
    let vertex_buffer = gl.create_buffer().unwrap();

    gl.bind_buffer(WebGlRenderingContext::ARRAY_BUFFER, Some(&vertex_buffer));
    gl.buffer_data_with_array_buffer_view(
        WebGlRenderingContext::ARRAY_BUFFER,
        &vertices_array,
        WebGlRenderingContext::STATIC_DRAW,
    );

    let coordinates_location = gl.get_attrib_location(&shader_program, "coordinates");

    gl.bind_buffer(WebGlRenderingContext::ARRAY_BUFFER, Some(&vertex_buffer));
    gl.vertex_attrib_pointer_with_i32(
        coordinates_location as u32,
        3,
        WebGlRenderingContext::FLOAT,
        false,
        0,
        0,
    );
    gl.enable_vertex_attrib_array(coordinates_location as u32);
}
Again, take some time to go through the code and/or read the breakdown below:
setup_vertices is given two things to work with:
gl, which is like the toolbox for doing anything with WebGLvertices_array is created from the vertices list. This is a kind of format WebGL likes for the data it’s going to use — the unsafe part just means we’re doing some stuff that’s a bit risky because it messes with computer memory directlyvertex_buffer, which is like a temporary storage space to put data that WebGL will use.coordinates attribute in our shader program, which tells WebGL how to interpret the vertices data (like knowing whether a number represents an x, y, or z coordinate)gl.enable_vertex_attrib_arrayIn simple terms, this function takes a list of points that form a shape, puts them in a format and place that WebGL can use, and then sets up WebGL to read and use that data when it’s drawing the shape.
In our case, we’ll use this to draw a triangle in our next and final function. Create a new function draw_triangle and paste in the following:
#[wasm_bindgen]
pub fn draw_triangle(
    canvas_id: &str,
    selected_color: Option<Vec<f32>>,
) -> Result<WebGlRenderingContext, JsValue> {
    let gl: WebGlRenderingContext = init_webgl_context(canvas_id).unwrap();
    let shader_program: WebGlProgram = setup_shaders(&gl).unwrap();
    let vertices: [f32; 9] = [
        0.0, 1.0, 0.0, // top
        -1.0, -1.0, 0.0, // bottom left
        1.0, -1.0, 0.0, // bottom right
    ];

    setup_vertices(&gl, &vertices, &shader_program);

    let color = selected_color.unwrap_or(vec![1.0, 0.0, 0.0, 1.0]);
    let color_location = gl
        .get_uniform_location(&shader_program, "fragColor")
        .unwrap();
    gl.uniform4fv_with_f32_array(Some(&color_location), &color);

    gl.draw_arrays(
        WebGlRenderingContext::TRIANGLES,
        0,
        (vertices.len() / 3) as i32,
    );

    Ok(gl)
}
Like before, take some time to go through the code and/or go through the breakdown below:
draw_triangle has two parameters:
canvas_id: The ID of the HTML canvas where we want to drawselected_color: An optional list of numbers representing the color we want to draw the triangleinit_webgl_context using the given canvas ID and call setup_shaders to set up our shader programvertices array defines three points, each of which has three values: x, y, z, for our triangle. The coordinates are defined as a triangle with the top point centered on the y-axis and the base sitting on the x-axissetup_vertices function to prepare our vertices in the way WebGL likes itfragColor uniform in our shader program, which defines the color of our shape in the fragment shader. We then tell WebGL to use our chosen color when drawingdraw_arrays function! We tell WebGL we’re drawing triangles, to start at the first vertex, and divide the total length by three because each vertex is defined by three valuesIn simpler terms, this function grabs our drawing tools, decides on the points and color of a triangle, sets those up for WebGL, then tells WebGL to draw the triangle on our canvas.
Notice that this function has the comment #[wasm_bindgen] above it. This is to tell wasm-bindgen that we would like this function exposed in the generated JavaScript bindings so we can call this function in the browser.
We now have everything ready. Compile the program, and then we can move on to working in the browser. Run the following command to build your project:
wasm-pack build --target web
It’s finally time to render the triangle in the browser. We will do this by using the generated JavaScript bindings from wasm-pack. However, we need some scaffolding first so let’s go ahead and create one.
Create a web folder in the root of the project by running:
mkdir web
Then, create an index.html, a style.css, and a main.js file by running:
touch web/index.html web/style.css web/main.js
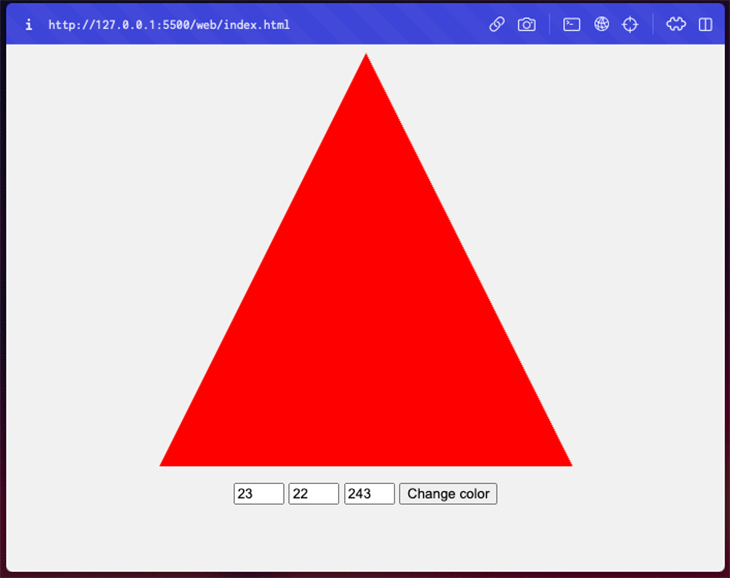
Open the index.html file and paste in the contents from the HTML file linked here. Note that the file already has a canvas setup, form included, and scripts linked. Optionally, you can open the style.css file and paste in the contents from the CSS file linked here.
Then, open the main.js file. With our scaffolding setup, we can go ahead and paste in the following in the main.js file:
import init, { draw_triangle } from "../pkg/webassembly_webgl_viewer.js";

const CANVAS_ID = "triangle";

async function run() {
  await init();
  const color = [1.0, 0.0, 0.0, 1.0];
  draw_triangle(CANVAS_ID, color);
}

run();

const colorChangerForm = document.getElementById("color-changer");
colorChangerForm.addEventListener("submit", (e) => {
  e.preventDefault();

  const color = [
    clampRGBValue(e.target.elements.red.value),
    clampRGBValue(e.target.elements.green.value),
    clampRGBValue(e.target.elements.blue.value),
    1.0,
  ];

  draw_triangle(CANVAS_ID, color);
});

function clampRGBValue(value) {
  return parseFloat((parseFloat(value) / 255 || 0).toFixed(2));
}
As before, let’s go through the code above:
init helper function to help us set up WebGL and a draw_triangle function to actually draw the triangle on the canvas. These are coming from the generated wasm-pack bindingsCANVAS_ID variable to hold the ID of the HTML canvas (check the index.html to see where we set it)init and calls our draw_triangle function with a default red color. We call this run function in the very next linedraw_triangle function with the submitted color valuesNow, you can open the index.html file in the browser and see the triangle. Try changing the color!
You can view the source code for the completed version on my GitHub.
Congratulations if you made it to the end of this tutorial! It was a long one, but hopefully you were able to follow along and learn something new.
We’ve barely scratched what we can do with WebGL and Rust, though. Here are some ways you can think about how to take this even further:
If you’d like to spend more time with this code, take a look at the full project on my GitHub.
Debugging Rust applications can be difficult, especially when users experience issues that are hard to reproduce. If you’re interested in monitoring and tracking the performance of your Rust apps, automatically surfacing errors, and tracking slow network requests and load time, try LogRocket.
LogRocket lets you replay user sessions, eliminating guesswork around why bugs happen by showing exactly what users experienced. It captures console logs, errors, network requests, and pixel-perfect DOM recordings — compatible with all frameworks.
LogRocket's Galileo AI watches sessions for you, instantly identifying and explaining user struggles with automated monitoring of your entire product experience.

Modernize how you debug your Rust apps — start monitoring for free.

Learn how to protect full-stack projects from NPM supply chain attacks with a practical security checklist.

Explore 15 essential MCP servers for web developers to enhance AI workflows with tools, data, and automation.

Learn how contrast-color() automatically picks accessible text colors using native CSS, without JavaScript.

Learn how to build a harness-style AI workflow using Claude Code with specialized Dev, QE, and Ops subagents, gated handoffs, MCP telemetry, and LEARNING.md.
Would you be interested in joining LogRocket's developer community?
Join LogRocket’s Content Advisory Board. You’ll help inform the type of content we create and get access to exclusive meetups, social accreditation, and swag.
Sign up now

