From the moment the application starts to the very time the user exits the app, their experience determines whether or not they’ll return to the app, or interact with it further — so a good user experience really cannot be overemphasized. If there are glitches, unwanted delays, uneven flow, or any number of more frustrating issues, you can as well know you’ve lost a user that month.

One significant contribution to a great user experience is choosing and implementing loading indicators. Loading indicators and their effects build up a healthy anticipation (as long as it’s not too long) for your application’s content.
For instance, when a user logs in to the application, if there is no on-screen change after the user clicks the Login button, the user might assume that there is a glitch somewhere and may keep re-tapping the button. If relevant checks are not in place, the user may make too many requests and put the app under unneeded stress, so it might eventually crash.
That’s just one out of several use cases in which indicators can be a convenient tool. In this post, we’ll discuss how to implement shimmer effects, a special kind of loading indicator. Let’s dive in!
Shimmer effects are loading indicators used when fetching data from a data source that can either be local or remote. It paints a view that may be similar to the actual data to be rendered on the screen when the data is available.

Instead of the usual CircularProgressIndicator or LinearProgressIndicator, shimmer effects present a more aesthetically pleasing view to the user and in some cases helps build up some anticipation of the data before it’s rendered on the screen.
In the sample app we’ll build, we’ll fetch character data from a Rick and Morty API and display it in our app. While fetching the data, the shimmer effect will display. Let’s get to it.
Let’s start by creating a new Flutter project.
flutter create shimmer_effect_app
Import the following dependencies and dev dependencies we need in the app in our pubspec.yaml file:
GET request to the Rick and Morty API to get the list of characters and their datadependencies: cupertino_icons: ^1.0.2 flutter: sdk: flutter http: ^0.13.4 shimmer: ^2.0.0 stacked: ^2.2.7+1 dev_dependencies: flutter_lints: ^1.0.0 flutter_test: sdk: flutter build_runner: ^2.1.5 stacked_generator: ^0.5.6
In the lib directory, create a folder named utils. This folder will contain one file, our api_constants.dart file, which is the endpoint to get characters from the API. This file makes it easier to call the getCharacters endpoint across the entire codebase without having to declare it in every file. Ours is a tiny app, but it’s much better to have clean reusable code at all times.
class ApiConstants {
 static const scheme = 'https';
 static const host = 'rickandmortyapi.com';
 static get getCharacters =>
   Uri(host: host, scheme: scheme, path: '/api/character/');
}
Next up is creating the model classes. We will create two model classes. The first one is the CharacterResponseModel, which gets the response from the endpoint and sorts it into info and the actual data. The second one is the CharacterModel, which will hold the details of each character.
We only need two pieces of information for each character in the app: the name and the species of each of the characters.
Below is the CharacterResponseModel:
class CharacterResponseModel {
 //The InfoModel class which holds additional information e.g total number of characters, next, previous pages etc
 Info? info;
 //The CharacterModel class which holds the actual data/results
 List<CharacterModel>? results;
 CharacterResponseModel({this.info, this.results});

 //The fromJson method, which takes the JSON response, checks if the results are not null and then loops through the values, creating a List of CharacterModels.
 CharacterResponseModel.fromJson(Map<String, dynamic> json) {
  info = json['info'] != null ? Info.fromJson(json['info']) : null;
  if (json['results'] != null) {
   results = [];
   json['results'].forEach((v) {
    results!.add(CharacterModel.fromJson(v));
   });
  }
 }
 //The toJson method which creates a map from the given CharacterModel details
 Map<String, dynamic> toJson() {
  final Map<String, dynamic> data = {};
  if (info != null) {
   data['info'] = info!.toJson();
  }
  if (results != null) {
   data['results'] = results!.map((v) => v.toJson()).toList();
  }
  return data;
 }
}
And here is the CharacterModel:
class CharacterModel {
 String? name;
 String? species;
 CharacterModel({
  this.name,
  this.species,
 });
 //The fromJson method which takes the JSON response and creates a CharacterModel from it
 CharacterModel.fromJson(Map<String, dynamic> json) {
  name = json['name'];
  species = json['species'];
 }
 Map<String, dynamic> toJson() {
  final Map<String, dynamic> data = {};
  data['name'] = name;
  data['species'] = species;
  return data;
 }
}
Lastly, we have the InfoModel:
//Handles general information on the response from the endpoint
class Info {
 int? count;
 int? pages;
 String? next;
 String? prev;
 Info({this.count, this.pages, this.next, this.prev});
 Info.fromJson(Map<String, dynamic> json) {
  count = json['count'];
  pages = json['pages'];
  next = json['next'];
  prev = json['prev'];
 }
 Map<String, dynamic> toJson() {
  final Map<String, dynamic> data = {};
  data['count'] = count;
  data['pages'] = pages;
  data['next'] = next;
  data['prev'] = prev;
  return data;
 }
}
Next is to set up the service responsible for fetching the list of characters and their data. Let’s call it DashboardService. It will contain just one method, the getCharactersDetails() method.
Import the http package, the dart convert file (which grants us access to the json.decode and json.encode functions from dart, the character_model file and the api_constants file. Next is to create the getCharactersDetails method,
//Import the necessary packages
import 'dart:convert';
import 'package:http/http.dart' as http;
import 'package:shimmer_effect_app/models/character_model.dart';
import 'package:shimmer_effect_app/utils/api_constant.dart';

class DashboardService {
 //Creating the getCharacterDetails method
 Future<List<CharacterModel>?> getCharactersDetails() async {}
}
In the getCharactersDetails method, we call the getCharacters API endpoint using the HTTP package and fetch the data. This data is then passed to the CharacterResponseModel.fromJson() method, and then we return the result.
 Future<List<CharacterModel>?> getCharactersDetails() async {

  // Make the call to the getCharacters endpoint of the Rick and Morty's API
  final response = await http.get(ApiConstants.getCharacters);

  // pass the response to the fromJson method of the CharacterResponseModel and access the results data in it
  final charactersList =
    CharacterResponseModel.fromJson(json.decode(response.body)).results;

  // return the list of characters gotten from the CharacterResponseModel
  return charactersList;
 }
In the lib directory, create a folder named UI. Create a new folder named home in this folder and add two files: the home_view.dart and home_viewmodel.dart files.
We’ll perform a basic setup in the next steps and fully flesh them out a bit later.
In the home_viewmodel.dart file, create a new class named HomeViewModel. This class extends the BaseViewModel from the stacked package.
class HomeViewModel extends BaseViewModel{}
In the home_view.dart file, create a stateless widget and name it HomeView; this file will hold all UI-related code for the homepage. This widget returns the ViewModelBuilder.reactive() constructor from the stacked package that links/bind the view to its ViewModel.
class HomeView extends StatelessWidget {
 const HomeView({Key? key}) : super(key: key);
 @override
 Widget build(BuildContext context) {
  return ViewModelBuilder<HomeViewModel>.reactive(
    viewModelBuilder: () => HomeViewModel(),
    builder: (context, viewModel, child) {
     return Scaffold();
    });
 }
}
We won’t put anything here yet, as we need to set up a locator and register the dependencies we’ll be using in the ViewModel. Let’s move directly to that.
In the lib directory, create a new folder named app. In this folder, create a new file named app.dart. This is where we’ll register the views and services we’ll be using.
First, create a new class named AppSetup and annotate it with the @StackedApp annotation. It takes in two parameters, routes and dependencies. We pass the HomeView and DashboardService to the routes and dependencies, respectively.
import 'package:shimmer_effect_app/services/dashboard_services.dart';
import 'package:shimmer_effect_app/ui/home/home_view.dart';
import 'package:stacked/stacked_annotations.dart';

@StackedApp(
 routes: [
  AdaptiveRoute(page: HomeView, initial: true),
 ],
 dependencies: [
  LazySingleton(classType: DashboardService),
 ],
)
class AppSetup {}
>
Next, run the Flutter command to generate the files.
flutter pub run build_runner build --delete-conflicting-outputs
This command generates the app.locator.dart and app.router.dart files, which will handle the dependencies and routing.
Back to the HomeViewModel file, create a getCharacters method. This method will reach out to the dashboard and get the list of CharacterModels from it. We then assign this list to the charactersList, which was created initially as an empty list. We then make use of the locator to access the DashboardService.
class HomeViewModel extends BaseViewModel {

 // This gives us access to the DashboardService using the locator
 final _dashboardService = locator<DashboardService>();

 // This is the list, initially empty, but would contain the List of CharacterModels after the getCharacter function runs.
 List<CharacterModel>? charactersList = [];

 Future<void> getCharacters() async {
 // We assign the result from the call to the dashboardService to the charactersList which can then be displayed in the HomeView
 // The runBusyFuture here would set the entire ViewModel to a busy state until the call finishes, this is pretty handy as it helps us display the shimmer while the call to get the data is still ongoing
  charactersList =
    await runBusyFuture(_dashboardService.getCharactersDetails());
 }

}
With that, we have the ViewModel all set up and ready to go.
HomeViewNext is fully setting up the view. We’ll create a base view for this app that displays the shimmer when the ViewModel is busy — i.e., fetching the data — and then displays a list of cards when it’s done and the data is ready.
The shimmer package gives us access to two constructors:
Shimmer() constructor:
 Shimmer(
  // The gradient controls the colours of the Shimmer effect, which would be painted over the child widget
  gradient: gradient,
  child: child,
 )
Shimmer.fromColors():
Shimmer.fromColors(
 // The baseColor and highlightColor creates a LinearGradient which would be painted over the child widget
  baseColor: baseColor,
  highlightColor: highlightColor,
  child: child,
 )
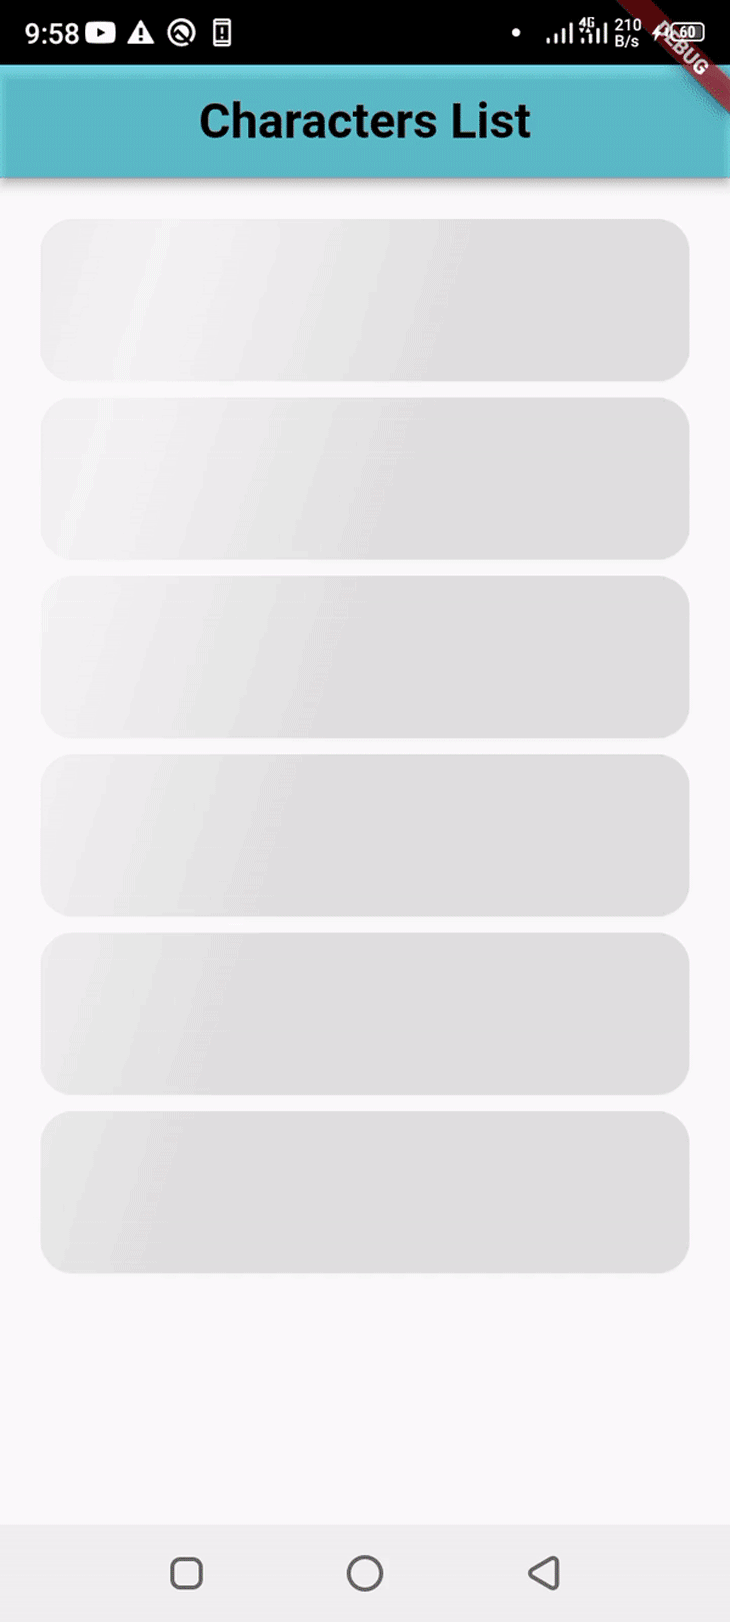
In our sample app, we will be using the Shimmer.fromColors() constructor. While the V``iewModel is busy fetching the data, we’ll display a card widget, over which the shimmer effect will be implemented. It’s a placeholder and has no children in it. When the ViewModel finishes loading, we’ll display a card of a similar size with the actual data.
Expanded(
// First we check if the ViewModel is busy (isBusy :) definitely) and display the Shimmer
  child: viewModel.isBusy
    ? Shimmer.fromColors(
      baseColor: Colors.grey[300]!,
      highlightColor: Colors.grey[100]!,
      child: ListView.builder(
       itemCount: 6,
       itemBuilder: (context, index) {
        return Card(
         elevation: 1.0,
         shape: RoundedRectangleBorder(
          borderRadius: BorderRadius.circular(16),
         ),
         child: const SizedBox(height: 80),
        );
       },
      ),
     )
    : ListView.builder(
      itemCount: viewModel.charactersList!.length,
      itemBuilder: (context, index) {
       return Card(
         elevation: 1.0,
         // This is just a little play with colors changing the colors everytime the app is refreshed or restarted :)
         color: Colors.primaries[Random()
               .nextInt(Colors.primaries.length)]
             .withOpacity(0.5),
         shape: RoundedRectangleBorder(
            borderRadius: BorderRadius.circular(16),
           ),
         child: Container()
       );
      },
     ),
 )
You can check out the complete code for the HomeView here.
main.dart fileIn the main.dart file, we will add the setupLocator function from the app.locator.dart generated file, a navigator key from the stacked_services package, and the onGenerate route from the app.router.dart file, ultimately linking the app from start to finish.
import 'package:flutter/material.dart';
import 'package:shimmer_effect_app/app/app.locator.dart';
import 'package:shimmer_effect_app/app/app.router.dart';
import 'package:stacked_services/stacked_services.dart';
void main() {
 WidgetsFlutterBinding.ensureInitialized();
 setupLocator();
 runApp(const MyApp());
}
class MyApp extends StatelessWidget {
 const MyApp({Key? key}) : super(key: key);
 @override
 Widget build(BuildContext context) {
  return MaterialApp(
   title: 'Material App',
   onGenerateRoute: StackedRouter().onGenerateRoute,
   navigatorKey: StackedService.navigatorKey,
  );
 }
}
Yes! We are done. We’ve successfully set up a shimmer effect over the application. Looks cool, yeah? Definitely! You’ve increased the overall user experience of your app. You can implement this in your applications, improving your app’s aesthetic look and feel.
Check out the complete source code for the sample app. If you have any questions or inquiries, feel free to reach out to me on Twitter: @Blazebrain or LinkedIn: @Blazebrain.
Install LogRocket via npm or script tag. LogRocket.init() must be called client-side, not
server-side
$ npm i --save logrocket

// Code:

import LogRocket from 'logrocket';
LogRocket.init('app/id');
// Add to your HTML:

<script src="https://cdn.lr-ingest.com/LogRocket.min.js"></script>
<script>window.LogRocket && window.LogRocket.init('app/id');</script>

We built the same app in TanStack Start RSC and Next.js RSC. TanStack shipped 40% less JS and built 4x faster — but Next.js is still the safer production bet.

From RSC vulnerabilities and the Vercel breach to TypeScript 7.0 Beta and AI agents — the nine frontend storylines that defined H1 2026, ranked.

AI tools generate working React code fast, but miss race conditions, empty states, debouncing, and accessibility. Here’s how to catch bugs before production.

Learn how to use Gemini CLI subagents to delegate frontend, backend, testing, and docs tasks to specialized agents with guardrails and clear ownership.
Hey there, want to help make our blog better?
Join LogRocket’s Content Advisory Board. You’ll help inform the type of content we create and get access to exclusive meetups, social accreditation, and swag.
Sign up now

