If you’ve developed any React application with a decent level of complexity in the recent past, you probably already understand how state management can pretty quickly become a major concern. The native tools provided by React, like useState and useContext, turn out to be inadequate when trying to implement common design patterns, like a central, shared state that is consumed and updated by several components.

Redux is the most popular library that helped to solve this problem; it had a great run for several years, and, to overcome the minor gaps that it had, a great ecosystem grew around it in the form of libraries like Reselect and Redux-Saga. More recently, other alternatives like MobX, Zustand, and Jotai have gained popularity. In this article, we’ll learn about Signia, a state management library that uses signals to solve the same problems.
Jump ahead:
As mentioned in the announcement blog post by the tldraw team, “Signia is an original library for working with fine-grained reactive values, called signals, using a new lazy reactivity model based on logical clocks”.
In simpler terms, Signia uses primitives called signals for state management, which can efficiently calculate computed values by performing incremental calculations. In addition, with the help of internal clocks that provide support for the rollback of the entire transaction, they can implement the concept of transactions if required.
Although the core library is framework agnostic, the tldraw team has also released a set of React bindings that make integrating Signia into a React application a breeze.
Let’s first understand what a signal is conceptually before getting into Signia’s functionality. According to the official documentation, “a signal is a value that changes over time and whose change events can trigger side effects”. In other words, a signal is a pure, reactive value that can be observed for changes. It is then the responsibility of the signal’s library to observe these changes, notify the subscribers, and trigger the required side effects.
In theory, signals are somewhat similar to the concept of observables provided by the RxJS library, but with a few fundamental differences. One of them is the need to create a subscription and pass a callback function to access the value of the observable.
Let’s review a few concepts that are necessary to understand Signia.
An Atom in Signia represents the signals that correspond to the root state, i.e., the source of truth for your app. Its value can be read and updated as well as built upon to create computed values.
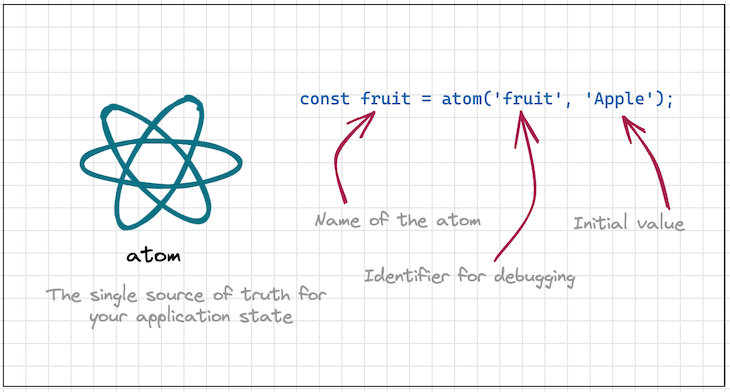
To create an Atom, the Signia library provides the atom function:
import { atom } from 'signia'
const fruit = atom('fruit', 'Apple');
The code above creates a signal called fruit with the value of Apple. We also pass fruit as the first argument to the atom function because it is helpful for debugging purposes.
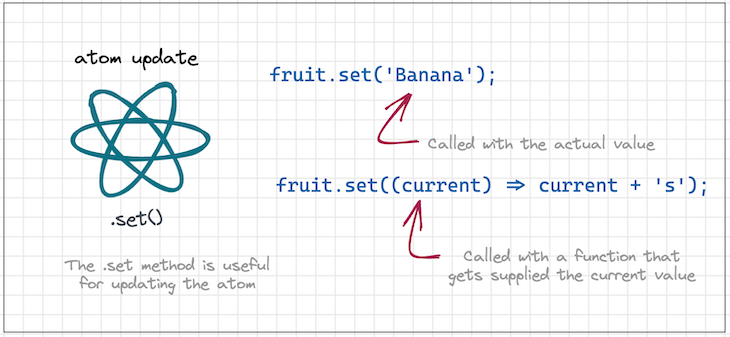
To update an Atom, we use the set function as follows:
fruit.set('Banana');
console.log(fruit.value); // Banana
fruit.set((current) => current + 's');
console.log(fruit.value); // Bananas
Similar to the React setState function, there is an alternate version of set that accepts a function as the argument. It then calls that function with the current value of the signal and computes the updated value.
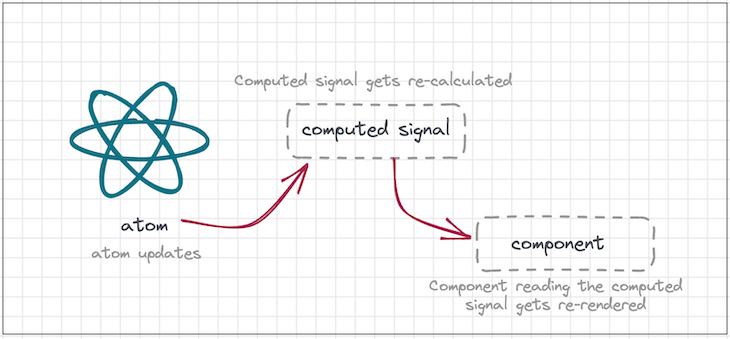
Computed signals are derived from Atoms and therefore have a dependency on them; their values are recomputed whenever the Atoms they depend on change.
You can create a computed signal using the computed function as follows:
import { computed, atom } from 'signia'
const fruits = atom('fruits', 'Apples')
const numberOf = atom('numberOf', 10)
const display = computed('display', () => {
    return `${numberOf.value} ${fruits.value}`
})
console.log(display.value) // 10 Apples
There is no direct way to update a computed signal. But, updating any of its root atoms will automatically update the computed signal:
fruits.set('Bananas')
console.log(display.value) // 10 Bananas
As shown above, the value of the computed signal is updated to reflect the latest value set on the fruit‘s root atom.
The code examples we’ve reviewed so far are generic, using the Signia core library. But, as mentioned earlier, the tldraw team has also released a set of React bindings that make it easier to integrate Signia into a React application. The official React bindings are shipped in two packages, namely, signia-react and signia-react-jsx.
signia-react provides Hooks like useAtom and useComputed, which help with managing local state in a React component.signia-react also provides utilities like track and useValue, which you can use to provide reactivity to components but aren’t required if you’re using the signia-react-jsx library.
signia-react-jsx provides configuration options that cause all functional components to become tracked and reactive. It also unpacks every signal, so we don’t need to wrap a signal inside of useValue. Now, let’s create a React to-do list app using Signia for its state management.
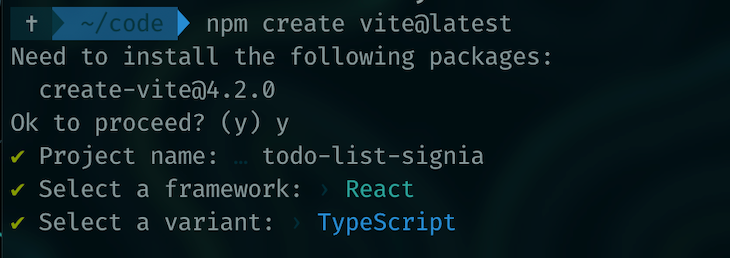
Signia has out-of-the-box support for Vite, so we’ll use Vite as our bundler. To create a new Vite project, run the following command:
npm create vite@latest
When the interface comes up, provide a name for the new project, select React as the framework, and select TypeScript as the language. When the project is created, you should see something similar to the following:
We need to work in the directory where our project is created, which is the todo-list-signia directory in our case.
Now, let’s install the Signia-specific libraries:
npm install --save signia-react signia-react-jsx
We’ll set up reactivity for our components so that we don’t need to manually wrap each component in a track function. To set this up, we open the tsconfig.json file in our newly created boilerplate Vite project and add the following code to the compilerOptions object:
"compilerOptions": {
  "jsx": "react-jsx",
  "jsxImportSource": "signia-react-jsx"
}
Now, we can start working with Signia in our boilerplate.
Let’s also install a component library called Chakra UI, which we’ll use to build our UI components, making them look clean and organized. To install Chakra UI and its peer dependencies, run the following command:
npm i @chakra-ui/react @emotion/react @emotion/styled framer-motion react-icons
Make the following changes in App.tsx:
import { ChakraProvider } from '@chakra-ui/react'
function App() {
  return (
   <ChakraProvider>
      <div className="App">
        <Heading>Testing Vite!</Heading>
        <Button colorScheme='blue'>Button</Button>
      </div>
    </ChakraProvider>
  )
}
Next, we run the local dev server using the command below:
npm run dev
We can see that the app is up and running on localhost, showing the following:

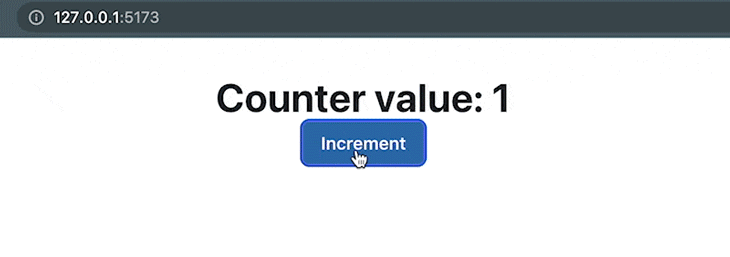
Before creating the actual app, let’s test if we have everything set up correctly. We’ll create a simple counter app that uses Signia for state management. We’ll create a local state variable with useAtom that will hold the value of the count and an increment function to add to it every time the button is clicked:
import { useAtom } from 'signia-react'
...
function App() {
  const count = useAtom('count', 0);
  const onButtonClick = () => {
    count.set(count.value + 1);
  }
  return (
    <ChakraProvider>
      <div className="App">
        <Heading>Counter value: {count.value}</Heading>
        <Button colorScheme='blue' onClick={() => onButtonClick()}>Increment</Button>
      </div>
    </ChakraProvider>
  )
}
When we click the button, we can see that the counter value is updated correctly. Therefore, our setup is working as expected:
Now that we can store simple values as Signia atoms, we can move on to the next step, designing the state for our to-do list app. The requirement is to store two entities, the list of items and the title of the list. We can use the class-based design that is recommended by the Signia team and create two separate Atoms for storing these entities. The class would look something like this:
class Todo {
  metadata = atom('metadata', {
    title: 'Groceries',
  })
  items = atom('items', {
    1: {
      id: 1,
      text: 'Milk',
      completed: false,
    }
  })
}
Notice how our items class property is an object that holds other objects corresponding to the individual items, which will help us to efficiently update the state. We don’t need to loop through items to find the one we’re looking for, and we can use the spread operator over the items and update only the ones we’re interested in
Also notice how each of our to-do list items has three keys, id, text, and completed. We need to add functions to this class that will be able to modify this state, namely, addItems, markItemAsDone, and setTitle:
class Todo {
  ...
  addItem(todoText: string) {
    const listItem = {
    id: Date.now(),
    text: todoText,
     completed: false,
    }
    this.items.update((items) => ({ ...items, [listItem.id]: listItem }))
  }
  markItemAsDone(itemId) {
    const updatedItem = { ...this.items.value[itemId], completed: true }
    this.items.update((items) => ({ ...items, [itemId]: updatedItem }))
  }
  setTitle(title: string) {
    this.metadata.update((metadata) => ({ ...metadata, title }))
  }
}
The code above provides us with all the minimal functionality required to implement the UX.
For our to-do list app’s UI, we’ll display the title at the top. To implement functionality to rename the list, you’ll simply provide an edit button and call the setTitle function that we’ve already defined in our state class.
Below the Title, we can have our input box with a button that you can use to add items to the list. Using Chakra UI, the code for the title along with the input box looks something like the following:
<Heading>Todo Title</Heading>
<InputGroup size='md' mt='2rem'>
  <Input
    pr='4.5rem'
    type={'text'}
    value={todoText.value}
    onChange={onTodoItemChange}
    placeholder='Enter item to add'
  />
  <InputRightElement width='4.5rem'>
    <Button h='1.75rem' size='sm' onClick={onAddClick}>
      Add
    </Button>
  </InputRightElement>
</InputGroup>
To get hold of the state inside of the React component, we’d have to instantiate the Todo class. For that, we create a memoized version of the state with the useMemo Hook, like so:
const useNewTodo = () => useMemo(() => new Todo(), [])
We can now use this custom hook inside of the App component:
function App() {
  const todo = useNewTodo()
  ...
}
We also need to create a local state variable that will keep a track of the text being typed inside of the input box. We can leverage useAtom for that purpose:
const todoText = useAtom('todoText', '');
const onTodoItemChange = (e) => {
  todoText.set(e.target.value);
}
We need two more handlers, one to handle the addition of a todo item and another to mark it as done:
const onAddClick = (e) => {
  todo.addItem(todoText.value);
  todoText.set('');
}
const onDoneClick = (id) => {
  todo.markItemAsDone(id);
}
When the add button is clicked, we call the addItem method on the instantiated state class. When the checkbox is checked, we call the markItemAsDone method with the ID.
There’s one thing left; we iterate over the list of to-do items and display them in the UI. For that, we‘ll use the List and the ListItem components along with the Object.values helper to iterate over the object values:
<List spacing={3} textAlign={'left'} mt='2rem'>
  {Object.values(todo.items.value).map((item) => (
    <ListItem key={item.id} alignItems={'center'}>
      <Checkbox disabled={item.completed} checked={item.completed} mt={'4px'} mr={2} onChange={() => onDoneClick(item.id)} />
      <Text as={item.completed ? 's' : 'b'}>{item.text}</Text>
    </ListItem>
  ))}
</List>
That completes all of the code changes required for our minimal to-do list app to work. You can check the complete set of code changes and even run it yourself by cloning this GitHub repo.
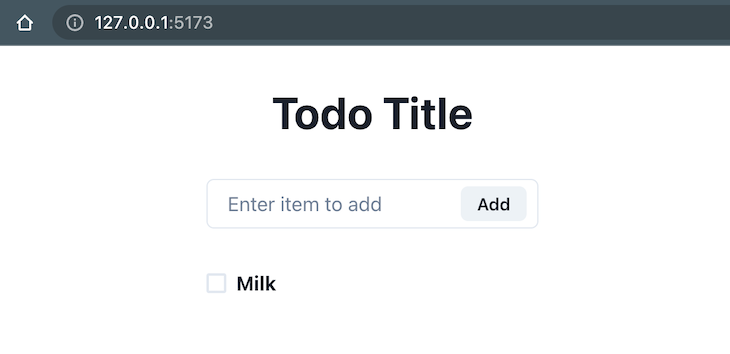
Let’s test out the code changes. When we run the app for the first time, we can see the Milk item present in the to-do list because we hardcoded that in the state:
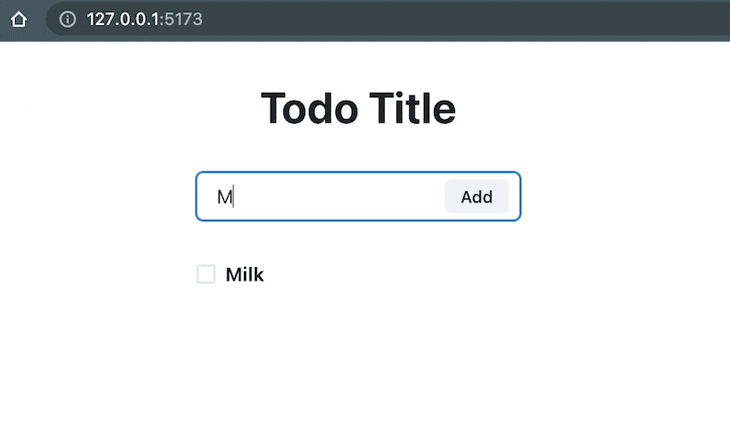
We can play around with the app by adding more items:
We can check off tasks by clicking on the checkbox:

Our UI is working as expected, and we can add more tasks as desired.
One last thing that we need to explore is sharing state among different React components. The example that we’ve built in this tutorial has the state class as well as the consumers of that state in the same file.
But, in real-life use cases, the point of storage of state and consumption are far apart. How do we manage sharing state in those scenarios? Signia recommends using React.context. We first create a context using the state class, then, we wrap our entire application in that context provider, passing the instantiated state class as the value:
const TodoContext = React.createContext<Todo | null>(null)
class TodoHelper {
   static useNewTodo = () => {
        const todoState = useMemo(() => new Todo(), [])
        return todoState
    }
}
const App = () => {
    const todo = TodoHelper.useNewTodo()
    return (
        <TodoContext.Provider value={todo}>
        ...other components get access to the state
        </TodoContext.Provider>
    )
}
Let’s make these changes in our example and test it out. To do so, we make the changes above in the App component. We then create a new file named TodoList.jsx and duplicate the code to render the list items inside of it. We also place the code to consume the state object from the context inside of this file:
import { TodoContext } from './App';
const useTodoFromContext = () => {
  const doc = useContext(TodoContext)
  if (!doc) throw new Error('No document found in context')
  return doc
}
export function TodoList() {
  const todo = useTodoFromContext();
  return (
    <List spacing={3} textAlign={'left'} mt='2rem'>
      {Object.values(todo.items.value).map((item) => (
       <ListItem key={item.id} alignItems={'center'}>
         <Checkbox disabled={item.completed} checked={item.completed} mt={'4px'} mr={2} />
         <Text as={item.completed ? 's' : 'b'}>{item.text}</Text>
        </ListItem>
      ))}
    </List>
  )
}
The useTodoFromContext helper is responsible for fetching the context and returning the latest instantiation of the state to this component. Now, we’ll place this component inside of a blue <div> in the App.tsx file. We can place it anywhere in the UX, even on a new route.
Now, when we add a new to-do item, we see that the TodoList component that reads this state from the context also displays the latest item added to the list:
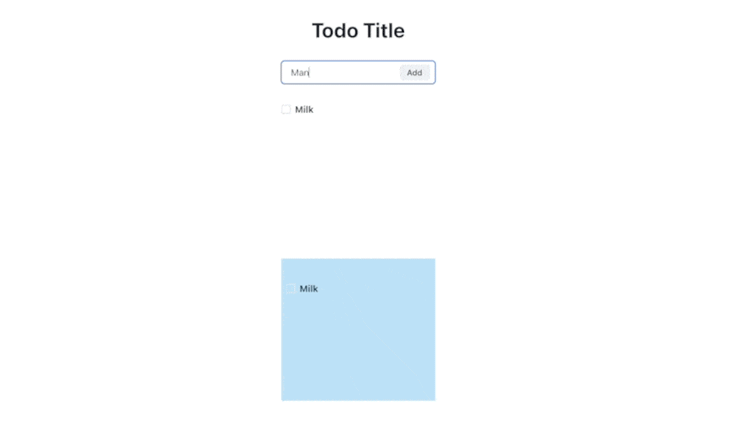
In the demo above, we’re reading the list items in the TodoList component. Because we have access to the todo object from the context, we can call the addItem and markItemAsDone methods too, and it would reflect across both of the lists. Therefore, we’ve effectively achieved the sharing of state from a central source.
In this article, we built an application that uses the Signia library and its React helpers to manage state. The useAtom Hook provides an alternative to useState, and the class-based architecture with atoms as class properties provides a way to structure more complex state.
We also explored a way to share the common state between different components with React.createContext and useContext, all without the initial setup for reactivity and the boilerplate that libraries like Redux expect. Therefore, Signia could be the library that you use for state management the next time you build a React application. I hope you enjoyed this article, and be sure to leave a comment if you have any questions.
Install LogRocket via npm or script tag. LogRocket.init() must be called client-side, not
server-side
$ npm i --save logrocket

// Code:

import LogRocket from 'logrocket';
LogRocket.init('app/id');
// Add to your HTML:

<script src="https://cdn.lr-ingest.com/LogRocket.min.js"></script>
<script>window.LogRocket && window.LogRocket.init('app/id');</script>
Hey there, want to help make our blog better?
Join LogRocket’s Content Advisory Board. You’ll help inform the type of content we create and get access to exclusive meetups, social accreditation, and swag.
Sign up now
This guide walks you through creating a web UI for an AI agent that browses, clicks, and extracts info from websites powered by Stagehand and Gemini.

This guide explores how to use Anthropic’s Claude 4 models, including Opus 4 and Sonnet 4, to build AI-powered applications.

Which AI frontend dev tool reigns supreme in July 2025? Check out our power rankings and use our interactive comparison tool to find out.

Learn how OpenAPI can automate API client generation to save time, reduce bugs, and streamline how your frontend app talks to backend APIs.


