
In-app purchases (IAP) have transformed the way mobile applications are monetized. It has not only unlocked new revenue streams for developers and businesses but has also enabled developers to create a more engaging and immersive experience for users.

There are various React Native IAP packages built on top of the Google Play Billing Library and Apple’s StoreKit framework, which allow you to easily incorporate in-app purchases into your application. However, we’ll take a look at how to integrate react-native-iap into your React Native application via a series of steps that involves building a simple recipe application; find the GitHub here.
Jump ahead:
react-native-iapThe Replay is a weekly newsletter for dev and engineering leaders.
Delivered once a week, it's your curated guide to the most important conversations around frontend dev, emerging AI tools, and the state of modern software.
In-app purchases are additional content, features, subscriptions, or services that a user can purchase directly within your application. In other words, it is an app monetization model that allows you to offer your application for free or at a reduced cost, giving your users a chance to use the application without an upfront financial commitment with the option to unlock extra features or content by making in-app purchases.
In-app purchases are facilitated through payment gateways connected to an app store’s billing system. The billing and transaction process is completely managed by the app store, allowing users to transact securely.
IAP offers great flexibility. Whether you’re developing an ecommerce platform, a productivity app, or a media platform, you can leverage IAP to unlock your application’s full monetization potential. Some common examples of in-app purchases include:
Additionally, IAP allows you to create personalized offers tailored to select user groups based on various criteria, such as their purchase history, to maximize gains and also provide your users with a more relevant experience.
Before setting up IAP, you should understand that there are three broad groups of in-app purchases:
To smoothly follow allow along with this article, you should have the following:
To demonstrate how to integrate in-app purchases into a React Native app, we’ll develop a recipe application that displays a limited list of recipes for free users with an option to make an in-app purchase to unlock all recipes via a premium subscription.
The application consists of three screens:
The starter project for the application is available on GitHub. We’ll build on it to develop the in-app purchase section of the application throughout the rest of the article.
Run the following command to clone the starter project:
git clone -b start https://github.com/emmanuelhashy/RecipeApp.git --single-branch
To integrate IAP into your application, you first need to set up the products in their respective stores. These stores serve as a hub for configuring and managing which products are shown to users in your application.
In this example, we’ll cover the steps to set up products for Android devices in the Google Play console. In order to seamlessly test in-app purchases in your application while in development, you need to publish your application to the internal testing track.
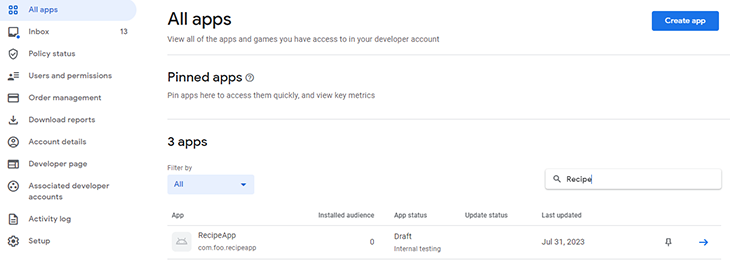
In the Google Play console, set up a merchant account to accept payments in your application. After that, select your application from the list of published applications on the All apps page:
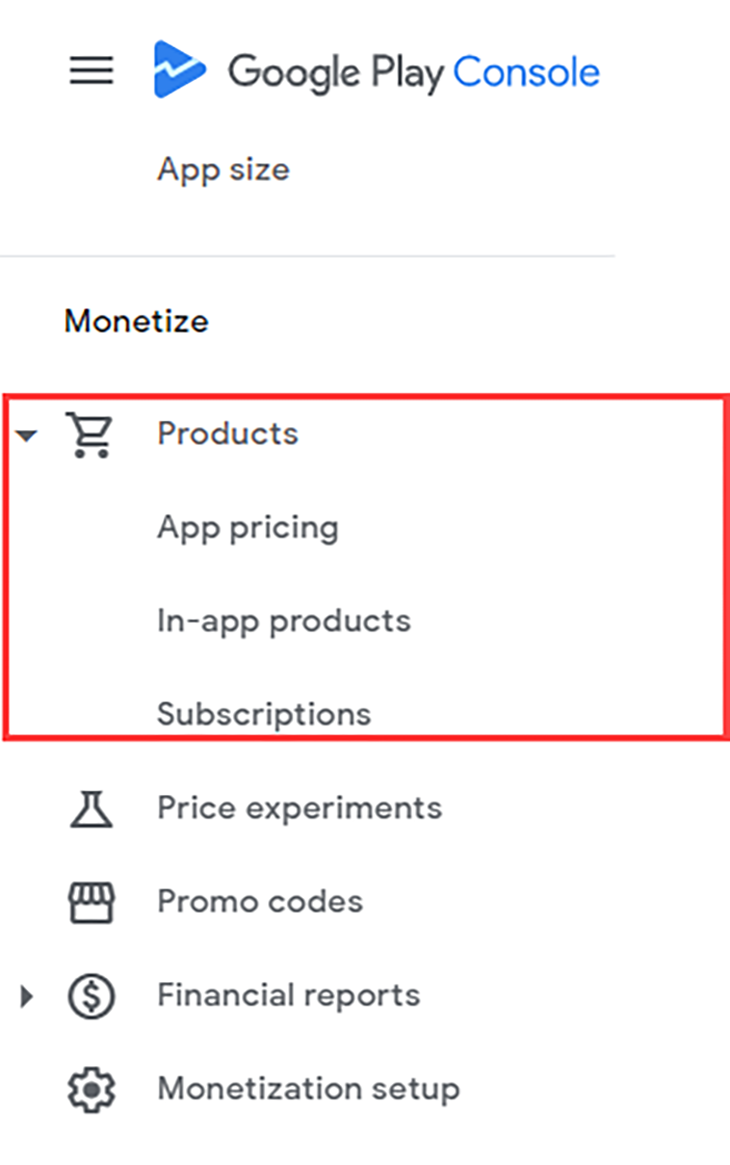
In the application dashboard, scroll to the Monetize section on the sidebar and select the Products dropdown button. You can choose either In-app Products or Subscriptions, depending on your IAP product type. We’ll select In-app Products for this example:
Now, on the In-app Products page, click the Create Product button to create a new product:

Provide the required attributes for the product, including the Product ID, name, description, and price. After that, click Save, then click Activate to make the product available for purchase. You’ll want to copy the product’s ID as we’ll use it later on in the application:

You should now see your product on the products Summary page. You can create as many products as needed in this page.
A license tester is an account that allows you to interact with in-app purchases in a controlled environment. During development, you can use a license tester to test and verify that your in-app purchases work without making actual payments.
In your Google Play console, navigate to the License testing page, either by searching in the search bar or selecting License testing from the main console’s dashboard sidebar:
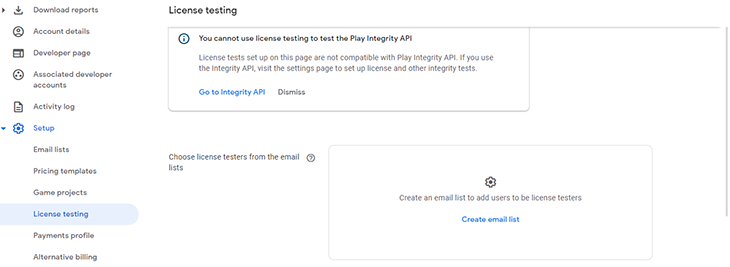
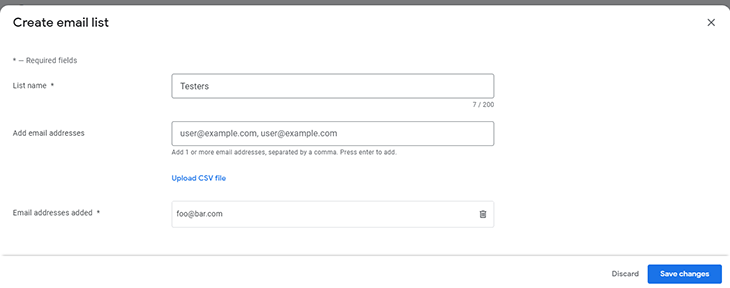
Then, click the Create email list button and provide a name for the list and email addresses of the test accounts. Click Save changes:
Next, in the Internal testing section of your application dashboard, click the Testers tab, and add your testers’ list:
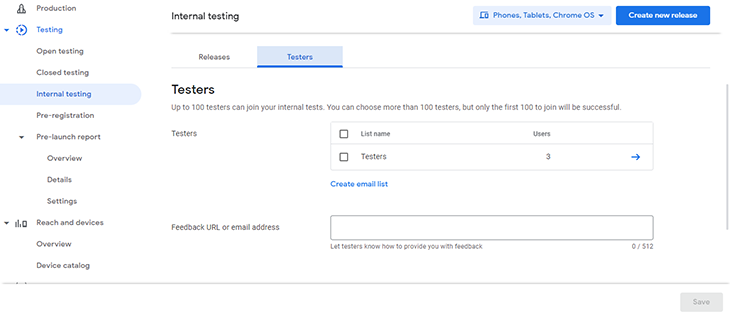
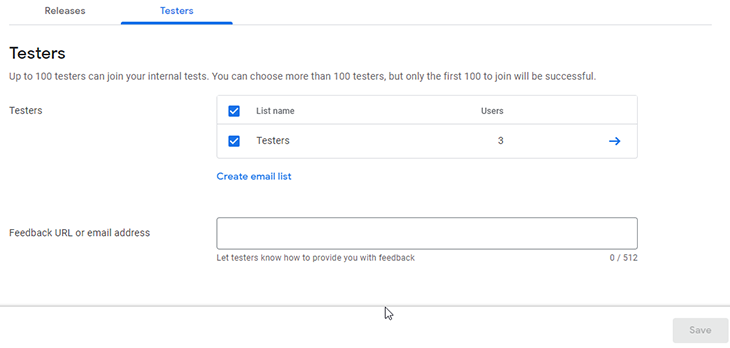
Select the list you created previously and click Save:
Next, click the Copy link button at the bottom of the page to copy the invite URL for your testers:
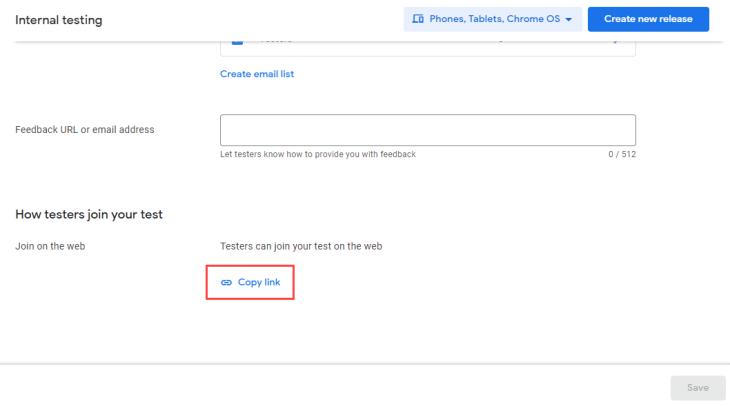
Lastly, open the URL on a device with the test account to accept the invite.
react-native-iapThe react-native-iap library allows you to seamlessly implement in-app purchases in your React Native application. It is a wrapper around the Google Play Billing Library and the Apple StoreKit framework. Moreover, with the library, you can also integrate IAP items from the Amazon Appstore.
To begin, run the following command in your terminal to install the package using npm:
npm install react-native-iap
After installation, you need to make some additional configurations to complete the package’s setup. Go to android/build.gradle and add the following properties in the buildscript.ext block:
androidXAnnotation = "1.1.0"
androidXBrowser = "1.0.0"
minSdkVersion = 24
kotlinVersion = "1.6.0"
Then, add the following under the dependencies block:
classpath "org.jetbrains.kotlin:kotlin-gradle-plugin:$kotlinVersion"
react-native-iap allows you to integrate IAP products from both the Google Play Store and Amazon Appstore. To enable payments for the Play Store, navigate to android/app/build.gradle, and then add the following under the defaultConfig block:
missingDimensionStrategy "store", "play"
Alternatively, you can enable payments for both stores by adding the following properties in the Android block:
 flavorDimensions "appstore"
 productFlavors {
   googlePlay {
     dimension "appstore"
     missingDimensionStrategy "store", "play"
   }
   amazon {
     dimension "appstore"
     missingDimensionStrategy "store", "amazon"
   }
 }
The native modules of the react-native-iap library need to be initialized early in the lifecycle of the application, before any IAP-related function calls are made. This can be done in the root component of the application.
To do this, add the following code to your App component:
useEffect(() => {
  const init = async () => {
    try {
      await initConnection();
      if (Platform.OS === 'android') {
        flushFailedPurchasesCachedAsPendingAndroid();
      }
    }
    catch (error) {
      console.error('Error occurred during initilization', error.message);
    }
  }
  init();
  return () => {
    endConnection();
  }
}, [])
In the code above, the initConnection function is called to initialize the native modules of the package.
Also, include the following imports in the file:
import React, { useEffect } from 'react';
import { Platform } from 'react-native';
import {
  initConnection,
  endConnection,
  flushFailedPurchasesCachedAsPendingAndroid,
} from 'react-native-iap';
Product IDs are a key component for integrating in-app purchases. Each one uniquely identifies a product available for purchase. Since our IAP product’s ID will be used in different places in the application, we need to define it in a central place.
Create a new file named constants.js under src/utils and add the following code:
import { Platform } from "react-native"
const productSkus = Platform.select({
    android: [
        'recipe_app_premium'
    ]
})
export const constants = {
    productSkus
};
Here, we’ve defined a constant, productSkus, which, with the help of the Platform.select function, correctly identifies the product ID that corresponds to the device’s operating system. We also provide the product ID of the product previously created in the Google Play console.
react-native-iap provides the getAvailablePurchases function for checking the user’s current purchases. We can use this method to verify whether the user has a premium subscription to unlock access to all recipes.
Open src/screens/home.jsx and add the code below in the Home component:
 useFocusEffect(
    useCallback(() => {
        setLoading(true);
        const getPurchase = async () => {
            try {
                const result = await getAvailablePurchases();
                const hasPurchased = result.find((product) => product.productId === constants.productSkus[0]);
                setLoading(false);
                setPremiumUser(hasPurchased);
            }
            catch (error) {
                console.error('Error occurred while fetching purchases', error);
            }
        }

        getPurchase();

    }, [])
)
Inside the useFocusEffect Hook, we define a getPurchase function that fetches the user’s available purchases and sets the isPremiumUser state to true if the user’s purchased products have an ID that matches our premium product’s ID.
Also, don’t forget to include the following imports:
import { getAvailablePurchases } from "react-native-iap";
import { constants } from "../utils/constants";
Currently, the paywall screen doesn’t display the available IAP products behind it. To show our IAP products on this screen, let’s begin by creating a ProductItem component to represent each IAP item.
Create a file named productItem.js in src/components. Then, add the following code:
import React from "react";
import { View, StyleSheet, Text, Button } from "react-native";

const ProductItem = ({ title, onPress }) => {
    return (
        <View style={styles.container}>
            <Text style={styles.title}>{title}</Text>
            <View style={styles.button}><Button title='Buy' color='coral' onPress={onPress}/></View>
        </View>
    )
}
export default ProductItem;
The component has two props — title, which is the name of the product, and onPress, a callback function that initiates a purchase.
Next, add component styles:
const styles = StyleSheet.create({
    container: {
        flexDirection: 'row',
        backgroundColor: '#fff',
        height: 100,
        borderRadius: 10,
        elevation: 6,
        justifyContent: 'space-between',
        alignItems: 'center',
        padding: 10,
        marginTop: 30,
        marginHorizontal: 10
    },
    title: {
        color: '#000',
        fontSize: 16,
        flex: 2.5,
        marginRight: 10
    },
    button: {
        flex: 1
    }
});
Then, open src/screens/paywall.jsx and add the following in the Paywall component:
const [products, setProducts] = useState([]);
const [isLoading, setLoading] = useState(true);
useEffect(() => {
      const  purchaseUpdateSubscription = purchaseUpdatedListener(
          async (purchase) => {
              const receipt = purchase.transactionReceipt;
              if (receipt) {
                  try {
                      await finishTransaction({ purchase, isConsumable: false });
                  } catch (error) {
                      console.error("An error occurred while completing transaction", error);
                  }
                  notifySuccessfulPurchase();
              }
          });
      const purchaseErrorSubscription = purchaseErrorListener((error) =>
          console.error('Purchase error', error.message));
      const fetchProducts = async () => {
          try {
              const result = await getProducts({ skus: constants.productSkus });
              setProducts(result);
              setLoading(false);
          }
          catch (error) {
              Alert.alert('Error fetching products')
          }
      }
      fetchProducts();
      return () => {
          purchaseUpdateSubscription.remove();
          purchaseErrorSubscription.remove();
      }

  }, [])
Let’s break down what the block of code above does:
products and isLoading — to store the IAP items and the loading status of the IAP items being fetcheduseEffect Hook, we define two listeners — purchaseUpdatedListener and purchaseError — to listen for successful purchases and any errors that may occur during the process. Generally, you should register these listeners before any purchase event is initiatedpurchaseUpdatedListener, we define some custom logic to handle receipt validation with our backendIn the Hook, we retrieve the available products using the fetchProduct function, which wraps around the getProducts function from react-native-iap. The product’s state is then updated with the return results.
Lastly, we ensure that the listeners are removed when the component is unmounted.
Next, add the following function, which is executed when a purchase is completed:
const notifySuccessfulPurchase = () => {
    Alert.alert("Success", "Purchase successful", [
        {
            text: 'Home',
            onPress: () => navigation.navigate('Home')
        }
    ])
}
Afterward, add the code below to handle purchases:
const handlePurchase = async (productId) => {
    setPurchaseLoading(true)
    try {
        await requestPurchase({ skus: [productId] });
    } catch (error) {
        Alert.alert('Error occurred while making purchase')
    }
    finally {
        setLoading(false);
    }
}
The function above calls the requestPurchase function to initiate an IAP by providing the product ID for the item being purchased.
Lastly, update the paywall’s JSX to the following:
<View style={styles.container}>
    {
        !isLoading ?
            <>
                <View style={styles.header}>
                    <Image source={backgroundImage} style={styles.image} />
                    <View style={styles.heading}>
                        <Text style={styles.text}>Unlock all Recipes</Text>
                        <Text style={styles.subText}>Get unlimited access to 1000+ recipes</Text>
                    </View>
                </View>
                {products.map((product, index) => (
                    <ProductItem
                        key={index}
                        title={product.title}
                        onPress={() => handlePurchase(product.productId)} />
                ))}
            </> :
            <View style={styles.indicator}>
                <ActivityIndicator size='large' />
            </View>
    }
</View>
Include the following imports in the file:
import React, { useEffect, useState } from "react";
import { View, StyleSheet, Text, Image, Alert, ActivityIndicator } from "react-native";
import { constants } from "../utils/constants";
import {
    getProducts, //For fetching available products
    requestPurchase, //For initiating in-app purchases
    purchaseUpdatedListener, //For listening to purchase events
    purchaseErrorListener, //For listening to purchase errors
    finishTransaction  //For acknowledging a purchase
} from "react-native-iap";
import ProductItem from "../components/productItem";
Now that you’ve finished setting up in-app purchases, it’s time to run the application. To do this, ensure that your Android device is connected to your development machine. Although you can use an emulator for this, it’s recommended that you test in-app purchases on a real device.
Now, run the following command in your terminal:
npx run react-native run-android
You should see a similar output to the one below and be able to initiate an in-app purchase:
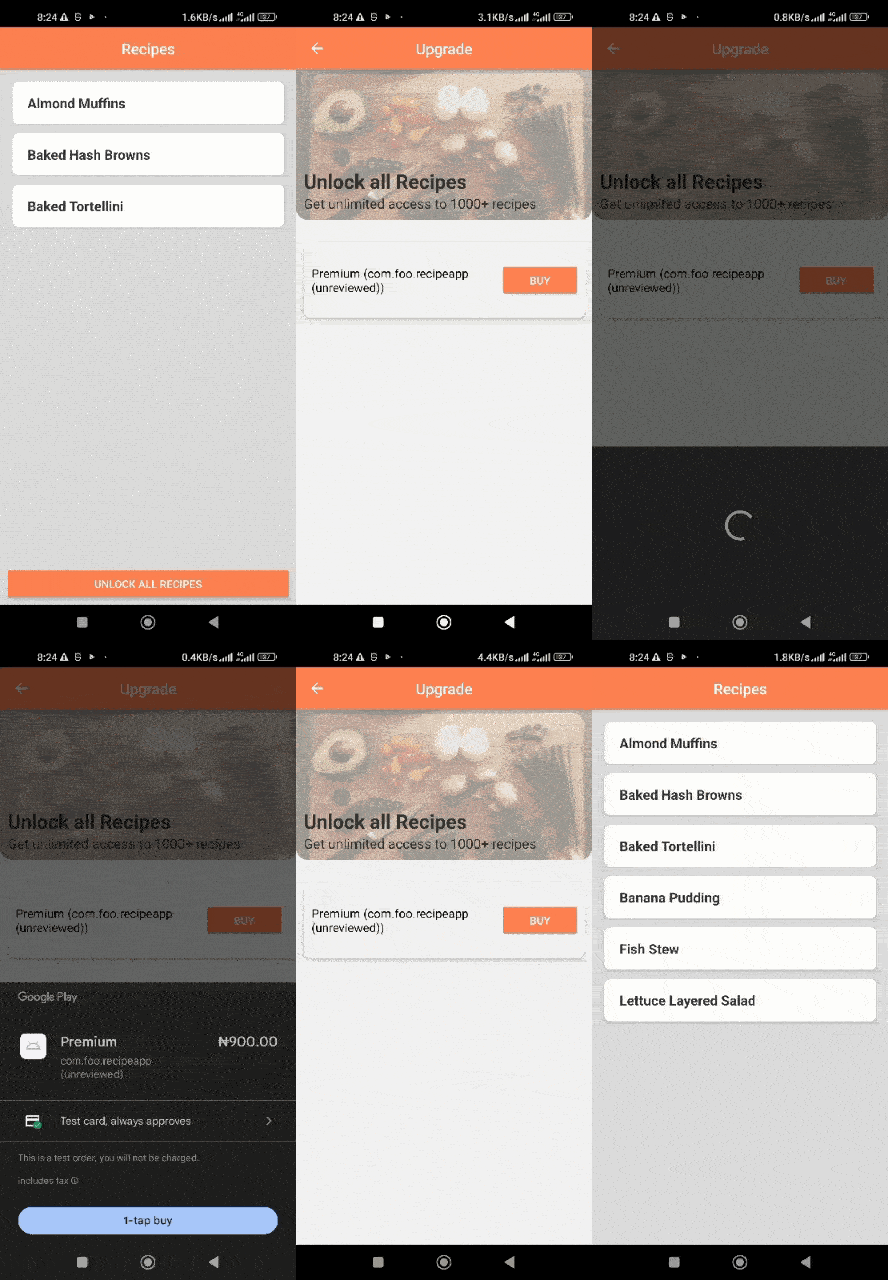
Implementing in-app purchases in your React Native application unlocks an additional revenue stream and, when implemented well, can enhance your user’s experience.
We’ve gone through a step-by-step guide on how to easily integrate in-app purchases to your React Native app using the react-native-iap library. If you’d like to consider a different method, or want to implement IAP in an iOS app, check out our post on implementing IAP with expo-in-app-purchases.
You can find the complete code for the project on GitHub.

LogRocket's Galileo AI watches sessions for you and and surfaces the technical and usability issues holding back your React Native apps.
LogRocket also helps you increase conversion rates and product usage by showing you exactly how users are interacting with your app. LogRocket's product analytics features surface the reasons why users don't complete a particular flow or don't adopt a new feature.
Start proactively monitoring your React Native apps — try LogRocket for free.

@container scroll-state: Replace JS scroll listeners nowCSS @container scroll-state lets you build sticky headers, snapping carousels, and scroll indicators without JavaScript. Here’s how to replace scroll listeners with clean, declarative state queries.

Explore 10 Web APIs that replace common JavaScript libraries and reduce npm dependencies, bundle size, and performance overhead.

Russ Miles, a software development expert and educator, joins the show to unpack why “developer productivity” platforms so often disappoint.

Discover what’s new in The Replay, LogRocket’s newsletter for dev and engineering leaders, in the February 18th issue.
Hey there, want to help make our blog better?
Join LogRocket’s Content Advisory Board. You’ll help inform the type of content we create and get access to exclusive meetups, social accreditation, and swag.
Sign up now
3 Replies to "Implement React Native in-app purchases for Android apps"
I’m using a single Google in-app product SKU for multiple products on my React Native app, how to identify product details when receive a response on purchaseUpdatedListener()?
Hey! there’s one thing that I’m having trouble to understand though: How does my React Native app know that it is connected to that specific Play Console account? There are no api Keys or anything in the setup that makes that connection explicitly. How will my app know where to fetch the products from? If anybody can help me understand this i’d be very grateful! (i’m asking because right now getSubscriptions isn’t returning anything, and I’m trying to debug)
Why won’t this example work for iOS store kit given that the library works for both? Your other example uses a deprecated Expo library for iOS.