
Push notifications are automated messages sent to a user’s phone by an application, even when that application is not open. They are used to send important alerts to a user, like when they get a text, receive a transaction, or even when there are special discounts on their favorite shopping apps.
Push notifications are essential for mobile apps because they serve as a rich alternative to emails for communication with your users. Plus, they can drive user engagement, which is always good for your app.
In this article, we’ll be looking at how to add push notifications to your React Native applications on both iOS and Android by implementing them in a sample React Native app.
The Replay is a weekly newsletter for dev and engineering leaders.
Delivered once a week, it's your curated guide to the most important conversations around frontend dev, emerging AI tools, and the state of modern software.
To add push notifications to a React Native app, we first need to create one. If you have an existing project, you can skip to the next section that guides you through setting up OneSignal for iOS push notifications.
npx react-native init PushExample
The above commands creates a new React Native CLI project called “PushExample.”
After the project is created, we need to generate the credentials required on OneSignal so it can deliver messages to our users’ devices. These credentials are the iOS push certificate and the Firebase Server API key.
To set up the iOS platform on OneSignal, we need a p12 iOS push certificate. In order to create an iOS push certificate, there are a few more steps we need to take.
For example, we need to update the bundle identifier for the app and create a provisioning profile in order to enable the required features and run the app on development devices. We will walk through these requirements in the sections below.
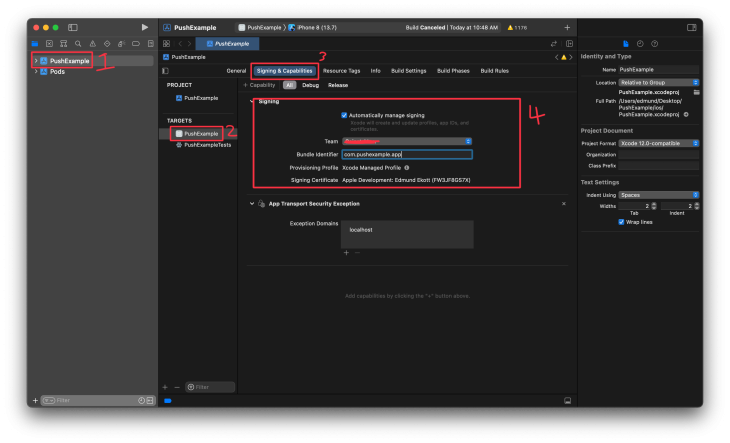
To start, open the .xcworkspace file in the ios folder of your newly created project, and go to the Signing & Capabilities tab.
Under the Signing section, update the Bundle Identifier from the default identifier and choose the appropriate team where you have an Admin role under the Team field (this only applies if you enabled automatic signing with XCode).
Confirm that the newly updated identifier was not created as a wildcard by clicking the information icon (i):
![]()
If the App ID exactly matches the Bundle Identifier we set earlier, you can skip to the next section.
From the screenshot above, you can see that the identifier is a wildcard, so we have to manually create one. To start, uncheck the Automatically manage signing field in Xcode.
Next, go to the developer center and remove the wildcard identifier. Then, go to the Identifiers section to create a new identifier. Click the plus sign icon (+) to get started, and select App IDs.
On the next page, select App because we will be using this identifier for an app.
Enter a description and a unique bundle ID (this is the same as the bundle identifier in Xcode). Scroll down to the Capabilities section and check the App Groups and Push Notifications capabilities. Enabling these capabilities is important to properly implement push notifications with Xcode.

Now you should see the newly created ID on the Identifier page.
Next, create a provisioning profile on the Profiles section by clicking the plus sign. Select the kind of profile you want to create (ideally we want to create an App Store distribution profile, but because this app is a demo, I’ll be creating an iOS App Development profile).
Choose the identifier we created earlier from the dropdown list.

Click the Continue button and select the appropriate certificate. If none exists, follow the guide on the page to create a new certificate.
When you get to the page to name your profile, be sure to enter a unique name. I suggest you follow this naming pattern: AppName_ProfileType. Click the Generate button once you’ve named your profile and download the file.
Once the profile is downloaded to your machine, return to the Signing & Capabilities tab on Xcode and choose the Import Profile option from the Provisioning Profile field.
Next, select the newly created profile and we should be ready to create a push certificate.
If you get a warning that the bundle IDs do not match, simply update the bundle identifier on Xcode to match the one from provisioning profile’s identifier.
There are two processes to create a push certificate: automatic and manual. The automatic process doesn’t work all of the time, so if you encounter an error with the tool, you can follow the manual process.
There’s a tool created by the OneSignal team called Provisionator that reduces the number of steps for creating a push certificate. Open the Provisionator tool, sign in with your Apple ID, select the identifier we created earlier, and generate the certificate.
To generate a push certificate manually, follow this guide from the OneSignal docs.
Get the certificate and head to OneSignal to create a new app on your account. Be sure to note the password generated with the p12 file.
Select Apple iOS as the platform for now (we can enable more later). On the next page, upload the p12 certificate and enter the password generated with the certificate. If you didn’t set a password in the manual process, just ignore the password field.
After uploading the certificate and clicking the Next button, chose React Native / Expo as the target SDK.
After proceeding, you will find your OneSignal app ID and a guide to install the OneSignal SDK in the React Native project.
We can find all that information later, but for now, we will begin a similar process for the Android platform.
In order to send push notifications to an Android device, we need to add a Firebase Server API key and a Sender ID to OneSignal.
To get started, we will create a new Firebase project. First, click the gear icon in the side menu, then click the Project settings link.
In the Cloud Messaging tab, you will find the Server key and Sender ID.
To complete the Android platform setup on OneSignal, go to your app’s Settings page, then Platforms, then Google Android.
Paste the server key and sender ID from Firebase into the fields and hit Save. Select React Native / Expo and you should see your app’s ID again.
We’ve been able to generate the necessary credentials for both platforms and add them to OneSignal, now we want to configure the SDK in our project and install the apps on our device to test.
Install the SDK with Yarn or npm like so:
yarn add react-native-onesignal
If your existing project is an Expo-managed project, use the OneSignal Expo plugin instead:
expo install onesignal-expo-plugin
If your project is using React Native v0.59 and below, you need to manually link the package using the command below:
react-native link react-native-onesignal
For React Native CLI projects (just like this one), the next steps are essential.
Add the code snippet below to the top of the android/app/build.gradle file:
buildscript {
    repositories {
        gradlePluginPortal()
    }
    dependencies {
        classpath 'gradle.plugin.com.onesignal:onesignal-gradle-plugin:[0.12.10, 0.99.99]'
    }
}

apply plugin: 'com.onesignal.androidsdk.onesignal-gradle-plugin'
Start by running the command below in your terminal:
cd ios && pod install
After the pods have been installed, open the .xcworkspace file from the /ios folder of your React Native project in Xcode.
Add the push notification capability by clicking the + Capability button under the Signing & Capabilities tab.
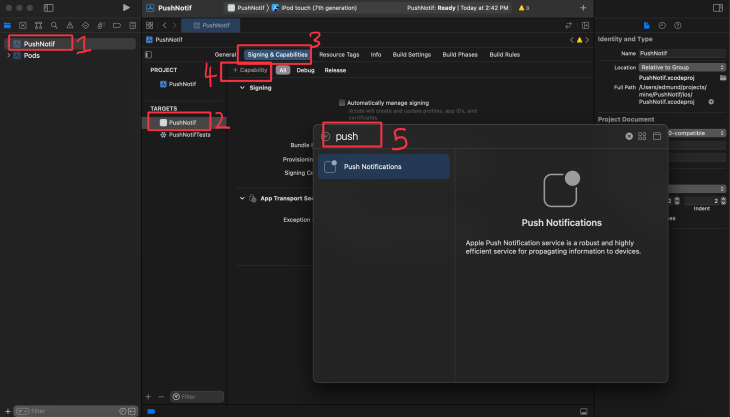
Click the + Capability button again, and enable the Background Modes capability. Once that’s added, check the Remote notifications option. This will enable our app receive push notifications in the background as well.
Next we’ll be adding a notification service extension so our app can receive push notifications that have images and buttons.
In Xcode, go to File > New > Target… and select Notification Service Extension, then press Next.
Enter “OneSignalNotificationServiceExtension” as the product name and fill in the other fields.
Take note of the selected language and click the Finish button once done. Do not press Activate on the next dialog!
Instead, press Cancel on the dialog. Clicking cancel makes Xcode continue debugging our app, and not this newly created extension.
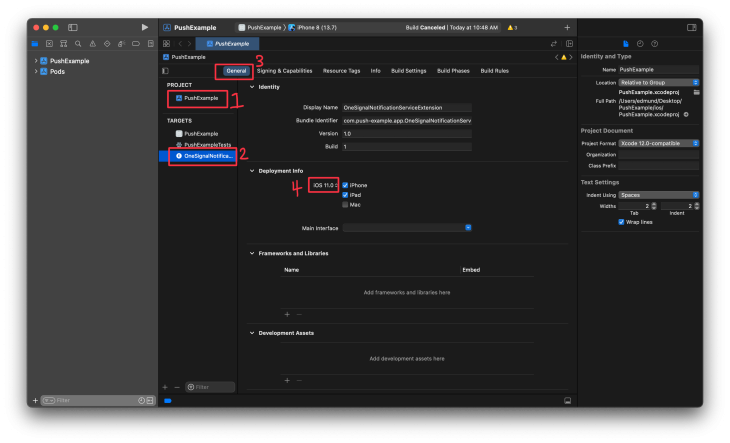
Next, we need to change the deployment target for the notification service extension to support as many older iOS versions as possible.
Open the General tab under the OneSignalNotificationServiceExtension target and change the deployment target to iOS 11.
In your default code editor, paste the snippet below into the Podfile in your ios folder. It should be below the main target:
# main target
target 'PushExample' do
end

# copy from here
target 'OneSignalNotificationServiceExtension' do
  pod 'OneSignalXCFramework', '>= 3.0', '< 4.0'
end
After pasting the snippet, close Xcode and run pod install again in the ios directory.
Next, open the .xcworkspace file again in Xcode, and once the project is open, check the OneSignalNotificationServiceExtension folder in the project navigator. You should see either a NotifiicationService.swift file or a NotificationService.m file, depending on the language selected when we created the notification service extension earlier.
If the file is a NotificationService.swift file, replace the content with the code below:
//
//  NotificationService.swift
//  OneSignalNotificationServiceExtension
//

import UserNotifications

import OneSignal

class NotificationService: UNNotificationServiceExtension {

    var contentHandler: ((UNNotificationContent) -> Void)?
    var receivedRequest: UNNotificationRequest!
    var bestAttemptContent: UNMutableNotificationContent?

    override func didReceive(_ request: UNNotificationRequest, withContentHandler contentHandler: @escaping (UNNotificationContent) -> Void) {
        self.receivedRequest = request
        self.contentHandler = contentHandler
        self.bestAttemptContent = (request.content.mutableCopy() as? UNMutableNotificationContent)

        if let bestAttemptContent = bestAttemptContent {
            //If your SDK version is < 3.5.0 uncomment and use this code:
            /*
            OneSignal.didReceiveNotificationExtensionRequest(self.receivedRequest, with: self.bestAttemptContent)
            contentHandler(bestAttemptContent)
            */

            /* DEBUGGING: Uncomment the 2 lines below to check this extension is excuting
                          Note, this extension only runs when mutable-content is set
                          Setting an attachment or action buttons automatically adds this */
            //OneSignal.setLogLevel(.LL_VERBOSE, visualLevel: .LL_NONE)
            //bestAttemptContent.body = "[Modified] " + bestAttemptContent.body

            OneSignal.didReceiveNotificationExtensionRequest(self.receivedRequest, with: bestAttemptContent, withContentHandler: self.contentHandler)
        }
    }

    override func serviceExtensionTimeWillExpire() {
        // Called just before the extension will be terminated by the system.
        // Use this as an opportunity to deliver your "best attempt" at modified content, otherwise the original push payload will be used.
        if let contentHandler = contentHandler, let bestAttemptContent =  bestAttemptContent {
            OneSignal.serviceExtensionTimeWillExpireRequest(self.receivedRequest, with: self.bestAttemptContent)
            contentHandler(bestAttemptContent)
        }
    }

}
If it’s a NotificationService.m file, which means the selected language was Objective-C, replace the content with this instead:
//  NotificationService.m
//  OneSignalNotificationServiceExtension
#import <OneSignal/OneSignal.h>

#import "NotificationService.h"

@interface NotificationService ()

@property (nonatomic, strong) void (^contentHandler)(UNNotificationContent *contentToDeliver);
@property (nonatomic, strong) UNNotificationRequest *receivedRequest;
@property (nonatomic, strong) UNMutableNotificationContent *bestAttemptContent;

@end

@implementation NotificationService

- (void)didReceiveNotificationRequest:(UNNotificationRequest *)request withContentHandler:(void (^)(UNNotificationContent * _Nonnull))contentHandler {
    self.receivedRequest = request;
    self.contentHandler = contentHandler;
    self.bestAttemptContent = [request.content mutableCopy];

    //If your SDK version is < 3.5.0 uncomment and use this code:
    /*
    [OneSignal didReceiveNotificationExtensionRequest:self.receivedRequest
                       withMutableNotificationContent:self.bestAttemptContent];
    self.contentHandler(self.bestAttemptContent);
    */

    /* DEBUGGING: Uncomment the 2 lines below and comment out the one above to ensure this extension is excuting
                  Note, this extension only runs when mutable-content is set
                  Setting an attachment or action buttons automatically adds this */
    // NSLog(@"Running NotificationServiceExtension");
    // self.bestAttemptContent.body = [@"[Modified] " stringByAppendingString:self.bestAttemptContent.body];

    // Uncomment this line to set the default log level of NSE to VERBOSE so we get all logs from NSE logic
    //[OneSignal setLogLevel:ONE_S_LL_VERBOSE visualLevel:ONE_S_LL_NONE];
    [OneSignal didReceiveNotificationExtensionRequest:self.receivedRequest
                       withMutableNotificationContent:self.bestAttemptContent
                                   withContentHandler:self.contentHandler];
}

- (void)serviceExtensionTimeWillExpire {
    // Called just before the extension will be terminated by the system.
    // Use this as an opportunity to deliver your "best attempt" at modified content, otherwise the original push payload will be used.

    [OneSignal serviceExtensionTimeWillExpireRequest:self.receivedRequest withMutableNotificationContent:self.bestAttemptContent];

    self.contentHandler(self.bestAttemptContent);
}

@end
If you run into any build errors, they’ll be resolved once we import the OneSignal library into our .js file.
Before we start making use of the SDK, there’s one more step we have to take: adding an app group capability. In our case, an app group capability will enable our iOS app to display badges and see confirmed deliveries on the dashboard for analytics purposes.
Back to the main app’s target again, go to Signing & Capability then click + Capability to add an App Groups capability.
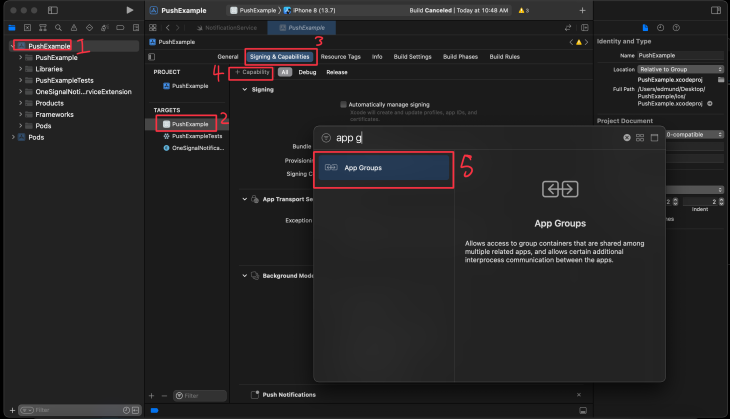
Click the plus sign button under the App Groups capability, and in the dialog that opens up, set the container name to be “group.YOURAPPBUNDLEIDENTIFIER.onesignal”. “YOURAPPBUNDLEIDENTIFIER” is exactly the one we created earlier.
Once your container has been created, and if you manually created the provisioning profile earlier, you’ll get a warning that looks like this:
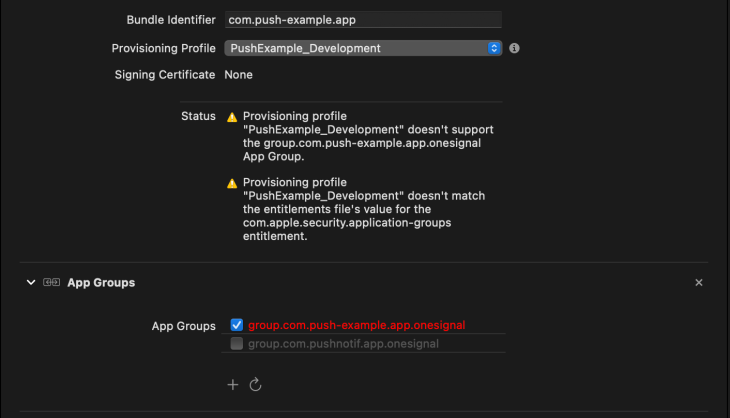
This is because we haven’t configured the App Groups capability under our app’s identifier in the developer center.
To do so, open your app’s identifier from the identifiers page and click the Configure button on the App Groups capability.
Click the Register app group button, or create a new app group identifier if you already have an existing app group for a different project.
Set a description for the app group we’re creating, then enter the exact identifier from the app group we created earlier in Xcode. Click Continue to complete the registration.
Next, head back to the identifier and click the Configure button for the app groups capability, then select the newly registered app group.
When you try to update the capabilities, you’ll get a warning saying that you need to regenerate the provisioning profile because it will be rendered invalid. Click Confirm.
Now, go to the Profiles page and you should see the provisioning profile is now invalid.
Delete the profile and create another exactly like the one you just deleted by following the steps from earlier.
Download the newly generated profile and import into Xcode again. After importing the profile, click the refresh icon under the app groups capability to sync.
Next, go to the OneSignalNotificationServiceExtension target. We need to repeat some things we did earlier.
If Xcode does not automatically manage signing, follow these steps:
First, Copy the bundle identifier from here and create a new app ID in the Developer center under Identifiers.
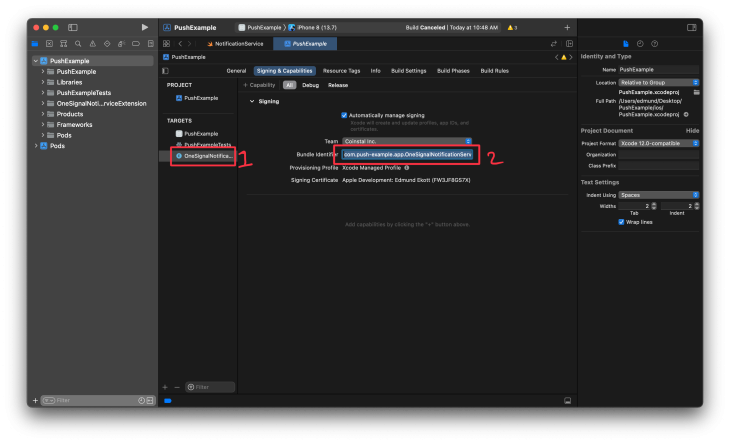
Enable App Groups under capabilities, and be sure to set the bundle ID to match the bundle identifier for the OneSignalNotificationExtension from Xcode.
Once the identifier has been created, open it up again and configure the App Groups capability to enable the “push example app group” from earlier (or whatever you named yours).
Second, create a provisioning profile for OneSignalNotificationServiceExtension. The steps are exactly like what we did earlier. Download the provisioning profile and import it in under Signing & Capabilities.
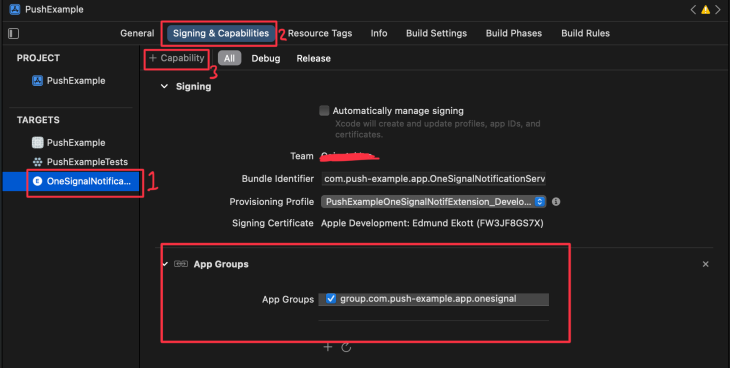
Finally, add the app groups capability for the notification service extension and check the app group we enabled for the app ID.
Open the React Native project in your editor and paste the code snippet below into the index.js file:
import OneSignal from 'react-native-onesignal';

//OneSignal Init Code
OneSignal.setLogLevel(6, 0);
OneSignal.setAppId("YOUR_ONESIGNAL_APP_ID");
//END OneSignal Init Code

//Prompt for push on iOS
OneSignal.promptForPushNotificationsWithUserResponse(response => {
  console.log("Prompt response:", response);
});

//Method for handling notifications received while app in foreground
OneSignal.setNotificationWillShowInForegroundHandler(notificationReceivedEvent => {
  console.log("OneSignal: notification will show in foreground:", notificationReceivedEvent);
  let notification = notificationReceivedEvent.getNotification();
  console.log("notification: ", notification);
  const data = notification.additionalData
  console.log("additionalData: ", data);
  // Complete with null means don't show a notification.
  notificationReceivedEvent.complete(notification);
});

//Method for handling notifications opened
OneSignal.setNotificationOpenedHandler(notification => {
  console.log("OneSignal: notification opened:", notification);
});
Once the initialization is done, run your app and you should see a prompt that “your app” would like to send you push notifications.
Note that iOS simulators cannot receive push notifications, so you do have to run the app on a physical iOS device.
If you check your app in the OneSignal dashboard under Audience > All Users, you will see all active devices that are subscribed to the push notification.
Head to the Messages tab and send your first push notification; you should receive the notifications on your devices. And the best part is, you can see all metrics on your OneSignal dashboard.
This article was a quick guide to adding push notifications to your React Native mobile app with OneSignal. There are many more things you may want to do, like setting external user IDs in order to send notifications to specific users. Learn about more features you can take advantage of in the OneSignal docs.

LogRocket's Galileo AI watches sessions for you and and surfaces the technical and usability issues holding back your React Native apps.
LogRocket also helps you increase conversion rates and product usage by showing you exactly how users are interacting with your app. LogRocket's product analytics features surface the reasons why users don't complete a particular flow or don't adopt a new feature.
Start proactively monitoring your React Native apps — try LogRocket for free.

Discover what’s new in The Replay, LogRocket’s newsletter for dev and engineering leaders, in the February 11th issue.

Cut React LCP from 28s to ~1s with a four-phase framework covering bundle analysis, React optimizations, SSR, and asset/image tuning.

Rich Harris (creator of Svelte) joined PodRocket this week to unpack his Performance Now talk, Fine Grained Everything.

Cloudflare strengthens security at the edge, but real protection depends on how you design, layer, and own controls beyond it.
Would you be interested in joining LogRocket's developer community?
Join LogRocket’s Content Advisory Board. You’ll help inform the type of content we create and get access to exclusive meetups, social accreditation, and swag.
Sign up now
One Reply to "Implement push notifications in React Native with OneSignal"
Lately I can no longer use Onesignal in React Native, both with Expo and CLI 🙁
I did all the steps
In my simulator the following message appears when I try iOS:
Invariant Violation: `new NativeEventEmitter()` requires a non-null argument.
ERROR Invariant Violation: Module AppRegistry is not a registered callable module (calling runApplication). A frequent cause of the error is that the application entry file path is incorrect.
This can also happen when the JS bundle is corrupt or there is an early initialization error when loading React Native.