
Building a correct HTML structure for your site goes a long way toward creating a good experience for users with disabilities. But, translating design into code can be challenging, especially when you start considering accessibility.
In this article, we’ll demystify HTML landmarks and discuss how they can benefit users who rely on assistive technology to navigate a site. We’ll also provide guidance on the nuances of each type of landmark and how to use them in your projects.
I believe that learning to translate a design into code is a very important skill, so I’ll demonstrate how to check a design and recognize the different landmarks in it. I’ll also share my thought processes for translating a new design into landmarks.
The Replay is a weekly newsletter for dev and engineering leaders.
Delivered once a week, it's your curated guide to the most important conversations around frontend dev, emerging AI tools, and the state of modern software.
Landmarks are a group of HTML tags and roles that define different subsections of a website. Sometimes a section of a site is so important that you want the user to be able to navigate directly into it. For example, finding a form on a website or using the navigation bar to jump to a different section of the site.
Good design enables a sighted user to visually scan a site and quickly find those different subsections. But users of assistive technologies can’t do this, and this is where landmarks come into play. According to WebAIM’s Screen Reader User Survey #9 Results, more than half of all screen reader users rely on landmarks to some degree to navigate through a website.
To see how landmarks are used in a particular project, navigate to a site with NVDA, press Insert+F7 to open the elements list window, and then select the Landmarks radio button. Here’s an example from allyproject.com:
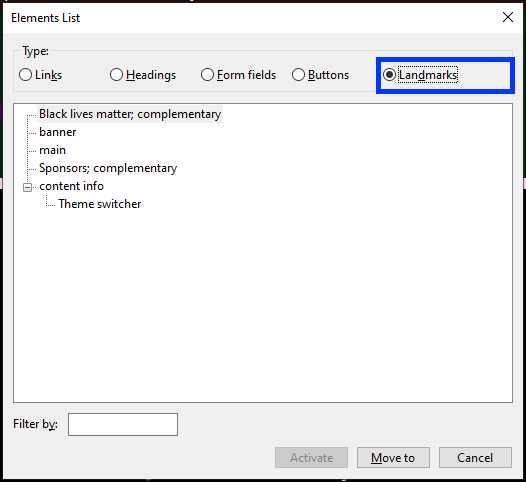
This page uses different landmarks and some of them have accessible names to help screen reader users detect important information sections of a website, the type of content they can expect, and a general idea of where they are located. This helps screen reader users to navigate to the part of a site they’re interested in.
An accessible name is a string associated with an element; assistive technologies use it as a label to identify the element.
In the above example, you’ll notice two landmarks: Black Lives Matter; complementary and Sponsors; complementary. The Black Lives Matter and Sponsors portions of those landmarks represent the names. They provide screen readers with additional context about the content inside that section.
We can use aria-label and aria-labelledby to add accessible names to our landmarks. aria-label uses a string to give the accessible name and the former links an existing HTML element with a label to use as the element’s accessible name.
Here’s how we can give an accessible name to the landmarks from the earlier a11yproject.com example:
<aside aria-label="Black lives matter">
    <!-- Content -->
</aside>

<aside aria-labelledby="sponsors">
  <h2 id="sponsors">Sponsors</h2>
  <!-- Content -->
</aside>
For further reading on accessible names, see the W3C guide, Providing Accessible Names and Descriptions. Now, let’s focus on our landmarks.
There are eight different HTML tags that work as landmarks: <main>, <header>, <footer>, <nav>, <form>, <section>, <aside>, and <search>. Each has a corresponding ARIA role, and there are some considerations when using them on a project.
<main>Let’s start with the most basic landmark that every website should use. The <main> landmark is used to mark the most important part of your website. Content that explains what your website is about and why it is relevant to users should be included inside the <main> tag. You can use the corresponding ARIA role, role="main", to represent this landmark.
There are two important points to keep in mind. First, there can only be one visible <main> element per page. You can technically make a site with more than one <main> element, but one of them will need to be hidden.
For example, the below markup is valid because the hidden attribute hides the second <main> tag:
<body>
  <main></main>
  <main hidden></main>
</body>
Second, the <main> tag will only be valid if you add it as a child of the <body>, <html>, <div>, and <form> tags, as long as they do not have an accessible name. Adding it as a child of another tag will not give it the proper semantics, as shown below:
<!-- This is valid -->

<body>
  <main></main>
</body>


<!-- This is valid -->

<body>
  <div>
    <main></main>
  </div>
</body>


<!-- This is not valid -->

<body>
  <section>
    <main></main>
  </section>
</body>


<!-- This is also not valid -->

<body>
  <form aria-label="Form">
    <main></main>
  </form>
</body>
<header>The <header> element is typically used to wrap elements listed before the <main> landmark that repeat across the different pages on a website. It’s often used to group things like navigational content, banners, logos, search forms, and sometimes a hero section as well.
The <header> element has the implicit ARIA role of role="banner" and it is usually the first landmark a user encounters on the website. Here’s an example showing how to use it:
<header>
  <img src="path/to/image.jpg" alt="Site logo">
  <h1>Welcome to Site Logo™️</h1>
  <div class="banner">
    <!-- Banner content -->
  </div>
</header>
<main>
  <!-- Site's main content -->
</main>
This is also a pretty simple landmark to understand. For proper semantics, there should be only one <header> element as a direct child of the <body> tag.
If the <header> element is a direct child of any sectioning category elements, (<nav>, <article>, <section>, <aside>, or <main>, it will have no semantic value. This means that we can use the <header> elements to group content, for example a title, and then use it as a selector to add styles with CSS without the need for classes or <div> elements!
This is a neat trick that can help with your styling. Here’s an example:
<article>
  <header>
    <h2>How to use the <header> element as a style selector</h2> </header> <!-- Content --> </article> article { padding: 1rem; border-radius: 1rem; border: 2px solid crimson; } article header { padding: 0.1rem; background-color: crimson; color: whitesmoke; }
<footer>The <footer> element is made to wrap information that repeats across different pages, similar to how footers work on a document. This landmark usually goes at the end of the page, but that’s not always the case.
Copyright data, internal links to useful pages, or external links to social media, author information, or contact information can be located inside this tag. This landmark has the implicit ARIA role of role="contentinfo". Here’s how to use it:
<footer>
  <p><address>13526 Kevon Crossing Suite 282</address></p>
  <h2>Social media</h2>
  <ul>
    <!-- Social media links -->
  </ul>
    <p>© Cristian Díaz 2023–Today. All rights reserved.</p>
</footer>
You can use the <footer> landmark to group content elements from the footer section of the website and then use it as a selector to add CSS styles without the need for <div elements or classes.
There‘s an accessibility bug in the Safari browser prior to v13 in which the <footer> tag is not properly exposed to assistive technology users. If you still need to support those older browser versions, I recommend you add the corresponding ARIA role to the tag, like this:
<footer role="contentinfo">
  <!-- Footer info -->
</footer>
<nav>The <nav> element is used to contain blocks of links that enable the user to navigate through different parts of a website. It works well for creating the list of links used at the header to navigate between different pages of a website, to create a table of contents in your blog, or to use as the container element for the site’s breadcrumbs.
The <nav> landmark has the implicit ARIA role of role="navigation". Here’s how this tag looks in HTML code:
<nav>
  <ul>
    <li><a href="/about">About</a></li>
    <li><a href="/services">Services</a></li>
    <li><a href="/contact">Contact</a></li>
  </ul>
</nav>
You can use multiple <nav> elements on the same page, but without a label, they will appear the same to assistive technologies, reducing their usefulness. To provide an example, I created three different navigations in a project: the main navigation, breadcrumbs, and a table of contents.
Here’s how they look if I check the landmarks list with NVDA:
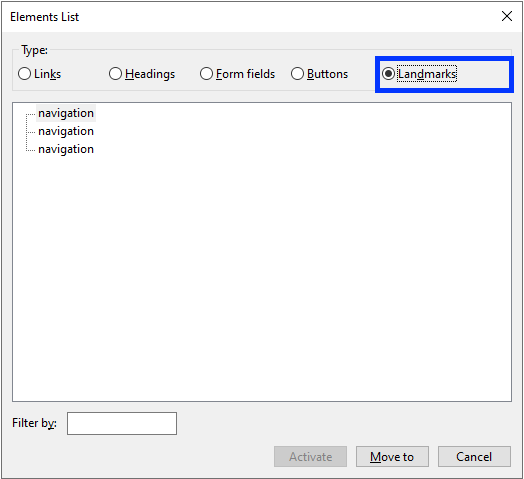
This is where the accessible name is important. We can give a different accessible name to each <nav>. That will provide the screen reader with more context, enabling the user to check out the part of a site they’re interested in:
<nav aria-label="Main navigation">
  <!-- Main navigation links -->
</nav>

<nav aria-label="Breadcrumbs">
  <!-- Breadcrumbs links -->
</nav>

<nav aria-label="Table of content">
  <!-- Table of content links -->
</nav>
Here’s how the updated landmark list will appear to a screen reader:
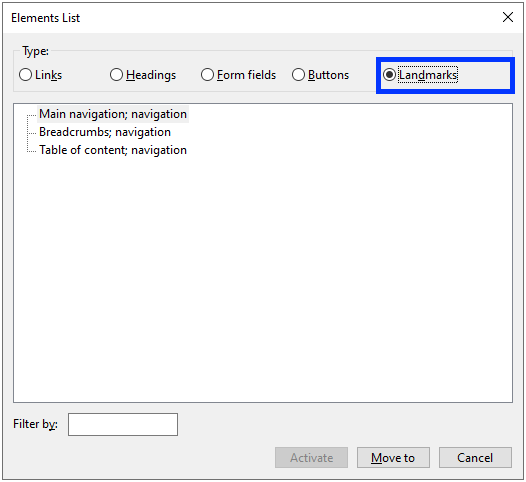
If you’re using more than one <nav> element per page, be sure to give them accessible names so that they will be useful to screen reader users.
<form>The <form> element is used to contain a group of form fields that will be sent to a server to process them. Fields for newsletter subscription forms, contact forms, or any group of form field elements like <input>, <select>, or <textarea>, should be included inside this tag. Its implicit ARIA role is role="form".
Just like with the <nav> element, you can have multiple <form> landmarks in your project, so you should give each one an accessible name to provide better context to screen reader users.
<search>This <search> landmark is similar to the <form>landmark in the sense that is used to store a group of form elements. The big difference is that the <search> element is used to search or filter elements in a website or a part of a page.
You can use the <search> landmark to add a search bar on the header, to create a series of filter controls for a table, or to add advanced search form controls. Its implicit ARIA role is role="search"
You can also use a <form> landmark inside a <search> landmark if you’d like to send the form information to a server. This pattern is not necessary if you’re using client-side JavaScript to search instead:
<search>
  <form action="server/search.php">
    <label for="query">Search article</label>
    <input id="query" name="article" type="search">
    <button type="submit">Search</button>
  </form>
</search>
<search> is the most recent HTML tag to represent a landmark, and it still has compatibility issues. At the time of writing, Edge and Opera have not implemented the <search> tag, and only Safari and iOS have implemented it for mobile.
In order to use <search> in a way that is more widely accepted for another browser, you’ll need to add the role="search" attribute to the tag, like so:
<search role="search">
  <form action="server/search.php">
    <label for="query">Search article</label>
    <input id="query" name="article" type="search">
    <button type="submit">Search</button>
  </form>
</search>
<aside>The <aside> landmark is used to add a section with information that is related in some way to the surrounding content, but is not the main focus. Adding complementary notes to a blog post, a list of additional resources related to a topic, or a banner mentioning an event or offer are good examples of using the <aside> element. It has the implicit ARIA role of role="complementary".
You’ll probably use this landmark the least in a project. It’s very context-dependent.
The a11yproject example uses two <aside> elements: a Black Lives Matter banner and a sponsor’s list. When developing the site, someone may have thought that the sponsor’s list was something they wanted to highlight. They may have used a different landmark. That’s OK – there’s no one right answer; the team can make the judgment call.
If you’re using multiple <aside> elements, you should add an accessible name for additional context. Also, you should not use the <aside> landmark inside another landmark.
According to Deque University Team, some screen readers can have issues navigating inside nested <aside> elements. Also, according to some tests I made with NVDA and JAWS, screen readers announce the start of a complementary region when the virtual cursor is on it, but do not announce when it ends. This can create confusion for screen reader users.
Here’s an example:
<main>
  <h1>Welcome to FakeApp</h1>
  <p>FakeApp is an application that doesn't exist!</p>
  <aside aria-labelledby="sponsors-title">
    <h2 id="sponsors-title">Sponsors</h2>
    <ul>
      <li>All for Sales</li>
      <li>Penstagram</li>
      <li>Timber</li>
    </ul>
  </aside>
  <p>This app does nothing!</p>
</main>
<footer>
  <p>App created by FakeApp - This is not a real site!</p>
</footer>
Here’s the transcription showing how NVDA reads this site:
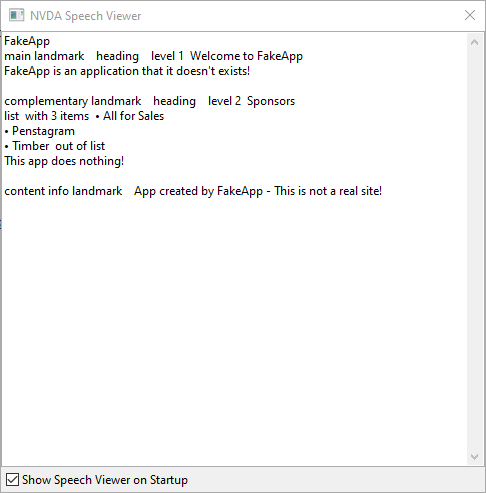
In this case, the paragraph “This app does nothing!” is outside the <aside> tag, but there’s no distinction to the screen reader so it appears to be part of the <aside> landmark, potentially creating confusion.If you want to provide information that would normally qualify to be included in an <aside> but needs to be inside this region, there are two alternatives. The first is to add the attribute role="note" to this element, like so:
<aside aria-labelledby="sponsors-title" role="note">
  <h2 id="sponsors-title">Sponsors</h2>
  <ul>
    <li>All for Sales</li>
    <li>Penstagram</li>
    <li>Timber</li>
  </ul>
</aside>
The second option is to use the <section> tab as we’ll see below.
<section>The <section> landmark can be used to direct a screen reader user to an important place of interest on a site. If the location doesn’t meet the criteria for any of the other landmarks, you should use the <section> tag. This tag has the implicit ARIA role of role="region".
You can nest this tag inside other landmarks and even nest it inside other <section> elements, making it quite versatile. Unlike the previous landmarks if a <section> element doesn’t have an accessible name via aria-label or aria-labelledby, it won’t have any semantic value and won’t be recognized by screen readers.
Here’s an example:
<section aria-labelledby="section-title">
  <h2 id="section-title">I'll be recognized as a section</h2>
  <p>Content of this section</p>
</section>
<section>
  <h2>I won't be recognized as one</h2>
  <p>Content of this section</p>
</section>
The first <section> element uses the <h2> tag as an accessible name, but the second <section> does not have an accessible name. Here’s how this will look to a screen reader:
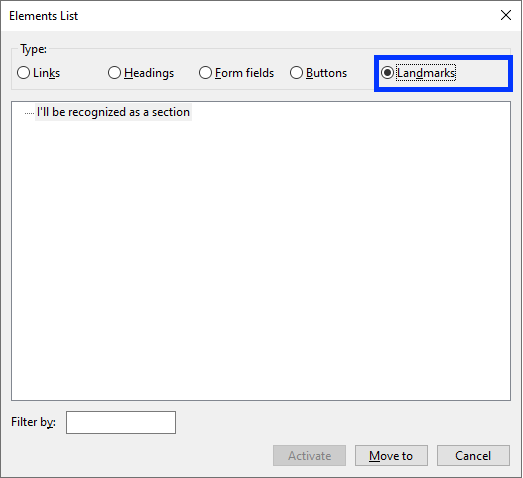
Now that we understand every type of landmark, it’s time to combine all we have learned in a project.
The best way to truly understand how to use landmarks in a project, is to put it into practice. Let’s use landmarks in the design of this hotel booking landing page:
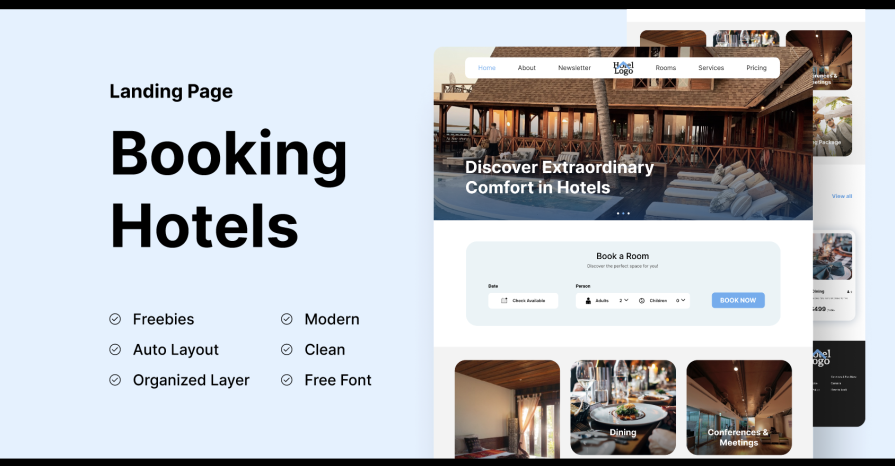
N.B., the original design for this landing page is from Booking Hotel Landing Page by @trisnow; I added a couple of sections, so we can apply landmarks, all credit for the original design goes to @trisnow
In this tutorial, we’ll walk through each part of the site and decide what kind of landmark to use. We’ll use this A11y Annotation Kit made by Indeed and Stephanie Hagadorn to show the landmarks used in the Figma file.
<header> and <footer> tagsLet’s start by looking at the beginning and the end of the page; those sections tend to have landmarks that are easy to spot, like the <header> and <footer>:
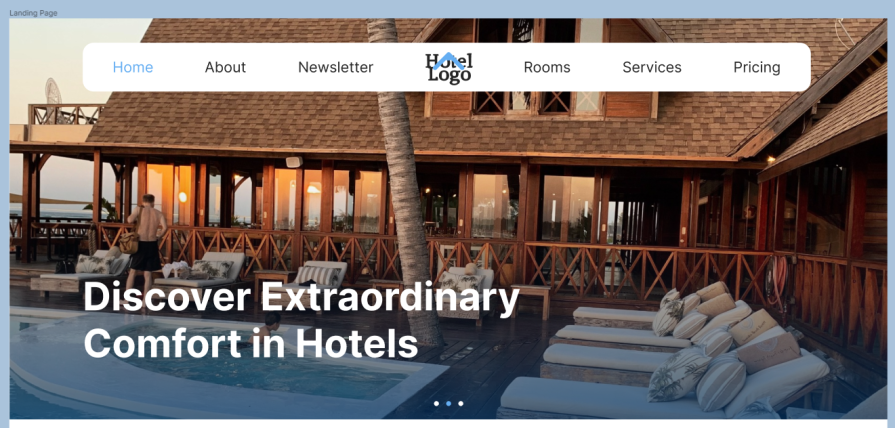
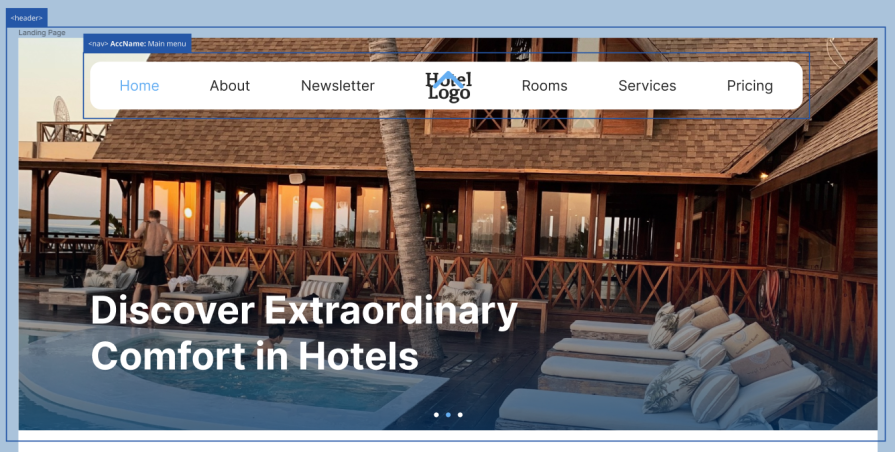
This page has a navigation bar and a carousel that acts as a banner. Any content that comes before the main page content should generally be under the <header> tag.
Additionally, this header has a group of links that help the user navigate between different parts of a site, so grouping those links under the <nav> tag works well. Here’s how that section of the site looks translated into code:
<header>
  <nav>
    <ul>
      <!-- Navigation's links -->
    </ul>
  </nav>
  <!-- Carousel markup -->
</header>
Now let’s take a look at the site’s footer section; it uses the <footer> landmark:
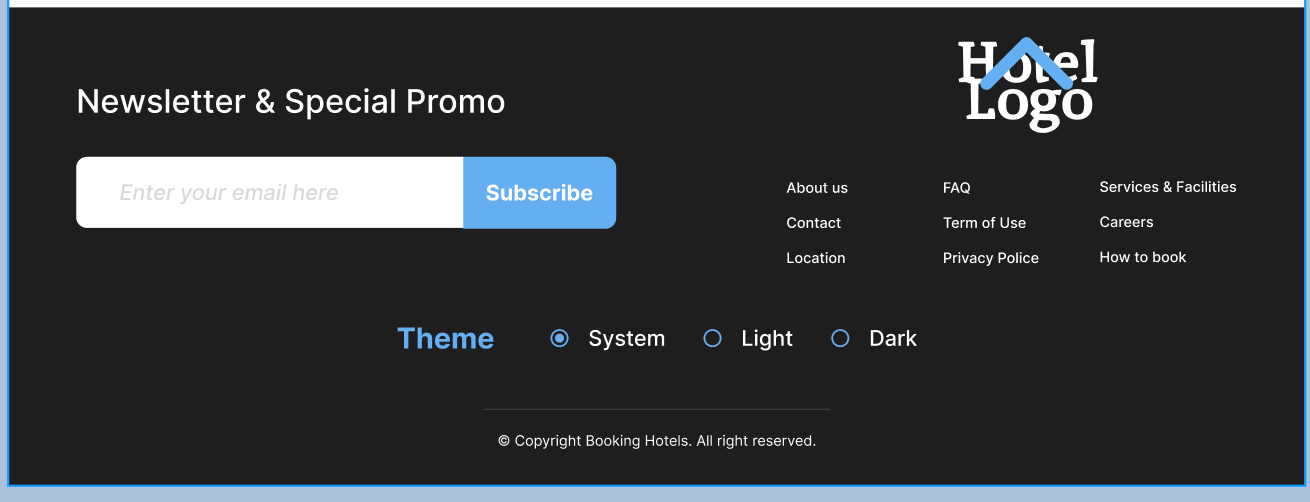
This particular footer has four elements:
The newsletter input form will send information (an email) to a server for the newsletter registration, so it needs to be inside a <form> tag. Since it has a visible title, we can use that as an accessible name for this landmark, like so:
<form aria-labelledby="newsletter-title">
  <h2 id="newsletter-title">Newsletter & Special Promo</h2>
  <label for="newsletter" class="sr-only">Email</label>
  <input type="email" id="newsletter" placeholder="Enter your email here">
  <button type="submit">Subcribe</button>
</form>
All input fields need an accessible name, so using the <label> tag is the best option here. However, since the label is not visible in the design, we’ll need to hide it visually, but not from screen readers. That’s why we use the sr-only class.
For more in-depth information about the CSS visually-hidden class, see this guide: Design vs. accessibility and the CSS visually-hidden class.
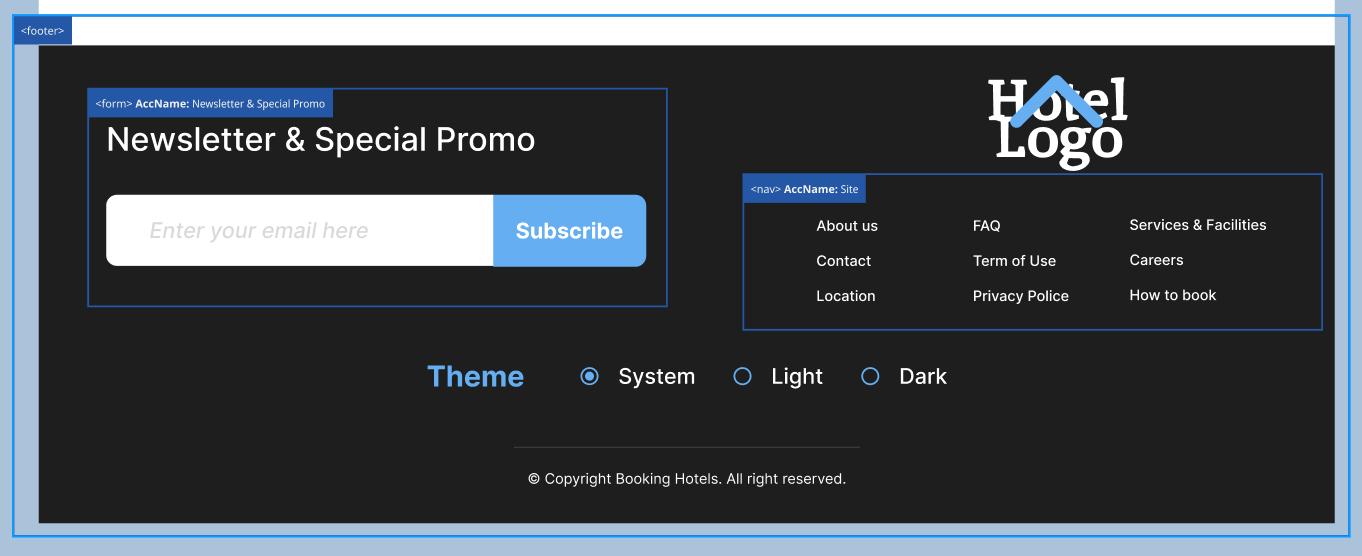
The group of navigation links will be inside another <nav> landmark. But, since we’re using multiple <nav> elements on the page, it’s advisable to add accessible names to each one.
In the <header> markup, let’s add an accessible name to the first <nav>. Since we don’t have a visible name for this one, we can use aria-label:
<header>
  <nav aria-label="Main menu">
    <!-- Content -->
  </nav>
</header>
Now, let’s create the next <nav> in the <footer>. We’ll use "Site" as its accessible name:
<footer>
  <form aria-labelledby="newsletter-title">
    <h2 id="newsletter-title">Newsletter & Special Promo</h2>
    <!-- Form markup -->
  </form>
  <nav aria-label="Site">
    <ul>
      <!-- Footer's links -->
    </ul>
  </nav>
</footer>
The theme selector has a group of radio buttons. and those are considered inputs, but the information from them is not submitted to a server for processing. Changing a website’s theme is not something that needs to be done on the server side. Most of the time, you use server-side JavaScript and CSS to modify themes, so this is not a case where we would use the <form> landmark.
Instead, we can group the theme selector radio buttons in a <fieldset> tag, like so:
<fieldset>
  <legend>Theme</legend>
  <input id="system-theme" type="radio" name="theme" value="system">
  <label for="system-theme">System</label>
  <input id="light-theme" type="radio" name="theme" value="light">
  <label for="light-theme">Light</label>
  <input id="dark-theme" type="radio" name="theme" value="dark">
  <label for="dark-theme">Dark</label>
</fieldset>
Here’s our landmark structure for <header> and <footer> as shown in our Figma file. I’m using “AccName” as an abbreviation for accessible name to identify which element needs to be labeled:
<main> landmarkNow that we’ve defined our <header> and <footer> we need to check where to add the <main> landmark. Generally, putting everything that’s between the <header> and <footer> tags inside the <main> tag is a safe bet. Right now, there are four content items (or four possible landmarks) in this section of the site:
The first step is to determine if these are the sections that we want to bring to the attention of users. For example, if we determine that Travel resources are related, but not central, to the primary content of the site, then we might include them in an <aside> landmark.
If we choose to include the Travel resources section as an <aside>, then it should be outside the <main> section, like this:
<aside aria-labelledby="resources-title">
  <h2 id="resources-title">Travel resources</h2>
  <!--   Section's content -->
</aside>
The three remaining content items should be inside the <main> landmark:
<main>
  <!--   Services and facilities -->
  <!--   Search form -->
  <!--   Offers -->
</main>
<aside aria-labelledby="resources-title">
  <h2 id="resources-title">Travel resources</h2>
  <!--   Section's content -->
</aside>
Here’s how our <aside> notes look on Figma:

<main> landmark’s contentNow, let’s review the content inside the <main> landmark to see if there are parts that are worth highlighting as individual landmarks. This content includes the following:
We can use the generic <section> landmark for the information about different services. But, to be recognized as a landmark, it will need an accessible name. Since this section doesn’t have a visible heading, we can add a visually hidden heading and using it as the section’s accessible name, like so:
<section aria-labelledby="services-title">
  <h2 id="services-title" class="sr-only">Services and facilities</h2>
  <!--   Section's content -->
</section>

The search form is a group of input fields that enables the user to search and filter information, so it should go inside a <search> landmark. This form likely works by sending requests to the server and then bringing back the information, so this search form content should be inside a <form> landmark as well.
Here’s how the code will look:
<search role="search">
  <form aria-labelledby="search-title">
    <h2 id="search-title">Book a Room</h2>
    <!-- Form fields -->
  </form>
</search>
Since the <search> landmark is still not fully supported, it needs a role=" search" attribute. We can use the Book a Room title as an accessible name for the <form> field.
Here’s how it looks in our Figma file:

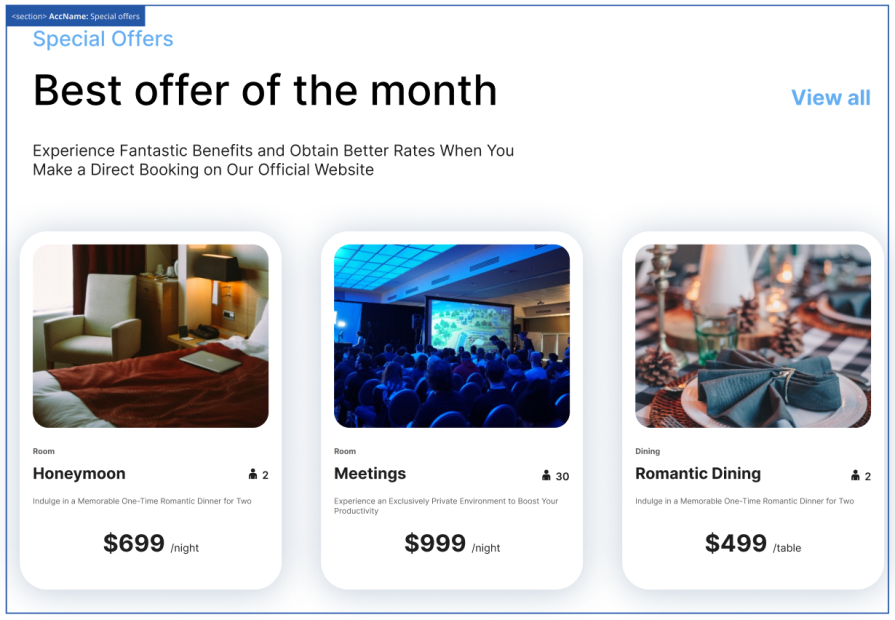
We can use the <section> landmark for the information about special offers. This section has a visible heading, Special Offers, so we can use that as its accessible name:
<section aria-labelledby="offers-title">
  <h2 id="offers-title">Special Offers</h2>
  <!-- Section's content -->
</section>
Here’s how this section looks with the Figma annotations:
Here is our <main> landmark’s content translated to HTML:
<main>
  <section aria-labelledby="services-title">
    <h2 id="services-title" class="sr-only">Services and facilities</h2>
    <!--   Section's content -->
  </section>

  <search role="search">
    <form aria-labelledby="search-title">
      <h2 id="search-title">Book a Room</h2>
      <!-- Form fields -->
    </form>
  </search>

  <section aria-labelledby="offers-title">
    <h2 id="offers-title">Special Offers</h2>
    <!-- Section's content -->
  </section>
</main>
Learning to look into a design and translate the visual information into HTML is a very important skill for creating accessible content. I hope this article has helped improve your understanding of how to translate visual information into HTML landmarks and create a better experience for screen reader users.
As helpful as landmarks are, too many can create excessive “noise,” reducing their usefulness. So, be sure to use landmarks wisely, reserving them for highlighting the most important sections of your project.
Install LogRocket via npm or script tag. LogRocket.init() must be called client-side, not
server-side
$ npm i --save logrocket

// Code:

import LogRocket from 'logrocket';
LogRocket.init('app/id');
// Add to your HTML:

<script src="https://cdn.lr-ingest.com/LogRocket.min.js"></script>
<script>window.LogRocket && window.LogRocket.init('app/id');</script>

React Server Components and the Next.js App Router enable streaming and smaller client bundles, but only when used correctly. This article explores six common mistakes that block streaming, bloat hydration, and create stale UI in production.

Gil Fink (SparXis CEO) joins PodRocket to break down today’s most common web rendering patterns: SSR, CSR, static rednering, and islands/resumability.

@container scroll-state: Replace JS scroll listeners nowCSS @container scroll-state lets you build sticky headers, snapping carousels, and scroll indicators without JavaScript. Here’s how to replace scroll listeners with clean, declarative state queries.

Explore 10 Web APIs that replace common JavaScript libraries and reduce npm dependencies, bundle size, and performance overhead.
Hey there, want to help make our blog better?
Join LogRocket’s Content Advisory Board. You’ll help inform the type of content we create and get access to exclusive meetups, social accreditation, and swag.
Sign up now