Node.js developers often have to dynamically generate HTML documents from the server side and send them to connected web app users. For example, a generic MVC web app displays the logged user’s name within the header section by dynamically constructing the header section HTML within the Node.js server. We can generate HTML documents using native HTML syntax and JavaScript with simple string concatenation, JavaScript template literals, or string replacement-based templating logic. However, these approaches become time-consuming and complex as the project complexity grows.

Template engines offer a fully featured, pre-developed, productive solution for generating HTML documents based on templates and provided data objects. EJS (Embedded JavaScript Templating) is a popular template engine that we can use to send dynamically generated HTML documents from Node.js apps.
In this tutorial, we’ll learn EJS templating syntax, basic examples, and how to properly set up and use EJS templating in your Node.js apps. We’ll also explore advanced EJS templating techniques, best practices, and common development pitfalls, and compare EJS with other popular templating engines.
Editor’s note — This blog was updated on 11 March, 2025, many thanks to the contributions of Shalitha Suranga. The revised post improves clarity with a more comprehensive introduction to EJS, detailed installation instructions, and expanded code examples. It also includes a comparison with other templating engines, a troubleshooting section, and answers to common reader questions. These updates make it an even more practical guide for developers working with EJS.
A template engine dynamically generates content based on two primary inputs:
Understand the underlying process of a template engine using the following diagram:
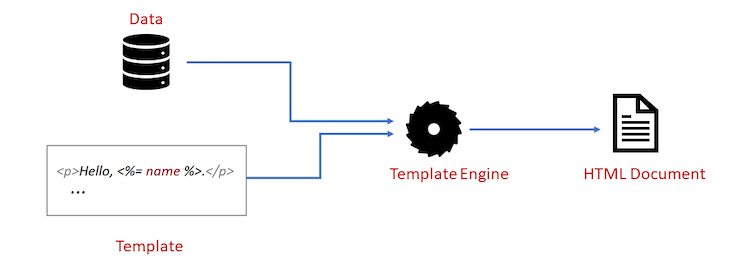
Web template engines, like EJS, handle the task of interpolating data into HTML code while providing some features like repetitive blocks, nested blocks, shared templates that would have been difficult to implement by concatenating strings, or similar built-in JavaScript features.
EJS is a web template engine that lets you generate HTML documents by embedding JavaScript code snippets within HTML code. EJS takes an HTML template written using EJS syntax and data as input parameters and renders the final HTML document by injecting data based on template logic.
The EJS web template engine comes with the following highlighted features:
.ejs template files. The EJS engine handles .ejs files like PHP handles .php files to generate HTML documents dynamicallyEJS is a popular web template engine that most Node.js developers integrate with their favorite web frameworks to build complex, MVC, server-rendered web apps.
We typically use EJS with web frameworks like Express and Fastify, but it’s possible to use EJS for templating requirements without a specific web framework. Let’s understand how EJS works by using it without a web framework.
Create a new Node.js project by using NPM or Yarn as follows:
npm init -y
# --- or ---
yarn init -y
Install EJS to the project:
npm install ejs
# --- or ---
yarn add ejs
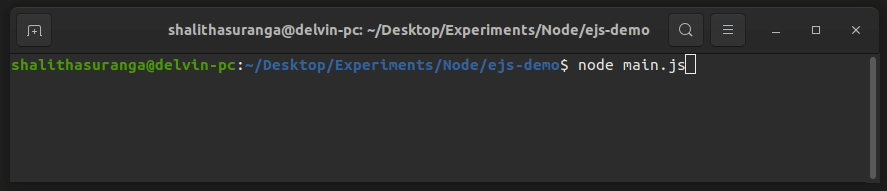
Add the following code snippet to the main.js file:
const ejs = require('ejs');

const template = `
  <h2>Hello <%= name %>!</h2>
  <p>Today is <%= date %></p>
  <p>1 + 2 is <%= 1 + 2 %></p>
`;
const data = {
  name: 'John',
  date: new Date().toISOString().split('T')[0]
};

const output = ejs.render(template, data);

console.log(output);
The render(template, data) method generates output based on the input template string and data. Here, the template uses the <%= %> tag to render each data object property and we passed the required data properties from the second parameter of the render() method. EJS uses JavaScript as the templating language so expressions like 1 + 2 directly get executed.
When you run the main.js file with Node.js, you’ll see the generated output on the terminal, as shown in the following preview:
You can also store the template content within a file named template.ejs and use the renderFile() method as follows:
ejs.renderFile('template.ejs', data)
  .then((output) => console.log(output));
We’ll learn how to use .ejs files in a web framework in an upcoming section soon!
You have just seen the basic syntax of EJS. The syntax used the following pattern and follows basic HTML-like syntax:
<startingTag JavaScript expression closingTag>
For example, previously we used the <%= name %> block to render the value of the name data element. EJS has different tags for different purposes. The start tag <%= is called the “HTML-escaped output” tag because if the string in the content has forbidden characters like > and &, the characters will be escaped (replaced by HTML codes) in the output string.
EJS supports the following tags:
| Syntax | Description | Example |
<% expression %> |
Scriplet tag, produces no output and is used for the control flow | <% if(isLogin) { %> |
<%_ expression %> |
Scriplet tag that strips all previous whitespaces | <%_ if(isLogin) { %> |
<%= expression %> |
Outputs HTML-escaped data | <%= name %> |
<%- expression %> |
Outputs HTML-unscaped data | <%- htmlString %> |
<%# comment %> |
Commenting tag | <%# This is a comment %> |
<%% |
Outputs the <% literal |
<%% |
Earlier, we wrote a sample templating example without using a web framework to simplify the introduction of this tutorial. Using a Node.js web framework undoubtedly boosts developer productivity and fastens feature delivery for building Node.js web apps, so let’s focus on using EJS under a web framework from now on.
We will use Express in this tutorial because it’s one of the best Node frameworks. It’s minimalistic and easy to get started with.
Let’s start a project from scratch. Create a new directory where you want to put the project files.
Initialize a new Node.js project in the directory by running npm init -y or yarn init -y in the terminal, then to install Express and EJS, run:
npm install express ejs
# --- or ---
yarn add express ejs
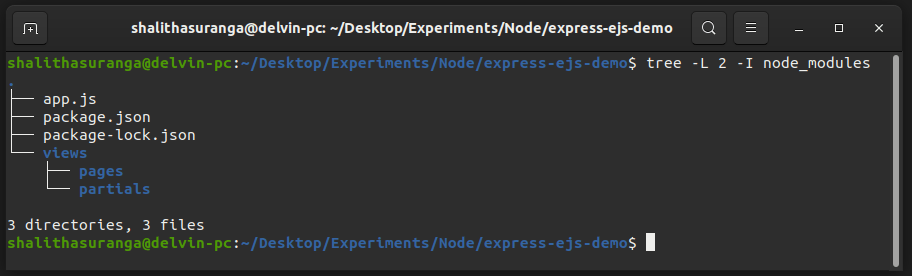
After installation, create a app.js file and a views directory in the root project directory. Inside the views directory, create two directories — pages and partials. I will be explaining why we need these directories shortly.
First, copy the following into app.js:
const express = require('express');
const app = express();
const port = 3000;

app.set('view engine', 'ejs');

app.get('/', (req, res) => {
    res.render('pages/index');
});

app.listen(port, () => {
  console.log(`App listening at port ${port}`);
});
Now, inside the views/pages directory, create a file called index.ejs. And the following into index.ejs:
<h1>Hi, there!</h1>
If you run node app.js on the terminal from the project directory, and then visit http://localhost:3000, you should see the following result:

Now, let’s walk through some parts of the code and understand what is going on:
app.set('view engine', 'ejs') is self-explanatory. We are setting EJS as the Express app view engine. By default, Express will look inside of a views directory when resolving the template files, which is why we had to create a views directoryres.render('pages/index'), we are calling the render() method on the response object. This renders the view provided (pages/index in this case) and sends back the rendered HTML string to the clientapp.set('view engine', 'ejs'). We also didn’t have to write the path as views/pages/index because the views directory is used by defaultRecall that our aim is to combine data with templates. We can do that by passing a second argument to res.render(). This second argument must be an object, whose properties will be accessible in the EJS template file.
Update app.js like so:
const express = require('express');
const app = express();
const port = 3000;

app.set('view engine', 'ejs');

const user = {
    firstName: 'John',
    lastName: 'Doe'
};

app.get('/', (req, res) => {
    res.render('pages/index', { user });
});

app.listen(port, () => {
  console.log(`App listening at port ${port}`);
});
The above GET endpoint renders the index.ejs template by passing the user details object via the user property name, so we can now use the user object identifier within the template to access available properties of the user details object.
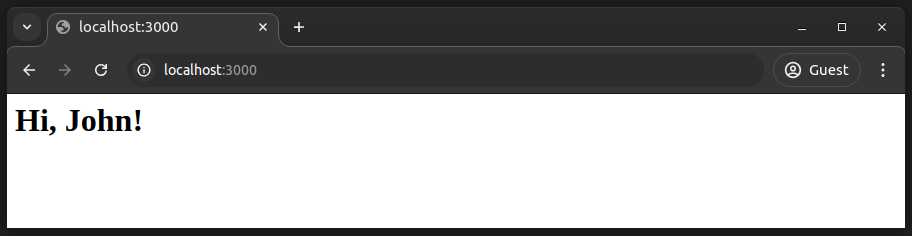
Update index.ejs too as follows:
<h1>Hi, <%= user.firstName %>!</h1>
Run node app.js and you should get this:
The EJS scriptlet tag, <% %> can contain view layer logic to render HTML content dynamically based on the provided data elements. Any JavaScript syntax can be used in this tag. You can use JavaScript if statements to render HTML segments conditionally.
To see this in action, update the user details object in app.js as follows:
const user = {
    firstName: 'John',
    lastName: 'Doe',
    isAdmin: true
};
Then update index.js:
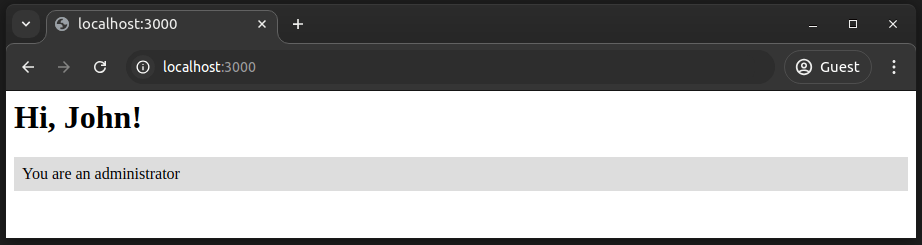
<h1>Hi, <%= user.firstName  %>!</h1>
<% if (user.isAdmin) { %>
    <div style="background: #ddd; padding: 0.5em">You are an administrator</div>
<% } %>
If you run the app, you will see the paragraph in the if statement displayed, as shown in the following preview:
Change isAdmin: false in the user details object, and the HTML block won’t be displayed.
Take note of the syntax of the scriptlet <% if(user.isAdmin) { %>. The opening { is added within the second scriptlet block and the closing } is added in the next scriptlet block. EJS scriptlet tags work the same as PHP tags.
Because the <% %> scriptlet tag can contain any valid JavaScript code, we can easily loop through and display data in EJS using JavaScript loop structures. You can use any preferred JavaScript loop structure with EJS by wrapping repetitive segments with a scriptlet block.
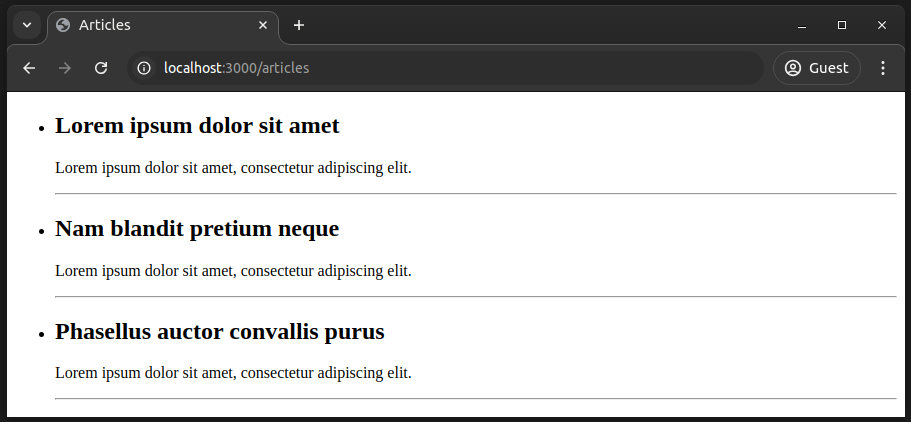
Create a new GET endpoint named /articles and pass a list of sample articles into its template by adding the following code snippet to the app.js:
const articles = [
    {id: 1, title: 'Lorem ipsum dolor sit amet', body: 'Lorem ipsum dolor sit amet, consectetur adipiscing elit.'},
    {id: 2, title: 'Nam blandit pretium neque', body: 'Lorem ipsum dolor sit amet, consectetur adipiscing elit.'},
    {id: 3, title: 'Phasellus auctor convallis purus', body: 'Lorem ipsum dolor sit amet, consectetur adipiscing elit.'}
];

app.get('/articles', (req, res) => {
    res.render('pages/articles', { articles });
});
Create a new file inside the views/pages named articles.ejs and add the following code:
<!DOCTYPE html>
<html lang="en">
<head>
    <meta charset="UTF-8">
    <meta http-equiv="X-UA-Compatible" content="IE=edge">
    <meta name="viewport" content="width=device-width, initial-scale=1.0">
    <title>Articles</title>
</head>
<body>
    <ul>
    <% for(const article of articles) { %>
        <li>
            <h2><%= article.title %></h2>
            <p><%= article.body %></p>
        </li>
        <hr />
    <% } %>
    </ul>
</body>
</html>
Here we used the for...of JavaScript loop structure, but you can use the forEach() array method also based on your development preferences:
<% articles.forEach((article)=> { %>
    <li>
        <h2><%= article.title %></h2>
        <p><%= article.body %></p>
    </li>
    <hr />
<% }) %>
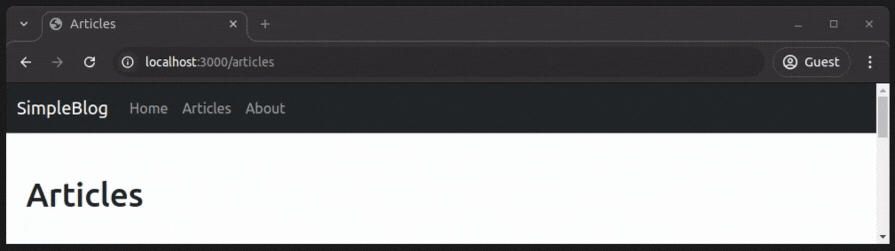
When you run the app, visit http://localhost:3000/articles and you should see the following:
Notice the following implementation facts:
articles which is an array of article objects containing a title and a body to the articles.ejs template. Then, in the template, we loop through the array using for..of ( or forEach() ) to render each post object as an HTML list item<li></li> block since the parent scriptlet tag has a loop structurearticle variable that references each item of the array on each iteration of the loop ( <% for(const article of articles) { %> ) is accessible in the nested block of the template code until we reach the closing brackets, <% } %>Try to use other JavaScript loop structures to render this article list.
Some parts of websites stay the same across different pages, like the header, footer, and sidebar. If we repetitively add these parts in each page template, your project becomes hard to maintain since you’ll have to edit multiple templates to edit something in a common frontend section, i.e., adding a new link to the website’s primary navigation bar. EJS lets you create shared templates and import them with the include(file) inbuilt function.
Recall that we created the views/partials directory earlier. Create two new files named header.ejs and footer.ejs in this folder.
The content of header.ejs should be the following:
<!DOCTYPE html>
<html lang="en">
<head>
    <meta charset="UTF-8">
    <meta http-equiv="X-UA-Compatible" content="IE=edge">
    <meta name="viewport" content="width=device-width, initial-scale=1.0">
    <link
      rel="stylesheet"
      href="https://cdn.jsdelivr.net/npm/[email protected]/dist/css/bootstrap.min.css"
      integrity="sha384-QWTKZyjpPEjISv5WaRU9OFeRpok6YctnYmDr5pNlyT2bRjXh0JMhjY6hW+ALEwIH" crossorigin="anonymous">
    <title>Articles</title>
</head>
<body>
<nav class="navbar navbar-expand-lg navbar-dark bg-dark">
  <div class="container-fluid">
    <a class="navbar-brand" href="/">SampleBlog</a>
    <div class="collapse navbar-collapse" id="navbarNav">
      <ul class="navbar-nav mr-auto">
        <li class="nav-item">
          <a class="nav-link" href="/">Home</a>
        </li>
        <li class="nav-item">
          <a class="nav-link" href="/articles">Articles</a>
        </li>
        <li class="nav-item">
          <a class="nav-link" href="#">About</a>
        </li>
      </ul>
    </div>
  </div>
</nav>
We have included a link to Bootstrap in header.ejs because we will be using Bootstrap classes to style the sample project.
Now, update footer.ejs like so:
<footer class="p-3">
<p class="text-muted">© <%= new Date().getFullYear() %> Simple Blog</p>
</footer>
</body>
</html>
And the following code to the articles.ejs file:
<%- include('../partials/header') %>
<main class="container py-5">
  <h1>Articles</h1>
  <ul class="pt-4">
  <% for(const article of articles) { %>
      <li>
          <h3><%= article.title %></h3>
          <p><%= article.body %></p>
      </li>
      <hr />
  <% } %>
  </ul>
</main>
<%- include('../partials/footer') %>
Note the following implementation facts:
header.ejs and footer.ejs partials using the include() function that takes the relative path to the file as an argument. Because pages and partials are in the same directory, to access partials from pages, we have to first go out of the pages directory using the template file path as ../partials/header<%- %>) instead of the escaped output tag since we needed to render the HTML code of the shared template directly. Make sure not to use the HTML-unescaped output tag with untrusted user inputs, because it can expose your application to script injection attacksRun node app.js , visit http://localhost:3000/articles and you should see this:
Now we can reuse these EJS partials on other pages and avoid writing repetitive code segments. Include the partials within the index.ejs file as follows:
<%- include('../partials/header') %>
<main class="container py-5">
  <h1>Hi, I am <%= user.firstName  %> <%= user.lastName %></h1>
  <h3>Welcome to my blog</h3>
</main>
<%- include('../partials/footer') %>
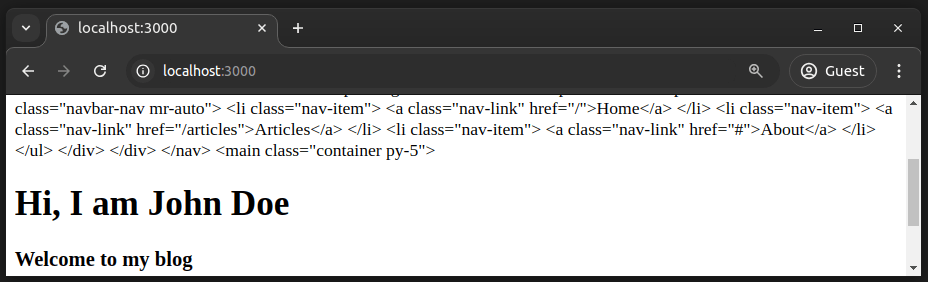
Click on the “Home” link. You’ll see the homepage with the same header and footer we’ve used for the articles page:
Note that we can use any JavaScript operator in the EJS tags so that we can write this instead:
...
<h1>Hi, I am <%= user.firstName + ' ' + user.lastName  %>
...
Something is wrong on the index page. Can you see it?
The title of the homepage is “Articles,” because the header.ejs partial has the title of the web page hard coded as such, which is not desirable. We want the title of the page to reflect the content of the page, so we must pass in the title as an argument.
EJS makes it easy because a partial has access to every variable in the parent view, so we just have to pass the variable in the object alongside the call to res.render().
Update the call to res.render() in app.js as follows:
//...
app.get('/', (req, res) => {
    res.render('pages/index', {
        user,
        title: 'Home'
    });
});

app.get('/articles', (req, res) => {
    res.render('pages/articles', {
        articles,
        title: 'Articles'
    });
});
//...
Then update the title tag in header.ejs:
...
<title><%= title %></title>
...
Run the app again and each page should have the correct title:
You can also pass a variable to a partial when you include it as follows:
<%- include('../partials/header', { title :'Page Title' }) %>
Variables passed this way precede variables passed through Express’s render() function.
I intentionally didn’t implement the About page. Create the About page by passing some data to the about.ejs to be more familiar with EJS partials and data passing.
EJS uses JavaScript as the templating language, so it directly throws JavaScript exceptions and displays them within the terminal and website frontend. Here are some common EJS templating errors and how to resolve them:
<identifier> is not defined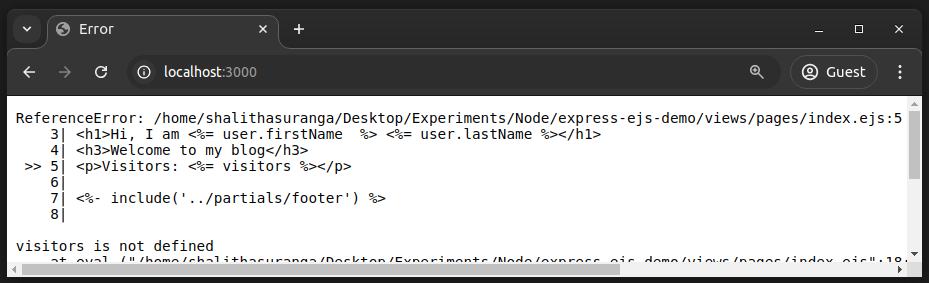
EJS throws a ReferenceError when you try to use a data property that is not provided by the render() function. This error can be fixed by sending the data element you used in the template or by checking whether the identifier is available as follows:
<p>Visitors: <%= typeof visitors != 'undefined' ? visitors : 0 %></p>
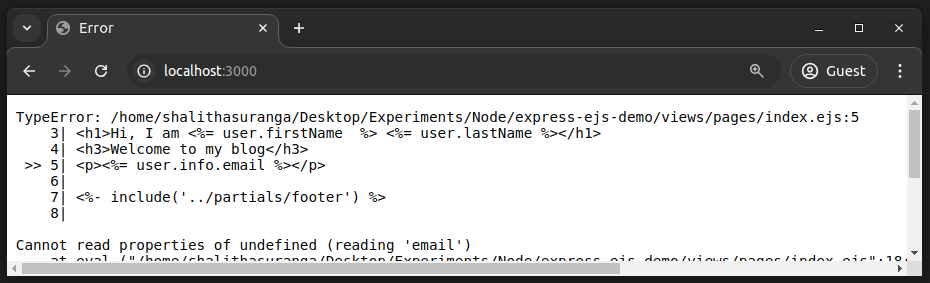
EJS throws a TypeError if we try to read the properties of undefined identifiers. For example, if we try to access user.info.email within the template but the user object doesn’t contain the info nested object, EJS throws this error.
Using JavaScript’s optional chaining operator is a popular way to solve these issues:
<p><%= user?.info?.email %></p>
Most developers know the possibility of printing HTML codes on the browser viewport by escaping HTML-specific characters. EJS renders HTML-escaped outputs with the <%= %> tag, so if we use it to include a template, the raw code of the included template gets HTML-escaped, rendering visible HTML code on the browser viewport.
To solve this, check whether you use include() as follows:
<%= include('../partials/header') %>
Replace = with - to render HTML-unescaped output to send raw HTML to the browser properly:
<%- include('../partials/header') %>

SyntaxError is a general error type that JavaScript interpreters use to report language syntax issues, so EJS throws it for JavaScript-related syntax issues. Fixing JavaScript syntax issues is the only way to solve this issue. For example, the above error is thrown due to a missing curly brace of an if statement, so closing the if block properly resolves this issue:
<% if(user.isAdmin) { %>
    <p>You are not an administrator</p>
<% } %>
You can use the ejs-lint NPM package or EJS code editor plugins to detect EJS syntax issues during development.
Adhering to development best practices is the most practical way to create high-quality, maintainable, and beginner-friendly codebases. Consider adhering to the following best practices while developing EJS templates:
<% if(user.isAdmin) { %>...<% } %> is better than using so many <% user.isAdmin ? .. : .. %> blocks<%- %> tag with user inputs. Sanitize HTML strings properly if you need to render user input data as raw HTMLApart from these EJS-specific best practices, write clean, readable, and error-free JavaScript code to improve the quality of JavaScript expressions in EJS templates.
EJS has two main competitors: Pug and Handlebars. Both these EJS alternatives competitively offer features that EJS implements. Let’s check how EJS tries to offer a better templating solution by comparing it with Pug and Handlebars:
| Comparison factor | EJS | Pug | Handlebars |
| Document structuring method | Native HTML tags | Pug document syntax | Native HTML tags |
| Templating language | JavaScript | Pug language and JavaScript | Handlerbars language, extra features should be added via helpers |
| Templating language complexity | Minimal | Minimal | Moderate (uses some unique syntax like Bash scripting does) |
| Beginner-friendliness | Beginner-friendly since it uses simple tags, HTML, and JavaScript | Can be challenging for new developers since structuring language is not HTML | Beginner-friendly than Pug, but limited features might frustrate beginners |
| Web framework support | Good | Good | Good |
| Partials supported? | Yes | Yes | Yes |
| Template composition supported? (extending template blocks in a base template) | No | Yes | Yes |
| Complete ports in other languages (i.e., Go, Java, etc) | Not available since it depends on JavaScript | Available | Mustache (the base language of Handlebars) implementations are available |
EJS doesn’t implement template composition, but developers can use partials to decompose complex apps into reusable parts using the same technique that PHP developers use. Overall, EJS offers a simple and powerful templating solution by integrating native JavaScript with HTML using ASP-like tags.
In this article, we explored template engines, introduced EJS for Node.js app templating, and learned how to use it. We have seen how to reuse code with partials and how we can also pass data to them. Adhere to EJS templating best practices discussed above to write highly readable, maintainable, and beginner-friendly template source codes.
Here is the EJS syntax reference if you want to learn more about what’s possible with EJS. You can check out the complete code for this article from this GitHub repository.
 Monitor failed and slow network requests in production
Deploying a Node-based web app or website is the easy part. Making sure your Node instance continues to serve resources to your app is where things get tougher. If you’re interested in ensuring requests to the backend or third-party services are successful, try LogRocket.

LogRocket lets you replay user sessions, eliminating guesswork around why bugs happen by showing exactly what users experienced. It captures console logs, errors, network requests, and pixel-perfect DOM recordings — compatible with all frameworks.
LogRocket's Galileo AI watches sessions for you, instantly identifying and explaining user struggles with automated monitoring of your entire product experience.
LogRocket instruments your app to record baseline performance timings such as page load time, time to first byte, slow network requests, and also logs Redux, NgRx, and Vuex actions/state. Start monitoring for free.

Learn how to set up Meilisearch, index documents, and build keyword, semantic, and hybrid search with AI-powered retrieval.

Compare pnpm and npm across security defaults, disk usage, dependency strictness, and workspace policy to decide which package manager fits your project.

I migrated 20 production-style components from Tailwind to StyleX. Here’s what the data showed about LOC, CSS bundle size, build time, and type safety.

A guide for using JWT authentication to prevent basic security issues while understanding the shortcomings of JWTs.
Would you be interested in joining LogRocket's developer community?
Join LogRocket’s Content Advisory Board. You’ll help inform the type of content we create and get access to exclusive meetups, social accreditation, and swag.
Sign up now

