One of the most important parts of building any website or web app is its search functionality. Search functionality helps to make interactions with products easier and faster. We live in a world where every millisecond counts and a bad search experience could lead to users discontinuing the use of a product.

In this tutorial, we will :
The final version of our app should look something like this: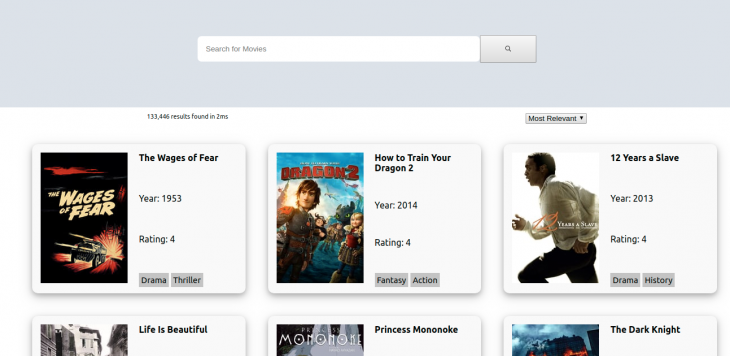
The following prerequisites are needed to follow along with this tutorial:
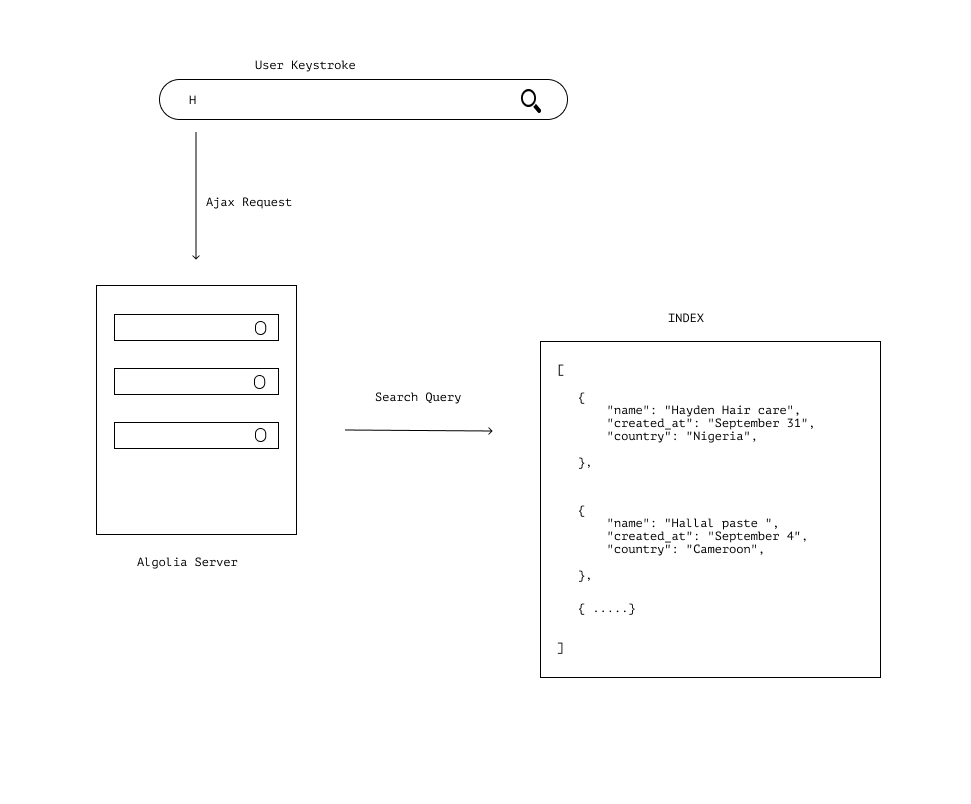
It’s a predictive search feature that tries to anticipate and guess the most likely completion of what a user’s search query is and displays information that is relevant to the user’s input instantly with every keystroke inputted in the search box.
According to its website:
Algolia is search-as-a-service solution that helps you build real-time search into your app with customizable, prebuilt widgets along with tools that make building search systems easy.
To understand how the Algolia InstantSearch service works we need to know the following key terms:
INDEX — The set of information which will be used in our application for querying and searching. It is a collection of RECORDSRECORDS — An array of JSON objects, these objects contain data/information that is eventually shown to the user. They are composed of ATTRIBUTESATTRIBUTES — Key-value pair contents that describe their parent RECORDThe InstantSearch package interacts with the Algolia API, when a user enters a keystroke in the search box, a request is made to the Algolia servers, which in turn compares the search query to the available INDEX and filters through the RECORD for the ones that contain the relevant ATTRIBUTE then sends back the RECORDS that are relevant to the search term.
Algolia provides us with preconfigured UI widgets that serve as building blocks for our Algolia powered app. These widgets leverage upon the Algolia API to help ease interacting with and rendering data from the Algolia API.
The widgets we will be using in this tutorial are:
InstantSearch —This widget is the parent component of all Algolia Instant search widgets. It interfaces directly with the Algolia APISearchBox — This component houses the search bar and provides a means to get user queriesRefinementList — This is a widget that provides a set of filters to refine the query results data gotten from the Algolia API according to their attributesHits — This is a widget that displays all the results for a particular queryHighLights — This widget helps with highlighting the attribute of a query resultHitsPerPage — This widget is used to regulate the number of results to be shown per pagePagination — This widget is used to change Hit pagesStats — This widget shows the amount of time it took to retrieve data and the number of hits that match a search queryFor a full list of the React InstantSearch widgets and what they do, refer to this API reference.
We will be using the create-react-app boilerplate to bootstrap our project so we don’t have to worry about configurations to get started with using Algolia for instant search in your application.
Run this command to create a new React app with the boilerplate:
#Using NPM
npx create-react-app react-instant

#or, Using Yarn
yarn create react-app react-instant
Then change into the directory for our project using the command:
cd react-instant
Next, we install the React instant search package using the command:
npm install react-instantsearch-dom
#or, Using Yarn
yarn add react-instantsearch-dom
We will also need to install the algoliasearch package, Algoliasearch is an HTTP client that communicates with the Algolia API.
Run the command:
npm install algoliasearch
or
yarn add algoliasearch
Create a folder named components in your src folder, this folder will house the Search component of our app.
We will need to remove the unneeded contents of our boilerplate, open your src/App.js and delete the unnecessary code. It should look something like this:
import React from 'react';
import './App.css';
function App() {
  return (
        <div className="App">

        </div>
  );
}
export default App;
Proceed to create a file named Search.js in your components folder and include the following in the file:
# /src/components/Search.js

import React from 'react';
function Search () {
        return (

          );
}
export default Search;
Then we proceed to import algoliasearch and the InstantSearch component into our Search.js file:
import algoliasearch from 'algoliasearch'
import { InstantSearch } from 'react-instantsearch-dom'
After importing, initialize it in the search component:
return(
   <InstantSearch>

   </InstantSearch>

 );
We then proceed to configure our app to use our API key, app ID and index name.
For the purpose of this tutorial, we will be using an already configured index provided by Algolia for test purposes that includes all the data we would need to create our app.
The value for these configurations should be replaced with the one you got from your Algolia dashboard.
Include the following in your Search.js file, just after your import statements.
const searchClient = algoliasearch("latency", "6be0576ff61c053d5f9a3225e2a90f76")
Add the searchClient as an attribute of your InstantSearch component and include your indexName as an attribute with a value of movies.
function Search() {

    return (
        < InstantSearch searchClient={searchClient} indexName="movies" >

        </InstantSearch >
    );
....
Next, we create a Header component that will contain our SearchBox and import the SearchBox component from InstantSearch:
import { InstantSearch, SearchBox } from 'react-instantsearch-dom';
....
const Header = () => (
    <header className="header">
        <SearchBox
            className="search-bar"
            translations={{placeholder: 'Search for Movies'}}
        />
    </header>
)
....
Then we proceed to configure our Hits to receive results from the Algolia API:
const Hit = ({ hit }) => (
    <a href={"/"} >
        <div className="card">
            <div className="card-image">
                <img src={hit.image} alt={hit.name} className="image"/>
            </div>
          <div className="card-contents">
                <Highlight attribute="title" hit={hit} className="card-title" />
                <Highlight attribute="year" hit={hit}  className="card-year"/>
                <div className="card-rating">Rating: {hit.rating}</div>
                <div className="card-genre"> <span>{hit.genre[0]}</span> <span>{hit.genre[1]}</span> </div>
            </div>
        </div>
    </a>
);
Our Hits component receives hit as a prop then we would use the hit props to interact with our preconfigured index data.
Next, we create a content component that will house every content that would be displayed in our app and we import the Hits, Hightlight, Pagination and the SortBy component into it:
import { InstantSearch, SearchBox, Hits, Highlight, Stats, SortBy, Pagination } from 'react-instantsearch-dom';
....
const Content = () => (
    <main>
        <div className="information">
            <div className="stats"> <Stats/> </div>
            <div className="">
                <SortBy defaultRefinement="movies"
                    items={[
                        { value: 'movies', label: 'Most Relevant' },
                    ]}
                />
            </div>
        </div>


        <Hits hitComponent={Hit} />
        <div> <Pagination/> </div>
    </main>
);
....
The contents of your Search.js file should now look similar to this:
import React from 'react';
import algoliasearch from 'algoliasearch'
import { InstantSearch, SearchBox, Hits, Highlight, Stats, SortBy, Pagination } from 'react-instantsearch-dom';


const searchClient = algoliasearch("latency", "6be0576ff61c053d5f9a3225e2a90f76")


function Search() {

    return (
        < InstantSearch searchClient={searchClient} indexName="movies" >
            <Header />
            <div className="body-content">
                <Content/>
            </div>
        </InstantSearch >
    );
};
const Header = () => (
    <header className="header">
        <SearchBox
            className="search-bar"
            translations={{ placeholder: 'Search for Movies' }}
        />
    </header>
);
const Hit = ({ hit }) => (
    <a href={"/"} >
        <div className="card">
            <div className="card-image">
                <img src={hit.image} alt={hit.name} className="image"/>
            </div>
             <div className="card-contents">
                <Highlight attribute="title" hit={hit} className="card-title" />
                <Highlight attribute="year" hit={hit}  className="card-year"/>
                <div className="card-rating">Rating: {hit.rating}</div>
                <div className="card-genre"> <span>{hit.genre[0]}</span> <span>{hit.genre[1]}</span> </div>
            </div>
        </div>
    </a>
);
const Content = () => (
    <main>
        <div className="information">
            <div className="stats"> <Stats/> </div>
            <div className="">
                <SortBy defaultRefinement="movies"
                    items={[
                        { value: 'movies', label: 'Most Relevant' },
                    ]}
                />
            </div>
        </div>
        <Hits hitComponent={Hit} />
        <div> <Pagination/></div>
    </main>
);
export default Search;
Create a Search.css file inside your components folder and include the following styles to make our app look beautiful:
.header{
    padding-top: 4em;
    width: 100%;
    display: flex;
    background-color: #dce2e9;
    height: 20vh
}
.search-bar{
    display: flex;
    justify-content: center;
    width: 100%
}
input{
    min-width: 500px;
    border: none;
    border-radius: .5em;
    padding: 15px

}
.ais-SearchBox-submit{
    width: 100px;
    padding: 15px;
    color: #c4c4c4
}
.ais-SearchBox-reset{
    display: none
}
main{
    width: 100%;
}
ul{
    width: 100%;
    display: flex;
    flex-wrap: wrap
}
li{
    list-style-type: none;
}
.ais-Hits-item{
    width: 32%;
}
.card{
    background-color: #f9f9f9;
    display: flex;
    border-radius: 10px;
    margin:20px;
    padding: 15px;
    box-shadow: 0 4px 8px 0 rgba(0, 0, 0, 0.2), 0 6px 20px 0 rgba(0, 0, 0, 0.19);
}
.card-contents{
    margin-left: 20px;
    display: flex;
    align-content: center;
    flex-direction: column;
    justify-content: space-between
}
.card-title{
    font-weight: bold
}
.card-genre > span{
    font-size: 15px;
    width: 20px;
    padding: 4px;
    background-color: #c4c4c4
}
.information{
    padding-top: 10px;
    display: flex;
    justify-content: space-around;
    font-size: 11px
}
a{
    text-decoration: none
}
a:visited{
    color: black;
}
.ais-Pagination-list{
    display: flex;
    justify-content: center
}
.ais-Pagination-item{
    margin: 5px
}
Then import the Search component into our App.js file:
....
import Search from './components/Search'

....
<div className="App">
  <Search/>

</div>
....
Run the following command on your terminal:
#using NPM
npm start

#or,using yarn
yarn start
Our App should look similar to this:
And when we type in a search query it refines our movie cards accordingly.
We’ve seen how to configure Algolia in our React app. To learn more about Algolia search services you can check out its documentation.
You can check out the repository to this tutorial on GitHub also a deployed version of the working app.
Install LogRocket via npm or script tag. LogRocket.init() must be called client-side, not
server-side
$ npm i --save logrocket

// Code:

import LogRocket from 'logrocket';
LogRocket.init('app/id');
// Add to your HTML:

<script src="https://cdn.lr-ingest.com/LogRocket.min.js"></script>
<script>window.LogRocket && window.LogRocket.init('app/id');</script>

Debug RSC hydration mismatches in production with Next.js instrumentation, Suspense isolation, HTML diffing, and CI smoke tests.

Explore why npm dependencies are a major supply chain security risk and how to protect JavaScript apps from compromised packages and transitive threats.

Enabled React Compiler v1.0 on a production Next.js app. Here’s every warning, breakage, and silent opt-out I documented — and what actually worked.

We built the same app in TanStack Start RSC and Next.js RSC. TanStack shipped 40% less JS and built 4x faster — but Next.js is still the safer production bet.
Hey there, want to help make our blog better?
Join LogRocket’s Content Advisory Board. You’ll help inform the type of content we create and get access to exclusive meetups, social accreditation, and swag.
Sign up now

