Adding sounds to your app is a great way to engage users. A little ding for a new notification, a “whoosh” sound for an email sent, or a crumbling noise for deleting files can go a long way toward building a better user experience for your React Native app.

In this guide, we’ll explore react-native-sound, a powerful audio component that can handle sound-related tasks for your React Native app.
We’ll cover the following with practical examples:
To follow along, you should be familiar with the basics of React Native, including JSX, components (class and functional), and styling.
You could simply copy and paste the code blocks from this guide, but I would suggest reading through the whole tutorial for a complete understanding. This guide assumes you’ve already done the basic setup for you app.
react-native-sound is a module in React Native for playing sound clips on iOS, Android, and Windows. This module enables you to add audio from various sources, such as the app bundle (native), the JavaScript bundle, or remote paths (local storage or remote URLs).
react-native-sound is more of a class than a class component, which helps to control the instances using predefined methods without updating states or props. This alleviates concerns related to slow rerenders of the app.
Though its documentation warns that react-native-sound is “alpha quality and may have bugs,” its one of the most popular and widely used React Native sound libraries today.
To get started using react-native-sound, you’ll need the sounds you want to play in your app if they are not remotely available (i.e., they are inside the app’s package rather than in the device’s external storage or on a remote server).
To add react-native-sound to your app, simply enter the following command inside your app directory using your preferred package manager (e.g., npm or yarn):
$ yarn add react-native-sound
If you’re building for Android, linking is handled during the building process.
For iOS, simply navigate to the iOS directory and call pod install. This will add pods required for the react-native-sound.
Now it’s time to add the sounds you want to play. This step is just for the sake of learning how to bundle the audio files inside the native package. We’ll also go over a simpler way of requiring the audio files from the assets directory.
For Android, create the raw directory and copy the sounds to that:
{appDirectory}/android/app/src/main/res/raw
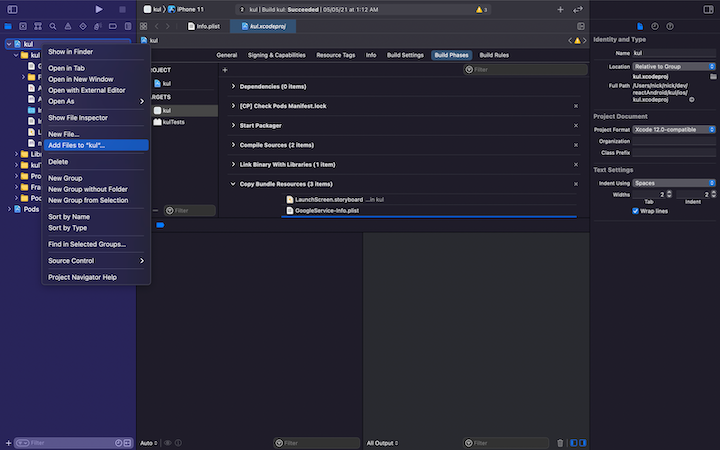
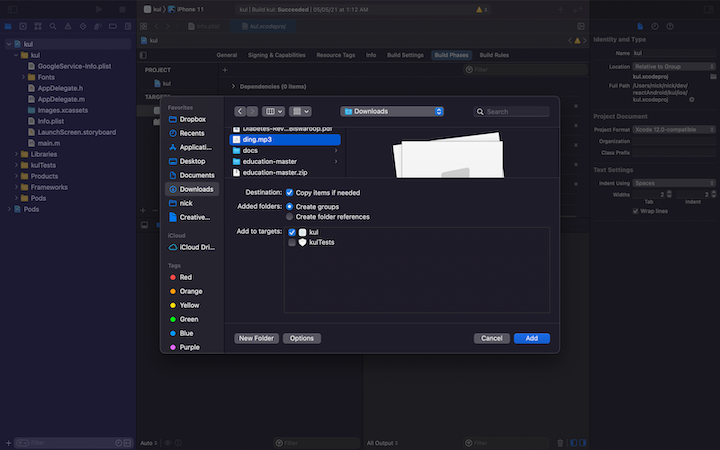
For iOS, open the workspace in Xcode, then right click on the project and click Add files to {project_name}, as shown below:


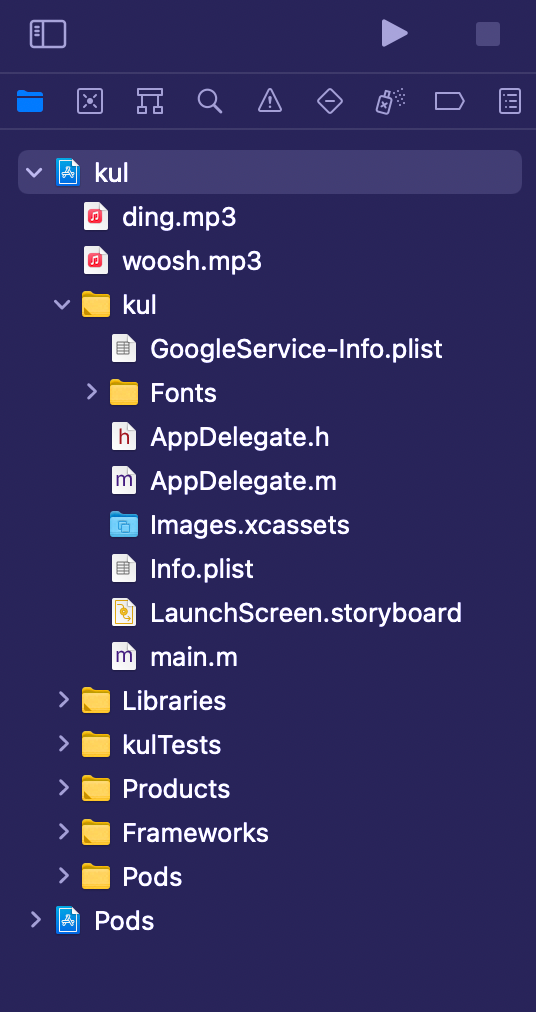
The result should look something like this:

After adding the sound files, just build the app and run it on a simulator or, preferably, on a real device.
After successfully running the app, it’s time to start coding.
First we need to import the sound component in the app:
import Sound from 'react-native-sound';
Before, setting up the sound we’re going to play, we need to specify the category of sound:
Sound.setCategory('Playback');
To initialize the sound, use the following code:
var ding = new Sound('ding.mp3', Sound.MAIN_BUNDLE, (error) => {
  if (error) {
    console.log('failed to load the sound', error);
    return;
  }
  // when loaded successfully
  console.log('duration in seconds: ' + whoosh.getDuration() + 'number of channels: ' + whoosh.getNumberOfChannels());
});
The above code uses the first argument, ding.mp3, a file from the bundle specified using the second argument, Sound.MAIN_BUNDLE, and returns a callback in the third argument.
\``getDuration is used to get the duration of the audio file in seconds, and getNumberOfChannels is used to get the count of the audio channels.
To set the volume of the playback, we can use the following method:
ding.setVolume(1);
Here, 1 is the highest volume and 0 is the lowest with the difference between them in decimal places — e.g., to reduce the volume to 50 percent, you would set it to 0.5.
To play the file, we can use the play method from Sound, as follows:
ding.play(success => {
  if (success) {
    console.log('successfully finished playing');
  } else {
    console.log('playback failed due to audio decoding errors');
  }
});
There is a callback after successfully completing the payback (or if anything goes wrong, for that matter).
To summarize the steps outlined above:
Here’s the final code to play a sound from the bundle:
import React, {useEffect} from 'react';
import {View, StyleSheet, TouchableOpacity} from 'react-native';
import Ionicons from 'react-native-vector-icons/Ionicons';

var Sound = require('react-native-sound');


Sound.setCategory('Playback');


var ding = new Sound('ding.mp3', Sound.MAIN_BUNDLE, (error) => {
if (error) {
    console.log('failed to load the sound', error);
    return;
  }
  // if loaded successfully
  console.log('duration in seconds: ' + ding.getDuration() + 'number of channels: ' + ding.getNumberOfChannels());

});
const App = () => {
  useEffect(() => {
    ding.setVolume(1);
    return () => {
      ding.release();
    };
  }, []);
  const playPause = () => {
    ding.play(success => {
      if (success) {
        console.log('successfully finished playing');
      } else {
        console.log('playback failed due to audio decoding errors');
      }
    });
  };
  return (
    <View style={styles.container}>
      <TouchableOpacity style={styles.playBtn} onPress={playPause}>
        <Ionicons name={'ios-play-outline'} size={36} color={'#fff'} />
      </TouchableOpacity>
    </View>
  );
};
const styles = StyleSheet.create({
  container: {
    flex: 1,
    alignItems: 'center',
    justifyContent: 'center',
    backgroundColor: '#000',
  },
  playBtn: {
    padding: 20,
  },
});
export default App;
Now, as for the files from the assets directory (or any directory from the app for that matter), we can just use same old require or import to get the instance of the file and play it using react-native-sound.
Just import the file —
import dings from './src/assets/ding.mp3';
— and use it in the Sound package, as shown below:
var ding = new Sound(dings, error => {
  if (error) {
    console.log('failed to load the sound', error);
    return;
  }
  // if loaded successfully
  console.log('duration in seconds: ' + ding.getDuration() + 'number of channels: ' + ding.getNumberOfChannels());
});
The difference when using an imported or required file from the assets as opposed to bundled files is that you don’t have to specify the basePath for the file. Instead, the callback takes its place.
Here’s the code for the component to play an imported file:
import React, {useEffect} from 'react';
import {View, StyleSheet, TouchableOpacity} from 'react-native';
import dings from './src/assets/ding.mp3';
import Ionicons from 'react-native-vector-icons/Ionicons';

var Sound = require('react-native-sound');

Sound.setCategory('Playback');

var ding = new Sound(dings, error => {
  if (error) {
    console.log('failed to load the sound', error);
    return;
  }
  // if loaded successfully
  console.log(
    'duration in seconds: ' +
      ding.getDuration() +
      'number of channels: ' +
      ding.getNumberOfChannels(),
  );
});
const App = () => {
  useEffect(() => {
    ding.setVolume(1);
    return () => {
      ding.release();
    };
  }, []);
  const playPause = () => {
    ding.play(success => {
      if (success) {
        console.log('successfully finished playing');
      } else {
        console.log('playback failed due to audio decoding errors');
      }
    });
  };
  return (
    <View style={styles.container}>
      <TouchableOpacity style={styles.playBtn} onPress={playPause}>
        <Ionicons name={'ios-play-outline'} size={36} color={'#fff'} />
      </TouchableOpacity>
    </View>
  );
};
const styles = StyleSheet.create({
  container: {
    flex: 1,
    alignItems: 'center',
    justifyContent: 'center',
    backgroundColor: '#000',
  },
  playBtn: {
    padding: 20,
  },
});
export default App;
Below is the result of the above code. Just tap the play button to play the sound.

You may want to play remote files or files from local storage. This is basically as easy as playing a bundled file using react-native-sound. You just need to add the URL as the first parameter to Sound and set the second parameter as null because the file is from a remote or local storage, not from the app.
var audio = new Sound(
  'https://file-examples-com.github.io/uploads/2017/11/file_example_MP3_700KB.mp3',
  null,
  error => {
    if (error) {
      console.log('failed to load the sound', error);
      return;
    }
    // if loaded successfully
    console.log(
      'duration in seconds: ' +
        audio.getDuration() +
        'number of channels: ' +
        audio.getNumberOfChannels(),
    );
  },
);
Below is a complete example of how to play, pause, and release the audio after the app is closed or the component is unmounted:
import React, {useEffect, useState} from 'react';
import {View, StyleSheet, TouchableOpacity} from 'react-native';
import Ionicons from 'react-native-vector-icons/Ionicons';

var Sound = require('react-native-sound');


Sound.setCategory('Playback');

var audio = new Sound(
  'https://file-examples-com.github.io/uploads/2017/11/file_example_MP3_700KB.mp3',
  null,
  error => {
    if (error) {
      console.log('failed to load the sound', error);
      return;
    }
    // if loaded successfully
    console.log(
      'duration in seconds: ' +
        audio.getDuration() +
        'number of channels: ' +
        audio.getNumberOfChannels(),
    );
  },
);
const App = () => {
  const [playing, setPlaying] = useState();
  useEffect(() => {
    audio.setVolume(1);
    return () => {
      audio.release();
    };
  }, []);
  const playPause = () => {
    if (audio.isPlaying()) {
      audio.pause();
      setPlaying(false);
    } else {
      setPlaying(true);
      audio.play(success => {
        if (success) {
          setPlaying(false);
          console.log('successfully finished playing');
        } else {
          setPlaying(false);
          console.log('playback failed due to audio decoding errors');
        }
      });
    }
  };
  return (
    <View style={styles.container}>
      <TouchableOpacity style={styles.playBtn} onPress={playPause}>
        <Ionicons
          name={playing ? 'ios-pause-outline' : 'ios-play-outline'}
          size={36}
          color={'#fff'}
        />
      </TouchableOpacity>
    </View>
  );
};
const styles = StyleSheet.create({
  container: {
    flex: 1,
    alignItems: 'center',
    justifyContent: 'center',
    backgroundColor: '#000',
  },
  playBtn: {
    padding: 20,
  },
});
export default App;
.release() is used to release the memory reserved to play the audio files. It’s very important to release the memory after the component is unmounted or the audio is not to be played again. This helps to avoid memory leaks or other errors.

LogRocket is a React Native monitoring solution that helps you reproduce issues instantly, prioritize bugs, and understand performance in your React Native apps.
LogRocket also helps you increase conversion rates and product usage by showing you exactly how users are interacting with your app. LogRocket's product analytics features surface the reasons why users don't complete a particular flow or don't adopt a new feature.
Start proactively monitoring your React Native apps — try LogRocket for free.
Would you be interested in joining LogRocket's developer community?
Join LogRocket’s Content Advisory Board. You’ll help inform the type of content we create and get access to exclusive meetups, social accreditation, and swag.
Sign up now
Build a React Native Turbo Module for Android to access device info like model, IP, uptime, and battery status using native mobile APIs.

Learn how to measure round-trip time (RTT) using cURL, a helpful tool used to transfer data from or to a server.

React.memo prevents unnecessary re-renders and improves performance in React applications. Discover when to use it, when to avoid it, and how it compares to useMemo and useCallback.

Learn how React’s useCallback hook boosts performance by memoizing functions and preventing unnecessary re-renders with practical examples and best practices.
4 Replies to "How to play sounds in React Native using react-native-sound"
How can we stop the sound when user locks the phone?
This library is a mess on IOs if you want to play audios with URLs, it’s not recommended
Hi, thank you it is very helpful. I want to ask how about if I get many mp3 data from api. when i declare audio in the function. the sound is play error. please help me to solve this error
it is very very very very very very very very very very very very………………………………………………………………………………………………. helpful.
thank you