Editor’s note: This article was last updated on 27 August 2024 by Ikeh Akinyemi to reflect more detailed implementation steps, the addition of new features like cart functionality, and deployment instructions.

In the world of JavaScript, a new framework is released almost every day. Generally, the ideas behind them are similar, offering few significant improvements. Modern UI component-based frameworks and libraries include React, Vue, and Angular to name a few.
In this article, we’ll explore Svelte, which takes a different approach to constructing user interfaces. As an example, we’ll build a bookstore app that keeps track of available book titles. We’ll also explore what sets Svelte apart from other frameworks.
To follow along with this article, you’ll need the following:
Let’s get started!
The Replay is a weekly newsletter for dev and engineering leaders.
Delivered once a week, it's your curated guide to the most important conversations around frontend dev, emerging AI tools, and the state of modern software.
Svelte is a frontend web development framework that was released in 2016 by Rich Harris. Svelte is an approach to building user interfaces that can be used to develop either small pieces of an interface or whole applications. We can either begin building our application with Svelte or incrementally integrate it into an existing application.
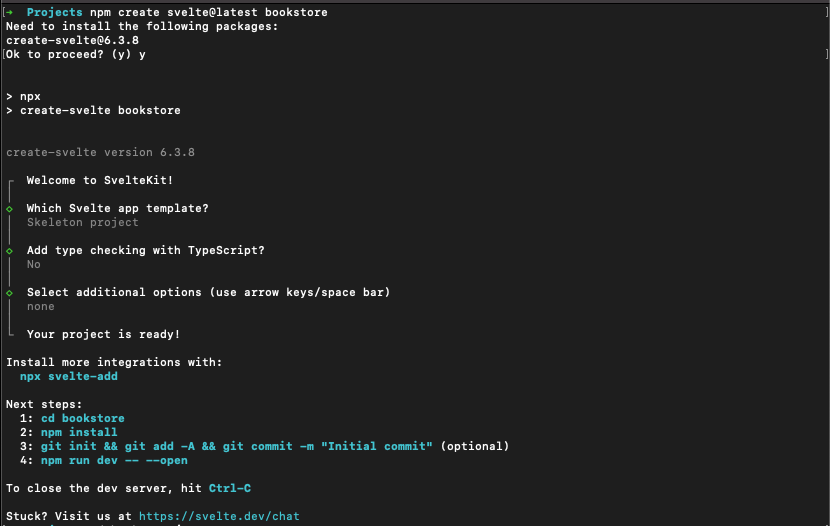
There are several ways to get Svelte up and running for a project. In this tutorial, we’ll use SvelteKit, a Svelte framework used as an easy scaffolding tool. To get started, run the following create svelte app commands:
npm create svelte@latest <PROJECT_NAME>
In this case, we name our project bookstore:
npm create svelte@latest bookstore
The above command will create a Svelte app template in the bookstore folder on your local machine with SvelteKit. The command will prompt you to configure the necessary options for your project. We’ll use the below option:
Navigate into the project directory:
cd bookstore
Install the required dependencies:
npm install
Finally, run the svelte app: \
npm run dev
Open localhost:5173 on your browser to view the page generated by Svelte. The source code creates a boilerplate “Welcome to SvelteKit” application contained in the src/routes/+page.svelte:
<h1>Welcome to SvelteKit</h1>
<p>Visit <a href="https://kit.svelte.dev">kit.svelte.dev</a> to read the documentation</p>
Keep in mind that components in Svelte are saved with a .svelte extension. The +page.svelte file serves as the main page in your application, and also as a template for generic pages in your app. But for better structural organization, you should create a structured hierarchy within the /src/routes directory using folders and subfolders.
When creating components, there are a few things that are noteworthy about Svelte. For one, styles are scoped within components, so a div styled in one component will not affect another div in a different component. Additionally, we can define functions that are connected dynamically.
In this section, we’ll create a dynamic event with Svelte and link the Book.svelte component with +page.svelte and passing props. The first step is creating a src/lib/components subfolder, and inside the folder create a Book.svelte file. Inside this file, you‘ll set up the Book component and export necessary variables, which can be set from the parent component in +page.svelte:
<script>
   export let bookTitle;
   export let bookPrice;
   export let bookDescription;
</script>

<style>
   .book-card {
      background-color: #f8f8f8;
      border-radius: 8px;
      box-shadow: 0 2px 4px rgba(0, 0, 0, 0.1);
      padding: 1rem;
      margin-bottom: 1rem;
      transition: box-shadow 0.3s ease;
   }
   .book-card:hover {
      box-shadow: 0 4px 8px rgba(0, 0, 0, 0.15);
   }
   h2 {
      font-size: 1.2rem;
      color: #333;
      margin: 0 0 0.5rem 0;
   }
   p {
      margin: 0.5rem 0;
      color: #666;
   }
   button {
      background-color: #4a4a4a;
      color: white;
      border: none;
      padding: 0.5rem 1rem;
      border-radius: 4px;
      cursor: pointer;
      transition: background-color 0.3s ease;
   }
   button:hover {
      background-color: #333;
   }
</style>

<div class="book-card">
   <h2>{bookTitle}</h2>
   <p><strong>Price:</strong> ${bookPrice}</p>
   <p>{bookDescription}</p>
   <button>Add to Cart</button>
</div>
In the script section in the above code snippet, we’re exporting three variables: bookTitle, bookPrice, and bookDescription. In SvelteKit, using the export keyword before a variable declaration makes it a prop, allowing parent components to pass data into this component. In the markup section, we’re using the props we defined earlier. The curly braces {} are used for dynamic content insertion in Svelte and SvelteKit. This means the values of bookTitle, bookPrice, and bookDescription will be rendered in their respective places.
In the +page.svelte file, we imported the Book component where we’ll do a lot of the dynamic manipulation:
<script>
   import Book from '$lib/components/Book.svelte';
   let title = '';
   let price = 0;
   let description = '';
</script>

<style>
   h1 {
     color: purple;
   }
   section{
     margin: auto;
     width: 30rem;
   }
   label, input, textarea {
     width: 100%;
   }
</style>

<section>
  ...
</section>

<Book bookTitle={title} bookPrice={price} bookDescription={description} />
In the code block above, we import the Book component from the $lib/components directory. In SvelteKit, $lib is an alias for the src/lib folder, making it easy to import components and utilities. Then we defined and initialized three variables, title, price, and description that will be used to store the data for a new book.
At the bottom, we utilize the Book component and pass the title, price, and description variables as props to the component.
To dynamically update these variables, let’s set up form inputs inside the <section> element together with a function in the <script> tag to handle the update:
<script>
   import Book from '$lib/components/Book.svelte';
   let title = '';
   let price = 0;
   let description = '';
   function setTitle(event) {
      title = event.target.value;
   }
</script>

<style>
   h1 {
     color: purple;
   }
   section {
     margin: auto;
     width: 30rem;
   }
   label, input, textarea {
     width: 100%;
   }
</style>

<h1>SvelteKit Bookstore</h1>

<section>
   <div>
     <label for="title">Title</label>
     <input type="text" id="title" value={title} on:input={setTitle}/>
   </div>
   <div>
      <label for="price">Price</label>
      <input type="number" id="price" bind:value={price}/>
   </div>
   <div>
    <label for="description">Description</label>
    <textarea rows="3" id="description" bind:value={description}></textarea>
   </div>
</section>

<Book bookTitle={title} bookPrice={price} bookDescription={description} />
In the above snippet, we used the on:input event directive on the title input so that when the input changes, it calls the setTitle function. Then for price and description, we used Svelte’s bind:value directive to create a two-way binding between the input value and the variable, effectively updating the variable when the input changes.
Now that we have a card that updates when we input value, the next step is to make sure that we are able to add books to our bookstore. To achieve this, we’ll create a books store that will update whenever a new book is added. Also, we’ll revamp our existing setTitle function to a more complex addBookfunction:
<script>
   import Book from '$lib/components/Book.svelte';
   import { writable } from 'svelte/store';
   let title = '';
   let price = 0;
   let description = '';
   const books = writable([]);
   function addBook() {
      books.update(currentBooks => [
        ...currentBooks,
        { title, price, description } ]);

      // Reset form fields
      title = '';
      price = 0;
      description = '';
   }
</script>

<style>
   h1 {
     color: purple;
     text-align: center;
   }
   form {
     margin: auto;
     width: 30rem;
     padding: 1rem;
     border: 1px solid #ccc;
     border-radius: 5px;
   }
   label, input, textarea {
     width: 100%;
     margin-bottom: 0.5rem;
   }
   button {
     width: 100%;
     padding: 0.5rem;
     background-color: purple;
     color: white;
     border: none;
     border-radius: 3px;
     cursor: pointer;
   }
   .books {
     margin-top: 2rem;
   }
</style>

<h1>SvelteKit Bookstore</h1>

<form on:submit|preventDefault={addBook}>
   <div>
      <label for="title">Title</label>
      <input type="text" id="title" bind:value={title} required/>
   </div>
   <div>
      <label for="price">Price</label>
      <input type="number" id="price" bind:value={price} min="0" step="0.01" required/>
   </div>
   <div>
      <label for="description">Description</label>
      <textarea rows="3" id="description" bind:value={description} required></textarea>
   </div>
   <button type="submit">Add Book</button>
</form>

<div class="books">
   {#each $books as book}
      <Book bookTitle={book.title} bookPrice={book.price} bookDescription={book.description} />
   {/each}
</div>
In the above code block, we’ve imported the writable function from svelte/store. This is used to create a reactive store for our books. Next, we initialize an empty array as a writable store, writable([]), and assign it to the books variable. This will hold all our book objects.
Inside the addBook function, we call the books.update method to add a new book to the store. The spread operator (...currentBooks) is used to create a new array with all existing books plus the new one. After adding the book, it resets the form fields (title, price, description) to their initial values.
The <form> element now has an on:submit|preventDefault={addBook} directive. This calls the addBook function when the form is submitted and prevents the default form submission behavior. Also, we’ve added a new <div class="books"> section at the bottom, using the Svelte’s {#each} block to iterate over the books in the store and render each book the Book component with the appropriate props.
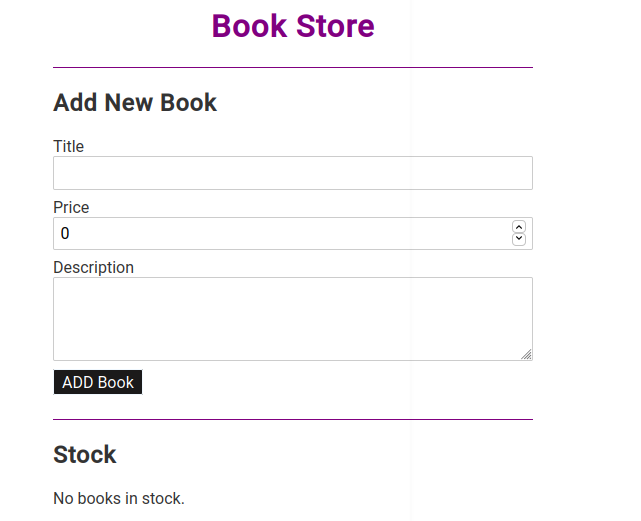
Let’s add a check for when we don’t have books in the books store yet. This way we have an array of books that are displayed conditionally using the special markup that Svelte gives us:
<div class="books">
   {#if books.length === 0}
      <p> No books in stock. </p>
   {:else}
      {#each $books as book}
         <Book bookTitle={book.title} bookPrice={book.price} bookDescription={book.description} />
      {/each}
   {/if}
</div>
If the array is empty, it will show No books in stock:
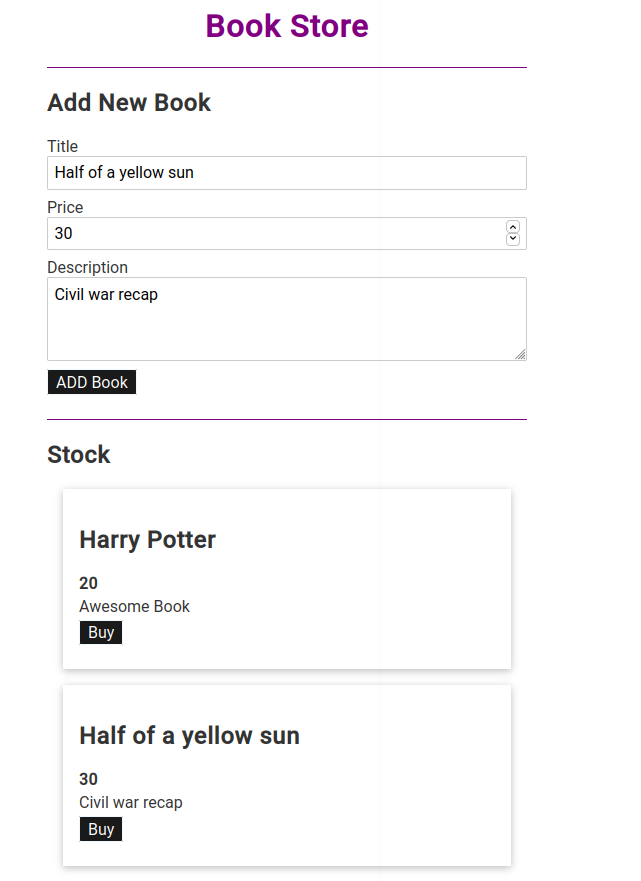
Once the user updates, it displays the information on the card:
To add a cart to our bookstore app, we will have to make another component called Purchase.svelte.
<!-- src/lib/components/Purchase.svelte -->
<script>
   export let purchasedBooks = [];
</script>

<div class="cart">
   <h2>Shopping Cart</h2>
   {#if purchasedBooks.length === 0}
      <p>Your cart is empty.</p>
   {:else}
     <ul>
       {#each purchasedBooks as book}
          <li>{book.title} - ${book.price}</li>
       {/each}
     </ul>
    {/if}
</div>

<style>
  .cart {
    border: 1px solid #ddd;
    padding: 1rem;
    margin-top: 1rem;
    border-radius: 8px;
   }
  ul {
    list-style-type: none;
    padding: 0;
  }
  li {
    margin-bottom: 0.5rem;
  }
</style>
In the Book.svelte script tag, let’s add support to the Book component to dispatch a custom event when the “Add to Cart” button is clicked:
<script>
   import { createEventDispatcher } from 'svelte';
   export let bookTitle;
   export let bookPrice;
   export let bookDescription;
   const dispatch = createEventDispatcher();
   function addToCart() {
      dispatch('addtocart', {
         title: bookTitle,
         price: bookPrice,
         description: bookDescription
      });
   }
</script>

<div class="book-card">
   <h2>{bookTitle}</h2>
   <p><strong>Price:</strong> ${bookPrice}</p>
   <p>{bookDescription}</p>
   <button on:click={addToCart}>Add to Cart</button>
</div>
<!-- ... (rest of the styles remain the same) -->
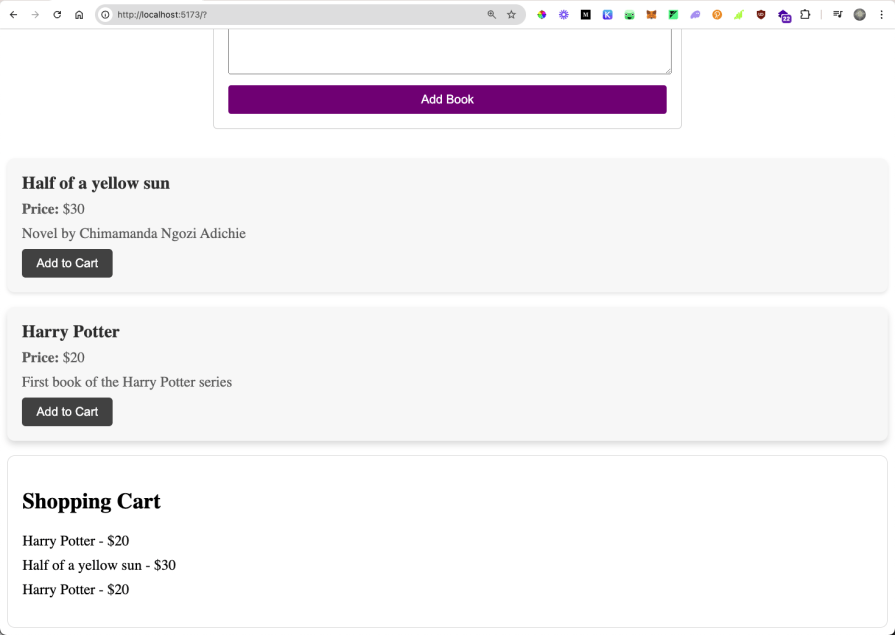
Then in the +page.svelte file we import the new Purchase component and setup a purchasedBooks array to hold the cart items. Next, we create a purchaseBook function that adds a book to the purchasedBooks array when the addtocart event is received, and bind the function to the Book component’s addtocart event using on:addtocart={purchaseBook}. Lastly, add the Purchase component at the bottom, passing it the purchasedBooks array.
<script>
   import Book from '$lib/components/Book.svelte';
   import Purchase from '$lib/components/Purchase.svelte';
   import { writable } from 'svelte/store';

   let title = '';
   let price = 0;
   let description = '';

   const books = writable([]);
   let purchasedBooks = [];

   function addBook() {
      books.update(currentBooks => [
        ...currentBooks,
        { title, price, description }
     ]);

     // Reset form fields
     title = '';
     price = 0;
     description = '';
   }

   function purchaseBook(event) {
     const newBook = event.detail;
     purchasedBooks = [...purchasedBooks, newBook];
   }
</script>

<h1>SvelteKit Bookstore</h1>

<!-- ... (form remains the same) ... -->

<div class="books-container">
   {#if $books.length === 0}
     <p class="no-books-message">No books in stock.</p>
   {:else}
     {#each $books as book}
        <Book
          bookTitle={book.title}
          bookPrice={book.price}
          bookDescription={book.description}
          on:addtocart={purchaseBook} />
     {/each}
   {/if}
</div>

<Purchase {purchasedBooks} />
Deploying your Svelte app is the final step in bringing your project to life. There are a plethora of platforms and methods to deploy your Svelte app, each with its own advantages. We’ll cover two popular options: Vercel and Netlify.
Vercel offers a great platform for deploying your Svelte apps. Install the Vercel CLI:
npm i -g vercel
Navigate to your project directory and run the vercel command and follow the prompts. This will deploy your Svelte app to Vercel and return back a URL for your svelte app. Vercel automatically detects Svelte projects and sets up the build configuration for you.
Netlify is another great option for deploying your Svelte apps. Create a netlify.toml file in your project root:
[build] command = "npm run build" \”
publish = "public
Push your source files to a Git repository (GitHub, GitLab, or Bitbucket), and log in to Netlify and click on “New site from Git”. Then select the repository and branch you want to deploy. Netlify will automatically detect your build settings and deploy your app
Developers can use both Svelte and React to effectively build web applications. However, while they serve the same overall purpose, there are distinct differences in how they work.
One essential distinction between Svelte and React is that Svelte works more like a compiler, while React operates like a JavaScript library. Svelte does most of its work within the compilation step that takes place during build time. As a result, no overhead framework code is injected into the browser when your program runs in the DOM. Being a compiler, Svelte can offer features that other frameworks can’t, like compile-time accessibility checking.
When it comes to its syntax, Svelte sticks close to the familiar conventions of HTML, CSS, and JavaScript, making it simpler to understand and easier to learn than React. Svelte sticks closely to classic web development models and introduces only a few HTML extensions, making it much easier to learn.
To demonstrate, here’s a Counter component written in Svelte:
//Counter.svelte
<script>
    let count = 0;
    function handleClick() {
        count += 1;
    }
</script>
<button on:click={handleClick}>{count}</button>
Unlike Svelte, React has its own syntax called JSX that allows us to write HTML inside the JavaScript code. This pattern betrays conventional practices and can be confusing to learn. Below is the same Counter component in React:
// React Component
import { useState } from "react";

const Counter = () => {
    const [count, setCount] = useState(0);
    const handleClick = () => {
        setCount((count) => count + 1);
    };
    return <button onClick={handleClick}>{count}</button>;
};

export default Counter;
Another great feature about Svelte is that it offers flexible styling by scoping styles to their component. Therefore, we don’t have to bother writing unique classes since Svelte generates them during the compile step. In a scenario where the <p> element appears in multiple components, we don’t need to attach different classes to avoid CSS conflicts.
An advantage of learning Svelte over other frameworks is that Svelte has a shallow learning curve. Web developers with basic HTML, CSS, and JavaScript knowledge should quickly grasp the specifics of Svelte and be able to start building web applications.
Svelte is becoming more popular, and the numbers cannot lie.
In 2021, 68 percent of developers were interested in learning Svelte. With Rich Harris moving to Vercel and Svelte now having the funding and community backing of the Vercel ecosystem, that number is sure to increase. One additional study showed that usage of Svelte has increased from eight percent to 20 percent from 2019 to 2021, a 150 percent growth. Svelte is the first choice for developers in frameworks they would like to learn in the future.
The Svelte ecosystem is continually developing rapidly, and several frameworks have been built on top of Svelte. For one, SvelteKit, which was released in March 2021, is a new framework that replaces Sapper. It is the fastest way to build Svelte apps, and it comes with advanced features like server-side rendering, code splitting, file-based routing, and offline support. SvelteKit is Svelte’s equivalent of Next.js or Nuxt.js.
Another example is Svelte Native, which allows Svelte developers to easily build native Android and iOS apps. Svelte Native, which was released in February 2019, combines the best of Native Script and Svelte.
In this article, we learned the basics of Svelte by creating a bookstore app. We reviewed the latest developments in the Svelte ecosystem and saw why companies and development teams are increasingly adopting Svelte into their production workflows. You can see the whole source code on GitHub.
To get a deeper understanding, be sure to check out Svelte’s interactive documentation. Happy coding!
Install LogRocket via npm or script tag. LogRocket.init() must be called client-side, not
server-side
$ npm i --save logrocket

// Code:

import LogRocket from 'logrocket';
LogRocket.init('app/id');
// Add to your HTML:

<script src="https://cdn.lr-ingest.com/LogRocket.min.js"></script>
<script>window.LogRocket && window.LogRocket.init('app/id');</script>

Local AI proxy tutorial for detecting, masking, and rehydrating PII before prompts reach cloud LLMs.

Learn how Graph RAG uses connected knowledge structures to improve retrieval beyond simple text similarity.

Learn how sibling-index() enables clean, JavaScript-free stagger animations using native CSS.

useEffect breaks AI streaming responses in ReactSee why useEffect breaks AI streaming in React, and how moving stream state outside React fixes flicker and stale updates.
Would you be interested in joining LogRocket's developer community?
Join LogRocket’s Content Advisory Board. You’ll help inform the type of content we create and get access to exclusive meetups, social accreditation, and swag.
Sign up now

