In this guide, we will walk through how to build a full-stack application with RedwoodJS.

You may have seen a lot of tutorials and guides around building a full-stack application with x framework (or) technology, but, RedwoodJS is different and beneficial in certain ways, including:
Here we are going to build a forum to understand how RedwoodJS apps are built. It includes all the functionalities that help you understand all the frameworks’ functions.
The functionalities that we are going to build are:
Along with RedwoodJS, we will use Typescript for type checking and TailwindCSS for styling.
RedwoodJS uses yarn as a package manager. Once you install it, you can create a new project using the following command:
yarn create redwood-app --ts ./redwoodblog
It scaffolds all the modules to build a full-stack application. Here, you can see the complete structure of a RedwoodJS application.

There are three major directories. They are api, scripts, and web. Let’s discuss them in detail.
.redwood: Contains the build of the application.api: Serves the backend of the application. It mainly contains db, which serves the database schema of the application. All backend functionalities will be in the src directory
src: Contains all your backend code. It contains five directories, which are as follows:
directives: Contains GraphQL schema directives to control access to GraphQL queriesfunctions: RedwoodJS runs the GraphQL API as a serverless function. It auto-generates graphql.ts; you can add additional serverless functions on top of itgraphql: Contains GraphQL schema written in schema definition language (SDL)lib: Contains all the reusable functions across the backend API. for example, authenticationservices: Contains business logic related to your data. It runs the functionality related to the API and returns the resultsInstalling TailwindCSS is straightforward; run the following command in the root directory:
yarn rw setup ui tailwindcss

To confirm the installation of TailwindCSS, go to web/src/index.css and see the Tailwind classes in that file.
The Replay is a weekly newsletter for dev and engineering leaders.
Delivered once a week, it's your curated guide to the most important conversations around frontend dev, emerging AI tools, and the state of modern software.
To connect the Postgres database, we will use Docker for local development.
(Note: To install Docker, see the documentation from the official Docker website)
Create docker-utils/postgres-database.sh in the root directory and add the following script:
#!/bin/bash

set -e
set -u

function create_user_and_database() {
        local database=$1
        echo "  Creating user and database '$database'"
        psql -v ON_ERROR_STOP=1 --username "$POSTGRES_USER" <<-EOSQL
            CREATE USER $database;
            CREATE DATABASE $database;
            GRANT ALL PRIVILEGES ON DATABASE $database TO $database;
EOSQL
}

if [ -n "$POSTGRES_MULTIPLE_DATABASES" ]; then
        echo "Multiple database creation requested: $POSTGRES_MULTIPLE_DATABASES"
        for db in $(echo $POSTGRES_MULTIPLE_DATABASES | tr ',' ' '); do
                create_user_and_database $db
        done
        echo "Multiple databases created"
fi
This script implements a function to create a user and database in Postgres. Once you create the script, you can use docker-compose up to run the Postgres database.
Create docker-compose.yml and add the following code:
version: "3.6"
services:
  postgres:
    image: postgres
    restart: unless-stopped
If you want to create different versions of docker-compose up based on the environment, you can do that as well. To do this, create docker-compose.override.yml and add the following code:
version: "3"
services:
  postgres:
    image: postgres
    environment:
      - POSTGRES_USER=api
      - POSTGRES_PASSWORD=development_pass
      - POSTGRES_MULTIPLE_DATABASES="redwoodforum-api","redwoodforum-api-testing"
    volumes:
      - ./docker-utils:/docker-entrypoint-initdb.d
      - redwoodforum_api_data:/data/postgres
    ports:
      - 5440:5432
volumes:
  redwoodforum_api_data: {}
Once you add the script, you can run the database using this command:
docker-compose up

To connect a Redwood application to Postgres, change the Prisma configuration to a PostgreSQL provider and add the database URL in an environment variable.
Go to api/db/schema.prisma and change the db provider to postgresql. Add DATABASE_URL in your .env.
DATABASE_URL=postgres://api:development_pass@localhost:5440/redwoodforum-api
As you can see in the demo, we want to build a forum. However, before we implement the functionality, Here are the key things we want users to be able to do in our application:
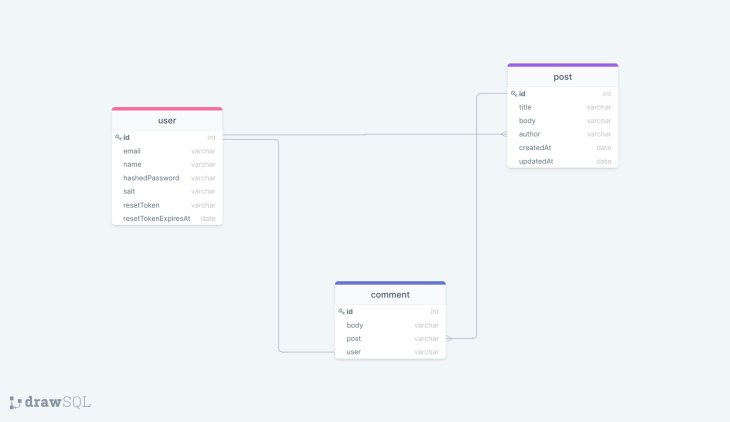
Let’s design an ER diagram for the application.

Here we have the user, post, and comment schemas.
user and post have a one-to-many relationship, and post and comment have a one-to-many relationship, while comment and user have a one-to-one relationship.
Now we have the ER diagram for the application. let’s create the schema for the database. For that, go to api/db/schema.prisma.
(Note: RedwoodJS uses Prisma for the database. If you’re new to Prisma world, check out their documentation for more information)
Now, create the schemas in a Prisma file:
model User {
  id           Int            @id @default(autoincrement())
  email        String         @unique
  name         String?
  hashedPassword     String
  salt String
  resetToken String?
  resetTokenExpiresAt DateTime?
  posts   Post[]
  comments Comment[]
}

model Post {
  id           Int            @id @default(autoincrement())
  title        String
  body         String
  comments     Comment[]
  author     User    @relation(fields: [authorId], references: [id])
  authorId   Int
  createdAt    DateTime  @default(now())
  updatedAt    DateTime  @default(now())
}

model Comment {
  id     Int    @id @default(autoincrement())
  body   String
  post   Post   @relation(fields: [postId], references: [id])
  postId Int
  author User   @relation(fields: [authorId], references: [id])
  authorId Int
  createdAt DateTime @default(now())
  updatedAt DateTime @default(now())
}
As you can see, we have a relationship between the User, Post, and Comment schemas.
Defining a relationship in Prisma is simple. You can refer to the documentation to learn more in detail.
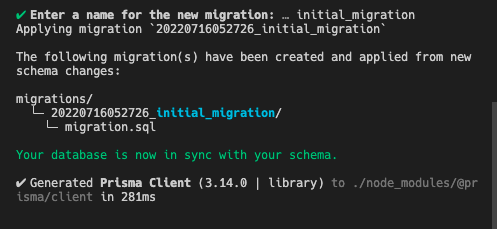
Once you define a schema in Prisma, you must run the migration to create those schemas as a table in Postgres.
One of the features of Prisma is that you can manage migration for different stages. Here, we are going to run the migration only for development. For that, you can use this command:
yarn redwood prisma migrate dev

To check if the migration was successful, you can go to Prisma Studio and see all the tables after migration. you can see all the tables and columns inside of each table by visiting http://localhost:5555.
yarn redwood prisma studio
Now, we have database and schema for the API and frontend, let’s create authentication for the application.
RedwoodJS provides authentication out of the box. A single CLI command will get you everything you need to get authentication working.
yarn rw setup auth dbAuth
It will create a auth.ts serverless function that checks the cookie if the user exists in the database and token expiry. Then, it returns the response based on that to a client.
It also creates lib/auth.ts to handle functionalities, such as getCurrent user from session, check if authenticated, require authentication, etc.
So far, we have the authentication functionality for the API and database. Let’s create pages for login, signup, and forgot password. Then, you can use the command to scaffold the login, signup, and forgot password pages.
yarn rw g dbAuth
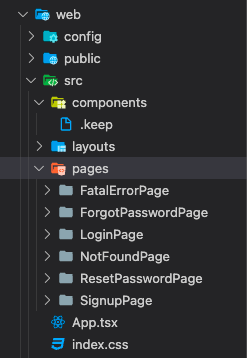
It will create all the pages for authentication. You can check those pages at web/src/pages.

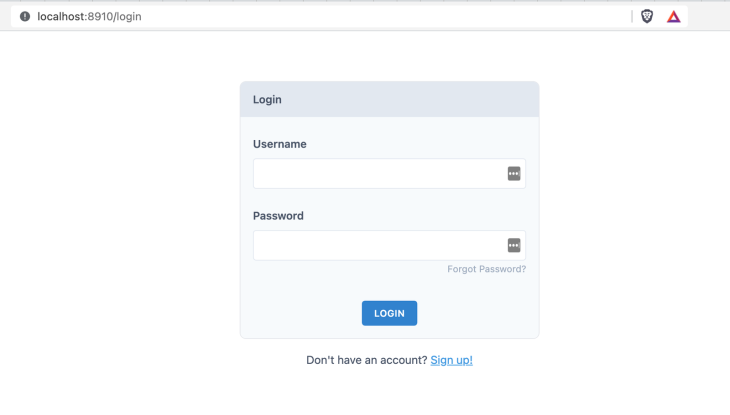
For styling the pages, you can use the components from the source code and customize them based on your preferences. Here is the complete login page from the implementation:

To connect an API for login and signup functionality, RedwoodJS provides hooks that do all the magic under the hood.
import { useAuth } from '@redwoodjs/auth'

// provides login and signup functionality out of the box
const { isAuthenticated, signUp, logIn, logOut } = useAuth()
In the form onSubmit function, we can use that signup and logIn to make the API request and send the payload.
const onSubmit = async (data) => {
    const response = await signUp({ ...data })

    if (response.message) {
      toast(response.message)
    } else if (response.error) {
      toast.error(response.error)
    } else {
      // user is signed in automatically
      toast.success('Welcome!')
    }
  }
Once the user signs up or logs in, you can access the user information across the application using currentUser.
const { currentUser } = useAuth()
Now, we have the user logged in to the application. Next, let’s build the functionality to post and comment.
Once the users log in, they land on the home page, where we need to show all the posts in the forum. Then, the user can create a new post and update a post.
To implement the listing page, create a route with the Home page component and fetch the data from the API to show it on the client side.
Luckily, RedwoodJS provides scaffolding that generates all the implementation for us. Let’s say you want to scaffold all the pages, including GraphQL backend implementation, you can use the following command:
yarn redwood g scaffold post
It will generate pages, SDL, and service for the post model. You can refer to all the RedwoodJS commands in their documentation.
Since we are going to customize the pages. Let’s scaffold SDL and services only. Use this command:
yarn redwood g sdl --typescript post
It will create post domain files in graphql/posts.sdl.ts and services/posts — let’s create pages on the web.
Even though we customize the pages and components, we don’t need to create everything from scratch. Instead, we can use scaffolding and modify it based on our requirements.
Let’s create a Home page using this command:
yarn redwood g page home
It will create a home page and add that page inside the Routes.tsx. So now, you have the basic home page component.
Now, to list all the posts on the home page, you need to fetch the data from the API and show it on the pages. To make this process easier, RedwoodJS provides cells. Cells are a declarative approach to data fetching — it executes a GraphQL query and manages its lifecycle.
To generate cells, use this command:
yarn rw generate cell home
It will create a GraphQL query and its lifecycle:
import type { FindPosts } from 'types/graphql'

import { Link } from '@redwoodjs/router'
import type {
  CellSuccessProps,
  CellFailureProps,
  CellLoadingProps,
} from '@redwoodjs/web'

export const QUERY = gql`
  query FindPosts {
    posts {
      id
      title
      body
      comments {
        id
      }
      createdAt
      updatedAt
    }
  }
`

export const Loading: React.FC<CellLoadingProps> = () => <div>Loading...</div>

export const Empty = () => <div>No posts found</div>

export const Failure = ({ error }: CellFailureProps) => (
  <div>Error loading posts: {error.message}</div>
)

export const Success = ({ posts }: CellSuccessProps<FindPosts>) => {
  return (
    <div>
      <ul>
        {posts.map((post) => (
          <li key={post.id}>
            {' '}
            <Link to={`/posts/${post.id}`}>
              <div className="p-2 my-2 rounded-lg shadow cursor-pointer">
                <h4 className="text-xl font-medium">{post.title}</h4>

                <p>{post.body}</p>
              </div>
            </Link>
          </li>
        ))}
      </ul>
    </div>
  )
}
To protect the route in the RedwoodJS application, you can use Private from @redwoodjs/router and wrap everything inside the route.
<Private unauthenticated="login">
        <Set wrap={NavbarLayout}>
          <Set wrap={ContainerLayout}>
            <Route path="/new" page={NewpostPage} name="newpost" />
            <Set wrap={SidebarLayout}>
              <Route path="/" page={HomePage} name="home" />
              // routes come here
            </Set>
          </Set>
        </Set>
</Private>
To create a new post, scaffold a new post page using the following command:
yarn redwood g page newpost /new
If you want to customize the route URL, you can pass that as a parameter here. RedwoodJS adds routes based on the provided name. RedwoodJS provides forms and validations out of the box,
import {
  FieldError,
  Form,
  Label,
  TextField,
  TextAreaField,
  Submit,
  SubmitHandler,
} from '@redwoodjs/forms'
Once a user submits a form, you can call the GraphQL mutation to create a post.
const CREATE_POST = gql`
  mutation CreatePostMutation($input: CreatePostInput!) {
    createPost(input: $input) {
      id
    }
  }
`
const onSubmit: SubmitHandler<FormValues> = async (data) => {
    try {
      await create({
        variables: {
          input: { ...data, authorId: currentUser.id },
        },
      })
      toast('Post created!')
      navigate(routes.home())
    } catch (e) {
      toast.error(e.message)
    }
  }
Create a post details page and cell for data fetching to view post details. You can follow the same process that we did before.
yarn redwood g page postdetails
This will create the page and route in routes.tsx. To pass URL params in the route, you can modify it like this:
<Route path="/posts/{id:Int}" page={PostDetails} name="postdetails" />
You can pass ID into the component as props. Then, create a cell to fetch the post details and render it inside the component.
yarn redwood g cell post
Add the following code to fetch the data and comments for a specific post:
import type { FindPosts } from 'types/graphql'
import { format } from 'date-fns'
import { useAuth } from '@redwoodjs/auth'
import type {
  CellSuccessProps,
  CellFailureProps,
  CellLoadingProps,
} from '@redwoodjs/web'

export const QUERY = gql`
  query FindPostDetail($id: Int!) {
    post: post(id: $id) {
      id
      title
      body
      author {
        id
      }
      comments {
        id
        body
        author {
          id
          name
        }
        createdAt
      }
      createdAt
      updatedAt
    }
  }
`

export const Loading: React.FC<CellLoadingProps> = () => <div>Loading...</div>

export const Empty = () => <div>No posts found</div>

export const Failure = ({ error }: CellFailureProps) => (
  <div>Error loading posts: {error.message}</div>
)

export const Success = ({ post }: CellSuccessProps<FindPosts>) => {
  const { currentUser } = useAuth()

  return (
    <div>
      <div>
        <h2 className="text-2xl font-semibold">{post.title}</h2>
        <p className="mt-2">{post.body}</p>
      </div>

      <div className="mt-4 ">
        <hr />
        <h3 className="my-4 text-lg font-semibold text-gray-900">Comments</h3>
        {post.comments.map((comment) => (
          <div
            key={comment.id}
            className="flex justify-between sm:px-2 sm:py-2 border rounded-lg"
          >
            <div className="my-4 flex-1  leading-relaxed">
              <strong>{comment.author.name}</strong>{' '}
              <span className="text-xs text-gray-400">
                {format(new Date(comment.createdAt), 'MMM d, yyyy h:mm a')}
              </span>
              <p>{comment.body}</p>
            </div>
            {currentUser && currentUser.id === post.author.id && (
              <div className="m-auto">
                <button
                  type="button"
                  className="focus:outline-none text-white bg-red-700 hover:bg-red-800 focus:ring-4 focus:ring-red-300 font-medium rounded-lg text-sm px-5 py-2.5 mr-2 mb-2 dark:bg-red-600 dark:hover:bg-red-700 dark:focus:ring-red-900"
                >
                  Delete
                </button>
              </div>
            )}
          </div>
        ))}
      </div>
    </div>
  )
}
An important thing to note here is the condition to check if the logged-in user is the author of the post. In that case, we provide an option to delete comments.
To provide user-based access inside the application, you can get the current user using useAuth hooks and add conditions to it. For example, To show a list of posts created by the user, you can use the current user ID to fetch posts by the author.
const { currentUser } = useAuth()
MyPostCell.tsx
import { Link } from '@redwoodjs/router'
import type { FindPosts } from 'types/graphql'
import type {
  CellSuccessProps,
  CellFailureProps,
  CellLoadingProps,
} from '@redwoodjs/web'

export const QUERY = gql`
  query FindMyPosts($id: Int!) {
    user: user(id: $id) {
      id
      name
      posts {
        id
        title
        body
      }
    }
  }
`

export const Loading: React.FC<CellLoadingProps> = () => <div>Loading...</div>

export const Empty = () => <div>No posts found</div>

export const Failure = ({ error }: CellFailureProps) => (
  <div>Error loading posts: {error.message}</div>
)

export const Success = ({ user }: CellSuccessProps<FindPosts>) => {
  return (
    <div>
      <ul>
        {user.posts.map((post) => (
          <li key={post.id}>
            {' '}
            <Link to={`/posts/${post.id}`}>
              <div className="shadow rounded-lg p-2 my-2 cursor-pointer">
                <h4 className="text-xl font-medium">{post.title}</h4>

                <p>{post.body}</p>
              </div>
            </Link>
          </li>
        ))}
      </ul>
    </div>
  )
}
RedwoodJS provides everything out of the box. It’s all about building the application based on our requirements. Some important concepts are cells, pages, Prisma schema and migration, and understanding how the system works.
Once you understand RedwoodJS, you can build a full-stack application with very little time, as we’ve seen in this post. You can find the source code for this tutorial here.
There’s no doubt that frontends are getting more complex. As you add new JavaScript libraries and other dependencies to your app, you’ll need more visibility to ensure your users don’t run into unknown issues.
LogRocket is a frontend application monitoring solution that lets you replay JavaScript errors as if they happened in your own browser so you can react to bugs more effectively.

LogRocket works perfectly with any app, regardless of framework, and has plugins to log additional context from Redux, Vuex, and @ngrx/store. Instead of guessing why problems happen, you can aggregate and report on what state your application was in when an issue occurred. LogRocket also monitors your app’s performance, reporting metrics like client CPU load, client memory usage, and more.
Build confidently — start monitoring for free.

React Server Components and the Next.js App Router enable streaming and smaller client bundles, but only when used correctly. This article explores six common mistakes that block streaming, bloat hydration, and create stale UI in production.

Gil Fink (SparXis CEO) joins PodRocket to break down today’s most common web rendering patterns: SSR, CSR, static rednering, and islands/resumability.

@container scroll-state: Replace JS scroll listeners nowCSS @container scroll-state lets you build sticky headers, snapping carousels, and scroll indicators without JavaScript. Here’s how to replace scroll listeners with clean, declarative state queries.

Explore 10 Web APIs that replace common JavaScript libraries and reduce npm dependencies, bundle size, and performance overhead.
Hey there, want to help make our blog better?
Join LogRocket’s Content Advisory Board. You’ll help inform the type of content we create and get access to exclusive meetups, social accreditation, and swag.
Sign up now