
Developing games inside Unity is fun, but when it comes to creating the backend system, it is a pain. This is because developers have to leave the Unity game engine and shift to an entirely new development environment to create a backend database and API endpoints. Combine this with authentication, storage, hosting, analytics, and testing infrastructure and you find yourself in a deep rabbit hole.

To prevent this scenario, Firebase bundles up all these different backend services in one place. It is developed by Google and is easy to set up with Unity.
In this article, you will learn how to create a Firebase Project, integrate it with Unity, and perform CRUD operations with Firebase.
The Replay is a weekly newsletter for dev and engineering leaders.
Delivered once a week, it's your curated guide to the most important conversations around frontend dev, emerging AI tools, and the state of modern software.
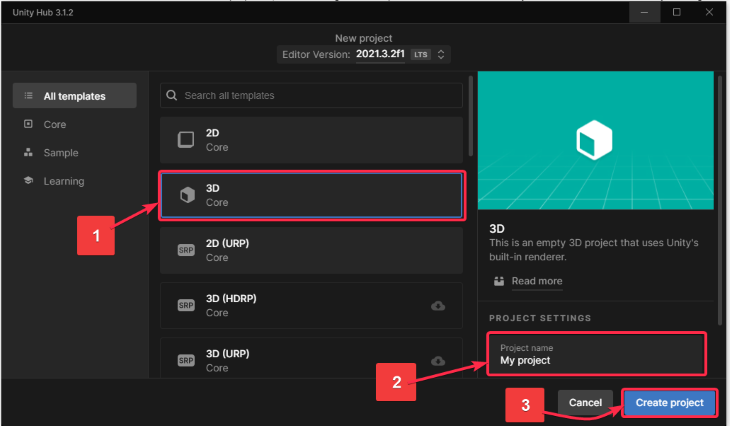
If you haven’t done so already, create a new Unity 3D project and name it Hello Firebase.
You can do so by launching Unity Hub on your computer and clicking New project.
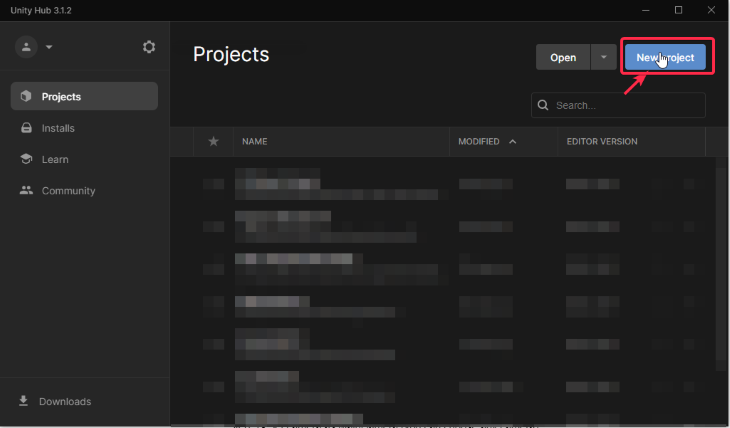
After clicking on New project, the window below pops up. To ensure that we are creating a 3D project, complete the following steps:
The project will take a few minutes to open up in Unity.
Keep the project open, and let’s work on configuring Firebase.
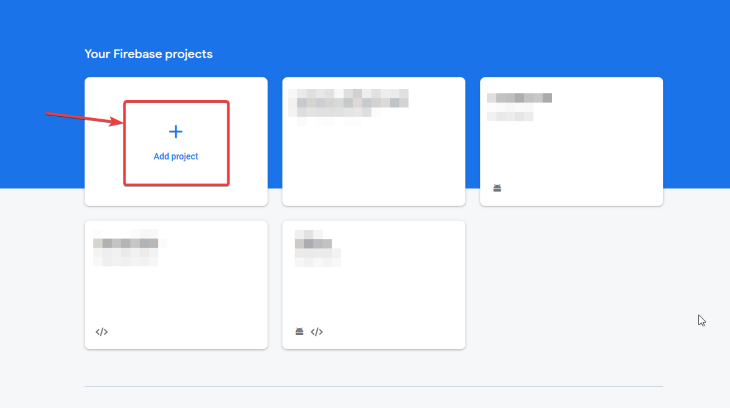
Open the Firebase Console in your browser. Click Add project.
Name the project HelloFirebaseUnity (up to you).
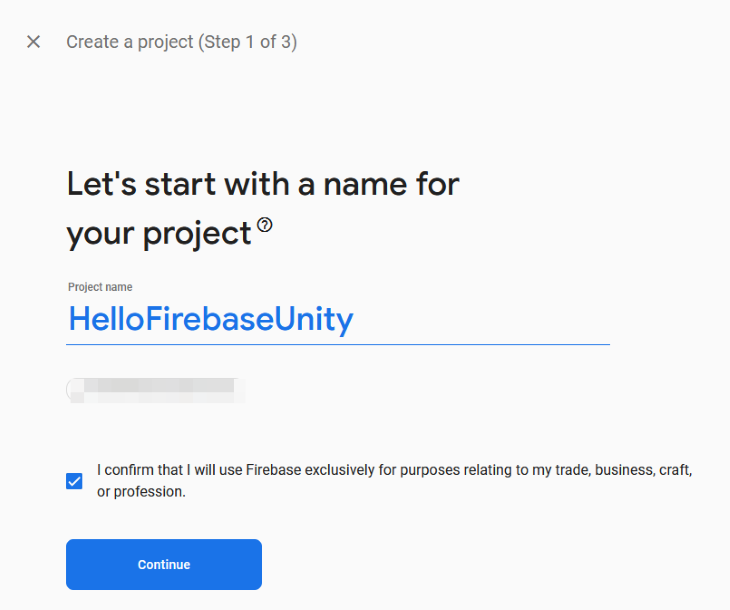
Keep Google Analytics disabled. You won’t need Google Analytics to learn Firebase. If required, we can always add it later to the same project from the Firebase Console.
Click Create project and wait till it gets created.

Once the project is ready, your project console will open. Click on the Unity logo in the project overview page.
![]()
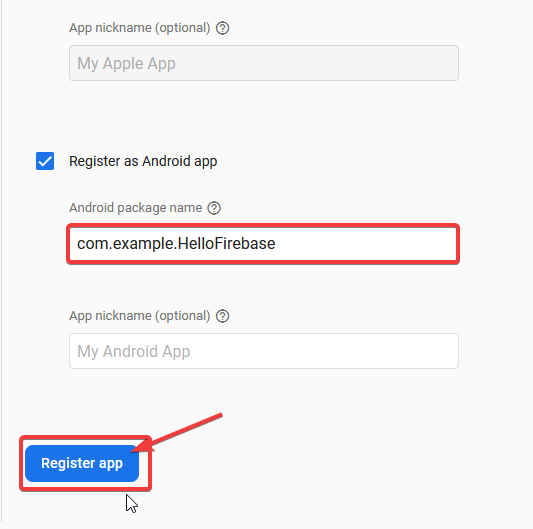
Then, enter your package name. This can be found in the HelloFirebase Unity project (under File > Build Settings > Platform > Other Settings > Package Name). You can overridde this setting and change it to anything in this format: com.yourcompany.yourprojectname.
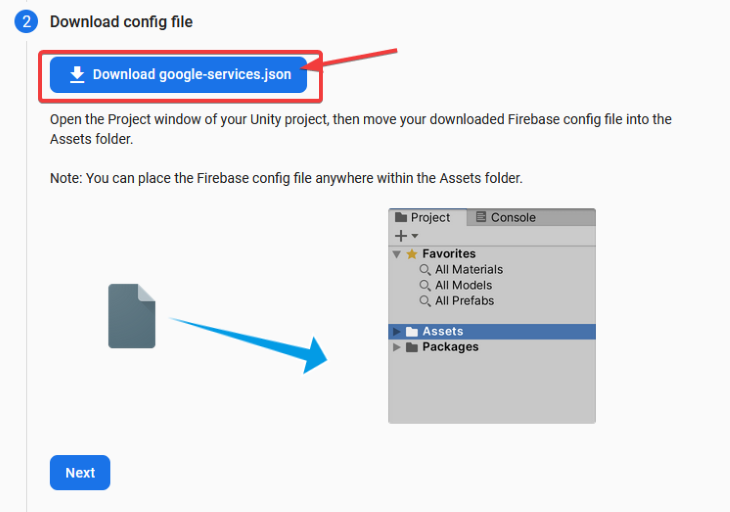
Download the google-services.json file and place it in the Assets folder of your HelloFirebase Unity project.
Download the Firebase Unity SDK and unzip it anywhere in your local machine.
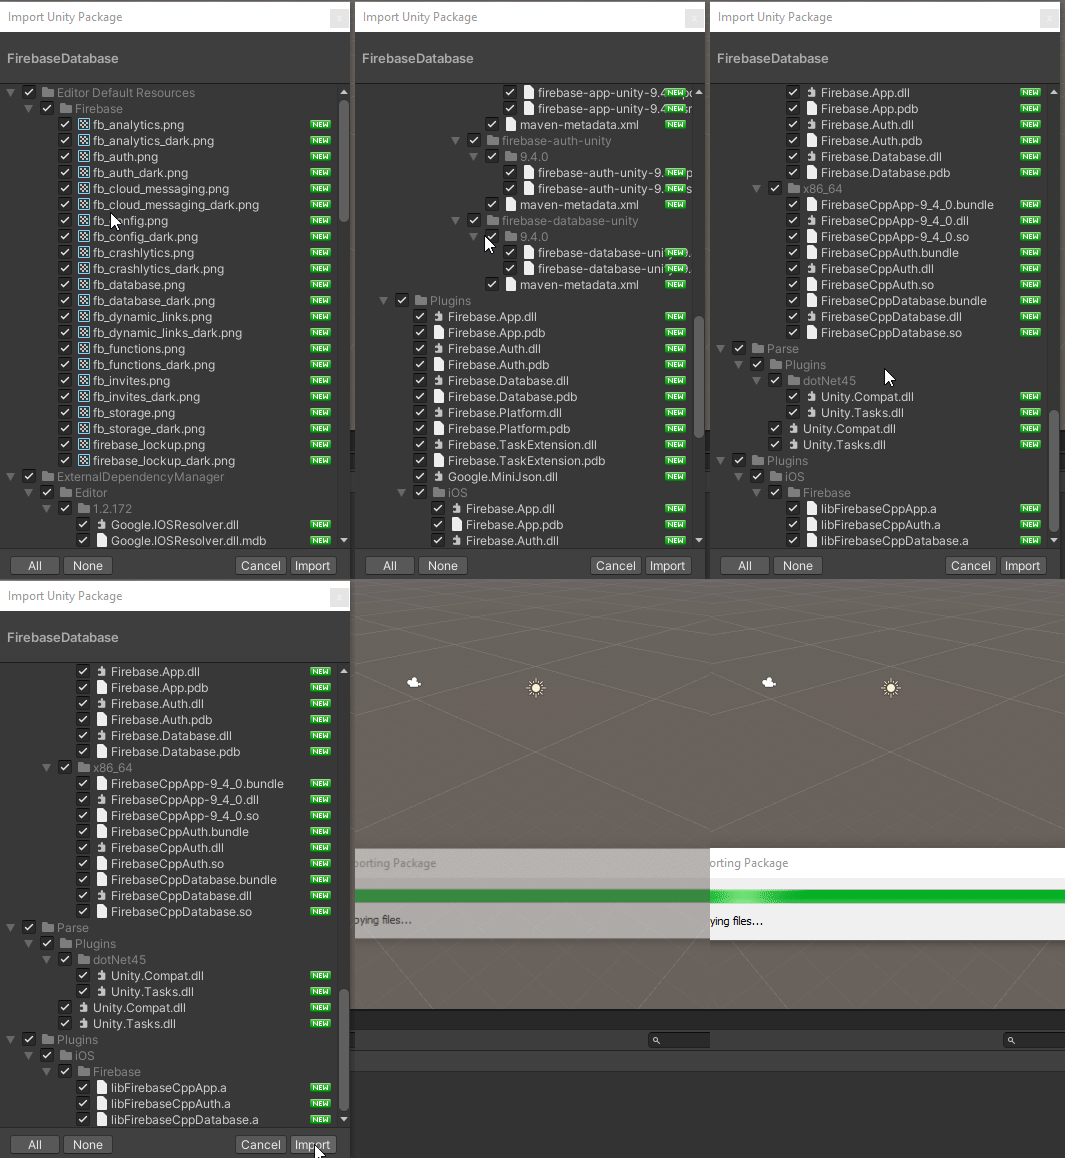
Inside the unzipped folder go to firebase_unity_sdk > dotnet4 > double click FirebaseDatabase.unitypackage. It will open this popup in your Unity project. Click Import. If you see any error in the console, simply click Clear.
At this point, you have completed all the steps required to configure a Firebase project and register an app, developed in Unity, with Firebase.
In order to create a database, go to your project’s Firebase Console. From the left-hand side menu, click Realtime Database.
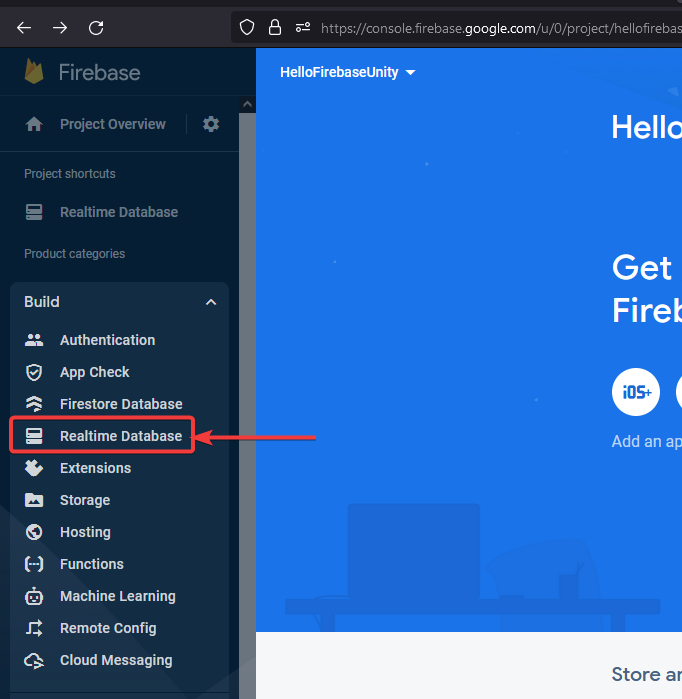
Click Create Database.

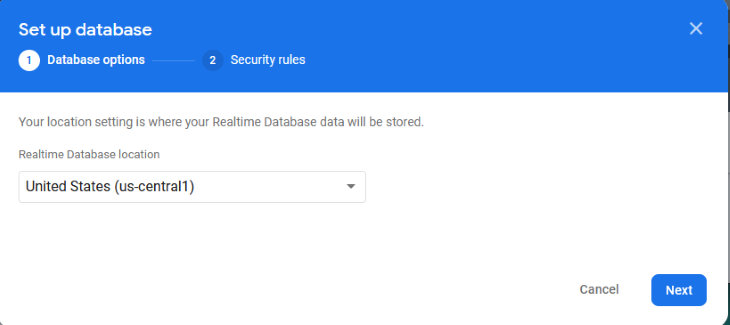
Select the Realtime Database location as United States. Click Next.
Select test mode. Click Enable.
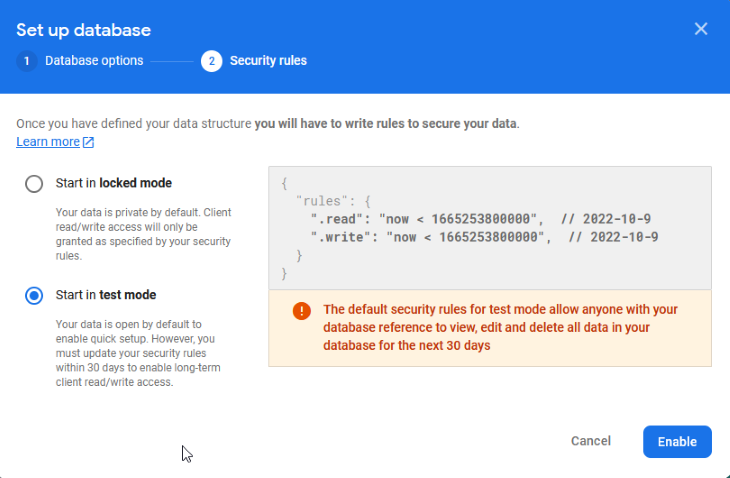
Please note that you should never keep the database in Test Mode during production. It is highly unsafe because anyone could make changes to your database. If you are experimenting around or casually doing some research, then Test Mode is completely acceptable.
Before jumping into the script and code, let’s take a minute to understand how Firebase stores data in the Realtime Database.
The Realtime Database is so named because it stores and syncs data in real time. This means that if data is changed or updated in one place, it instantly gets updated in all connected devices without the need for making a new request from the client to the server. Isn’t that great? All devices that have your app sync any updated data within milliseconds.
All this data is stored in JSON Format. JSON is a standard format for storing and transferring data. This data is in key-value pairs. This is how it looks:
{
      "users" : {
            "user_id_1" : {"name": "John Doe", "score":"100"},
        "user_id_2" : {"name": "Jane Doe", "score": "500"}
       }
}
The above data can be read as follows:
There are several ways to represent data. You can have a completely different representation of the same data that I have shown above.
CRUD stands for:
These are standard operations that can be performed on all databases either programmatically or manually from the Firebase Console. We will take a look at both the ways below.
Let’s learn how to perform these operations one by one.
From the Firebase Console > Your Project > Realtime Database click on the plus icon.
![]()
Then, add users as the key. Then, click on the plus icon.
![]()
Then add user_id_1 as the key and John Doe as the value. Click Add. This is a child of users. I have taken user_id_1 as an example. The user_id_1 should ideally be generated programmatically. It could be a device’s unique identification number or any other unique string.

This database was created manually, but you cannot follow the same process when you have users for your own game or app.
Think about it: if your game is a hit and it has one million users, will you really sit and type away a million names and user IDs? Of course not!
Therefore, let’s see how to do this programmatically.
To create the same database above programmatically:
Open up your Unity project.
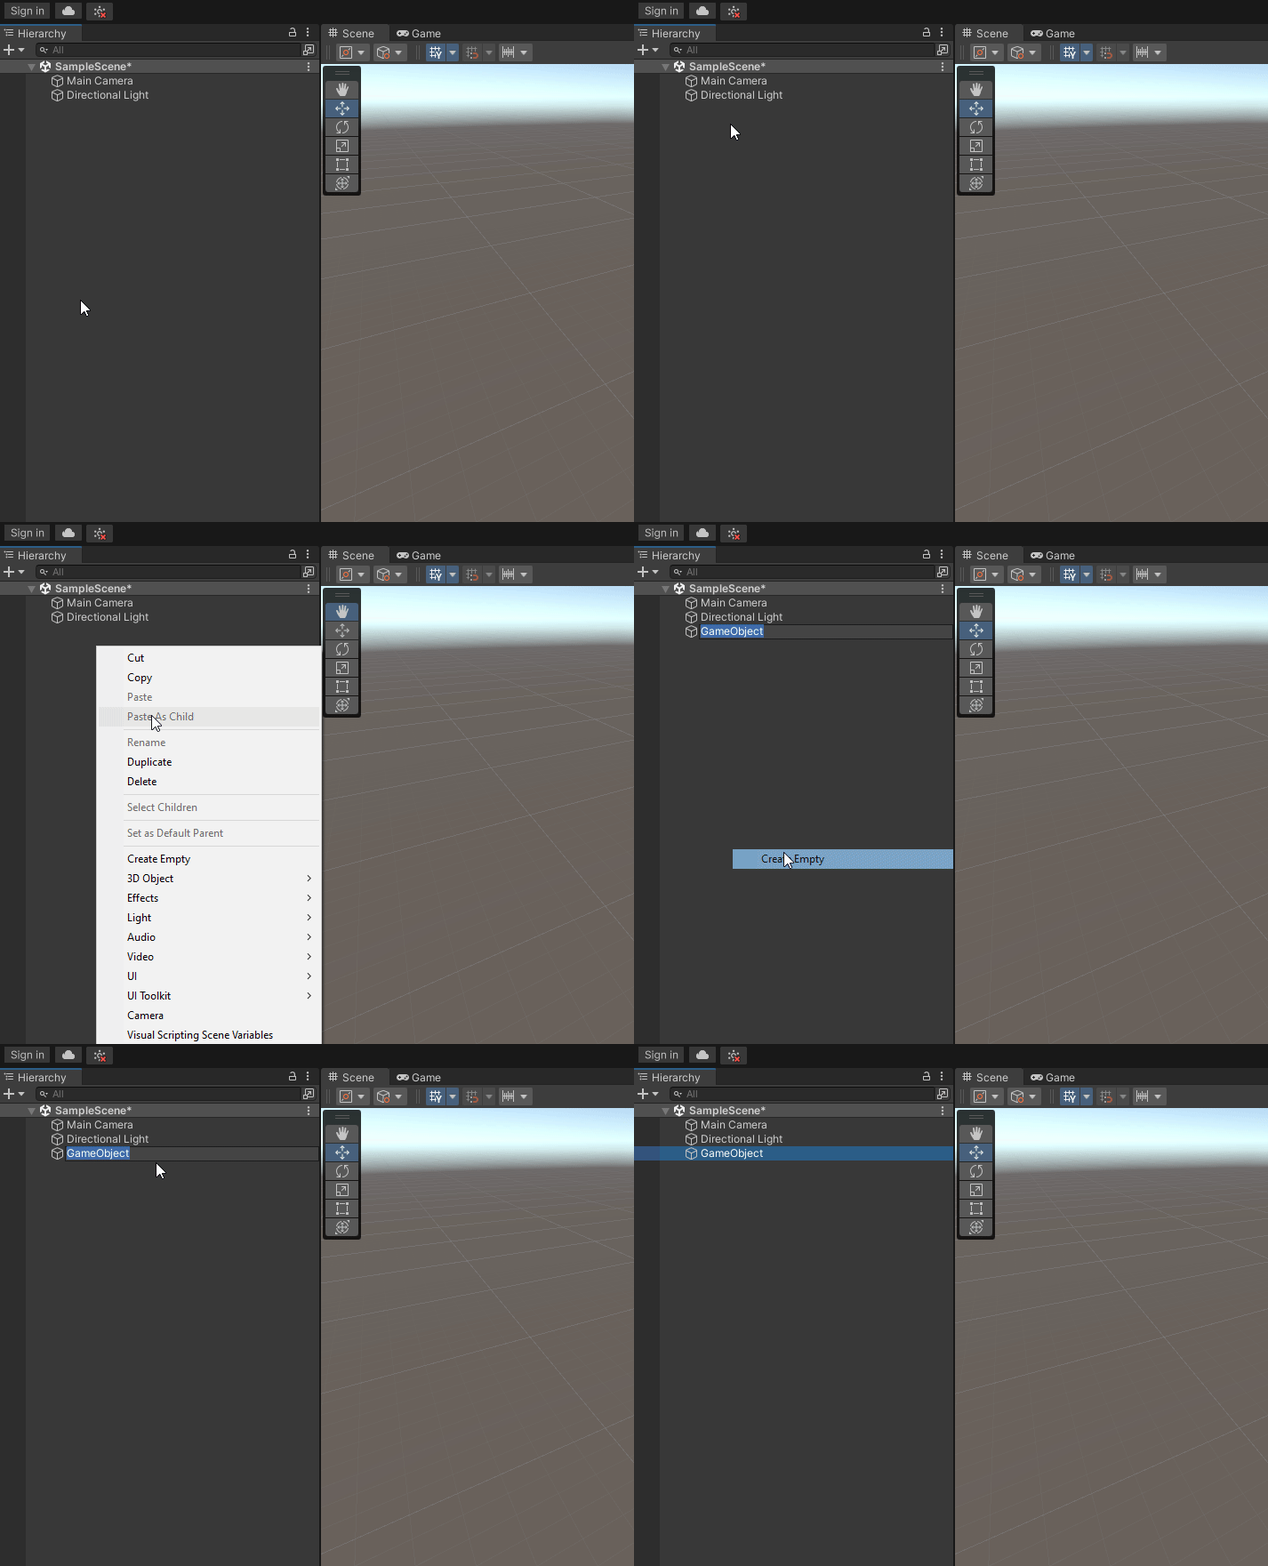
Create an empty GameObject (right click in Hierarchy panel > Create Empty). If you check the properties in the inspector panel for this GameObject, it won’t have anything at all. That is why it is an empty object.
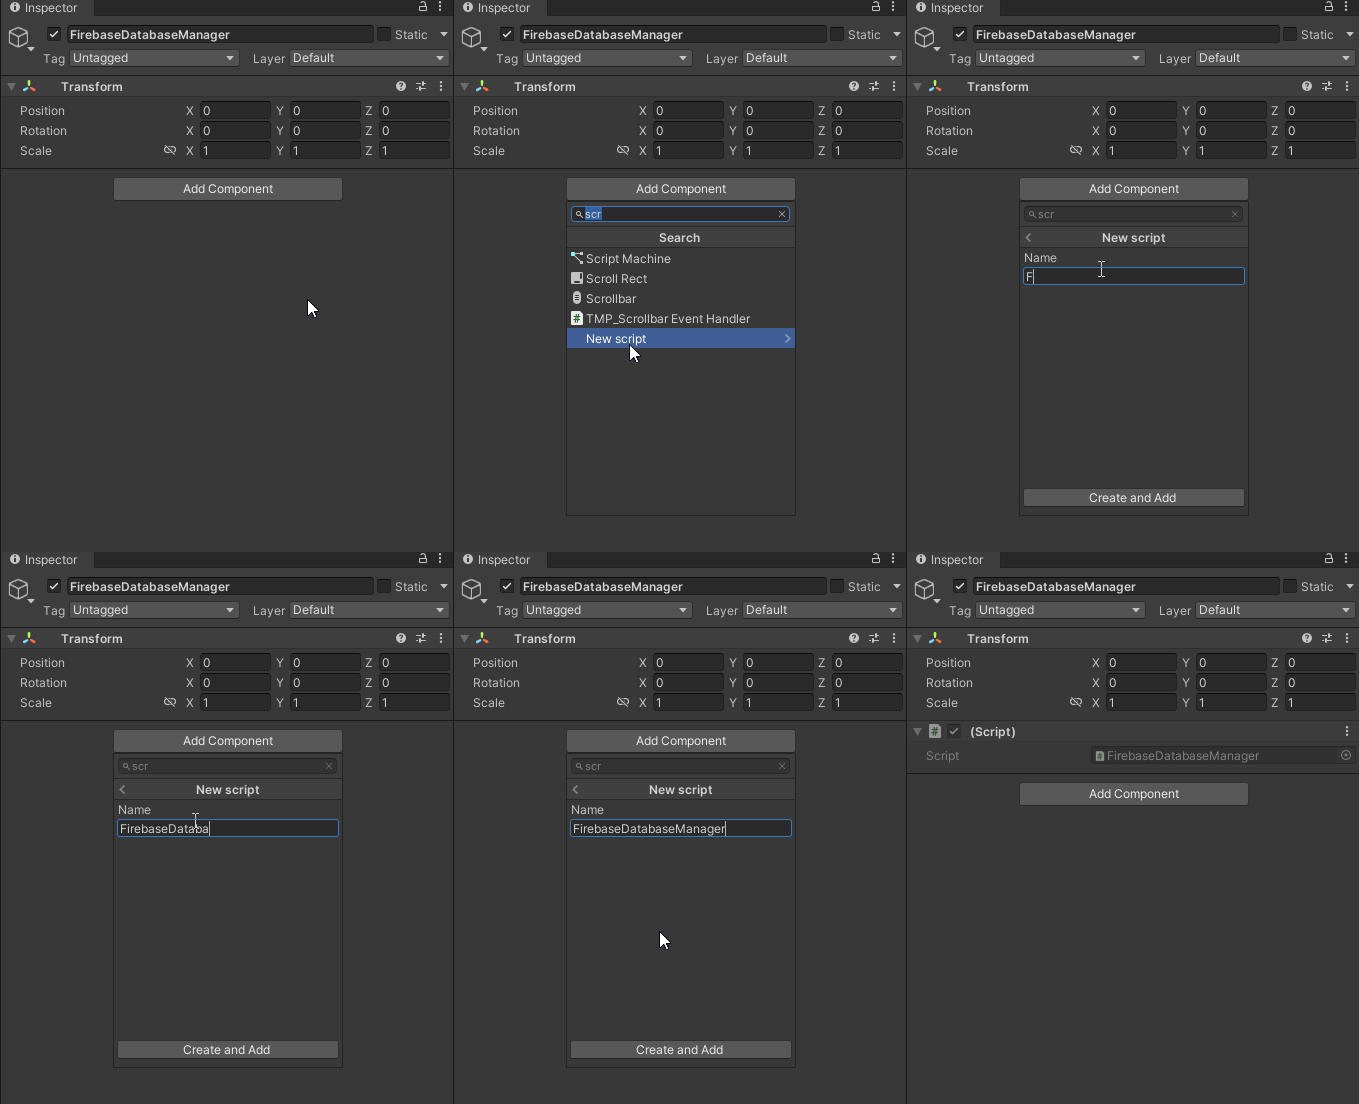
Rename the empty GameObject to FirebaseDatabaseManager. Then click Add Component > New script > name the script as FirebaseDatabaseManager > Create and Add.
Double click to open the FirebaseDatabaseManager.cs script in Visual Studio.
Replace everything with this code (we will understand the logic a little later code). It is important to save the file (CTRL + S). Otherwise, it won’t reflect the changes that you made to the FirebaseDatabaseManager.cs script:
using Firebase.Database;
using System.Collections;
using System.Collections.Generic;
using UnityEngine;

public class FirebaseDatabaseManager : MonoBehaviour
{
    string userId;
    DatabaseReference reference;

    void Start()
    {
        userId = SystemInfo.deviceUniqueIdentifier;
        reference = FirebaseDatabase.DefaultInstance.RootReference;
        CreateNewUser();
    }

    public void CreateNewUser()
    {
        reference.Child("users").Child(userId).SetValueAsync("John Doe");
        Debug.Log("New User Created");
    }
}
Jump back to the Unity Editor and click the Play button and then check the console. You should see New User Created with no error messages.
Now go to the Firebase Console > Your Project > Realtime Database. You will see a key (your device’s key) with the value of John Doe created.

Alright! Let’s understand the code:
userId stores the device’s (in which the app runs) unique identifier codereference stores the root of your Firebase Realtime DatabaseCreateNewUser() is just a method call. Inside it,
users. Then we create another child called system_user_id and set it’s value as John DoeGreat. You are able to write data to the database.
Your database has the user’s name but not the score. If you remember, we wanted to structure our data like this:
{
      "users" : {
            "user_id_1" : {"name": "John Doe", "score":"100"},
            "user_id_2" : {"name": "Jane Doe", "score": "500"}
       }
}
So how do we do that? Try once and then scroll down to check the solution.
All we have to do is to go into the FirebaseDatabaseManager.cs script and add one line to the CreateNewUser() method:
public void CreateNewUser()
{
        reference.Child("users")
            .Child(userId)
            .Child("name")
            .SetValueAsync("John Doe");

        reference.Child("users")
            .Child(userId)
            .Child("score")
            .SetValueAsync(100);

        Debug.Log("New User Created");
}
Hit the play button and go back to your Firebase Console. If all went well, this is what you will see:
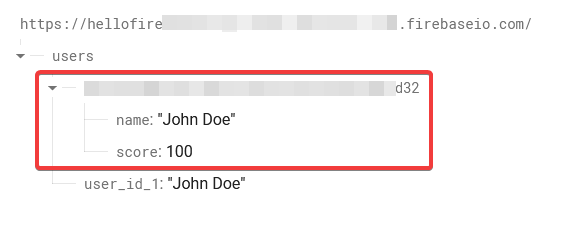
Awesome! We used a C# script in Unity to create data in the Firebase Realtime Database.
Go to your FirebaseDatabaseManager.cs script.
Comment out CreateNewUser() as we don’t need to call it anymore.
Create another method ReadDatabase() and call it in the Start method like this:
 void Start()
    {
        userId = SystemInfo.deviceUniqueIdentifier;
        reference = FirebaseDatabase.DefaultInstance.RootReference;
        // CreateNewUser();
        ReadDatabase();
    }


public void ReadDatabase()
    {
        reference.Child("users")
                 .Child(userId)
                 .Child("name")
                 .GetValueAsync().ContinueWithOnMainThread(task => {
                    if (task.IsFaulted)
                        {
                             Debug.Log(task.Exception.Message);
                        }
                        else if (task.IsCompleted)
                        {
                            DataSnapshot snapshot = task.Result;
                            Debug.Log("Name=" + snapshot.Value);
                        }
                   });
    }
Go back to Unity Editor. Hit the play button. You will see Name=John Doe message printed in the console.
In the code above, DataSnapshot is a snapshot of the key-value pairs or child data at the path that you choose to traverse in the JSON tree. If there is no data, you get null.
Updating the database simply means:
You can try the same code in the How to create a database in Firebase section. Just replace John Doe with your own name. It will automatically find a child with your system ID and update the value for that key.
Go to your FirebaseDatabaseManager.cs script.
Comment out CreateNewUser() as we don’t need to call it anymore.
Create another method RemoveUserWithUserID() and call it in the Start method like this:
void Start()
{
        userId = SystemInfo.deviceUniqueIdentifier;
        reference = FirebaseDatabase.DefaultInstance.RootReference;
        // CreateNewUser();

        RemoveUserWithUserID();
}

public void RemoveUserWithUserID()
{
        reference.Child("users")
            .Child(userId)
            .RemoveValueAsync();

        Debug.Log("User removed");
}
Go back to Unity Editor. Hit the play button. You will see the User removed message printed in the console.
Then go to your FirebaseConsole. You will see that the child with your system ID has been successfully removed from the database.
Awesome! You just created a C# script in Unity to communicate with your Firebase Realtime Database. Feel free to explore the other amazing features of Firebase.
If you face any issues or need some help, please ping me on Twitter or LinkedIn, and check out my Gumroad page or YouTube channel if you’re looking for more 3D or AR/VR related resources.
Install LogRocket via npm or script tag. LogRocket.init() must be called client-side, not
server-side
$ npm i --save logrocket

// Code:

import LogRocket from 'logrocket';
LogRocket.init('app/id');
// Add to your HTML:

<script src="https://cdn.lr-ingest.com/LogRocket.min.js"></script>
<script>window.LogRocket && window.LogRocket.init('app/id');</script>

@container scroll-state: Replace JS scroll listeners nowCSS @container scroll-state lets you build sticky headers, snapping carousels, and scroll indicators without JavaScript. Here’s how to replace scroll listeners with clean, declarative state queries.

Explore 10 Web APIs that replace common JavaScript libraries and reduce npm dependencies, bundle size, and performance overhead.

Russ Miles, a software development expert and educator, joins the show to unpack why “developer productivity” platforms so often disappoint.

Discover what’s new in The Replay, LogRocket’s newsletter for dev and engineering leaders, in the February 18th issue.
Would you be interested in joining LogRocket's developer community?
Join LogRocket’s Content Advisory Board. You’ll help inform the type of content we create and get access to exclusive meetups, social accreditation, and swag.
Sign up now