Editor’s note: This article was last updated by Chibuike Nwachukwu on 23 May 2023 to add information about using a proxy for load balancing, and caching in Node.js.

In this article, we will take a deep dive into proxy servers, including what they are, their benefits, what types are available, and their potential drawbacks. Then, we will explore how to use a proxy server in Node.js to get a grasp of what happens under the hood.
Jump ahead:
The Replay is a weekly newsletter for dev and engineering leaders.
Delivered once a week, it's your curated guide to the most important conversations around frontend dev, emerging AI tools, and the state of modern software.
Imagine yourself in a restaurant. You want to order a bottle of Cabernet Sauvignon, but you don’t want to go up to the bar. Instead, you call for the waiter, give them your order, and they go to the bar to order your bottle of wine for you. In this scenario, you are the computer, the waiter is the proxy server, and the bar counter is the internet.
Proxy servers act as middlemen, communicating your needs and requests without providing your information to the internet. Proxies can also allow you to bypass certain security blocks and allow you to access information that might otherwise be blocked. This is made possible through the use of a proxy server that does not reveal your personal IP address.
Each computer that talks to the internet already has an Internet Protocol (IP) address. For the individual user, an IP address is like your computer’s house address. Just as the waiter knew which table to bring your wine to, the internet knows to send your requested data back to your IP address.
On the other hand, when a proxy server sends your requests, it has the ability to change your IP address to its own address and “location,” thereby protecting your personal address and data.
So why use a proxy server? Should you always use one to protect your IP? Is it the most secure way to search for data? How do you make sure you’re using the right server? These are all important questions, and we’ll answer them in the following sections.
There are several reasons why individuals or organizations use proxies, the most common of which being to unblock sites that are restricted in their region or to remain anonymous when browsing. Here are some cases when one might use a proxy server:
There are two main types of proxy servers: forward and reverse proxies. Proxies differ by the direction in which they function: some move between the client and the server, while others move between the server and the client. We’ll discuss this in more detail below.
Forward proxies, often known as tunnels or gateways, are the most common and accessible proxy type on the internet. A forward proxy is an open proxy that provides services to an organization or a certain individual, like in the use cases we covered in the previous section. The most common use for a forward proxy is the storing and forwarding of web pages, which increases performance by reducing bandwidth usage.
Forward proxies are placed between the internet and the client; if the proxy is owned by an organization, then it is placed within the internal network. Many organizations use forward proxies to monitor web requests and responses, restrict access to some web contents, encrypt transactions, and change IP addresses to maintain anonymity.
Unlike forward proxies, reverse proxies are not open. Instead, they function on the backend and are commonly used by organizations within their internal network.
A reverse proxy receives every request from the client, acting as an intermediary server, then forwards these requests to the actual server(s) that should handle the request. The response from the server is then sent through the proxy to be delivered to the client as if it came from the web server itself.
There are many benefits to the reverse proxy architecture, but the most common is load balancing. Because the reverse proxy sits between the internet and the web server, it is able to distribute requests and traffic to different servers and manage the caching of content to limit server overload.
Other reasons for installing a reverse proxy in the internal network are:
Now that we understand what proxies are and what they are used for, we’re ready to explore how to use a proxy in Node.js. Below, we will make a simple proxy using the npm package. (Check this Github repository for the complete code.)
We will use this npm package to demonstrate how to proxy client GET requests to the target host. First, we must initialize our project to generate our package.json and index.js file:
npm init
Next, we’ll install two dependencies:
express: Our mini Node frameworkhttp-proxy-middleware: The proxy frameworknpm install express http-proxy-middleware
In your index.js file (or whichever file you want to proxy your request), add the following required dependencies:
import { Router } from 'express';
import { createProxyMiddleware } from 'http-proxy-middleware'
Finally, we add the options and define our route:
const router = Router();

const options = {
    target: 'https://jsonplaceholder.typicode.com/users', // target host
    changeOrigin: true, // needed for virtual hosted sites
    pathRewrite: {
       [`^/api/users/all`]: '',
    }, // rewrites our endpoints to '' when forwarded to our target
}
router.get('/all', createProxyMiddleware(options));
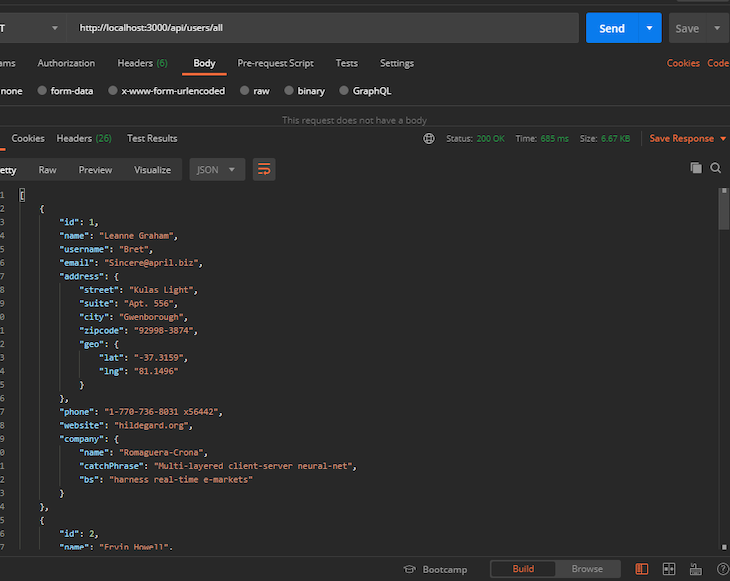
By using pathRewrite, we are able to proxy our application, which has the endpoint api/users/all, to an API called jsonplaceholder. When our client hits api/users/all from the browser, they will receive a list of users from https://jsonplaceholder.typicode.com/users as shown below:

Proxies can also be used for caching in Node.js. Let’s discover how to do this with an example that uses the apicache package.
Add the code snippet below:
import apicache from 'apicache';

let cache = apicache.middleware;

router.get('/all', cacheMiddleware(), createProxyMiddleware(options));

function cacheMiddleware() {
    const cacheOptions = {
      statusCodes: { include: [200] },
      defaultDuration: 300000,
      appendKey: (req:any, res: any) => req.method
    } as any;
    let cacheMiddleware = apicache.options(cacheOptions).middleware();
    return cacheMiddleware;
  }
This caches the proxy request for five minutes, during which the full code becomes this:
import { Router } from 'express';
import apicache from 'apicache'
import {createProxyMiddleware} from 'http-proxy-middleware'
const router = Router();

 // proxy middleware options
const options = {
    target: 'https://jsonplaceholder.typicode.com/users', // target host
    changeOrigin: true, // needed for virtual hosted sites
    pathRewrite: {
       [`^/api/users/all`]: '',
    },
}
router.get('/all', cacheMiddleware(), createProxyMiddleware(options));

function cacheMiddleware() {
    const cacheOptions = {
      statusCodes: { include: [200] },
      defaultDuration: 300000,
      appendKey: (req:any, res: any) => req.method
    } as any;
    let cacheMiddleware = apicache.options(cacheOptions).middleware();
    return cacheMiddleware;
  }

export default router;
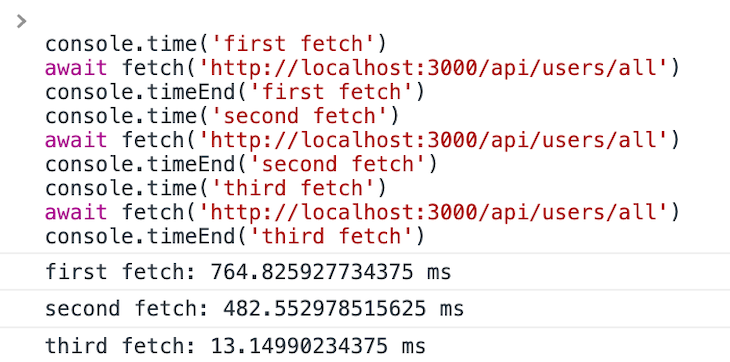
Let’s test this by running the test script below in a browser console:
console.time('first fetch')
await fetch('http://localhost:3000/api/users/all')
console.timeEnd('first fetch')
console.time('second fetch')
await fetch('http://localhost:3000/api/users/all')
console.timeEnd('second fetch')
console.time('third fetch')
await fetch('http://localhost:3000/api/users/all')
console.timeEnd('third fetch')
This is the result:

As you can see, the initial request took about 764 seconds to fetch the response from the external server (https://jsonplaceholder.typicode.com/users), but subsequent requests had a lower request time, 482 seconds for the second request and 13 seconds for the third request, due to fetching the response from the server cache and not making a direct request to the https://jsonplaceholder.typicode.com/users endpoint.
Proxies can also be used for load balancing in Node.js. Let’s update our example from the previous section to enable load balancing between targets.
Add the code snippets below:
const targets = [
    'https://jsonplaceholder.typicode.com/users',
    'https://jsonplaceholder.typicode.com/posts'
]

const options = {
    target: targets[(Math.floor(Math.random() * 2))], // target host
    changeOrigin: true, // needed for virtual hosted sites
    pathRewrite: {
       [`^/api/users/all`]: '',
    },
}
This adds two target servers as the target endpoint for the proxy. Ideally, these servers will have the same application code running in them.
This approach uses a random number to load balance requests across the two available endpoints. The result is then subsequently cached, and the full code becomes this:
import { Router } from 'express';
import apicache from 'apicache';
import {createProxyMiddleware} from 'http-proxy-middleware';
const router = Router();

const targets = [
    'https://jsonplaceholder.typicode.com/users',
    'https://jsonplaceholder.typicode.com/posts'
]
const options = {
    target: targets[(Math.floor(Math.random() * 2))], // target host
    changeOrigin: true, // needed for virtual hosted sites
    pathRewrite: {
       [`^/api/users/all`]: '',
    },
}
router.get('/all', cacheMiddleware(), createProxyMiddleware(options));

function cacheMiddleware() {
    const cacheOptions = {
      statusCodes: { include: [200] },
      defaultDuration: 60000,
      appendKey: (req:any, res: any) => req.method
    } as any;
    let cacheMiddleware = apicache.options(cacheOptions).middleware();
    return cacheMiddleware;
  }
export default router;
For a production site, it is better to use a more mature approach like Nginx to handle requests, as it handles load balancing automatically.
Just as there are benefits to using proxies, there are also several risks and drawbacks:
That being said, the solution to these risks is simple: find a reliable and trusted proxy server.
In this article, we learned that a proxy server acts like a middleman to our web requests, granting more security to our transactions on the web. In our Node.js sample, we were able to proxy our endpoint from JSONPlaceholder, and rewrote our URL to keep our identity masked from the API.
While forward and reverse proxies may serve different functions, overall, a proxy server can decrease security risks, improve anonymity, and even increase browsing speed.
 Monitor failed and slow network requests in production
Deploying a Node-based web app or website is the easy part. Making sure your Node instance continues to serve resources to your app is where things get tougher. If you’re interested in ensuring requests to the backend or third-party services are successful, try LogRocket.

LogRocket lets you replay user sessions, eliminating guesswork around why bugs happen by showing exactly what users experienced. It captures console logs, errors, network requests, and pixel-perfect DOM recordings — compatible with all frameworks.
LogRocket's Galileo AI watches sessions for you, instantly identifying and explaining user struggles with automated monitoring of your entire product experience.
LogRocket instruments your app to record baseline performance timings such as page load time, time to first byte, slow network requests, and also logs Redux, NgRx, and Vuex actions/state. Start monitoring for free.

Claude Code is deceptively capable. Point it at a codebase, describe what you need, and it’ll autonomously navigate files, write […]

Compare the top AI development tools and models of February 2026. View updated rankings, feature breakdowns, and find the best fit for you.

Broken npm packages often fail due to small packaging mistakes. This guide shows how to use Publint to validate exports, entry points, and module formats before publishing.

Discover what’s new in The Replay, LogRocket’s newsletter for dev and engineering leaders, in the February 11th issue.
Would you be interested in joining LogRocket's developer community?
Join LogRocket’s Content Advisory Board. You’ll help inform the type of content we create and get access to exclusive meetups, social accreditation, and swag.
Sign up now