Editor’s note: This article was last updated by Alexander Godwin on 13 March 2024 to include advanced Nginx configuration options such as SSL termination and load balancing, as well as to answer commonly asked questions like Why use Nginx with Node.js? and How does a reverse proxy server work?

Node.js is a vital tool for almost all kinds of microservice-based development and delivery. It’s also the leading tool for creating server applications in JavaScript, offering the functionality of both a web server and an application server.
But Node.js has some shortcomings and vulnerabilities that can cause performance issues and even crashes. For example, Node-based web applications are prone to slow code execution and crashes due to IO-bound operations or rapid traffic growth. They also sometimes struggle with serving static content such as images and JavaScript files and load balancing across multiple servers.
Fortunately, you can cache static content, reverse proxy and load balance among multiple application servers, and manage port contention between clients using Nginx. This makes Nginx an excellent tool for increasing Node.js performance.
In this tutorial, we’ll show you how to reverse proxy a Node.js application with Nginx. We’ll build a simple Node.js application that will run on port 3000 and use Nginx as a reverse proxy server for the Node.js application. The application will be addressed using a domain name:
Source: Kinsta
To follow along, you should have:
A server is a computer that communicates with other computers to serve them with the information requested by these computers. These computers, also called clients, connect to a server through either a local area network (LAN) or a wide area network (WAN). A server sends and collects information across a network within multiple locations.
A web server is a server on the internet that uses the Hypertext Transfer Protocol (HTTP) to receive requests from a client, such as a browser. It then returns an HTTP response, which can be an HTML webpage or data in JSON format, as used in API calls.
Web servers, essential for data exchange, use HTTP for client-server communication. They consist of both hardware and software, crucial in web development. The software interprets URLs and manages user access to hosted files.
According to its documentation, Nginx (pronounced “engine X”) is an HTTP and reverse proxy server, a mail proxy server, and a generic TCP/UDP proxy server, originally written by Igor Sysoev.
Nginx is used for a variety of tasks that contribute to improving Node performance:
Nginx currently supports seven scripting languages: Go, Node.js, Perl, PHP, Python, Ruby, and Java Servlet Containers (the last is an experimental module). It enables you to run applications written in different languages on the same server.
Now, let’s set up our Node.js application.
For this simple Node.js application, we’ll build a Node.js server with the HTTP module provided by Node.js. Let’s start by creating a folder and initializing the project on the terminal:
mkdir nginx_server_project
cd nginx_server_project
npm init -y
The above code will create the folder nginx_server_project and change the directory into the folder. We then initialize a Node.js application with npm, using the -y flag to set yes as the default answer to all the questions.
The next step is to create the server.js file that contains the source code for our application. Open it up with any IDE or text editor of your choice:
touch server.js
vim server.js
Now it’s time to build and start the server. Let’s define two extra subdomains as a means to test that our application is fully functional:
const http = require("http");
const server = http.createServer((req, res) => {
const urlPath = req.url;
if (urlPath === "/overview") {
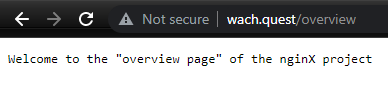
res.end('Welcome to the "overview page" of the nginX project');
} else if (urlPath === "/api") {
res.writeHead(200, { "Content-Type": "application/json" });
res.end(
JSON.stringify({
product_id: "xyz12u3",
product_name: "NginX injector",
})
);
} else {
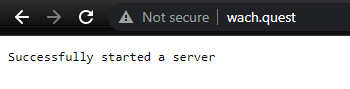
res.end("Successfully started a server");
}
});
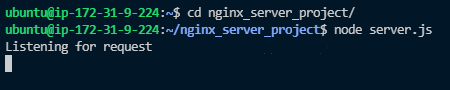
server.listen(3000, "localhost", () => {
console.log("Listening for request");
});
We created a server with a Node.js HTTP module that we imported using the require function in the above code. Within our server, we’ll render two different responses, depending on our current route. The two routes are /overview and /api.
On the /overview subdomain, we’ll render a plain text, while on the /api, we’ll render a JSON object. The above application will be accessed on the Public IPv4 address of your virtual machine — e.g., 34.211.115.4 on port 3000.
Now that the Node server application is ready, let’s install Nginx and configure it.
We’ll install Nginx using the default package manager for a Debian-based operating system, which is called apt. Nginx is also available for almost all operating systems under their default repositories.
Before installing Nginx, make sure you’ve installed the prerequisites for Ubuntu OS. Next, we’ll configure Nginx based on the unique needs of our project, then we’ll be ready to implement it.
For Nginx to route to the Node.js application listening on port 3000, we’ll need to first unlink the default configuration of Nginx and then create a new configuration to be used by our Node.js application.
To unlink the default Nginx configuration, you can use the following command:
sudo unlink /etc/nginx/sites-available/default
The Nginx configuration is kept in the /etc/nginx/sites-available directory. To create a new configuration, let’s navigate to this directory and create a configuration file pointing to the server block of our Node.js application:
cd /etc/nginx/sites-available
touch myserver.config
After changing the directory to /etc/nginx/sites-available, the second command will create an Nginx configuration file named myserver.config.
Next, open the myserver.config file:
sudo vim /etc/nginx/sites-available/myserver.config
Paste in the following configuration:
#The Nginx server instance
server{
    listen 80;
    server_name wach.quest;
    location / {
        proxy_set_header X-Forwarded-For $proxy_add_x_forwarded_for;
        proxy_set_header Host $host;
        proxy_pass http://127.0.0.1:3000;
        proxy_http_version 1.1;
        proxy_set_header Upgrade $http_upgrade;
        proxy_set_header Connection "upgrade";
        # location /overview {
        #     proxy_pass http://127.0.0.1:3000$request_uri;
        #     proxy_redirect off;
        # }
    }
}
The above configuration has Nginx listening on port 80 on your-domain.com. The / is your Uniform Resource Identifier (URI) with the following properties:
proxy_set_header: Sets the host header to be that of the Nginx serverproxy_pass HTTP: Instructs Nginx to proxy all requests matching the location pattern to an upstream (backend) serverproxy_http_version: Converts the incoming connection to HTTP 1.1proxy_set_header Upgrade: Converts the proxied connection to type Upgrade because WebSockets only communicate on upgraded connectionsproxy_set_header Connection: Ensures the connection header value is UpgradeSave the changes and exit the file by clicking the Esc key. Then, type the command :wq and hit the Enter or Return key.
For the next step, let’s enable the above file by creating a symbolic link from it to the sites-enabled directory, which Nginx reads from during startup:
sudo ln -s /etc/nginx/sites-available/myserver.config /etc/nginx/sites-enabled/
The server block is now enabled and configured to return responses to requests based on the listen port and location path.
Now it’s time to start both our Node.js application and the Nginx service to trigger the recent changes. But first, let’s check the status of Nginx to confirm that the configuration is working properly:
sudo nginx -t
The output upon running the above command would look like this:
nginx: the configuration file /etc/nginx/nginx.conf syntax is ok
nginx: configuration file /etc/nginx/nginx.conf test is successful
The above output confirms that our configuration was successful. Next, restart Nginx to enable your changes:
sudo systemctl restart nginx
With Nginx running again, let’s allow full access through the Nginx firewall:
sudo ufw allow 'Nginx Full'
Next, navigate to the directory of the Node.js application:
cd ~/nginx_server_project
Start your Node.js server application using the following command:
node server.js
Open your browser and access the Node.js application using your-domain.com:
Now we can navigate to the address your-domain.com/overview on the browser and access the /overview endpoint of our application:
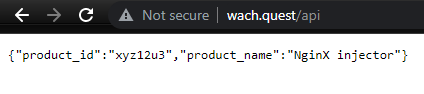
To further test if every other path we defined is working, let’s try the last path, your-domain.com/api:
Node.js has become popular for creating online applications that are fast and scalable. However, it is essential to optimize the web server infrastructure to take advantage of its possibilities. This section will explore how to optimize the scalability and security of Node.js apps by covering advanced Nginx configuration options including SSL termination, load balancing, and more.
It is essential to secure communication between clients and the Node.js server, and SSL/TLS encryption is a key component in making this happen. Nginx performs well when it comes to SSL termination.
By terminating HTTPS traffic from clients, Nginx relieves the computational burden of SSL/TLS encryption on your upstream web and application servers:
server {
    listen 443 ssl;
    server_name example.com;

    ssl_certificate /path/to/ssl_certificate.crt;
    ssl_certificate_key /path/to/ssl_certificate.key;

    # SSL settings
    ssl_protocols TLSv1.2 TLSv1.3;
    ssl_prefer_server_ciphers on;
    ssl_ciphers 'EECDH+AESGCM:EDH+AESGCM:AES256+EECDH:AES256+EDH';
    ssl_session_cache shared:SSL:10m;
    ssl_session_timeout 10m;

    location / {
        proxy_pass http://node_app_servers;
        proxy_set_header Host $host;
        proxy_set_header X-Real-IP $remote_addr;
        proxy_set_header X-Forwarded-For $proxy_add_x_forwarded_for;
        proxy_set_header X-Forwarded-Proto $scheme;
    }
}
The configuration file above:
proxy_pass directive to forward incoming requests to the backend Node.js serversAs Node.js applications develop in size to accommodate an increasing number of users, it becomes important to allocate incoming traffic among several backend servers to guarantee efficiency and dependability.
Nginx provides a variety of algorithms to help with load balancing. These algorithms determine how loads are distributed among the available servers:
http {
  upstream node_app_servers {
      # no load balancing method is specified for Round Robin
      server api1.backend.com;
      server api2.backend.com;
  }

  server {
      listen 80;
      server_name example.com;

      location / {
          proxy_pass http://node_app_servers;
          proxy_set_header Host $host;
          proxy_set_header X-Real-IP $remote_addr;
          proxy_set_header X-Forwarded-For $proxy_add_x_forwarded_for;
          proxy_set_header X-Forwarded-Proto $scheme;
      }
  }
}
upstream directive defines a group of backend Node.js servers for load balancingproxy_pass directive forwards requests to the backend servers within the upstream groupThe efficiency and scalability of Node.js applications can be improved by optimizing static assets and dynamic content for caching.
By storing content depending on the URL patterns, response headers, and other criteria, Nginx makes it easier for Node.js servers to serve content dynamically. This frees up resources for logic related to applications. To respond to client requests without requiring a proxy request for the same content each time, Nginx uses disk caching to store responses in response to queries:
http {
    # ...
    proxy_cache_path /data/nginx/cache keys_zone=mycache:10m loader_threshold=300
                     loader_files=200 max_size=200m;

    server {
        listen 8080;
        proxy_cache mycache;

        location / {
            proxy_pass http://backend1;
        }

        location /some/path {
            proxy_pass http://backend2;
            proxy_cache_valid any 1m;
            proxy_cache_min_uses 3;
            proxy_cache_bypass $cookie_nocache $arg_nocache$arg_comment;
        }
    }
}
Nginx offers strong security capabilities that shield Node.js applications from attacks and vulnerabilities in addition to enhancing scalability.
Because Nginx has a large number of security modules, it offers features like rate limiting, access control, and request filtering to prevent attacks like SQL injection, DDoS, and cross-site scripting:
server {
    listen 80;
    server_name example.com;

    # Rate limiting
    limit_req_zone $binary_remote_addr zone=limit_zone:10m rate=10r/s;
    limit_req zone=limit_zone burst=20;

    # Basic access control
    allow 192.168.1.0/24;
    deny all;

    # Request filtering
    if ($request_uri ~* (\.git|\.svn)) {
        return 404;
    }

  # ...other configurations
}
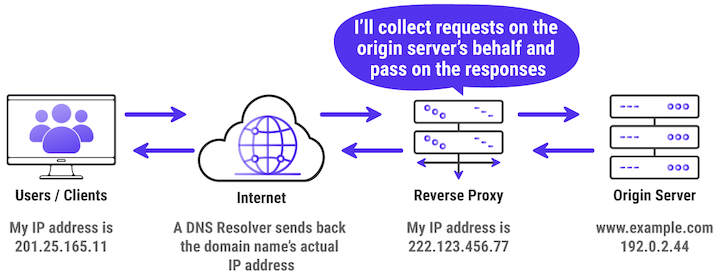
nginx.conf fileThe reverse proxy acts as an intermediary between client devices (e.g., web browsers) and backend servers (e.g., application servers or web servers), and instead of forwarding client requests directly to the backend servers, it intercepts these requests and forwards them on behalf of the client. Here’s how a reverse proxy server works:
The primary difference between a forward proxy and a reverse proxy lies in their roles, deployment, and the direction of traffic they handle.
A forward proxy manages client devices’ outgoing traffic to the internet. It receives a client’s request to access a resource online and passes it to the desired location on the client’s behalf.
On the other hand, a reverse proxy responds to incoming traffic going from clients to backend servers. Upon receiving a request from a client seeking access to a resource hosted on backend servers, the reverse proxy relays the request to the relevant backend server on the client’s behalf.
Forward proxies are usually installed on the client’s device or within the client’s network. By serving as a bridge between client devices and the internet, it offers services like anonymization, content screening, and caching.
Meanwhile, a reverse proxy is usually set up in front of web, application, or API servers. With functions like load balancing, SSL termination, and security protection, it serves as a gateway between clients and backend servers.
Forward proxies can be used to uphold rules, filter content, and improve users’ security and privacy when they browse the internet. Meanwhile, use cases of reverse proxy include routing incoming client requests to backend servers, SSL termination, caching, and load balancing.
Configuring SSL with Nginx for a Node.js application involves several steps to ensure secure communication between clients and the server. Below is a series of steps to configure SSL with Nginx.
First, obtain SSL/TLS certificates from a trusted Certificate Authority (CA) like Let's Encrypt or generate self-signed certificates for testing purposes. You need two files: a certificate file (.crt) containing the server’s public key and a private key file (.key) containing the server’s private key.
Then, open your Nginx configuration file (commonly located at /etc/nginx/nginx.conf or /etc/nginx/sites-available/default). Add or modify a server block to enable SSL. Here’s a basic example:
server {
    listen 443 ssl;
    server_name example.com;

    ssl_certificate /path/to/your/certificate.crt;
    ssl_certificate_key /path/to/your/privatekey.key;

    location / {
        proxy_pass http://localhost:3000;  # Forward requests to your Node.js application
        proxy_http_version 1.1;
        proxy_set_header Upgrade $http_upgrade;
        proxy_set_header Connection 'upgrade';
        proxy_set_header Host $host;
        proxy_cache_bypass $http_upgrade;
    }
}
Within the server block, you can configure additional SSL parameters for security and performance. Some common directives include:
ssl_session_cache: Configures session caching to improve performancessl_session_timeout: Specifies the timeout for SSL sessionsOptionally, you may want to redirect HTTP traffic to HTTPS to ensure all communication is encrypted:
server {
    listen 80;
    server_name example.com;

    return 301 https://$host$request_uri;
}
Then, verify your Nginx configuration using nginx -t. If the configuration is valid, reload Nginx to apply the changes: sudo systemctl reload nginx (or equivalent command, based on your system).
After configuring Nginx, ensure your Node.js application is running on the specified port.
Finally, use a web browser to access your application via HTTPS (e.g., https://example.com). Verify that the connection is secure and that SSL/TLS encryption is properly configured.
As a reverse proxy, Nginx requires constant monitoring and upkeep to guarantee the dependability, efficiency, and security of your web infrastructure.
In this tutorial, we learned how to set up Nginx as a Node.js server for backend applications. We built a simple Node.js application using Node.js and Nginx. Then, we configured Nginx to listen for port 3000 and served the contents we had predefined within our Node.js application on the browser.
Ngnix is a great tool for web application delivery, providing performance and scalability at both the ADC (Application Delivery Controller) and web server layers.
 Monitor failed and slow network requests in production
Deploying a Node-based web app or website is the easy part. Making sure your Node instance continues to serve resources to your app is where things get tougher. If you’re interested in ensuring requests to the backend or third-party services are successful, try LogRocket.

LogRocket lets you replay user sessions, eliminating guesswork around why bugs happen by showing exactly what users experienced. It captures console logs, errors, network requests, and pixel-perfect DOM recordings — compatible with all frameworks.
LogRocket's Galileo AI watches sessions for you, instantly identifying and explaining user struggles with automated monitoring of your entire product experience.
LogRocket instruments your app to record baseline performance timings such as page load time, time to first byte, slow network requests, and also logs Redux, NgRx, and Vuex actions/state. Start monitoring for free.
Hey there, want to help make our blog better?
Join LogRocket’s Content Advisory Board. You’ll help inform the type of content we create and get access to exclusive meetups, social accreditation, and swag.
Sign up now
Not sure if low-code is right for your next project? This guide breaks down when to use it, when to avoid it, and how to make the right call.

Compare Firebase Studio, Lovable, and Replit for AI-powered app building. Find the best tool for your project needs.

Discover how to use Gemini CLI, Google’s new open-source AI agent that brings Gemini directly to your terminal.

This article explores several proven patterns for writing safer, cleaner, and more readable code in React and TypeScript.


8 Replies to "How to use Nginx as a reverse proxy for a Node.js server"
Nice one bro. Simple and concise explanation. Keep it up. Thank you. I benefited a lot from this article.
Hello Mukhtar,
I’m really happy you found this helpful. Thanks you for leaving a comment!
On a grade scale this gets an F only because there is nothing lower. That you copy-pasted a rule for each path is lame to say the least. What was improved by inserting nginx in front of node in this example? Answer: nothing but additional overhead. You said “For Nginx to listen for port 3000 from our Node.js application”… but in no way shape or form does nginx “listen” to node. It is listening to port 80 and forwarding requests to node on port 3000. Then out of the blue you say “For the default port 127.0.0.1 to work…” First, that’s not a port it’s an IP address, but you already had a rule for / to proxy to 3000. Was that not working? Why is it there? You then say “We’ll use the port 127.0.0.1:8080”. Again, that’s not a port but at least it has a port this time. Finally, you gratuitously threw in the extra “listen [::]:8080 default_server” statement without explanation. You turned what should have been a dirt simple how-to into an incoherent mess full of misstatements and errors of omission.
Hello Rick,
I have updated the article, fixing issues raised as well as taking you and other readers on a journey on how better to serve NodeJs applications through Nginx.
Please do leave a comment or feedback and I will duly attend to them.
Thanks for the article! I followed you instructions and it got me set-up exactly the way I wanted.
Hi,
Thanks for these settings. When I used these with my docker node-app, and it only worked on the main page (www.example.com), but whenever I clicked on http://www.example.com/contactus, the links on my site kept taking me to 127.0.0.1:3000, which is wrong.
Can you please help?
Thanks
sudo nginx -t
nginx: [emerg] open() “/etc/nginx/sites-enabled/default” failed (2: No such file or directory) in /etc/nginx/nginx.conf:60
nginx: configuration file /etc/nginx/nginx.conf test failed
Seems you deleted the default Nginx config file. Visit this gist and copy the default cconfig code. https://gist.github.com/xameeramir/a5cb675fb6a6a64098365e89a239541d.
Paste this code in /etc/nginx/sites-available/default. If this file is missing, which it most likely is in your case, create it then paste the code from the gist in the file. perform systemctl nginx -t and it should solve your error. I have deleted the default files once or twice before by accident. Happens to the best of us 😉