Prisma is an open-source database toolkit that replaces traditional ORMs. It makes database access easy with an auto-generated query builder for TypeScript and Node. js. Using only an intuitive API and plain old JavaScript objects, it enables a developer to only worry about the data and not the native database queries to get data.
Prisma consists of the following parts:
The databases currently supported by Prisma are PostgreSQL, MySQL, SQLite. In this article, we will be building a basic polling GraphQL server. Some understanding of Prisma will make it easier to go along with this article. If you are not familiar with Prisma, Akshay Kadam wrote a great article that should help you get started. When we are done with the server, you should be able to create a user and the user can create a poll that other users can vote on.
As mentioned earlier basic knowledge of Prisma and Node.js will be necessary to follow along. Ensure that you have Node and Yarn, or npm installed on your machine.
The first thing we need to do is install Prisma 2 globally. If you have an earlier version of Prisma installed, you will need to uninstall it first before you continue. To install Prisma, run any of the following commands in your terminal:
npm install -g @prisma/cli
yarn global add @prisma/cli
Let’s create the folder structure for our voting server:
$ mkdir voting-app
$ cd voting-app
$ touch README.md index.js .gitignore
You can add a description of what your server does in the README.md. You should also add the node_modules folder to the .gitignore file like so:
node_modules/
To generate the package.json file without prompts, run the following command:
$ npm init -y
The contents of the package.json file will look something like this:
{
  "name": "voting-app",
  "version": "1.0.0",
  "description": "",
  "main": "app.js",
  "scripts": {
    "test": "echo \"Error: no test specified\" && exit 1"
  },
  "keywords": [],
  "author": "",
  "license": "ISC"
}
$ yarn add graphql-tools graphql-yoga
Create a folder at the root of our project called prisma and then add a file called schema.prisma to the folder. You can do this using the following commands:
mkdir prisma
touch prisma/schema.prisma
The schema.prisma is needed to set up Prisma Client. It is made up of three components:
Open the schema.prisma file and add the following code:
// 1
datasource db {
  provider = "sqlite"
  url = "file:./dev.db"
}

// 2
generator client {
  provider = "prisma-client-js"
}

// 3
model User {
  id          String @default(cuid()) @id
  name        String
  polls       Poll[]
}

// 4
model Poll {
  id          String  @default(cuid()) @id
  description String
  user        User
  options     Option[]
  votes       Vote[]

}

// 5
model Option {
  id          String  @default(cuid()) @id
  text        String
  poll        Poll
  votes       Vote[]
}

// 6
model Vote {
  id          String  @default(cuid()) @id
  user        User
  poll        Poll
  option      Option
}
What exactly have we added? Data source tells Prisma that we are using SQLite for our database. We have also defined the models that we will be using for this voting app. In these models, we are defining the connections and how each model is connected to another model, if any.
The official SQLite website defines it as a C-language library that implements a small, fast, self-contained, high-reliability, full-featured, SQL database engine. It reads and writes directly to ordinary disk files.
To get set up we use Prisma Migrate. Prisma Migrate is a tool that lets you make changes(schema migrations) to your database e.g. adding columns to existing tables.
The first step is to write your database schema in the form of a Prisma data model inside your Prisma schema file. Mapping your data model to your database schema is a two-step process which involves running two commands:
prisma migrate save --experimentalprisma migrate up --experimentalprisma migrate save --experimental saves a new migration to the prisma/migrations in the root folder of your project and updates the _Migration table in your database. A new migration is saved every time this command is run complete with its own README.md file detailing information about the migration.
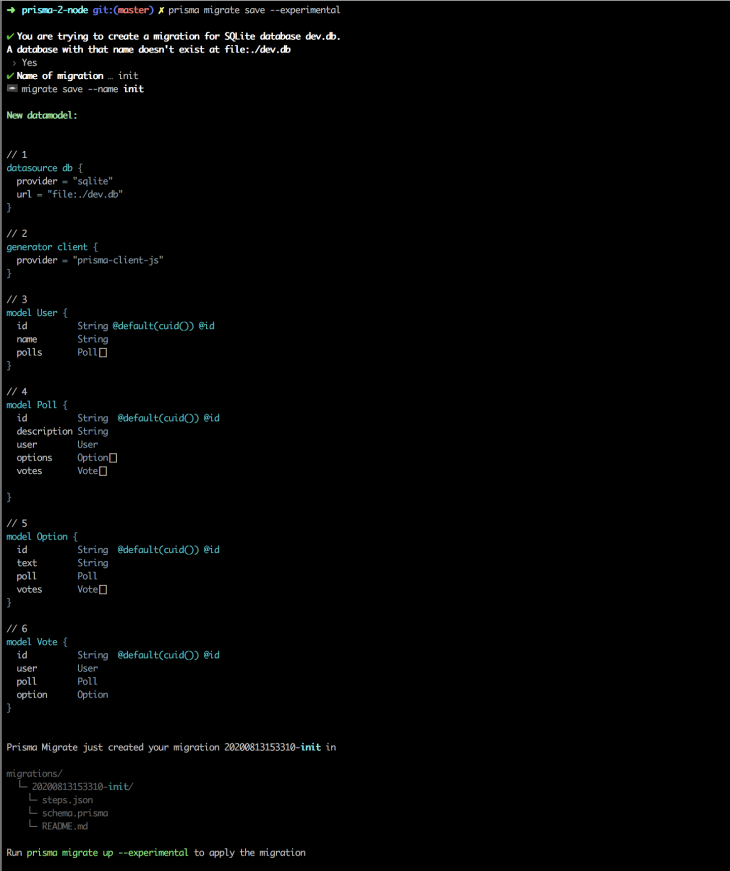
Let’s create our first migration by running the following command at the root of our folder:
npx prisma migrate save --experimental
The first time you run this command, you will be prompted to create a new database. After you select the option Yes you will then need to add a name for your migration. You will notice that a migrations folder has been created after running the command.
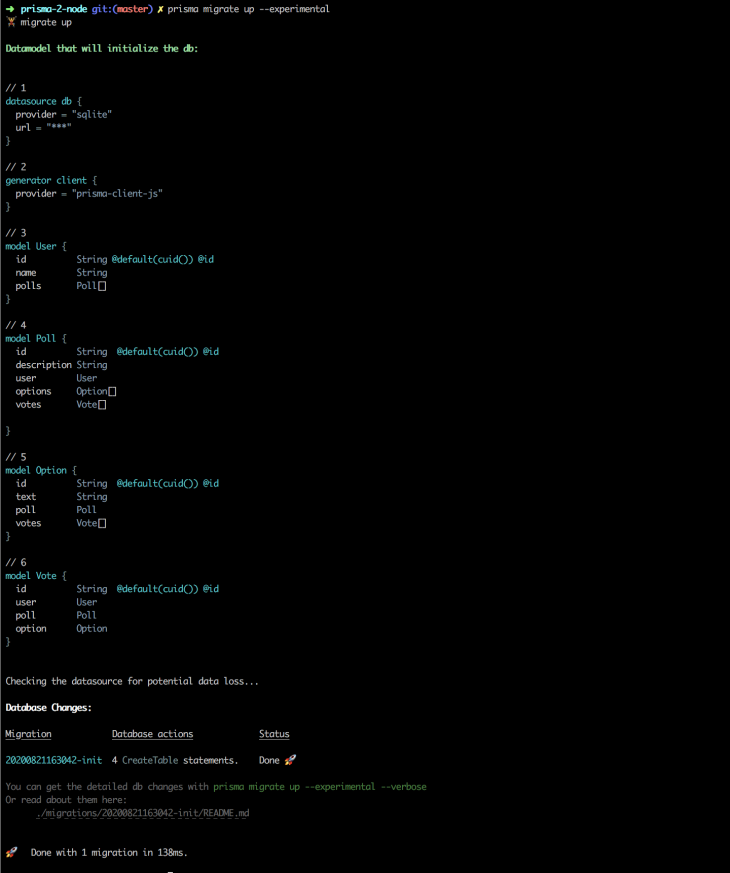
In order to actually execute the generated migrations, you need to run the second command:
npx prisma migrate up --experimental
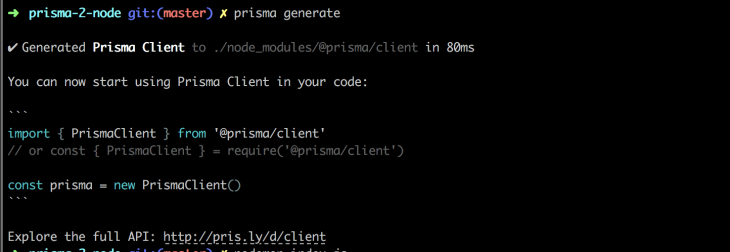
Prisma Client is an auto-generated and type-safe query builder that’s tailored specifically to your data. We are ready to generate our client. We can generate our client using either of the following commands:
yarn add @prisma/client

prisma generate
Note that the command yarn add @prisma/client also runs the prisma generate command which generates the Prisma Client into the node_modules/@prisma/client directory:
Open the index.js file we created earlier and enter the code below:
const { GraphQLServer } = require('graphql-yoga')

const typeDefs = `
  type Query {
    hello(name: String): String!
  }
`

const resolvers = {
  Query: {
    hello: (_, { name }) => `Hello ${name || 'World'}`,
  },
}

const server = new GraphQLServer({
  typeDefs,
  resolvers,
})

const options = {
  port: 8000,
  endpoint: '/graphql',
  subscriptions: '/subscriptions',
  playground: '/playground',
}
server.start(options, ({ port }) =>
  console.log(
    `Server started, listening on port ${port} for incoming requests.`,
  ),
)
Graphql-yoga is a fully-featured GraphQL server with a focus on ease-of-use, performance, and great developer experience. You create the server using the constructor GraphQLServer. This constructor takes the following options:
schema is not provided)typeDefs (required if schema is not provided)GraphQLSchema (required if typeDefs and resolvers are not provided)We can test out GraphQL server. Run the following command to start the server:
node index.js
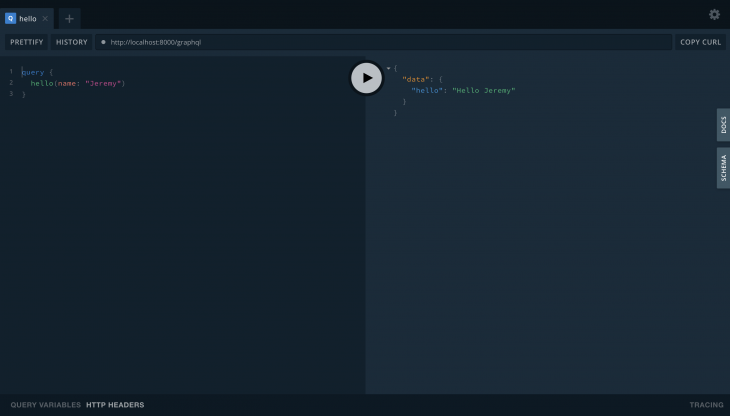
To test the sample query we created, navigate to http://localhost:8000/playground. Enter the following query in the panel on the left.
query {
  hello(name: "John Doe")
}
Press the play button and you should get a response from the server like so:
{
  "data": {
    "hello": "Hello John Doe"
  }
}
To access the database queries availed by our Prisma client, we need to import the generated Prisma client library and set up the server to use it.
Add the following to the top of your index.js file:
const { PrismaClient } = require('@prisma/client');
Create an instance of PrismaClient and pass it to the GraphQL server constructor through the context key. The context key contains custom data being passed through your resolver chain. This can be passed in as an object, or as a function with the signature (req: ContextParameters) => any.
const prisma = new PrismaClient()

const server = new GraphQLServer({
  typeDefs,
  resolvers,
  context: {
    prisma,
  }
})
When I build GraphQL I like to use GraphQL Tools which is an npm package and an opinionated structure for how to build a GraphQL schema and resolvers in JavaScript, following the GraphQL-first development workflow. By using the makeExecutableSchema function from the graphql-tools package, you can create an instance of GraphQLSchema based on the GraphQL schema language.
Let’s make updates to our code to use graphql-tools:
const { makeExecutableSchema } = require('@graphql-tools/schema');
.....

const schema = makeExecutableSchema({
  typeDefs,
  resolvers,
});

.....
const server = new GraphQLServer({
  schema,
  context: {
    prisma,
  }
})

.....
typeDefsWe need to update the typeDefs defined earlier to include all the types we are using based on the data model we created at the beginning. Additionally, we need to add all the queries and mutations that our graphQL server exposes. We will need queries to get users, polls, and votes. The mutations we will create will be used for creating a user, poll, and voting in a poll.
Update the typeDefs from before with the following:
const typeDefs = `
  type User {
    id          :ID!
    name        :String!
    polls       :[Poll]
  }
  type Poll {
    id          :ID!
    description :String!
    user        :User!
    options     :[Option!]
    votes       :[Vote]
  }
  type Option {
    id          :ID!
    text        :String!
    poll        :Poll!
    votes       :[Vote]
  }
  type Vote {
    id          :ID!
    user        :User!
    poll        :Poll!
    option      :Option!
  }
  type Query {
    users: [User]
    polls: [Poll]
    votes: [Vote]
    user(id: ID!): User
    poll(id: ID!): Poll
  }
  type Mutation {
    createUser(
      name: String!
    ): User
    createPoll(
      description: String!
      id: ID!
      options: [String!]
    ): Poll
    createVote(
      userID: ID!
      pollID: ID!
      optionID: ID!
    ): Vote
  }
`;
Creating a poll will require the user to interact with Prisma passed to the resolvers through context. We need to update the resolvers object we created earlier to include the queries and mutations we added to the typeDefs.
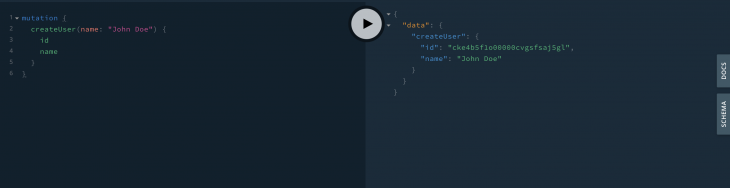
When a poll is created, it will be associated with a specific user. Therefore the first thing we need to create is a user that can then create polls. Since this is a very basic example, we will not implement authentication to validate the user that creates a poll. We are only interested in the concepts of creating a basic GraphQL server using Prisma 2. To create a user, we will need a name. This will be passed in through the args. Our createUser resolver should look something like this:
const resolvers = {
  Query: {
    ....
  },
  Mutation: {
    createUser: (parent, args, context, info) => {
      const newUser = context.prisma.user.create({
        data: {
          name: args.name,
        },
      })
      return newUser
    },
  },
}
We can test creating a user in the playground.
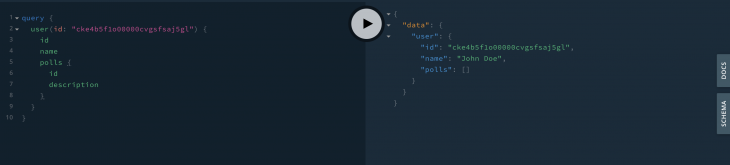
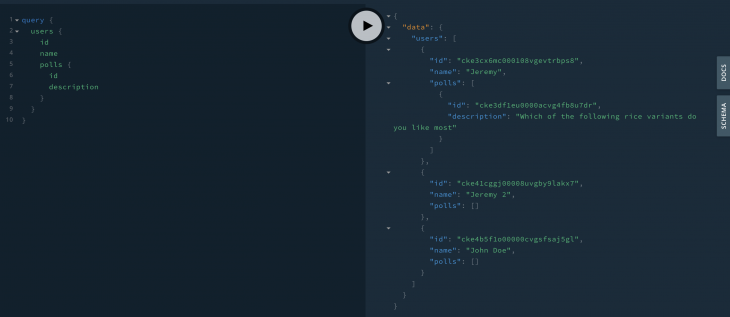
You will notice in the typeDefs, we have queries for getting a single user by ID or many users. The queries below will help us to retrieve either a single or multiple users along with their associated polls:
const resolvers = {
  Query: {
    user: async (parent, args, context) => {
      const { id } = args
      return context.prisma.user.findOne({
        where: {
          id,
        },
        include: { polls: true }
      })
    },
    users: async (parent, args, context) => {
      return context.prisma.user.findMany({
        include: { polls: true }
      });
    },
  },
  Mutation: {
    ....
  }
}
The findOne method is used to get a single user using an ID filter while the findMany method gets all users that meet certain criteria. In our example above, we are getting all created users without any filter. If you need to query a given data set along with nested fields, the query methods takes an option object with the key include. In this key, you include all the nested fields that should be populated and set them to true. Let’s test these out.
Any poll that is created will be associated with a particular user and so we will need to pass the ID of the user when creating it. A description/question will also be supplied. The last value required will be an array of strings containing the options a user can vote for:
const resolvers = {
  Query: {
    ....
  },
  Mutation: {
    createPoll: (parent, args, context, info) => {
      const { description, id, options } = args
      const newPoll = context.prisma.poll.create({
        data: {
          description,
          user: {
            connect: { id }
          },
          options: {
            create: options.map(option => ({ text: option }))
          }
        }
      });
      return newPoll;
    }
  },
}
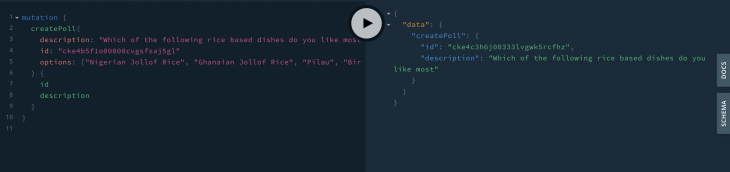
Using the user we created above, we can create a sample poll:
mutation {
  createPoll(
    description: "which of the following rice based dishes do you like the most"
    id: "USERID"
    options: ["Nigerian Jollof Rice", "Ghanaian Jollof Rice", "Pilau", "Biryiani"]
  ) {
    id
    description
  }
}
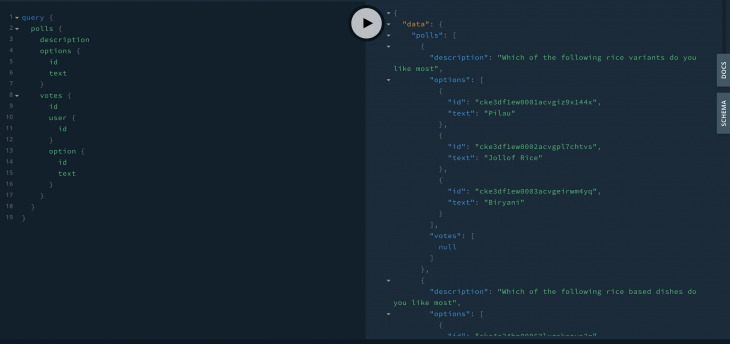
The queries to get a single poll or multiple polls will be structured in the same way as the user’s queries. The only difference will be the model we are querying and the nested fields to populate. Add the following code to your resolvers definition:
const resolvers = {
  Query: {
    ....
    poll: async (parent, args, context) => {
      const { id } = args
      return context.prisma.poll.findOne({
        where: {
          id,
        },
        include: {
          user: true,
          options: true,
          votes: {
            select: { user: true, option: true }
          }
        }
      })
    },
    polls: async (parent, args, context) => {
      return context.prisma.poll.findMany({
        include: {
          user: true,
          options: true,
          votes: {
            select: { user: true, option: true }
          }
        }
      })
    },
    ....
  },
  Mutation: {
    ....
  }
}
Make note of how the include option of the findMany method is structured when you need to retrieve deeply nested fields too.
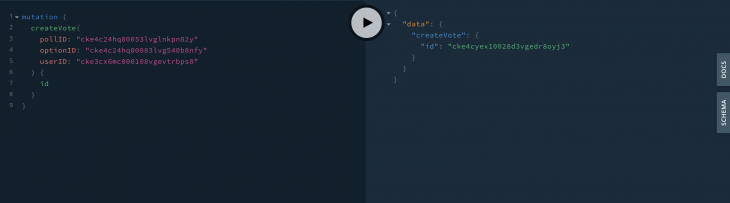
If there was a user interface paired with the GraphQL server, a user would be able to pull polls and be presented with options they can vote for. On the selection of an option, a mutation would be triggered that would create a vote for the particular option. A vote needs to be associated with a poll, a poll option, and the user that voted. The resolver to create a vote will therefore expect to receive a poll ID, option ID, and user ID. It will look something like this:
const resolvers = {
  Query: {
    .....
  },
  Mutation: {
    .....
    createVote: (parent, args, context, info) => {
      const { userID, pollID, optionID } = args
      const newVote = context.prisma.vote.create({
        data: {
          user: {
            connect: { id: userID }
          },
          poll: {
            connect: { id: pollID }
          },
          option: {
            connect: { id: optionID }
          }
        }
      });
      return newVote;
    }
  },
}
Let’s vote for the best rice based dish!
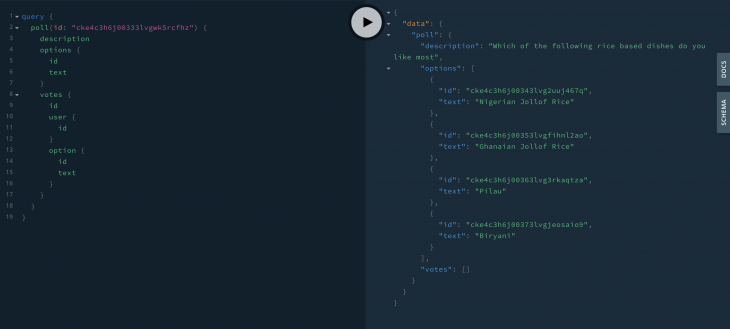
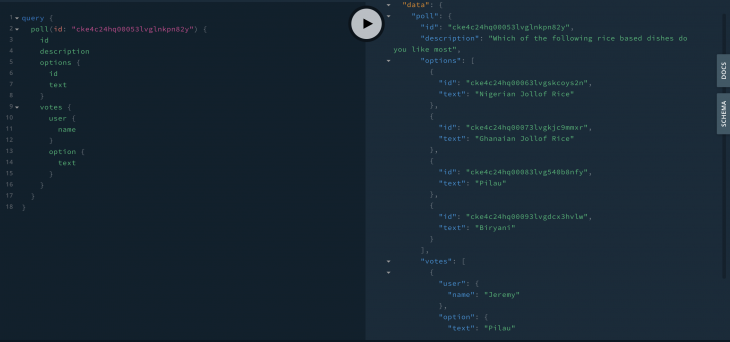
Querying the poll that we just voted on should show votes made for the poll with the name of the user that voted and the option that they chose.
That’s it! We managed to create a simple Node.js GraphQL server that can be used to create users, polls, and vote in the polls.
The final code for the index.js file will be:
const { PrismaClient } = require('@prisma/client');
const { GraphQLServer } = require("graphql-yoga");
const { makeExecutableSchema } = require("graphql-tools");
const typeDefs = `
  type User {
    id          :ID!
    name        :String!
    polls       :[Poll]
  }
  type Poll {
    id          :ID!
    description :String!
    user        :User!
    options     :[Option!]
    votes       :[Vote]
  }
  type Option {
    id          :ID!
    text        :String!
    poll        :Poll!
    votes       :[Vote]
  }
  type Vote {
    id          :ID!
    user        :User!
    poll        :Poll!
    option      :Option!
  }
  type Query {
    hello(name: String): String!
    users: [User]
    polls: [Poll]
    votes: [Vote]
    user(id: ID!): User
    poll(id: ID!): Poll
  }
  type Mutation {
    createUser(
      name: String!
    ): User
    createPoll(
      description: String!
      id: ID!
      options: [String!]
    ): Poll
    createVote(
      userID: ID!
      pollID: ID!
      optionID: ID!
    ): Vote
  }
`;

const resolvers = {
  Query: {
    users: async (parent, args, context) => {
      return context.prisma.user.findMany({
        include: { polls: true }
      });
    },
    polls: async (parent, args, context) => {
      return context.prisma.poll.findMany({
        include: {
          user: true,
          options: true,
          votes: {
            select: { user: true, option: true }
          }
        }
      })
    },
    user: async (parent, args, context) => {
      const { id } = args
      return context.prisma.user.findOne({
        where: {
          id,
        },
        include: { polls: true }
      })
    },
    poll: async (parent, args, context) => {
      const { id } = args
      return context.prisma.poll.findOne({
        where: {
          id,
        },
        include: {
          user: true,
          options: true,
          votes: {
            select: { user: true, option: true }
          }
        }
      })
    }
  },
  Mutation: {
    createUser: (parent, args, context, info) => {
      const newUser = context.prisma.user.create({
        data: {
          name: args.name,
        },
      })
      return newUser
    },
    createPoll: (parent, args, context, info) => {
      const { description, id, options } = args
      const newPoll = context.prisma.poll.create({
        data: {
          description,
          user: {
            connect: { id }
          },
          options: {
            create: options.map(option => ({ text: option }))
          }
        }
      });
      return newPoll;
    },
    createVote: (parent, args, context, info) => {
      const { userID, pollID, optionID } = args
      const newVote = context.prisma.vote.create({
        data: {
          user: {
            connect: { id: userID }
          },
          poll: {
            connect: { id: pollID }
          },
          option: {
            connect: { id: optionID }
          }
        }
      });
      return newVote;
    }
  },
}
const schema = makeExecutableSchema({
  typeDefs,
  resolvers,
});
const prisma = new PrismaClient()
const server = new GraphQLServer({
  schema,
  context: {
    prisma,
  }
})
const options = {
  port: 8000,
  endpoint: '/graphql',
  subscriptions: '/subscriptions',
  playground: '/playground',
}
server.start(options, ({ port }) =>
  console.log(
    `Server started, listening on port ${port} for incoming requests.`,
  ),
)
The purpose of this article was to show how you can get started building a basic GraphQL server using Prisma. While we created users, we didn’t implement a way for users to be authenticated or adding checks to prevent things like a user voting on their own poll or a user voting multiple times. This is usually achieved by using resolver directives which can check the validity of a token and the role of a user then adding their details to context. Directives can also be used to limit the queries and mutations that a user has access to. Another thing to note is that we added our typeDefs and resolvers to the index.js file. In a fairly complicated application, these can grow quite large and it’s good practice to move each into their own file. The Prisma website offers a lot of good documentation on working with Prisma. You can find information on various CRUD(Create, Read, Update, Delete) operations that we didn’t cover in this article as well as how to filter and sort data.
There are advantages to using raw queries to retrieve and manipulate data. In some instances, you will find that the queries generated by Prisma can be less than optimal. In the same breath, there are also advantages gained from using Prisma in your project. It provides a quick way to get started and is a handy toolkit to have in your software arsenal. The code used in this article can be found in GitHub. I would love to hear your experiences with Prisma as well as any general feedback. Happy coding!
While GraphQL has some features for debugging requests and responses, making sure GraphQL reliably serves resources to your production app is where things get tougher. If you’re interested in ensuring network requests to the backend or third party services are successful, try LogRocket.


LogRocket lets you replay user sessions, eliminating guesswork around why bugs happen by showing exactly what users experienced. It captures console logs, errors, network requests, and pixel-perfect DOM recordings — compatible with all frameworks.
LogRocket's Galileo AI watches sessions for you, instantly aggregating and reporting on problematic GraphQL requests to quickly understand the root cause. In addition, you can track Apollo client state and inspect GraphQL queries' key-value pairs.

We built the same app in TanStack Start RSC and Next.js RSC. TanStack shipped 40% less JS and built 4x faster — but Next.js is still the safer production bet.

From RSC vulnerabilities and the Vercel breach to TypeScript 7.0 Beta and AI agents — the nine frontend storylines that defined H1 2026, ranked.

AI tools generate working React code fast, but miss race conditions, empty states, debouncing, and accessibility. Here’s how to catch bugs before production.

Learn how to use Gemini CLI subagents to delegate frontend, backend, testing, and docs tasks to specialized agents with guardrails and clear ownership.
Hey there, want to help make our blog better?
Join LogRocket’s Content Advisory Board. You’ll help inform the type of content we create and get access to exclusive meetups, social accreditation, and swag.
Sign up now

