Setting up and configuring a full-stack application can be a pain in the neck. Imagine how easy it would be to develop a JAMstack app if you didn’t have to deal with SSG or headless CMS?

In this guide, I’ll introduce you to RedwoodJS, a full-stack JAMstack framework built on React, GraphQL, and Prisma, and demonstrate how to use some of its key features.
Many prominent tools and frameworks aim to simplify the development workflow. Some of them come with predefined setup for webpack, Babel, etc., which makes the process cumbersome. Redwood is a framework that makes decisions for you under the hood.
According to the documentation, Redwood is “an opinionated, full-stack, serverless web application framework that will allow you to build and deploy JAMstack applications with ease.”
Redwood is a React-like frontend that’s statically delivered by CDN. It talks via GraphQL to your backend running on AWS Lambdas, and it’s deployable by a simple git push.
Before we get started, let’s break down the key frontend and backend features we’ll highlight throughout this tutorial.
For deployment, RedwoodJS features first-class JAMstack-style deployment to Netlify.
To get started with RedwoodJS, you need some basic knowledge of React, GraphQL, and Prisma. That said, you don’t need to be an expert to pick up the Redwood framework.
You also need to have either Node version 12 or higher or yarn version 1.22 or higher installed in your machine. Otherwise, you might encounter issues along the way.
Redwood uses yarn to scaffold your app.
#Run the command and specify your folder name
yarn create redwood-app ./redwoodapp
After successful installation, you’ll have a new directory, redwoodapp, containing several directories and files. Change to that directory by running:
cd redwoodapp
To start the development server, run:
yarn redwood dev
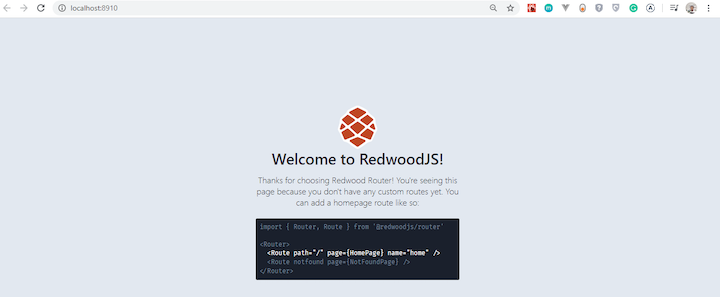
A browser should automatically pop up to http://localhost:8910 and you’ll see the Redwood welcome page.

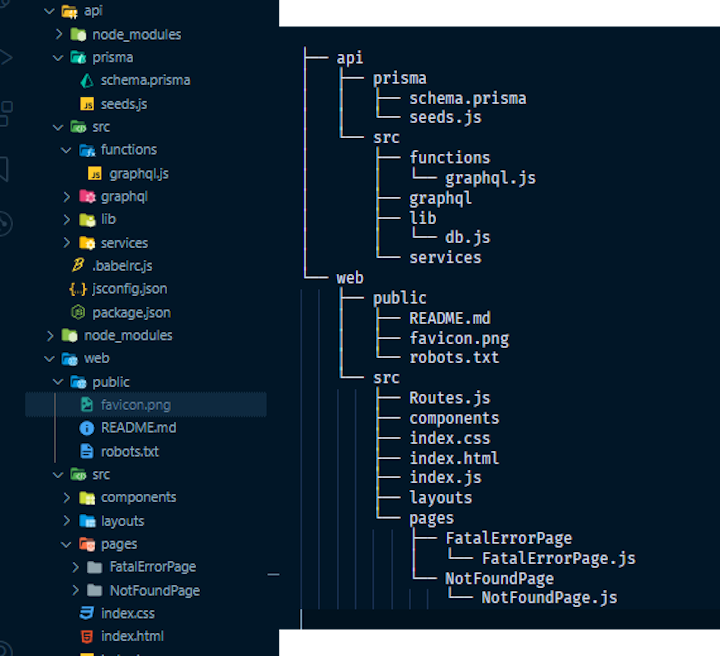
Redwood’s file structure has two parts: the api folder and the web folder. These are commonly referred to as workspaces.
Here’s what Redwood’s file structure looks like:

The web workspace comprises all component- and static-related files.
The public folder contains all the static assets, such as favicon, README, etc.
src holds other subdirectories, including:
components, which contains your usual React components along with other Redwood cellslayouts, which contains reusable components that wrap your content and are shared across other pages in your applicationpages, which contains components and is optionally wrapped inside layoutsRoutes.js, which defines all the routes in your appThe API directory contains two folders: prisma and src.
prisma determines how data is delivered to the frontend and is ascribed to the term as plumbing the database. It has two files:
schema.prisma contains the tables and columns, better known as the database schemaseeds.js is responsible for populating your database with any data that needs to exist for your appsrc contains all other backend code and four more directories:
functions contains any Lambda functions your app needs, in addition to the graphql.js file autogenerated by Redwoodgraphql contains your GraphQL schema written in a schema definition language (SDL).lib contains one file, db.js, which instantiates the Prisma database client. You can use this directory for other codes related to the API side that doesn’t fit in functions or servicesservices contains business logic related to your data. When querying or mutating data for GraphQL, the resolvers are taken care of in a format that’s reusable elsewhere in your appTo learn more about the file structure, check out the Redwood docs.
Redwood Router is unique compared to React Router. It’s a combination of React Router, Reach Router, and its own router.
Redwood Router (RR) is designed to list all routes in a single file, eliminating the need for nesting routes (which is not the case with React).
To use Redwood Router, import the Router and Route components from the @redwoodjs/router package. Creating a Route in Redwood requires path, name, and page to be passed as props into the Route component.
<Route path="/contact" page={ContactPage} name="contact" />
path specifies which URL path to matchpage specifies which component to render when the path is matchedname calls the Route component from the Link component. For example:const AboutPage = () =>
RR makes it possible to include parameters in your path prop.
<Route path="/user/{id}" page={UserPage} name="user" />
It has a cool hook called useParam that enables you to extract the parameters.
import { useParams } from '@redwoodjs/router'
const MainComponent= () => {
  const { id } = useParams()
  // ...
}
By default, JavaScript specifies parameters as strings. But with Redwood routing, it offers a suitable pattern to convert your parameters to any data type of your choice.
You can specify route parameter types right in the path props.
<Route path="/admin/{id:Int}" page={AdminPage} name="admin" />
By using :Int annotation on the code above, the Route parameter will only match digits by using regex (/\d+/) and then use Number() to convert the parameter into a number.
By default, RR (when used in a Redwood app) will code-split on every page, creating a separate, lazy-loaded webpack bundle for each. When navigating from page to page, RR waits until the new page module is loaded before rerendering, thus preventing the “white flash” effect.
Check out the Redwood Router documentation to learn more about this feature.
Data fetching in Redwood is different from the traditional asynchronous convention. The frontend and backend process data independently from each other. Usually, the frontend loads first while it waits for the data. In most cases, a loading indicator or spinner shows that data is fetched.
Redwood uses a pattern that adopts a declarative approach for fetching data from the server side (GraphQL). A cell is a higher-order component that provides a dynamic sequence whereby it retrieves data from an API showing a loading state using a placeholder and then displays the result as a reusable pattern.
The cell contains the GraphQL query and loading, empty, error, and success states, each one rendering itself automatically depending on the state of your cell. All you need to do is specify the query; Redwood does all the magic for you under the hood.
A typical cell file looks like this:
export const QUERY = gql`

  query {
    posts {
      id
      title
      body
    }
  }
`
export const Loading = () => <div>Loading...</div>

export const Empty = () => <div>No posts yet!</div>

export const Failure = ({ error }) => (
  <div>Error loading posts: {error.message}</div>
)

export const Success = ({ posts }) => {
  return posts.map((post) => (
    <article>
      <h2>{post.title}</h2>
      <div>{post.body}</div>
    </article>
  ))
}
To see a cell, you must import it into your page component.
import BlogLayout from 'src/layouts/BlogLayout'
import BlogPostsCell from 'src/components/BlogPostsCell'

const HomePage = () => {
  return (
    <BlogLayout>
      <BlogPostsCell />
    </BlogLayout>
  )
}

export default HomePage
In the code above, we imported a BlogPostCell and wrapped it inside the BlogLayout component.
Head to the Redwood cells documentation for more details.
Redwood forms have a lot of helper methods that make form handling and validations much easier to implement in web applications. It uses React Hook Form to make the form experience unique.
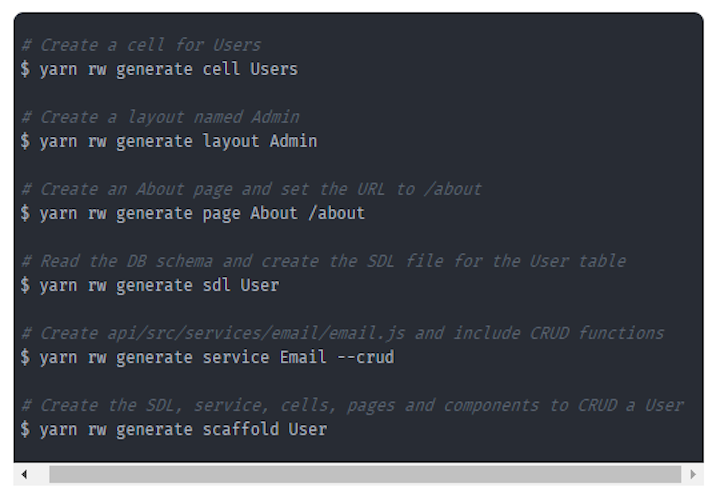
Redwood generates files using is own unique CLI inspired by Rails command line tools. This way, you can create any file inside the exact directory specified by you.
The Redwood CLI has one major entry point command, redwood (alias: rw), for developing an application.
You might use generate or g flag — either works fine.

The Redwood CLI tool automates repetitive tasks, such as generating files (pages, components, cells, etc.) and migrating the database, so you can work on what makes your application special.
Below are some reasons you might want to try Redwood in your next application.
There also are a few bottlenecks to consider when using Redwood.
Predict COVID-19 is one of the first sites to use Redwood in production.
When RedwoodJS becomes stable, it’s not hard to see it evolving into a standard for building full-stack web applications. Developers will benefit from the continued performance and feature upgrades over time and with minimum effort.
Redwood makes your work easier by making logical decisions under the hood for you, enabling you to develop robust apps with less setup.
To learn more about Redwood, check out the following resources.
There’s no doubt that frontends are getting more complex. As you add new JavaScript libraries and other dependencies to your app, you’ll need more visibility to ensure your users don’t run into unknown issues.
LogRocket is a frontend application monitoring solution that lets you replay JavaScript errors as if they happened in your own browser so you can react to bugs more effectively.

LogRocket works perfectly with any app, regardless of framework, and has plugins to log additional context from Redux, Vuex, and @ngrx/store. Instead of guessing why problems happen, you can aggregate and report on what state your application was in when an issue occurred. LogRocket also monitors your app’s performance, reporting metrics like client CPU load, client memory usage, and more.
Build confidently — start monitoring for free.
Hey there, want to help make our blog better?
Join LogRocket’s Content Advisory Board. You’ll help inform the type of content we create and get access to exclusive meetups, social accreditation, and swag.
Sign up now
Which AI frontend dev tool reigns supreme in July 2025? Check out our power rankings and use our interactive comparison tool to find out.

Learn how OpenAPI can automate API client generation to save time, reduce bugs, and streamline how your frontend app talks to backend APIs.

Discover how the Interface Segregation Principle (ISP) keeps your code lean, modular, and maintainable using real-world analogies and practical examples.

<selectedcontent> element improves dropdowns
2 Replies to "Getting started with RedwoodJS"
amazing…
I’m glad you liked it Jayen