
In the first years of Unity, there wasn’t solid support for 2D game development inside the engine — for years, the right way to refer to it was “Unity 3D”. Though it was possible to develop 2D games with Unity, without official engine support, it wasn’t a smooth process like it is nowadays.

Around 2013, Unity started to support 2D game development with inbuilt components, like a 2D physics engine — Collider2D, Rigidbody2D, Vector2, Sprite, Tilemap, etc.
In this post, we’ll cover the common properties and behaviors of 2D colliders, which messages are sent to their GameObjects, how we can use them in our scripts, and how each collider setup interacts with others.
These are the tutorial sections:
The following prerequisites are required to follow along with this tutorial:
The Replay is a weekly newsletter for dev and engineering leaders.
Delivered once a week, it's your curated guide to the most important conversations around frontend dev, emerging AI tools, and the state of modern software.
First, we need to create our Unity project. For this tutorial, we’ll use the version 2021.3.4f1, which, at the moment I’m writing, is the newest LTS Unity version.
On the project templates list, choose 2D(core), give it a name, and click the Create project button. We’ll call ours SampleScene.
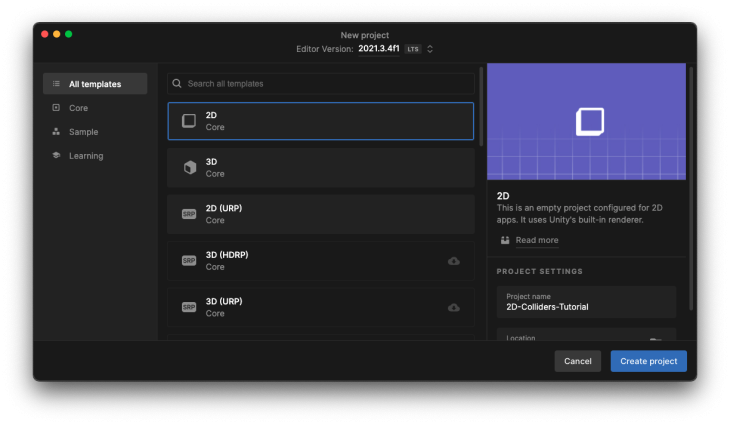
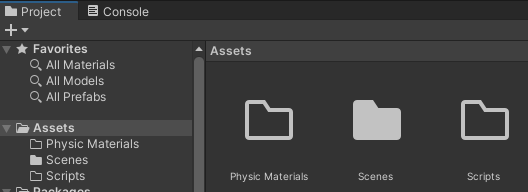
With the project started, create two folders called Scripts and Physic Materials inside the Assets folder. We’ll use them to keep our project organized during the tutorial.
Before we start using our Unity project, we need to take a little dive into the basic concepts of colliders.
Colliders are the way that Unity (and most of the available game engines, if not all) manages collisions between GameObjects. For the sake of this tutorial, we are only using the 2D colliders, but a lot of the rules mentioned below are applicable to 3D colliders, too.
In Unity, a 2D collider is a component that allows us to define a shape, where we want to receive notifications in our GameObject’s script whenever another GameObject (with another collider) collides with the first collider.
Unity doc tip: A collider is invisible, and does not need to be the exact same shape as the GameObject’s mesh. A rough approximation of the mesh is often more efficient and indistinguishable in gameplay.
Right now, Unity has eight inbuilt kinds of 2D colliders:
BoxCollider2DCapsuleCollider2DCircleCollider2DCompositeCollider2DCustomCollider2DEdgeCollider2DPolygonCollider2DTilemapCollider2D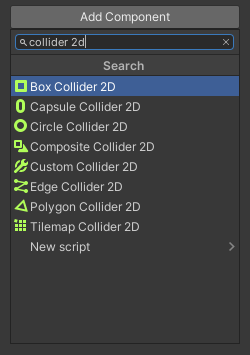
Every 2D collider in Unity inherits from a common class called Collider2D. As a result, they share common properties. Below is a list of the most notable and widely-used ones:

PhysicsMaterial2D that can be used by the collider to define things like friction and bouncinessEffector2D attached to the GameObjectUnity doc tip: Effector2D components are used to direct the forces when colliders come into contact with each other
In our Unity project, add a Sprite (Square) to the opened scene (SampleScene):
![]()
Select the Sprite (Square) GameObject and add a component called BoxCollider2D:
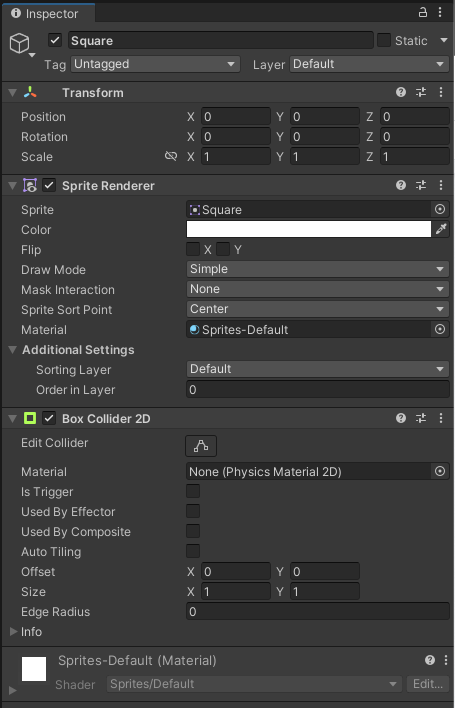
Now repeat the process, but add a Sprite (Circle) to the scene and add a CircleCollider2D component to it.
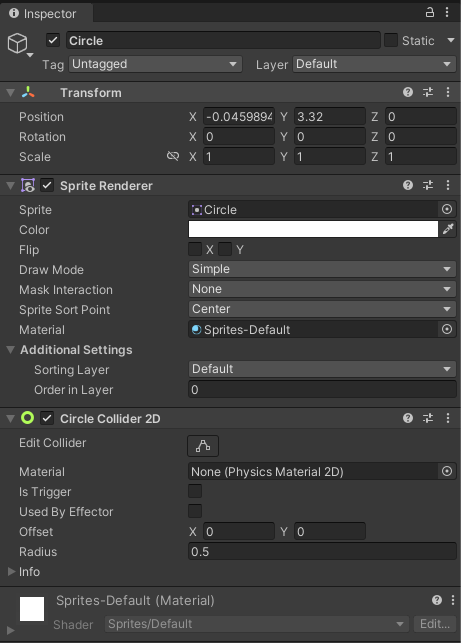
Move the Circle GameObject a little on top of the Square GameObject:
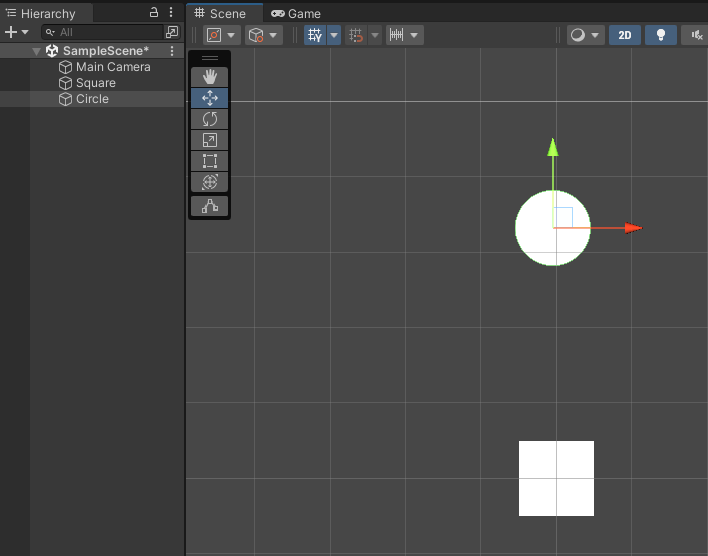
If we hit the Play button now, nothing will happen, even if we move the GameObjects inside the editor. No collision will happen.
Why does nothing happen? Well, we need to talk about the Rigidbody2D component.
A Rigidbody2D is a component used to tell Unity that it should put the GameObject under the control of the physics engine. In other words, GameObjects without a rigidbody do not exist for the physics engine.
If we just add a 2D collider to our GameObject, nothing will happen because the physics engine is not aware of it. If we want the physics engine to control our GameObject, we need to add a Rigidbody2D component to it.
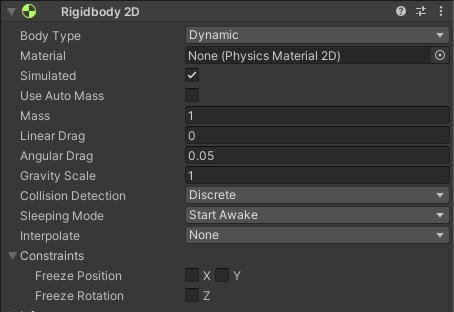
This means that now our GameObject is affected by gravity via the Gravity Scale property, and can be controlled from scripts using forces.
We Just need to add a Rigidbody2D to each of the GameObjects that we’ve already created and hit the Play button:

With the Rigidbody2D components added to our GameObjects, the physics engine is aware of them and has started making the gravity act.
In our sample, the two GameObjects are just falling, but what if we would like to have the Square GameObject stay in its position and the Circle GameObject hit it, before bouncing like a ball?
An easy way to achieve this is using PhysicsMaterial2D.
Let’s add that ball effect to our sample scene. First, on the Square GameObject, change the property Body Type of its Rigidbody2D to Static:
 Create a new
 PhysicsMaterial2D, name it Ball physics material, and place it inside our Physics Materials folder:
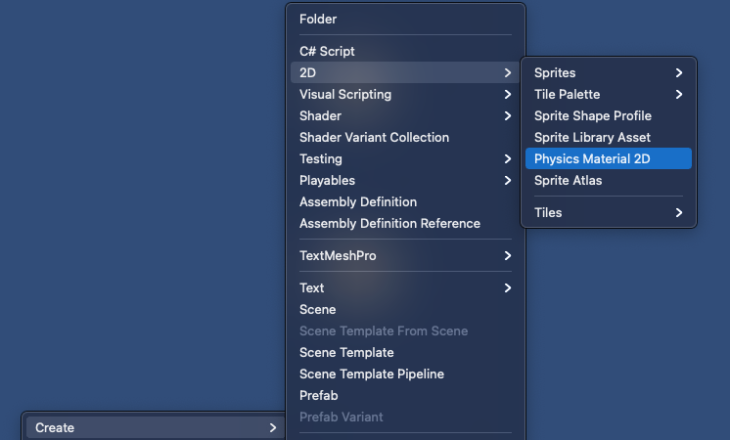
Change its Bounciness property to 1:

On the Circle GameObject's Rigidbody2D, change the Material property to use the Ball physics material that we’ve just created:
 Hit the Play button again. Now we should see this happen:

When one collider interacts with another collider, Unity sends some messages (e.g., call a method on any MonoBehavior attached to the GameObject). In the case of a 2D collider, there are six available messages:
IsTrigger is not checked:
OnCollisionEnter2D: called in the first frame when the collision startsOnCollisionStay2D: called in each frame while the collision is happeningOnCollsionExit2D: called in the first frame when the collision endsIsTrigger is checked:
OnTriggerEnter2D: called in the first frame when the collision startsOnTriggerStay2D: called in each frame while the collision is happeningOnTriggerExit2D: called in the first frame when the collision endsOnCollisionStay2D and OnTriggerStay2D are called each frame until they reach Time To Sleep (if the GameObject is not moving anymore).

It’s time to write some code. Let’s create a script to log every time that our Circle GameObject hits the Square GameObject (OnCollisionEnter2D) to the console window. We’ll record how many frames they stay in contact (OnCollisionStay2D), and when they stop hitting each other (OnCollsionExit2D). We’ll also show what happens with and without a trigger.
Inside our Scripts folder, create a script called CollisionLogger and add it to the Circle GameObject:
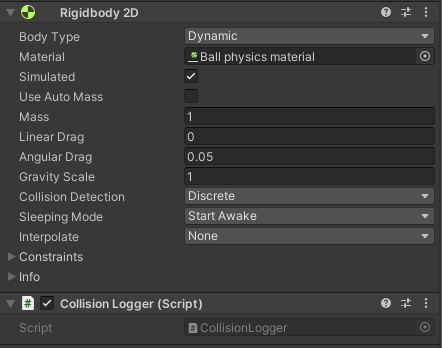
Open the CollisionLogger script in VS Code and type these methods in it:
using System.Runtime.CompilerServices;
using UnityEngine;

public class CollisionLogger : MonoBehaviour
{
    void OnCollisionEnter2D(Collision2D collision) => Log(collision);
    void OnCollisionStay2D(Collision2D collision) => Log(collision);
    void OnCollisionExit2D(Collision2D collision) => Log(collision);

    void Log(Collision2D collision, [CallerMemberName] string message = null)
    {
        Debug.Log($"{message} called on {name} because a collision with {collision.collider.name}");
    }
}
Hit the Play button, and we should see something like this in the Console window:
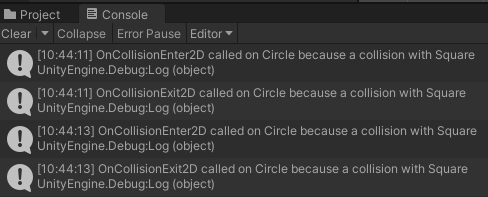
As we can see, OnCollisionEnter2D is called when the Circle GameObject hits the Square GameObject. OnCollsionExit2D is called when they aren’t hitting each other anymore, and OnCollisionStay2D has not been called because the two GameObjects are not keeping contact. To see OnCollisionStay2D being sent, just remove the Ball physics material from the Circle GameObject's Rigidbody2D:

Hit the Play button again and the output in our Console window should be:
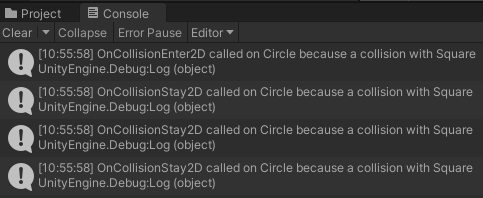
Now we have one OnCollisionEnter2D and a lot of OnCollisionStay2Ds that will be called until the two GameObjects keep the contact or until Time To Sleep is reached.
Now, re-enable the Ball physics material on the Circle GameObject's Rigidbody2D and add the CollisionLogger to the Square GameObjects too.
Hit Play, and the Console window should look like this:
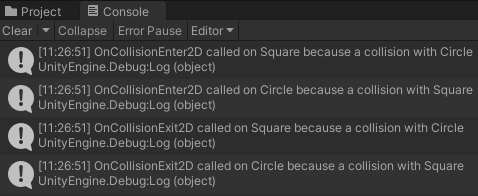
As expected, the messages are called in all GameObjects involved in the collision.
What about the OnTrigger method? Right now, none of our colliders are marked as a trigger (IsTrigger), which is why only OnCollision has been called.
Triggers are useful when we need to detect that a given GameObject has reached a point or another GameObject. Let’s say we want to be notified on Square GameObject every time that the Circle GameObject passes through it. We can add a collider with IsTrigger checked on it and we will receive the notification when the physics engine calls the OnTriggerEnter2D method.
To see a trigger in action, mark the Square GameObject's collider as a trigger:

Play the scene, and we’ll see that Circle GameObject is passing through the Square GameObject:
 This happens because the
 Square GameObject is a trigger now. The physics engine won’t generate the expected behavior when two objects collide, but will instead send the OnTrigger methods to the involved GameObjects.
If we look at the Console window, you’ll notice that it is empty because no OnCollision methods are called. To log the OnTrigger methods, open our CollisionLogger script and add these new methods:
void OnTriggerEnter2D(Collider2D collision) => Log(collision);
void OnTriggerStay2D(Collider2D collision) => Log(collision);
void OnTriggerExit2D(Collider2D collision) => Log(collision);

void Log(Collider2D collision, [CallerMemberName] string message = null)
{
    Debug.Log($"{message} called on {name} because a collision with {collision.gameObject.name}");
}
Run the scene and we can see this log in the Console window:
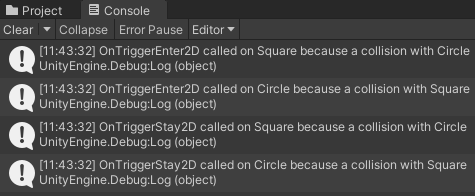

Now only OnTrigger methods are called because there is a trigger involved in the collision.
An important thing to note is that all OnCollision and OnTrigger methods receive the parameter Collision2D/Collider2D. This parameter can hold information about the collision itself, such as:
If we don’t need to use this information in our script, we can declare the OnCollision/OnTrigger methods without the logging parameter.
You probably noticed in the last section that there is parity between the OnCollision and OnTrigger methods the physics engine calls on the GameObjects involved in the collision. Knowing when each kind of interaction raises each kind of message/method in the involved GameObjects can be a little tricky; despite this apparent similarity, there are some rules for interaction possibilities between different collider setups.
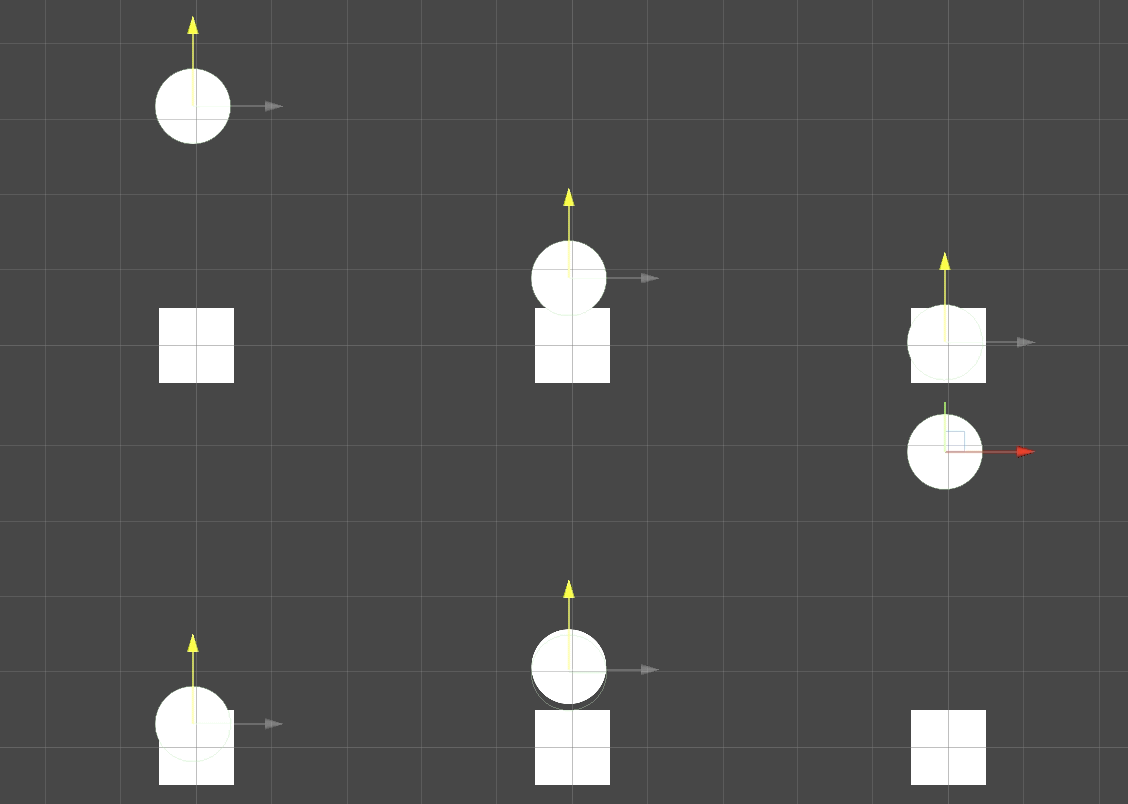
There are six different setups a collider can have that will differently affect how it interacts with other colliders. These setups can be done by a combination of the properties IsTrigger of the Collider2D and the property Body Type of the Rigidbody2D attached to the same GameObject. Below is a list of similar setups:
falsefalsefalsetruetruetrueThe answer to this question is in the table below, which I took from the Unity documentation site. It shows us where we can see when collisions happen and when the collision callbacks (the OnCollision and OnTrigger methods) are called.
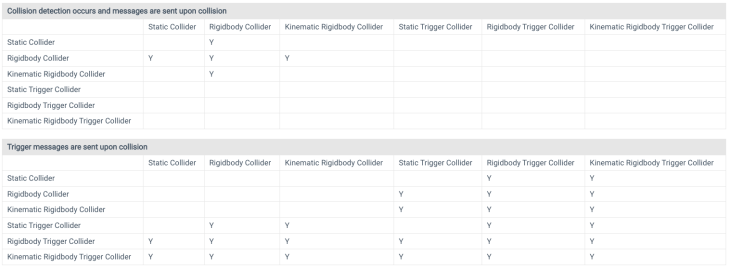 Source: Unity docs
Looking at the table, we can figure out things like:
These tables can be very useful during game development, when we get stuck with some sort of collider interaction that we expected to happen but doesn’t.
To help us to better understand the colliders’ interactions, now and when we face the kind of problem mentioned above, I created a sample where we can move the GameObjects through each of the six possible interaction setups, see how they interact with each other, and what callbacks messages are sent.
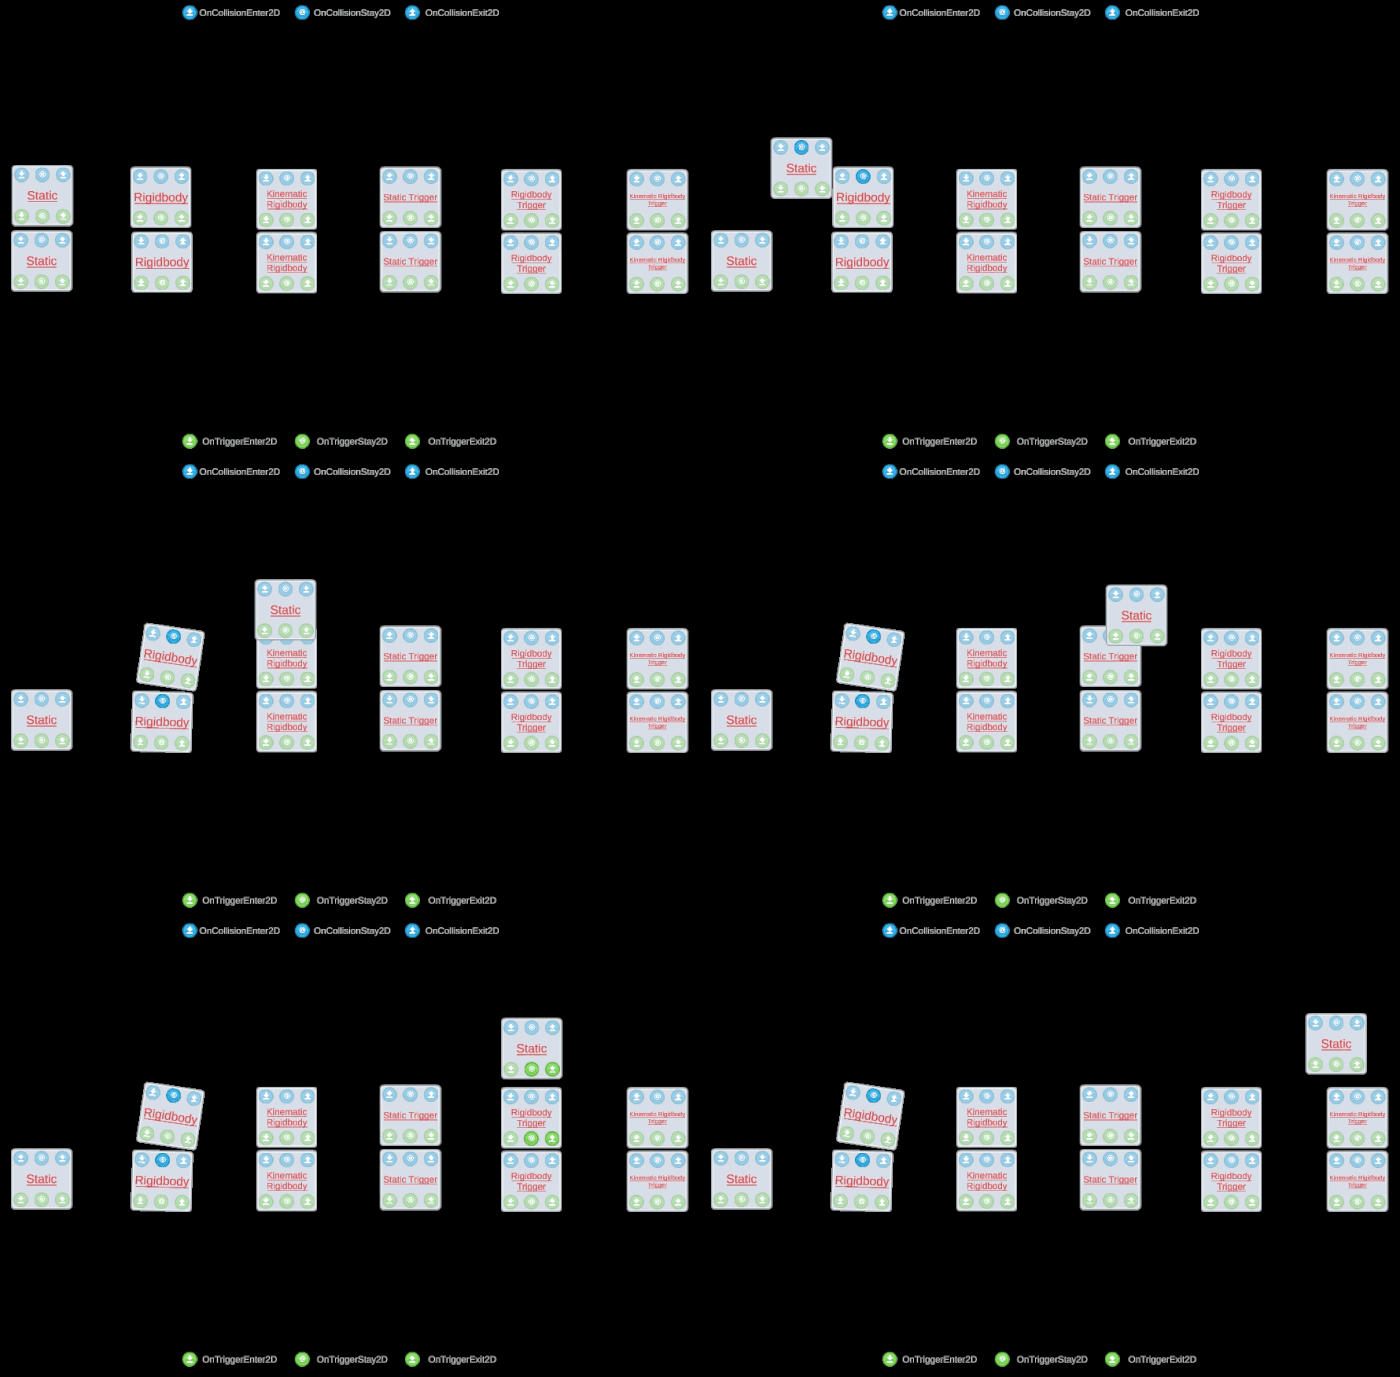
Try the online sample here and move each collider setup to better understand what messages are sent for each interaction.
For the last part of this tutorial, I would like to mention the Physics2D settings.
These settings are not within the scope of this tutorial — talking about some of them could fill another whole tutorial — but I think it’s important to know that they exist, what their default values are, and that we can adjust them to the needs of our project.
You can access these settings via Project Settings > Physics 2D.
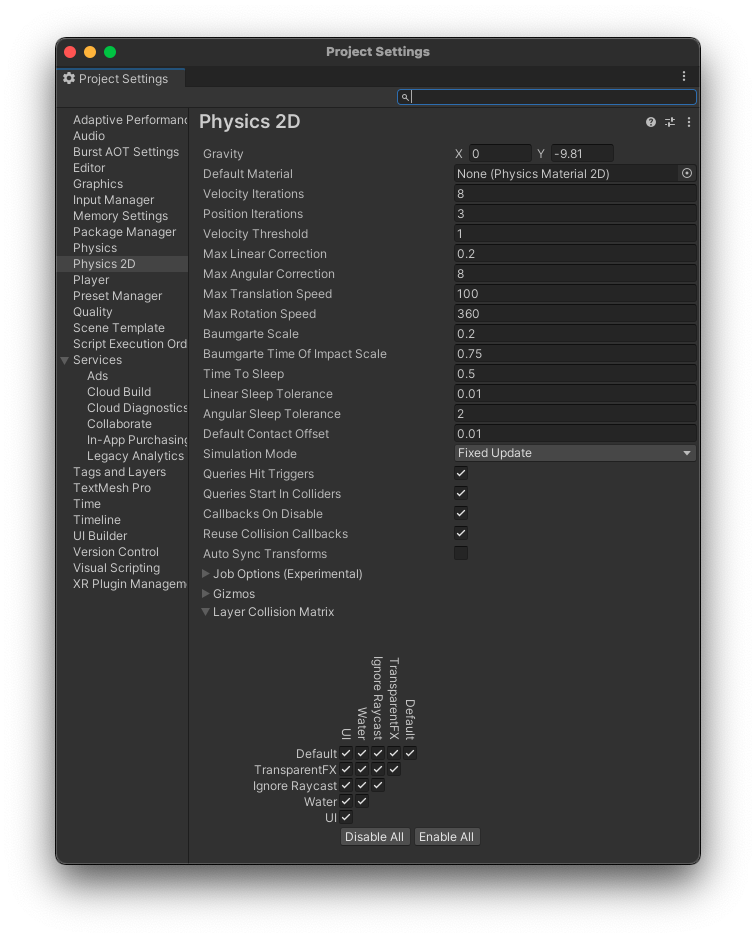
Settings like Gravity are pretty straightforward, but things like Velocity Iterations and Position Iterations can be a little obscure and can affect game behaviors a lot.
Most of these settings are changed when we need to achieve some kind of non-conventional physics behavior or performance improvement, but you should be aware that you’ll need to retest gameplay after each change you make to these settings to ensure that you haven’t broken anything.
The bottom line is: make sure to only change these settings after studying and understanding their impact.
In this tutorial, we’ve explained the fundamentals of Unity 2D Colliders: what they are, what their common properties and behaviors are, how to add a BoxCollider2D and CircleCollider2D to a GameObject, what a Rigidbody2D is and how to use PhysicsMaterial2D, what the collision callbacks are and how to use them on our scripts, and, finally, the kinds of collider setups and how they interact.
Install LogRocket via npm or script tag. LogRocket.init() must be called client-side, not
server-side
$ npm i --save logrocket

// Code:

import LogRocket from 'logrocket';
LogRocket.init('app/id');
// Add to your HTML:

<script src="https://cdn.lr-ingest.com/LogRocket.min.js"></script>
<script>window.LogRocket && window.LogRocket.init('app/id');</script>

@container scroll-state: Replace JS scroll listeners nowCSS @container scroll-state lets you build sticky headers, snapping carousels, and scroll indicators without JavaScript. Here’s how to replace scroll listeners with clean, declarative state queries.

Explore 10 Web APIs that replace common JavaScript libraries and reduce npm dependencies, bundle size, and performance overhead.

Russ Miles, a software development expert and educator, joins the show to unpack why “developer productivity” platforms so often disappoint.

Discover what’s new in The Replay, LogRocket’s newsletter for dev and engineering leaders, in the February 18th issue.
Hey there, want to help make our blog better?
Join LogRocket’s Content Advisory Board. You’ll help inform the type of content we create and get access to exclusive meetups, social accreditation, and swag.
Sign up now