Swift is a general-purpose, multiparadigm, compiled programming language developed by Apple, used specifically for iOS development. When writing any Swift application, developers usually want to add a database feature to their applications. This is where Firestore comes in.
Firestore is a NoSQL document database built for automatic scaling, high performance, and easy application development. In Firestore, all data has a set of key-value pairs and is stored in a collection.
In this tutorial, we will learn how to set up and configure Firestore in our Swift application. Firestore makes it easy to store data in the cloud while managing authentication and security without requiring a backend developer.
To begin this tutorial, ensure you have the following:
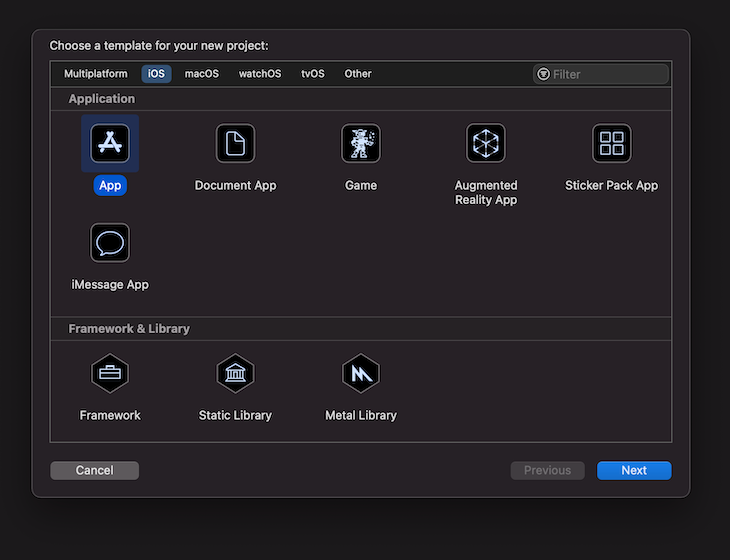
Let’s start by creating a new Swift application. Open the Xcode application and select App to scaffold a new project.
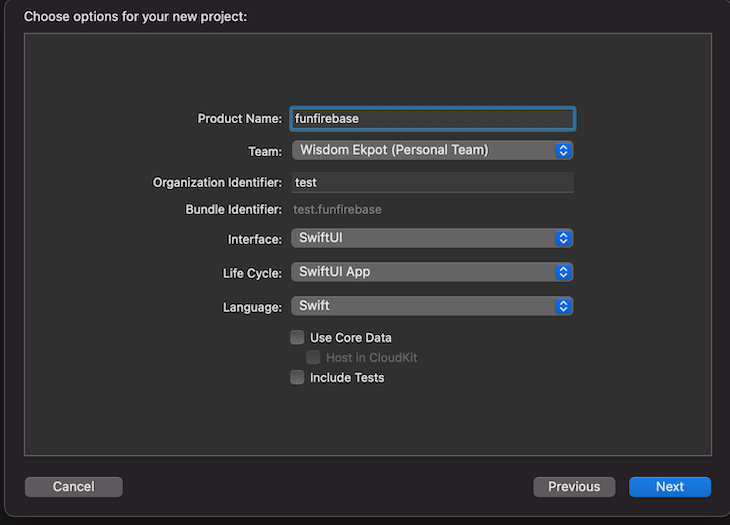
Name the application, click the Next button, and choose where to save your application on your local machine.
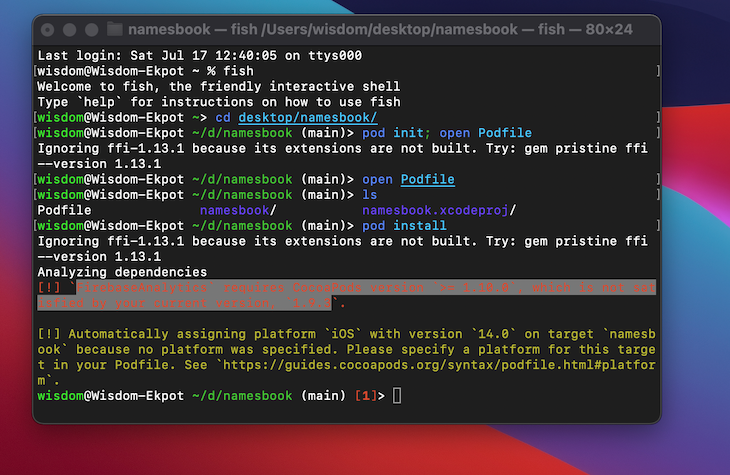
After setting up the project, we must initialize our pods and update the
Podfile through our terminal. To do this, first move into the project directory and run this command:
pod init;open Podfile
pod init initializes the pods while open Podfile opens a config terminal to update the Podfile.
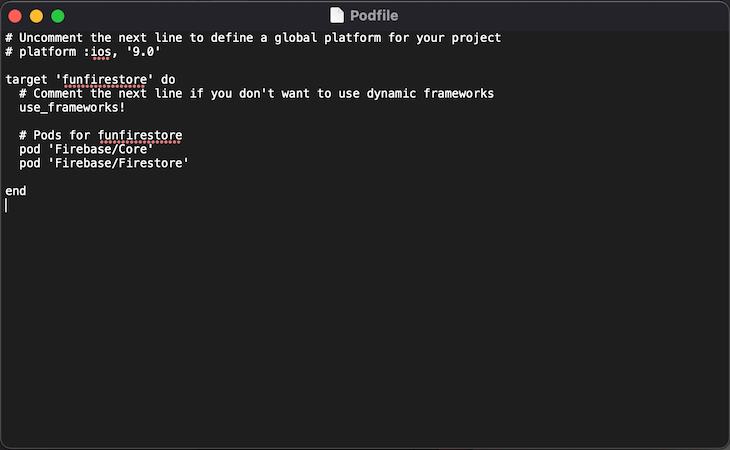
We must also include the Firebase pods for Podfile by including the following:
pod ‘Firebase/Core'
pod ‘Firebase/Firestore'
You can see this configuration executed in the terminal.
After doing this, press Command + S to save the Podfile and close the terminal editor.
Next, let’s install our pods by running pod install to bring in the Firestore dependencies.
If you get the error below while trying to install the pod, install cocoapods on your local machine by running sudo gem install cocoapods. CocoaPods is a dependency manager for Swift that manages installing dependencies in our Swift application.
After installation, use the pod setup command to update cocoapods.
If the error persists, use brew to install cocoapods with the following command:
brew install cocoapods
Then, use this command to overwrite the older version:
brew link --overwrite cocoapods
With this done, you can now run pod install to install the dependencies for our application.
After installing the pods, open the project directory and open the funfirebase.xcworkspace file in Xcode.
Now, head over to https://console.firebase.google.com/ and click the Create a project button. Enter a project name, such as “funfirebase.”
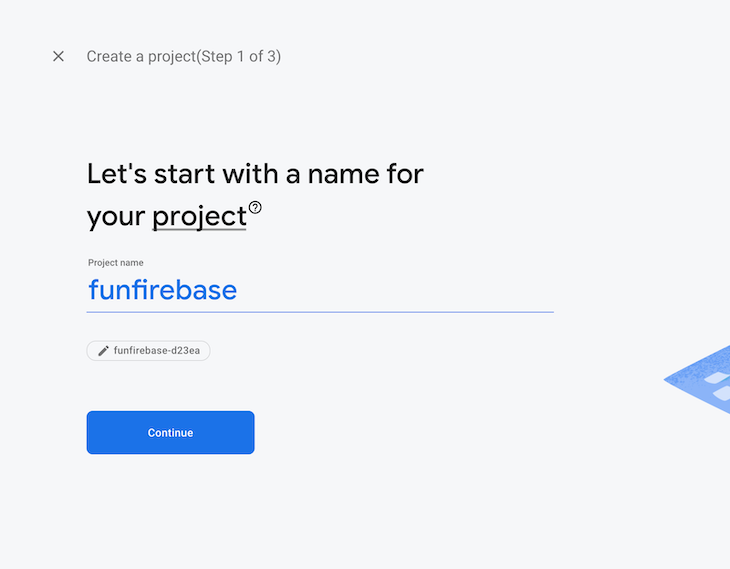
Click the Continue button, disable Google Analytics for this project, and click the Create project button.
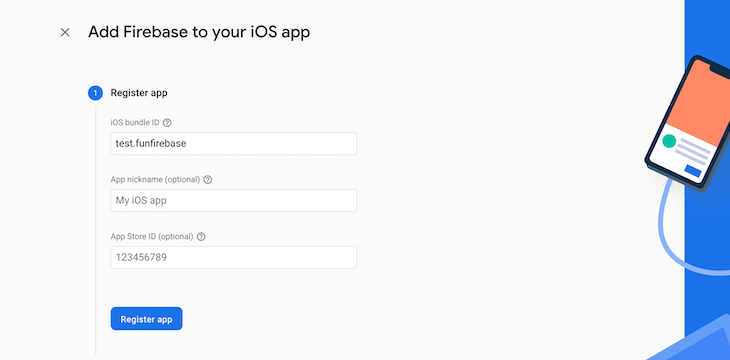
Once finished setting up the project, click the iOS icon to launch the setup prompt.

Add the application bundle identifier and click the Register app button. The application nickname and App Store ID is optional, so we can ignore that.
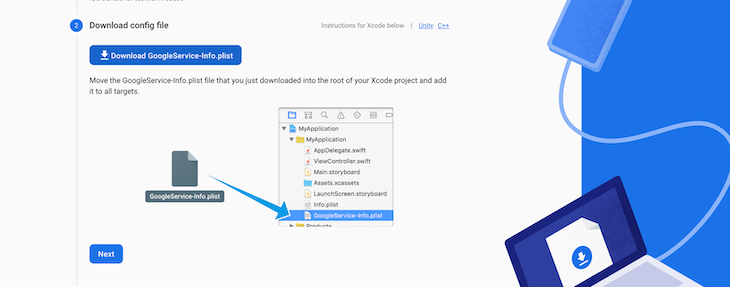
Next, click the Download GoogleService-Info.plist button to download the iOS config. After downloading this file, move the file into your root Xcode project.
pen the funfirebaseApp.swift file, create a funfirebaseApp extension, and add an initFirebase method.
Extensions in Swift add new functionalities to an existing class, structure, enumeration, or protocol type:
extension funfirebaseApp {
  private func initFirebase() {
    FirebaseApp.configure()
  }
}
The FirebaseApp.config method configures a default Firebase app for our application. We have to initialize the initFirebase method by invoking it in our funfirebaseApp struct:
@main
struct funfirebaseApp: App {
    // init firebase
    init() {
        initFirebase()
      }

    var body: some Scene {
        WindowGroup {
            ContentView()
        }
    }
}
We are going to build a simple to-do application, which will add a list of tasks for users. The purpose of building this project is to help us understand how to add and retrieve data from the Cloud Firestore.
Let’s start by creating a simple UI for our application and use SwiftUI for our implementation. First, open the ContentView.swift file and update it to the following:
//
//  ContentView.swift
//  funfirebase
//
//  Created by Wisdom Ekpot on 7/19/21.
//

import SwiftUI

struct ContentView: View {
    @State private var task:String = ""
    var body: some View {

        // input field
        TextField("Start typing a task...", text: $task)
            .padding()
            .border(Color.black)
            .frame(minWidth: 100, idealWidth: 150, maxWidth: 240, minHeight: 30, idealHeight: 40, maxHeight: 50, alignment: .leading)

        // button to add
        Button(action: { print("Task added \(task)")}) {
            Text("Add Task")
        }.padding()
        .foregroundColor(.white)
        .background(Color.black)
        .cornerRadius(5)


        //
        NavigationView {
            List {
                Text("Read")
                Text("Execise")
                Text("Text John")
                Text("Say hello")
            }.navigationTitle("All Tasks")
        }

    }
}

struct ContentView_Previews: PreviewProvider {
    static var previews: some View {
        Group {
            ContentView()
        }
    }
}
Let’s break down the code. We start by creating our input field:
 TextField("Start typing a task...", text: $task)
.padding()
.border(Color.black)
.frame(minWidth: 100, idealWidth: 150, maxWidth: 240, minHeight: 30, idealHeight: 40, maxHeight: 50, alignment: .leading)
Using the TextField property, we create input fields in Swift, including a defined minWidth and minHeight and a default placeholder. The task variable, defined in the body variable, stores the input field state:
@State private var task:String = ""
The next thing we’ll add is a button to add a to-do task to our Firestore database:
// button to add
        Button(action: { print("Task added \(task)")}) {
            Text("Add Task")
        }.padding()
        .foregroundColor(.white)
        .background(Color.black)
        .cornerRadius(5)
This assigns an action to the button to print the value of the input field.
Next, use the List property to list all the to-do items:
 // list all items
        NavigationView {
            List {
                Text("Read")
                Text("Execise")
                Text("Text John")
                Text("Say hello")
            }.navigationTitle("All Tasks")
        }
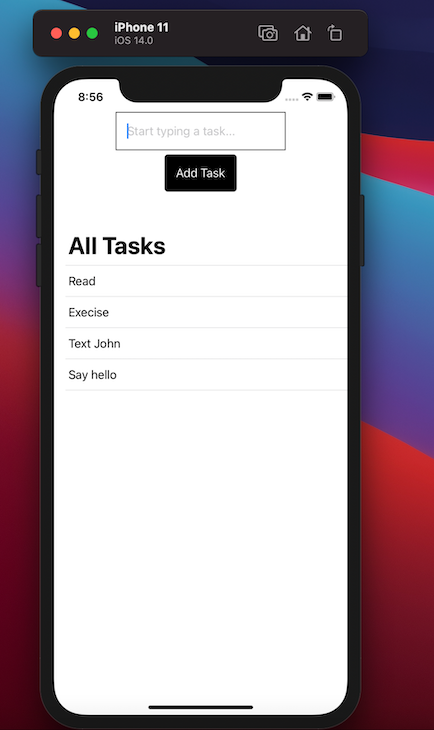
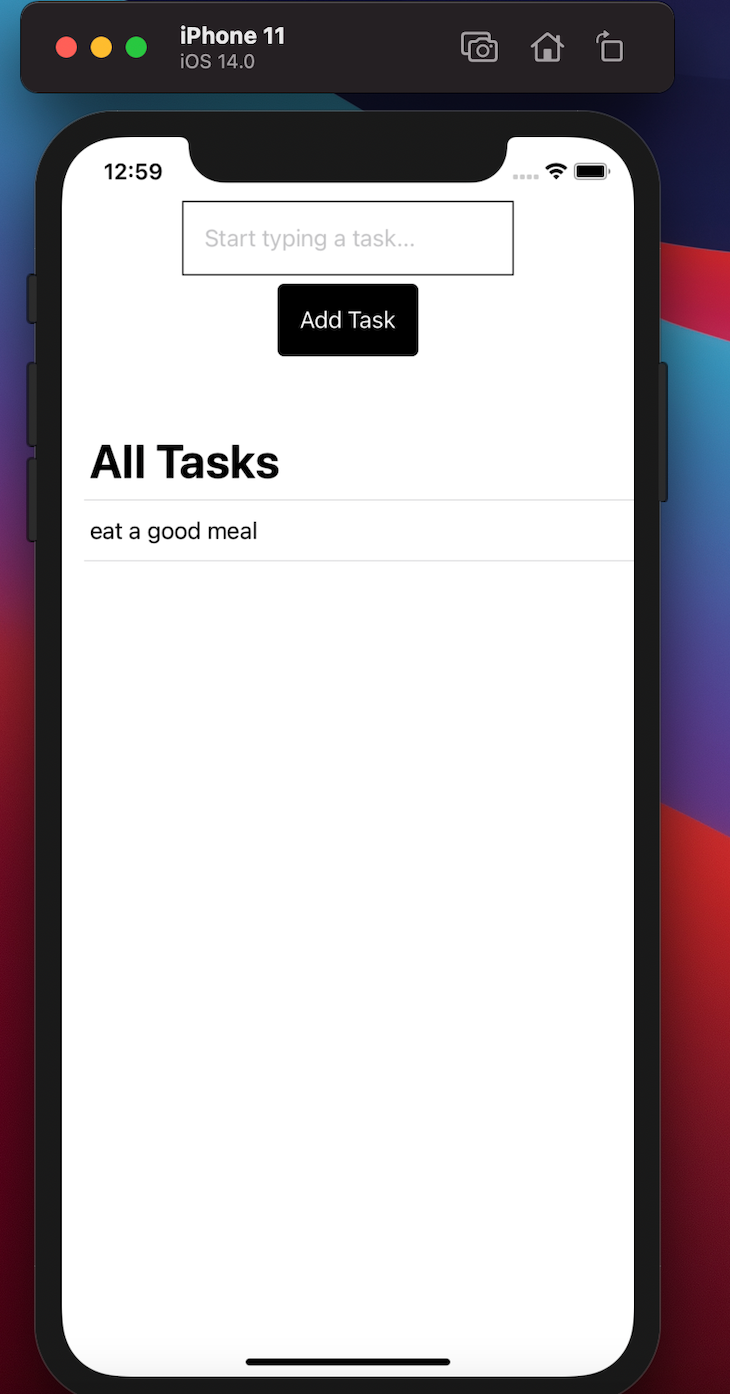
With the list defined, we can now preview our application on any simulator device. This tutorial uses iPhone 11 to preview the application, and it should look like this:
We will continue by creating the get and add functionalities. With these two functionalities added, users can add a new to-do task and get the list of all to-do tasks in the application.
Let’s start by creating a model for our to-do list. Create a Models directory. Inside, create a Todo.swift file and add the following code snippet:
import SwiftUI
struct Todo: Codable, Identifiable {
    var id: String = UUID().uuidString
    var name: String?
}
Our to-do list follows this data structure.
Next, create a viewModel directory, inside the directory, create a TodoViewModel.swift file and add the following code:
import Foundation
import FirebaseFirestore

class TodoViewModel: ObservableObject {

    @Published var todos = [Todo]()

    private var db = Firestore.firestore()

    func getAllData() {
        db.collection("todos").addSnapshotListener { (querySnapshot, error) in
            guard let documents = querySnapshot?.documents else {
                print("No documents")
                return
            }

            self.todos = documents.map { (queryDocumentSnapshot) -> Todo in
                let data = queryDocumentSnapshot.data()
                let name = data["name"] as? String ?? ""
                return Todo(name: name)
            }
        }
    }

    func addNewData(name: String) {
           do {
               _ = try db.collection("todos").addDocument(data: ["name": name])
           }
           catch {
               print(error.localizedDescription)
           }
       }
}
We have two functions here: the getAllData function gets all the data from our Firestore database, and the addNewData function adds a new item to the Firestore database.
To use the TodoViewModel.swift file, we must connect it to our ContentView.swift file inside our ContentView struct:
@ObservedObject private var viewModel = TodoViewModel()
With this defined, we must update our List element to the following:
 List(viewModel.todos) { todo in
                            VStack(alignment: .leading) {
                                Text(todo.name ?? "")
                            }
                        }.onAppear() {
                            self.viewModel.getAllData()
                        }.navigationTitle("All Tasks")
Of course, this renders a blank list because we don’t have any to-do tasks in our database.
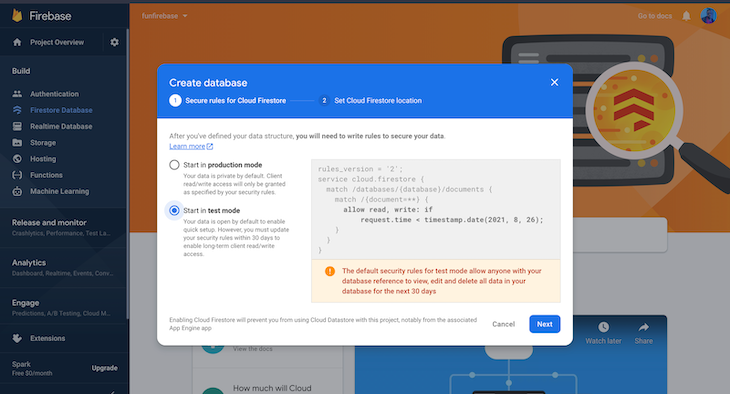
To add the to-do tasks, head over to the Firebase console and click Firestore Database. Click the Create database button and select the Start in test mode radio button.
With this done, we can start adding to-do tasks into our database.
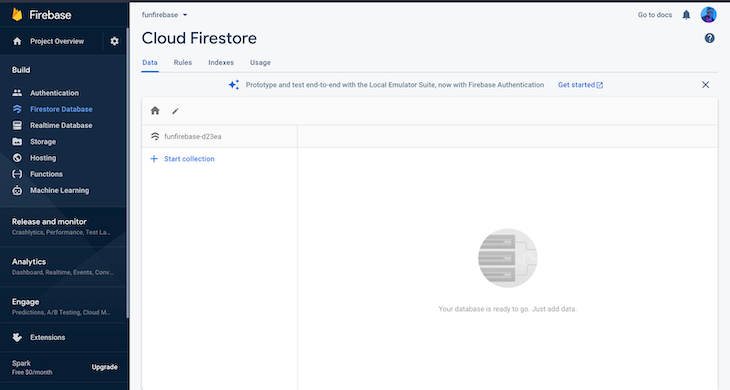
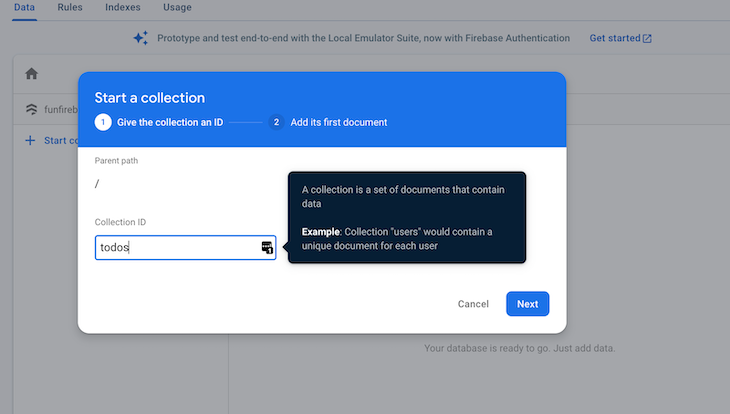
Click the Start collection link and add “todos” as the collection ID.
Now, start adding new to-do items into the database. Always set the field name to name.
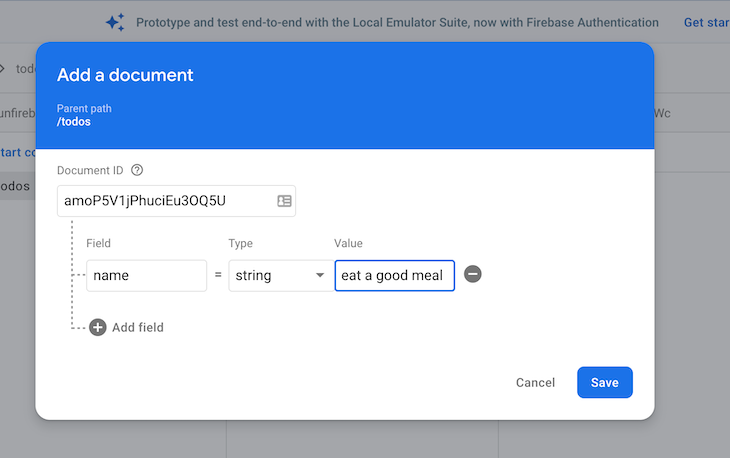
Clicking the Save button automatically updates the application with our changes.
add functionalityWe must also update our button to call the addNewData function that we created. We must add a task name as a parameter, which is retrieved from the input field.
To do this, modify the button to the following:
 Button(action: { self.viewModel.addNewData(name: task)}) {
            Text("Add Task")
        }.padding()
        .foregroundColor(.white)
        .background(Color.black)
        .cornerRadius(5)
Now, when clicking the button, it gets the value from the input field and passes it in the addNewData parameter, storing it in the Firestore collection.
Using Firestore in our Swift application is quite easy and straightforward. In this article, we have learned how to use SwiftUI to set up a user interface for our application and how to add and retrieve data from the Cloud Firestore.
Click here to get the source code of this application.
Install LogRocket via npm or script tag. LogRocket.init() must be called client-side, not
server-side
$ npm i --save logrocket

// Code:

import LogRocket from 'logrocket';
LogRocket.init('app/id');
// Add to your HTML:

<script src="https://cdn.lr-ingest.com/LogRocket.min.js"></script>
<script>window.LogRocket && window.LogRocket.init('app/id');</script>
Would you be interested in joining LogRocket's developer community?
Join LogRocket’s Content Advisory Board. You’ll help inform the type of content we create and get access to exclusive meetups, social accreditation, and swag.
Sign up now
This guide walks you through creating a web UI for an AI agent that browses, clicks, and extracts info from websites powered by Stagehand and Gemini.

This guide explores how to use Anthropic’s Claude 4 models, including Opus 4 and Sonnet 4, to build AI-powered applications.

Which AI frontend dev tool reigns supreme in July 2025? Check out our power rankings and use our interactive comparison tool to find out.

Learn how OpenAPI can automate API client generation to save time, reduce bugs, and streamline how your frontend app talks to backend APIs.


2 Replies to "Firestore in Swift tutorial"
CocoaPods hasn’t been necessary for some time now. Using the Swift Package Manager is a much simpler way to add Firebase support. Also, the first or second in your article says “Firestone”, not “Firestore”.
Hi David,
Thanks for reading the LogRocket blog and for your input. I’ve corrected the typo. We regularly update our older articles, so if this one comes up on our list, we’ll be sure to take a close look at the Swift Package Manager. Thanks!