Nowadays, you don’t need to know how to set up a server and database from scratch to build full-stack applications. The emergence of serverless technology has made it easier to scale your application without the hassle of managing infrastructure manually. In the modern world of technology, everything is API-driven.

There are many tools available to help you build scalable apps without the complexity and operational costs normally associated with full-stack development. Choosing the most appropriate solution based on the requirements of your project can save you a lot of headaches and technical debt in the future.
In this guide, we’ll compare Firebase and Fauna, evaluating each tool for learning curve, complexity, scalability, performance, and pricing.
Firebase is a backend-as-service (BaaS) tool that provides a variety of services including authentication, real-time databases, crashlytics, storage, and serverless cloud functions, to name a few.
Fauna (formerly FaunaDB) is a serverless application framework that provides a GraphQL API layer over the traditional databases. Furthermore, it transforms the DBMS into a data API that delivers all the capabilities you need to operate the database.
Fauna provides:
To demonstrate the advantages and drawbacks to using Firebase and Fauna, we’ll walk you through how to build an example app with each database.
Below is a quick demo of what we’ll build:
Firebase vs FaunaDB Demo
Demo for Firebase vs FaunaDB article
In the frontend world, it’s common to use React with Firebase because it enables frontend developers to build full-stack applications. Firebase is a BaaS tool that makes it easier for web and mobile developers to implement common functionalities such as authentication, file storage, and CRUD database operations.
For a deeper dive, including Firebase configuration and initial setup, check out “Getting started with react-redux-firebase.”
Let’s start with the entity/relationship and components diagrams:


First, create firebase.js in the root directory and add the following code:
import firebase from "firebase";
const config = {
  apiKey: "API_KEY",
  authDomain: "AUTH_DOMAIN",
  databaseURL: "DATABASE_URL",
  projectId: "PROJECT_ID",
  storageBucket: "STORAGE_BUCKET",
  messagingSenderId: "MESSAGING_SENDER_ID",
  appId: "APP ID",
};
// Initialize Firebase
firebase.initializeApp(config);
export default firebase;
Once you’ve configured Firebase, you can use it directly in your components.
For the next step, we’ll fetch all project data from Firebase:
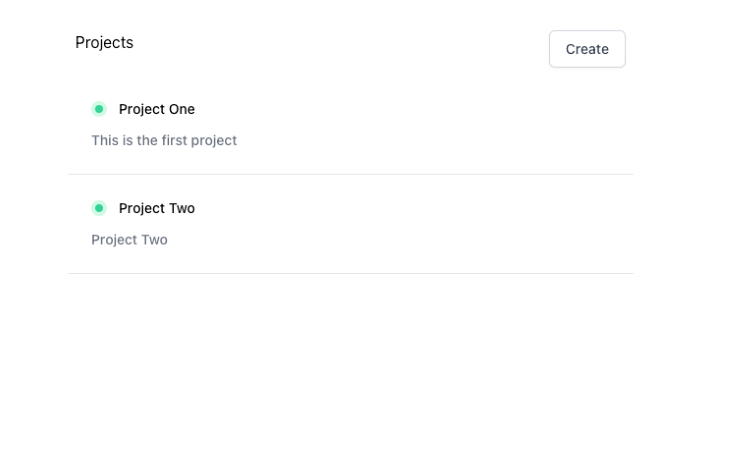
useEffect(() => {
    const fetchData = async () => {
      setLoading(true);
      const db = firebase.firestore();
      const data = await db.collection("projects").get();
      setProjects(data.docs.map((doc) => ({ ...doc.data(), id: doc.id })));
      setLoading(false);
    };
    fetchData();
  }, []);
Connect to Firebase using the following code:
const db = firebase.firestore();
Once Firebase establishes a DB connection, we can fetch the data from a specific collection using the code below:
const data = await db.collection("projects").get();
Inserting data into Firebase is as simple as reading data. First, create a project:
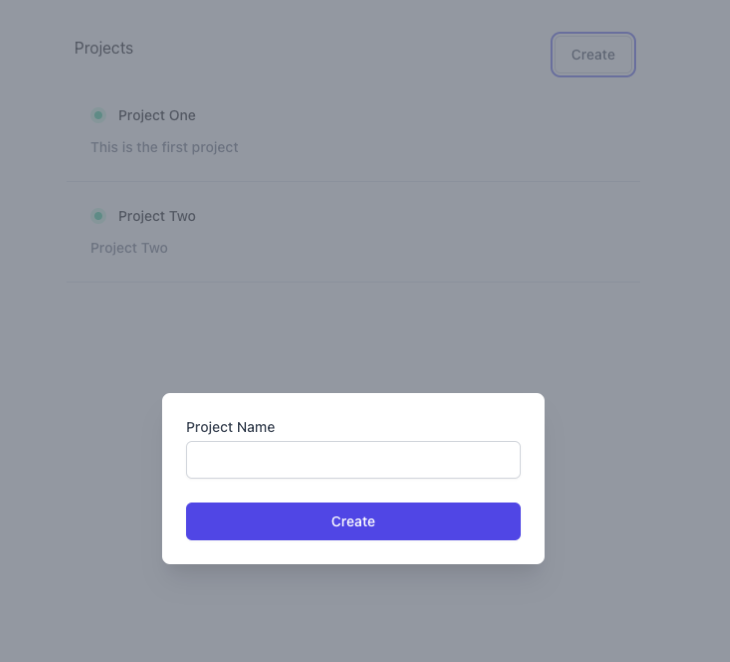
Add the following code to the onClick function:
const db = firebase.firestore();
db.collection("projects")
      .add({ name })
      .then(async (res) => {
        // component logic comes here //
        setModalState(!modalState);
        toast.success("Project created Successfully");
      })
      .catch((err) => {
        toast.error("Oops!! Something went wrong");
        console.log("err", err);
      });
We can use the add function from Firebase to add data to the specified collection.
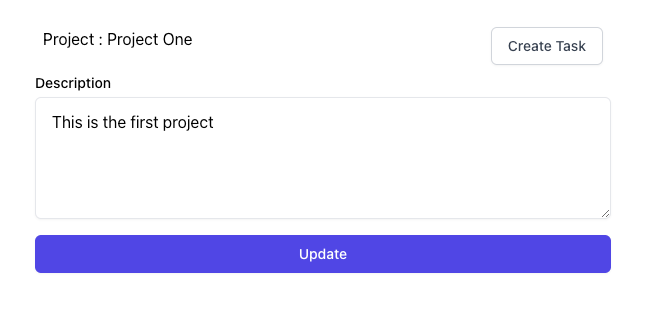
To update data in Firebase, use the set function:
 const db = firebase.firestore();
    db.collection("projects")
      .doc(id)
      .set(
        {
          description: project.description,
        },
        { merge: true }
      )
      .then((res) => {
        toast.success("Project Updated Successfully");
      })
      .catch((err) => {
        toast.error("Oops!! Something went wrong");
        console.log("Error while updating project", err);
      });
The merge option enables us to add the new data along with the existing data. Otherwise, it would replace the data.
Firebase support transactions. You can batch a setup operation to maintain data consistency. For example, if you delete a project, you also need to delete all the tasks associated with it. Therefore, you need to execute it as a transaction.
There are few important things to note about transactions:
var sfDocRef = db.collection("projects").doc();

return db.runTransaction((transaction) => {
    // This code may get re-run multiple times if there are conflicts.
    return transaction.get(sfDocRef).then((sfDoc) => {
        if (!sfDoc.exists) {
            throw "Document does not exist!";
        }

       // delete tasks here
    });
}).then(() => {
    console.log("Transaction successfully committed!");
}).catch((error) => {
    console.log("Transaction failed: ", error);
});
Before we start setting up Fauna for our example application, we must create an account, database, and collection in Dashboard.
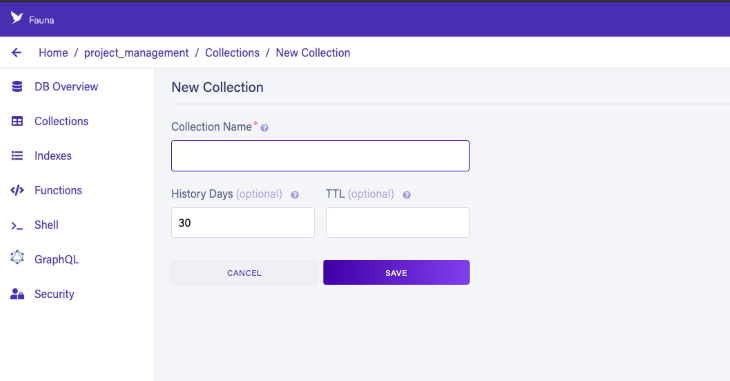
Now it’s time to set up Fauna. We’ll structure our application as follows:
configcomponentsapiconfig will have Fauna set up and api will contain all the queries to db. Create db.js and add the following:
import Fauna from "Fauna";
const client = new Fauna.Client({
  secret: process.env.REACT_APP_Fauna_KEY,
});
const q = Fauna.query;
export { client, q };
Next, we’ll create APIs for the read, insert and update operations.
import { client, q } from "../config/db";
const createProject = (name) =>
  client
    .query(
      q.Create(q.Collection("projects"), {
        data: {
          name,
        },
      })
    )
    .then((ret) => ret)
    .catch((err) => console.error(err));
export default createProject;
Every query in Fauna starts with client.query. To insert data into the DB, use q.Create to wrap the collection and data:
q.Create(<Collection>, {<data>})
There are two ways to read data from Fauna:
idFetching data using indexes is recommended when you need to fetch all the data as opposed to something specific.
import { client, q } from "../config/db";
const getAllProjects = client
  .query(q.Paginate(q.Match(q.Ref("indexes/all_projects"))))
  .then((response) => {
    console.log("response", response);
    const notesRefs = response.data;

    const getAllProjectsDataQuery = notesRefs.map((ref) => {
      return q.Get(ref);
    });
    // query the refs
    return client.query(getAllProjectsDataQuery).then((data) => data);
  })
  .catch((error) => console.warn("error", error.message));
export default getAllProjects;
Here, we fetched all the project data using the collection index. By default, we can paginate the data using q.Paginate and fetch all the data that matches indexes/all_projects.
If we have the id, we can fetch data as follows:
client.query(
  q.Get(q.Ref(q.Collection('projects'), <id>))
)
.then((ret) => console.log(ret))
A relationship is a crucial concept while designing the database and its schema. Here, we have a project and task entity with a one-to-many relationship. There are two ways to design our database for such a relationship: you can either add task IDs to the project collection as an array or add the project ID to each task’s data.
Here’s how to add task IDs to the project collection as an array:
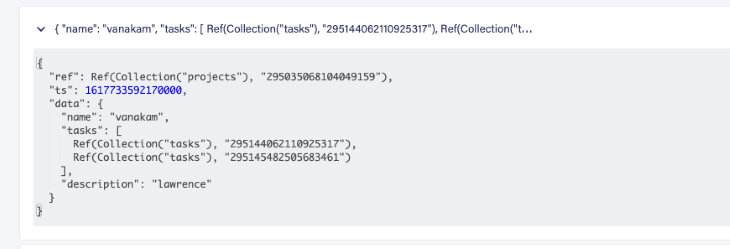
And here’s how to add the project ID into each task’s data:

Let’s follow the first method and add the task IDs into the project collection:
import { client, q } from "../config/db";
const createTask = async (projectId, name, description) => {
  try {
    const taskData = await client.query(
      q.Create(q.Collection("tasks"), {
        data: {
          name,
          description,
          projectId,
        },
      })
    );
    let res = await client.query(
      q.Let(
        {
          projectRef: q.Ref(q.Collection("projects"), projectId),
          projectDoc: q.Get(q.Var("projectRef")),
          array: q.Select(["data", "tasks"], q.Var("projectDoc"), []),
        },
        q.Update(q.Var("projectRef"), {
          data: {
            tasks: q.Append(
              [q.Ref(q.Collection("tasks"), taskData.ref.value.id)],
              q.Var("array")
            ),
          },
        })
      )
    );
    return taskData;
  } catch (err) {
    console.error(err);
  }
};
export default createTask;
First, insert the data into the task collection:
const taskData = await client.query(
      q.Create(q.Collection("tasks"), {
        data: {
          name,
          description,
          projectId,
        },
      })
    );
Next, add the task ID into the project collection:
let res = await client.query(
      q.Let(
        {
          projectRef: q.Ref(q.Collection("projects"), projectId),
          projectDoc: q.Get(q.Var("projectRef")),
          array: q.Select(["data", "tasks"], q.Var("projectDoc"), []),
        },
        q.Update(q.Var("projectRef"), {
          data: {
            tasks: q.Append(
              [q.Ref(q.Collection("tasks"), taskData.ref.value.id)],
              q.Var("array")
            ),
          },
        })
      )
    );
The Let function binds one or more variables into a single value or expression.
To update data in Fauna, use the following query:
await client.query(
      q.Update(q.Ref(q.Collection("projects"), projectId), {
        data: { description },
      })
    );
We’ve covered all the functionalities involved in a CRUD application using both Firebase and Fauna. You can find the complete source code for this example on GitHub.
Now that we understand how they work, let’s compare Firebase vs. Fauna and take stock of their pros and cons.
Before we begin to compare Firebase and Fauna, it’s worth noting that these are just my opinions based on personal preference, my own analysis, and my experience building the example app as described above. Others may disagree, and you’re welcome to express your opinion in the comments.
Firebase is easy to learn and adapt because most of its functions are similar to JavaScript functions. For example:
get() retrieves data from Firebaseset() inserts data to Firebaseupdate() updates data in FirebaseFauna, on the other hand, has a rather steep learning curve. You can use either GraphQL or Fauna Query Language (FQL). It takes some time to understand the concepts and learn how FQL works. But once you get a good grasp on it, it becomes easy to write complex queries in much less time,
The setup for both Firebase and Fauna on the client side is simple and straightforward. Both databases are designed for building scalable backend solutions. In my opinion, Fauna is the better choice for building complex applications. I’ll explain why shortly.
Fauna works well with GraphQL and can be served with low-latency global CDNs. Firebase is fast, responsive, and easy to set up compared to Fauna.
As your application grows, you might encounter the need to write some complex queries for things like:
As you can see from our example above, Fauna can efficiently handle complex queries and operations. Fauna is a distributed database that can be a relational, document, and graph database.
One of the main features of Fauna is its ability to handle ACID transactions, which is why it can easily handle complex queries.
Functions in Fauna, such as Lambda(),Let(), and Select(), for example, enable you to write powerful queries with less code.
Fauna’s free tier includes 100,000 reads, 50,000 writes, and 500,000 compute operations. For individual businesses, $23 per month covers most of the operations.
Firebase includes 50,000 reads, 20,000 writes, and 1GB storage, which covers the operation. It’s based on the pay-as-you-grow model.
Both Firebase and Fauna have excellent support and documentation. The Firebase community is mature and large compared to Fauna since both web and mobile developers widely use it. Fauna has particularly good documentation that helps you understand basic concepts easily.
Firebase is more suitable if you plan to use fewer complex queries and need to build an app quickly. Therefore, it’s a good choice when your application has a limited level of integration. Similarly, if you need to develop a quick prototype or small-scale application on a short deadline, Firebase is the best solution because it comes with batteries included.
Fauna is ideal when your application requires a high degree of scalability with regard to handling complex queries. It can handle a multimodel database with all the models available from a single query. Fauna is especially useful if you need to build a scalable application that can handle a relational database structure. Do note, however, that Fauna doesn’t offer an on-premises database.
Install LogRocket via npm or script tag. LogRocket.init() must be called client-side, not
server-side
$ npm i --save logrocket

// Code:

import LogRocket from 'logrocket';
LogRocket.init('app/id');
// Add to your HTML:

<script src="https://cdn.lr-ingest.com/LogRocket.min.js"></script>
<script>window.LogRocket && window.LogRocket.init('app/id');</script>
Hey there, want to help make our blog better?
Join LogRocket’s Content Advisory Board. You’ll help inform the type of content we create and get access to exclusive meetups, social accreditation, and swag.
Sign up now
A breakdown of the wrapper and container CSS classes, how they’re used in real-world code, and when it makes sense to use one over the other.

This guide walks you through creating a web UI for an AI agent that browses, clicks, and extracts info from websites powered by Stagehand and Gemini.

This guide explores how to use Anthropic’s Claude 4 models, including Opus 4 and Sonnet 4, to build AI-powered applications.

Which AI frontend dev tool reigns supreme in July 2025? Check out our power rankings and use our interactive comparison tool to find out.
One Reply to "Firebase and Fauna: Comparing database tools for frontend devs"
To clarify pricing:
Fauna = 100,000 reads, etc PER MONTH (free tier)
Firebase = 50,000 reads, etc PER DAY (free tier)