React may have originally been designed for the web, but it is commonly used beyond the web and the world of HTML and CSS. React was built as a framework-independent rendering engine, which means that what ends up being rendered depends on the renderer you use.

There are many renderers you can use to provide various results. One of the most popular renderers is React Native Renderer, which generates native mobile elements for Android or iOS.
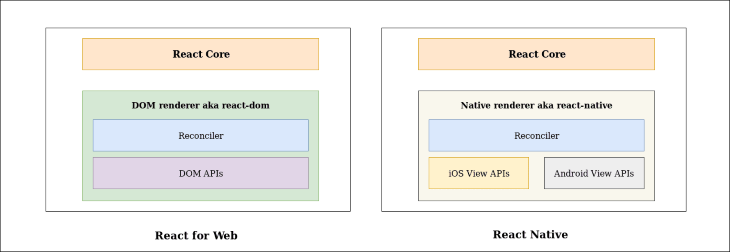
In the following figure, you can see how the parts are structured in React and React Native and the differences and similarities of both.

In this article, we’ll introduce Fela, a new styling framework for React that will help you avoid styling inconsistencies and cumbersome code.
Jump ahead:
In addition to the renderer differing depending on the platform your React code is running on, creating styles themselves changes depending on where your code is rendered. For example, it’s generally impossible to share styles between React and React Native.
For this reason, style libraries used for the web, such as styled-components, Emotion, and Tailwind CSS, do not work in React Native. Instead, we must create style sheets that work in our React Native apps.
But doing so can ultimately make your design system cumbersome and lead to styling and code inconsistencies and you need to maintain both styles. That’s where Fela, a new styling framework, comes in.
Fela is a styling framework that is independent of any JavaScript framework. The Fela renderer can be injected into the use case you want and generate the styling you need.
Essentially, you define your styles, install and configure the specific renderer for each platform you want to use the styles on, and then inject the styles.
There are three core issues that Fela looks to solve, and these are exactly what makes Fela unique.
Styles are usually static. This makes sense, as the definitions don’t change that often. Instead of changing which definitions should be used, however, why not make the styles themselves dynamic so that they change when the state changes?
According to the Fela documentation, “If the view is a function of state, your CSS should be, too, as it is part of your view.” This refers to the fact that all style definitions in Fela are dynamic and derived from the state of the component.
This is probably the biggest advantage of the library. Fela styles can be written without having a JavaScript framework in mind. We will see later how this is possible.
Rendering styles and loading styles should never be the bottleneck of your application. That’s why Fela is blazing-fast. Why? Because atomic styles make it easy to be cached and reused. This principle, combined with the general advantages of CSS-in-JS, means Fela has the best mix for speed.
Let’s explore how we can actually use this library. We’ll create a style for a button that can be used both on the web and in your React Native app.
Our goal is to create a website and a mobile application that render a button with the same look and feel using a source of styles. This project consists of three parts and will look like this:
-- mobile_app
-- web_app
-- shared
Let’s start with writing styles in your shared folder so that you don’t need to install a package. We can write and define our styles with JavaScript because they are defined as simple objects or functions.
// shared/index.js

export const buttonStyles = (props) => {
    width: props.size,
    padding: '10px',
    backgroundColor: 'black',
    color: 'white',
}
If you want to use pseudo-classes to add some elements or interactivity to your button, you can do that by nesting another object like this:
// shared/index.js

export const buttonStyles = (props) => {
    width: props.size,
    padding: '10px',
    backgroundColor: 'black',
    color: 'white',

    ':hover': {
      opacity: '0.8'
    }

    ':before': {
      content: '" "',
      height: '10px',
      width: '10px',
    }
}
Finally, we should also give our button a little change when we use it on a smaller device. To achieve that, we can also add some styles under a media query that can be used as follows:
// shared/index.js

export const buttonStyles = (props) => {
    // ... previous styles
    '@media (min-height: 540px)': {
      padding: '5px',
    },
}
If you want to learn more about how to write styles in Fela and how to use advanced CSS features like selectors, pseudo-elements, etc., you can read the article and guide on the official Fela website, which explains how to achieve any CSS feature by writing Fela styles.
To use the defined styles in your React app, you need to install the following in your React project:
yarn add fela React-fela
We need to install the specific renderer that will render our styles for use in the web app. Next, you need to package your React app with a specific Fela provider that allows the styles to be rendered as CSS:
// web_app/App.jsx

import { createRenderer } from 'fela'
import { RendererProvider } from 'react-fela'
import MyApp from './MyApp'

const renderer = createRenderer()

export default () => (
    <RendererProvider renderer={renderer}>
        <MyApp />
    </RendererProvider>
)
If this is defined in the root of your web React application, you can now use your shared styles within your component as follows:
// web_app/components/App.jsx
import { buttonStyles } from '../../shared'

function Button({ children, size = 16 }) {
    const { css } = useFela({ size })

    return <button className={css(buttonStyles)}>{children}</button>
}
That’s it! This generates common styles so a web browser can understand them.
Similar to the web, let’s install Fela and react-fela in our React Native project. In addition, you need to install the dedicated Fela package for React Native.
yarn add fela React-fela fela-native
Similar to what we did in our React web app, you need to package your entire app with a dedicated renderer provider, like this:
// mobile_app/App.js
import React from 'react'
import { AppRegistry } from 'react-native'
import { createRenderer } from 'fela-native'
import { RendererProvider } from 'react-fela'
import MyApp from './MyApp'

const renderer = createRenderer()

const App = (props) => (
    <RendererProvider renderer={renderer}>
        <App />
    </RendererProvider>
)

AppRegistry.registerComponent('FelaNative', () => App)
To use the same styles we used for the button in our web app, the usage is pretty similar. The only difference is that the styles are appended to the React Native style tag of the button component rather than the className.
// mobile_app/components/App.js
import { buttonStyles } from '../../shared'
import { Button } from 'react-native'
import { useFela } from 'react-fela'

function Button({ children, size = 16 }) {
    const { style } = useFela({ size })

    return <Button style={style(buttonStyles)}>{children}</button>
}
This will make the same style definition reflect not only the styles for the web button but also for the React Native mobile button. This is just a simple example, but when it comes to complex style definitions from a design system that can be shared across platforms and provide a consistent brand look and feel, Fela is powerful.
The way we write applications has changed, thanks to how different devices display content. Now, the need to write applications for different platforms has become even more important.
Fortunately, technology has also adapted so that we don’t have to develop every application from scratch for every platform. Using Fela to create styles across multiple platforms saves time, prevents bugs, and provides consistent branding.
Even though Fella has some small caveats, I’m a big fan of the library. Let me know what you think in the comments below!

LogRocket's Galileo AI watches sessions for you and and surfaces the technical and usability issues holding back your React Native apps.
LogRocket also helps you increase conversion rates and product usage by showing you exactly how users are interacting with your app. LogRocket's product analytics features surface the reasons why users don't complete a particular flow or don't adopt a new feature.
Start proactively monitoring your React Native apps — try LogRocket for free.
Hey there, want to help make our blog better?
Join LogRocket’s Content Advisory Board. You’ll help inform the type of content we create and get access to exclusive meetups, social accreditation, and swag.
Sign up now
Not sure if low-code is right for your next project? This guide breaks down when to use it, when to avoid it, and how to make the right call.

Compare Firebase Studio, Lovable, and Replit for AI-powered app building. Find the best tool for your project needs.

Discover how to use Gemini CLI, Google’s new open-source AI agent that brings Gemini directly to your terminal.

This article explores several proven patterns for writing safer, cleaner, and more readable code in React and TypeScript.