
A simple alert prompt or card is displayed when a newer app version is available in the Google Play Store or Apple App Store. Most users take advantage of this auto-upgrade feature to avoid having to update each app individually on their phones.
However, there are times when an app needs to be updated more quickly than usual, and the user must be notified directly rather than relying on a store alert. This direct notification is also helpful for reaching people who are not subscribed to auto updates.
This issue is especially important if you’re following a release early, release often philosophy; frequently adding new content and features to your app, and releasing new versions at a pretty high cadence.
Having multiple versions of your app out there can cause version fragmentation issues, which is an enormous problem for app development. Fortunately, there’s a great Flutter plugin that helps you alert users and prompt them to update their app to the newest version: upgrader.
In this tutorial, we’ll discuss how upgrader works and we’ll demonstrate different strategies that can be used to handle app version upgrades.
Jump ahead:
upgrader worksThe Replay is a weekly newsletter for dev and engineering leaders.
Delivered once a week, it's your curated guide to the most important conversations around frontend dev, emerging AI tools, and the state of modern software.
To follow along with this guide, you should have the following:
The tutorial portion of this article will use the Days Without Incidents (DWI) app to demonstrate concepts. DWI is a simple incident counter app that supports multiple counters, styles, and a simple user interface.
To follow along, download the open source code available via GitHub and ensure you are using Flutter v3.0+.
Open the project with your preferred IDE, and remember to get the dependencies with flutter pub get.
Here’s a quick rundown of some important files you should be aware of:
lib/main.dart: Standard main file required for Flutter projectslib/core: Core widgets and utilities shared between two or more featureslib/features: Uses feature grouping to abstract different parts of the UIpackages: Contains the data and domain layersTo better understand the essentials, you can also check out this GitHub pull request. It has all the changes required to handle app updates and version restrictions on your own.
upgrader worksAs mentioned previously, version fragmentation will occur when there are too many versions of an app in the market. Each version could have different features, device support, screen support, and even API versions. Your infrastructure and services will need to support all these variations, resulting in more expensive business operations.
So, what’s the solution?
There are three things you can do to reduce the impact of version fragmentation:
Guide the user through updates if their app is not running the latest version
This is where upgrader comes in handy; it helps you put in place all those mechanisms in your app without too much overhead.
upgrader is a Flutter plugin that helps manage the user’s installed version of your app. It allows you to check if the user has the latest version installed and if they do not, it guides the user to install it via an app store with a dialog or widget.
The plugin can also enforce a minimum app version and offers inbuilt support RSS feeds with the Appcast standard used by Sparkle (we’ll discuss this further later in this article).
Enough chit-chat; it’s time you dive into some code!
One of the most common use cases for upgrader is to display a dialog box when the currently installed app is outdated compared to the store listing.
To try this out, open the lib/features/time_counter/pages/counter_page.dart file and change the CountersPage build to the following:
@override
Widget build(BuildContext context) {
  return Scaffold(
    appBar: const DWIAppBar(),
    body: UpgradeAlert(
      child: const SafeArea(
        child: _Body(),
      ),
    ),
  );
}
UpgradeAlert can wrap a widget, allowing you to place it as a wrapper of the body property and not have to worry about manual checks to the version.
N.B., remember to add this import at the top of the file: import 'package:upgrader/upgrader.dart';
If you build and run the app right now, you’ll see the following:
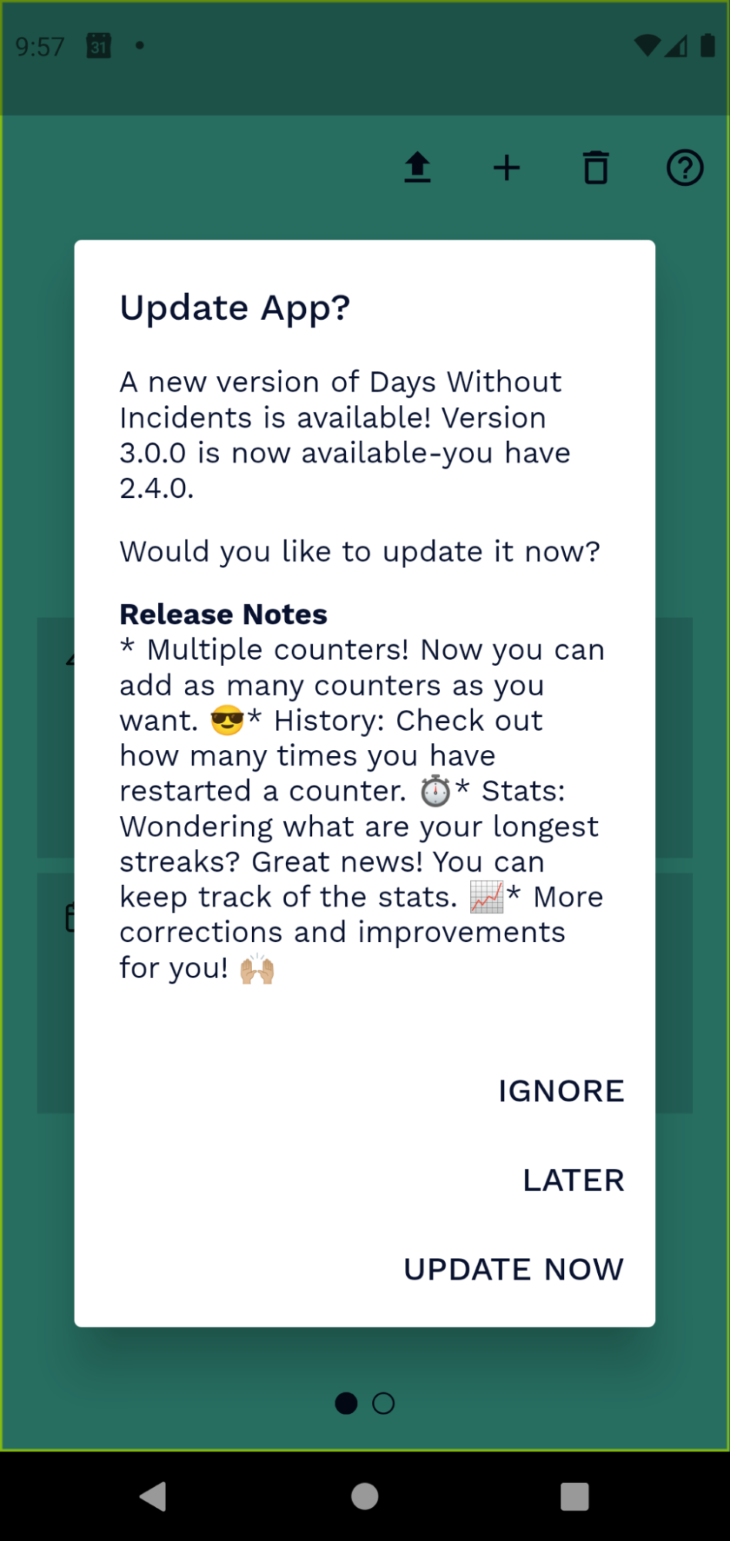
The plugin offers limited style customization for the dialog box. The dialogStyle property in Upgrader has two different options: UpgradeDialogStyle.cupertino and the default UpgradeDialogStyle.material.
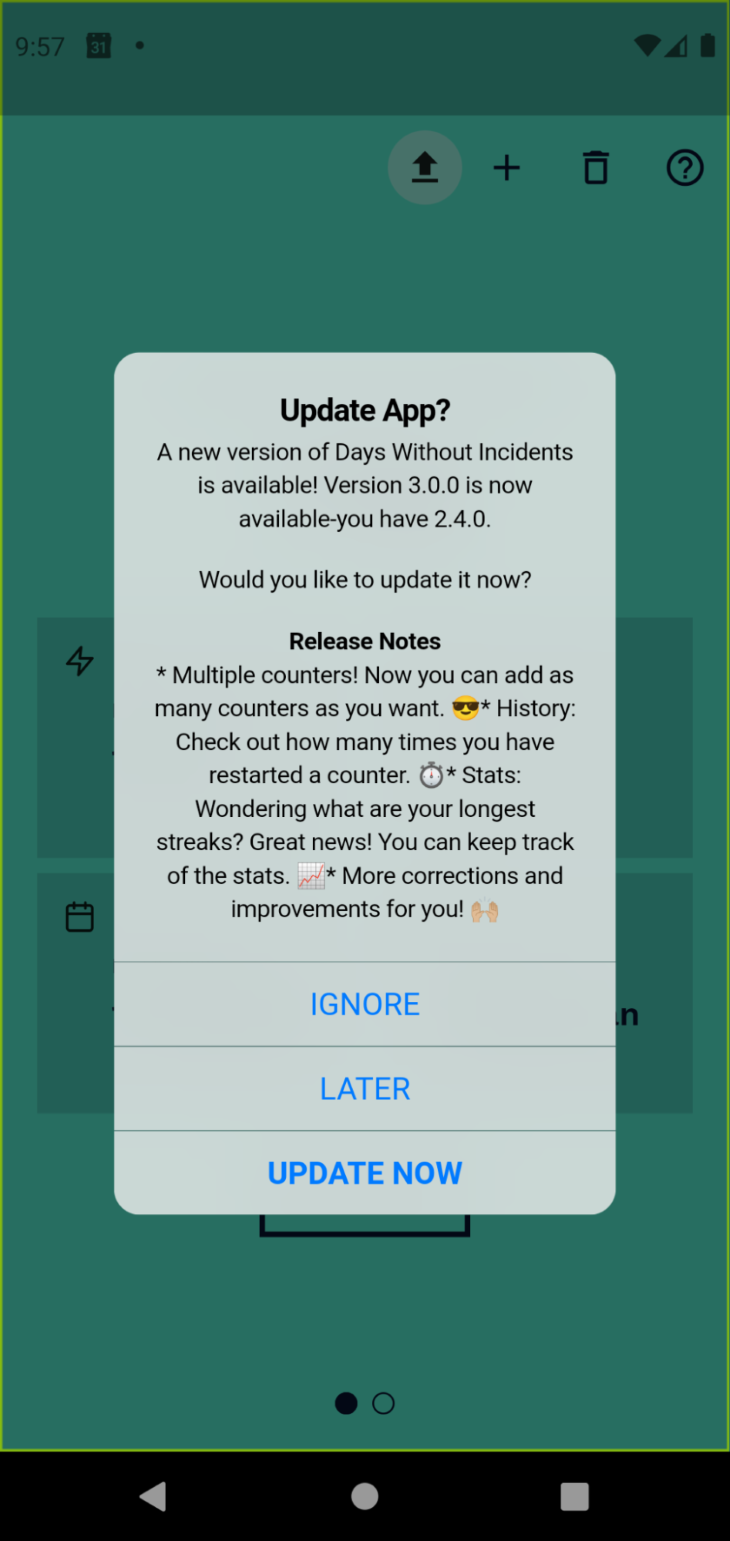
Change the build again and change the style to be cupertino, like so:
@override
Widget build(BuildContext context) {
  return Scaffold(
    appBar: const DWIAppBar(),
    body: UpgradeAlert(
      upgrader: Upgrader(dialogStyle: UpgradeDialogStyle.cupertino),
      child: const SafeArea(
        child: _Body(),
      ),
    ),
  );
}
Now, build and run the app. It should look something like this:
Next, go ahead and leave the build as it was in the beginning:
@override
Widget build(BuildContext context) {
  return const Scaffold(
    appBar: DWIAppBar(),
    body: SafeArea(
      child: _Body(),
    ),
  );
}
Another common scenario is having an indicator in the UI to display that the installed version of the app is not up to date. Again, the plugin has a really good implementation for this via UpgradeCard.
Let’s add UpgradeCard and see how it looks. Open the lib/features/time_counter/widgets/counter_list.dart file and add the following code above Expanded so that it is displayed at the top of the screen:
UpgradeCard(),
If you build and run the app, this is how it should look:
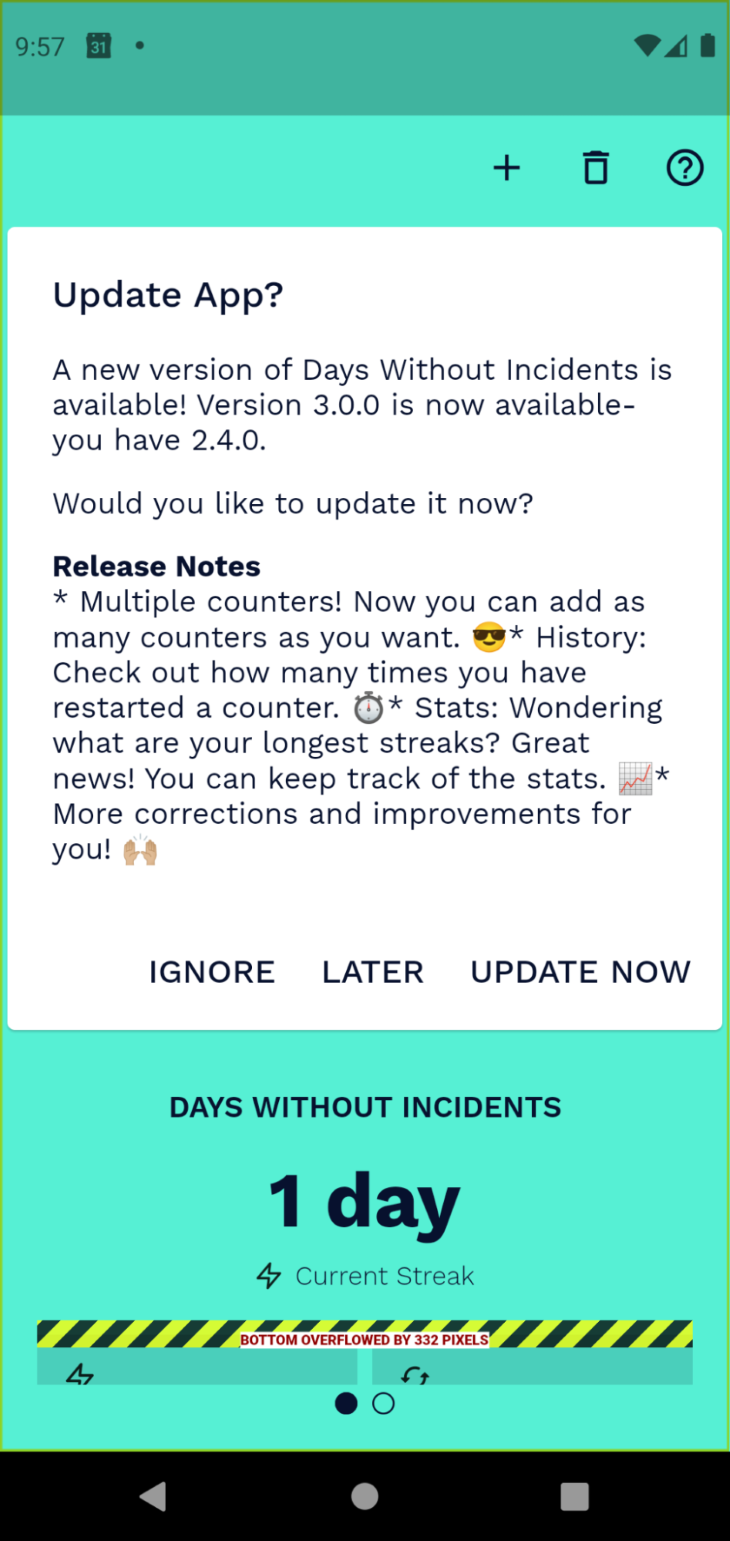
As you can see, UpgradeCard displays a card styled with Material Design, it uses the same content as UpgradeAlert but shows it inline instead of with a dialog box. Since the card does not look great, in this case, go ahead and delete the code you just added (delete line 81). We’ll consider some other options instead.
Now, sometimes those two inbuilt behaviors (UpgradeAlert and UpgradeCard) are not enough in terms of user experience. For example, you may want to show an IconButton when there’s an update available for the app.
Let’s give this example a try.
You’ll need to create a new widget that will work like UpgradeAlert and UpgradeCard. In fact, if you take a closer look at the library’s code, you’ll notice that both extend UpgradeBase which will make things a bit easier.
Start by creating a lib/core/widgets/upgrade_widget.dart file and add the following code:
import 'dart:developer';

import 'package:flutter/material.dart';
import 'package:upgrader/upgrader.dart';

/// Defines a builder function that allows you to create a custom widget
/// that is displayed in a similar fashion as [UpgradeCard]
typedef UpgradeWidgetBuilder = Widget Function(
  BuildContext context,
  Upgrader upgrader,
);

/// A widget to display by checking upgrader info available.
class UpgradeWidget extends UpgradeBase {
  /// Creates a new [UpgradeWidget].
  UpgradeWidget({
    Key? key,
    Upgrader? upgrader,
    required this.builder,
  }) : super(upgrader ?? Upgrader.sharedInstance as Upgrader, key: key);

  /// Defines how the widget will be built. Allows the implementation of custom
  /// widgets.
  final UpgradeWidgetBuilder builder;

  /// Describes the part of the user interface represented by this widget.
  @override
  Widget build(BuildContext context, UpgradeBaseState state) {
    if (upgrader.debugLogging) {
      log('UpgradeWidget: build UpgradeWidget');
    }

    return FutureBuilder(
      future: state.initialized,
      builder: (BuildContext context, AsyncSnapshot<bool> processed) {
        if (processed.connectionState == ConnectionState.done &&
            processed.data != null &&
            processed.data!) {
          if (upgrader.shouldDisplayUpgrade()) {
            if (upgrader.debugLogging) {
              log('UpgradeWidget: will call builder');
            }
            return builder.call(context, upgrader);
          }
        }

        return const SizedBox.shrink();
      },
    );
  }
}
Here’s a quick overview of the code we just added:
In the above code, UpgradeWidget is a wrapper widget that implements the same basic behavior that UpgradeCard and UpgradeAlert share. It extends UpgradeBase and does basic checks when the customized build is executed. It will allow you to wrap any widget and display information about updating the app if needed.
UpgradeWidget receives an optional Upgrader implementation but also has the default implementation, so both the UpgradeCard and UpgradeAlert work. Making the custom widget use the same principles allows you to keep interoperability between your custom widget and the library’s API.
UpgradeWidgetBuilder is an alias for the builder function used to render the content widget. It has Upgrader as a parameter because that will provide access to the information required for building a custom widget. We’ll discuss this in more detail a little later in this article.
Now that you’ve set up a reusable UpgradeWidget, open the lib/core/widgets/dwi_appbar.dart file and copy this code at the bottom of the file:
class _UpdateButton extends StatelessWidget {
  const _UpdateButton({
    Key? key,
  }) : super(key: key);

  @override
  Widget build(BuildContext context) {
    return UpgradeWidget(
      upgrader: Upgrader(
        //! This is a bit of a hack to allow the alert dialog to be shown
        //! repeatedly.
        durationUntilAlertAgain: const Duration(milliseconds: 500),
        showReleaseNotes: false,
        showIgnore: false,
      ),
      builder: (context, upgrader) => CircleAvatar(
        child: IconButton(
          onPressed: () {
            upgrader.checkVersion(context: context);
          },
          icon: const Icon(Icons.upload),
        ),
      ),
    );
  }
}
_UpdateButton is a convenient, private widget that allows us to set the behavior for our custom UpgradeWidget. In this case, the idea is to showcase the upgrader alert dialog when the IconButton is tapped. This can be accomplished by calling checkVersion and passing the context as a parameter; the plugin will take over when the function is called and a new UpgradeAlert should be displayed.
For better readability, the showReleaseNotes and showIgnore flags are set to false since both elements take up too much space in the UI. Also, DWI app users are familiar with simple user experience, so you can skip showing these for now.
One last caveat is that whenever the user taps Later in UpgradeAlert, the library stores a timestamp to avoid showing the dialog box too often or at undesired times. It will only reshow the dialog box once some time has passed (the default is three days).
You’ll need to bypass this feature for the DWI app and show the dialog box every time the user taps on the update IconButton. To accomplish this, we’ll override the default durationUntilAlertAgain with a Duration of 500ms. This way, the library will mark the dialog box as ready as it’s closed by the user.
N.B., this is a somewhat hacky solution, because it wouldn’t be needed if the library trusted us to display the alert dialog at any point we desired. Unfortunately, at the time of writing, upgrader does not offer inbuilt support for this kind of behavior.
Now, let’s add _UpdateButton(), to actions just above _AddCounterButton. Also, make sure you add the corresponding imports for the library at the top of the file:
import 'package:dwi/core/widgets/widgets.dart';
import 'package:upgrader/upgrader.dart';
After you build and run, you should see the following:
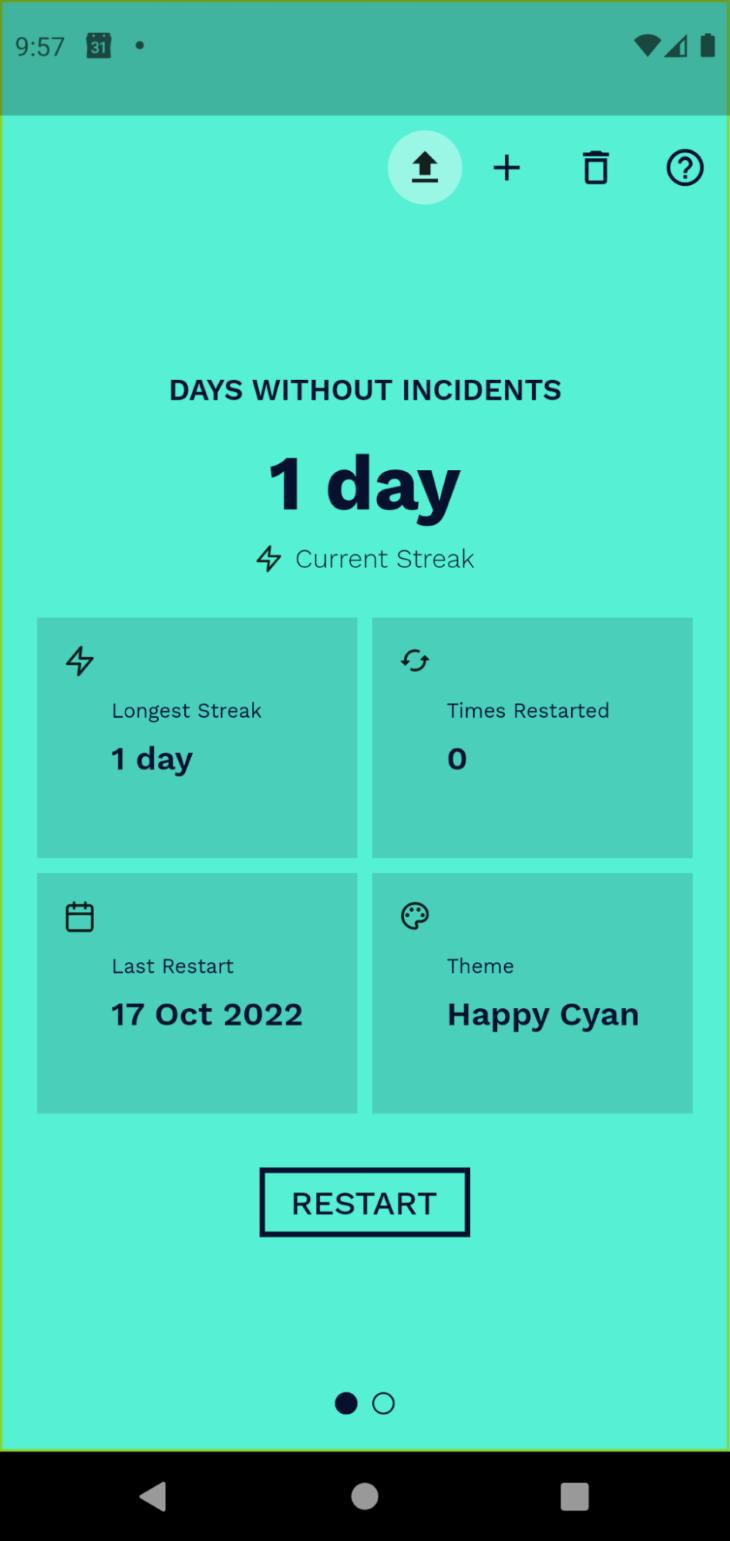
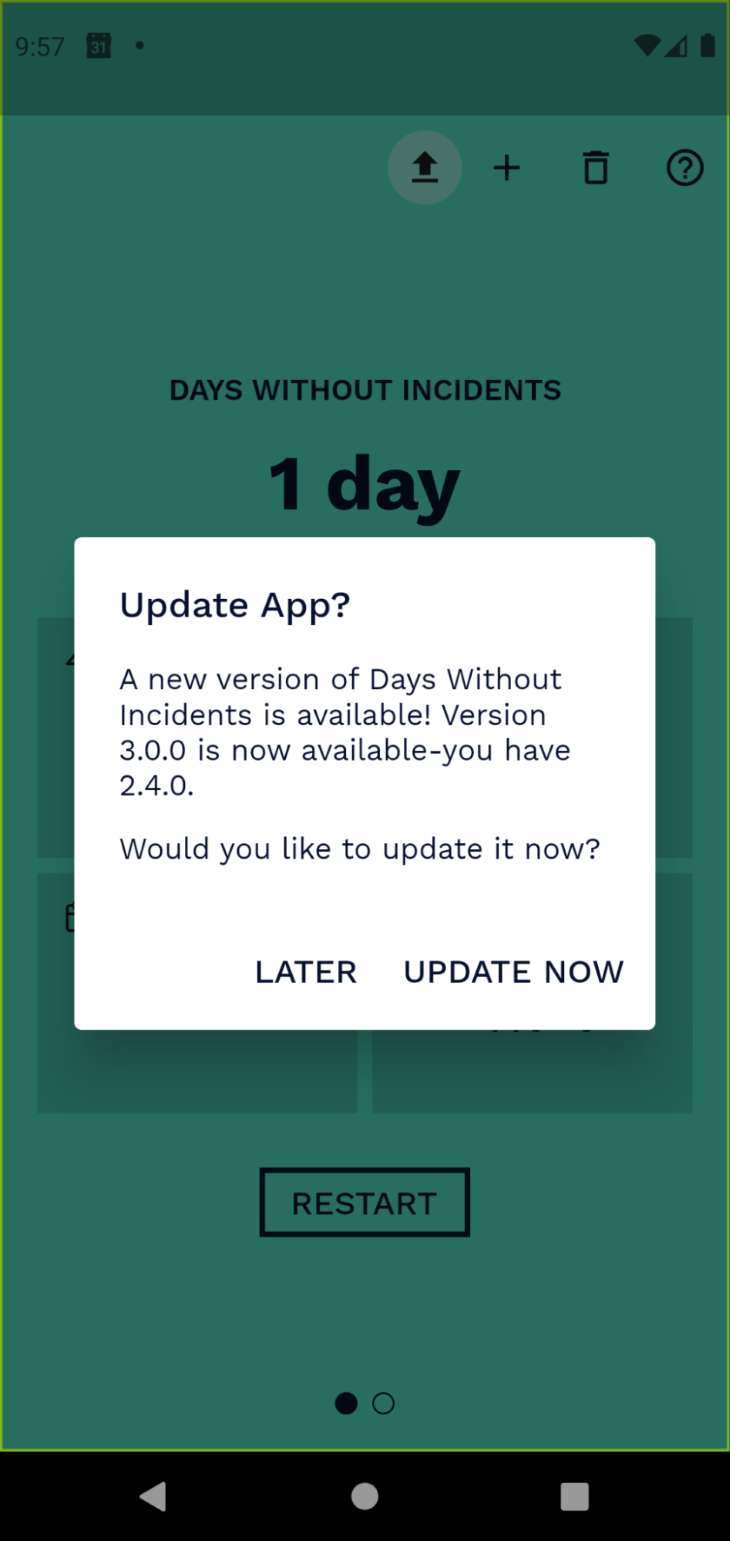
Another great feature of upgrader is its ability to enforce a minimum app version simply by adding predefined text to the description in the app stores or by defining a minimum app version inside Upgrader, like so:
Upgrader(
  minAppVersion: '3.0.0',
),
If you’re looking to use app store descriptions, keep the following formats in mind:
[Minimum supported app version: 1.2.3][:mav: 1.2.3]Using the above text format will define the minimum app version as 1.2.3. This means that earlier versions of this app will be forced to update to the latest version available.
An important limit of upgrader is that its default behavior leverages the current Apple App Store and Google Play Store listings of your app, meaning:
upgrader‘s default behavior will stop working
If your app is not distributed via public stores, upgrader will not work as intended out of the box
You are not in control of the list of versions that you support and there’s no history about them
To solve this, upgrader offers support for working with Appcast, which is based on the Sparkle framework by Andy Matuschak. Sparkle is a widely used standard that lists all the versions of an app with an XML format. The Appcast feed describes each version of an app and provides upgrader with the most recent version.
Here’s an example from the Sparkle documentation showing how an Appcast file could look:
<rss xmlns:sparkle="http://www.andymatuschak.org/xml-namespaces/sparkle" xmlns:dc="http://purl.org/dc/elements/1.1/" version="2.0">
  <channel>
    <title>Sparkle Test App Changelog</title>
    <link>http://sparkle-project.org/files/sparkletestcast.xml</link>
    <description>Most recent changes with links to updates.</description>
    <language>en</language>
    <item>
      <title>Version 2.0</title>
      <link>https://sparkle-project.org</link>
      <sparkle:version>2.0</sparkle:version>
      <description>
      <![CDATA[ <ul> <li>Lorem ipsum dolor sit amet, consectetur adipiscing elit.</li> <li>Suspendisse sed felis ac ante ultrices rhoncus. Etiam quis elit vel nibh placerat facilisis in id leo.</li> <li>Vestibulum nec tortor odio, nec malesuada libero. Cras vel convallis nunc.</li> <li>Suspendisse tristique massa eget velit consequat tincidunt. Praesent sodales hendrerit pretium.</li> </ul> ]]>
      </description>
      <pubDate>Sat, 26 Jul 2014 15:20:11 +0000</pubDate>
      <enclosure url="https://sparkle-project.org/files/Sparkle%20Test%20App.zip" length="107758" type="application/octet-stream" sparkle:edSignature="7cLALFUHSwvEJWSkV8aMreoBe4fhRa4FncC5NoThKxwThL6FDR7hTiPJh1fo2uagnPogisnQsgFgq6mGkt2RBw=="/>
    </item>
  </channel>
</rss>
This file should be hosted on a server accessible to anyone who uses the app. It also can be auto generated during the release process, or you can manually update it after a release is available in the app stores.
Using upgrader with an Appcast is relatively simple as well. Here’s an example from the library’s documentation:
import 'package:flutter/material.dart';
import 'package:upgrader/upgrader.dart';

void main() => runApp(const MyApp());

class MyApp extends StatelessWidget {
  const MyApp({
    Key key,
  }) : super(key: key);

  @override
  Widget build(BuildContext context) {
    final appcastURL =
        'https://raw.githubusercontent.com/larryaasen/upgrader/master/test/testappcast.xml';
    final appcastConfig = AppcastConfiguration(url: appcastURL, supportedOS: ['android', 'ios']);

    return MaterialApp(
      title: 'Upgrader Example',
      home: Scaffold(
          appBar: AppBar(
            title: Text('Upgrader Example'),
          ),
          body: UpgradeAlert(
            Upgrader(appcastConfig: appcastConfig),
            child: Center(child: Text('Checking...')),
          )),
    );
  }
}
Great work! Now you know exactly how to keep users running the latest version of your app and you’re also aware of the main “gotchas” that you might find along the way.
In this article, we reviewed different strategies for handling Flutter app updates using upgrader. You can view a complete list of all the changes needed in this PR of Days Without Incidents.
I hope you enjoyed this tutorial. If you found it useful, please consider sharing it with others. I’ll be happy to address any questions left in the comments section below.
Install LogRocket via npm or script tag. LogRocket.init() must be called client-side, not
server-side
$ npm i --save logrocket

// Code:

import LogRocket from 'logrocket';
LogRocket.init('app/id');
// Add to your HTML:

<script src="https://cdn.lr-ingest.com/LogRocket.min.js"></script>
<script>window.LogRocket && window.LogRocket.init('app/id');</script>

@container scroll-state: Replace JS scroll listeners nowCSS @container scroll-state lets you build sticky headers, snapping carousels, and scroll indicators without JavaScript. Here’s how to replace scroll listeners with clean, declarative state queries.

Explore 10 Web APIs that replace common JavaScript libraries and reduce npm dependencies, bundle size, and performance overhead.

Russ Miles, a software development expert and educator, joins the show to unpack why “developer productivity” platforms so often disappoint.

Discover what’s new in The Replay, LogRocket’s newsletter for dev and engineering leaders, in the February 18th issue.
Hey there, want to help make our blog better?
Join LogRocket’s Content Advisory Board. You’ll help inform the type of content we create and get access to exclusive meetups, social accreditation, and swag.
Sign up now
2 Replies to "Facilitate app updates with Flutter upgrader"
Thanks for the post Alejandro! I have a question… How do you test that the dialog appears? I want to implement this but when I run the app, the dialog does not appear even if i lower the version of the app in my build.gradle… the app is already on the store so it should be checking for it
Hey, sorry for the delayed reply. I wrote one earlier but it seems I never clicked send (:sad-panda:).
There are ways for you to always show the dialog while testing:
– If you are looking to check how it looks but it only shows once then you will need to enable `debugDisplayAlways` in `Upgrader`. This will force the dialog/card to be shown always while debugging.
– If you are looking to test whether it should be shown but it only displays once (and you would like to keep `debugDisplayAlways` as `false`) then you might need to tweak `durationUntilAlertAgain` to match your needs. It defines the amount of time that the app should wait until showing the alert again and it defaults to 3 days.
– If none of the previous information helps, you could try to enable `debugLogging` (defaults to `false`) and debug your issues too. I had some instances in which the version pulled was correct but the one locally was not matching properly so that’s something that will help you make sure your settings are correct.
Now, if none of this suggestions help, I’m willing to setup a call or something to review if that’s good with you. You can drop a line to [email protected]
Happy coding!