The Replay is a weekly newsletter for dev and engineering leaders.
Delivered once a week, it's your curated guide to the most important conversations around frontend dev, emerging AI tools, and the state of modern software.
Welcome to the world of building with the Jamstack. Originally denoting JavaScript, APIs, and markup, the Jamstack architecture enables a faster, more secure, and scalable web. Jamstack applications are very fast because they are pre-rendered, which means all the frontend components and assets are pre-built into highly optimized static pages.

With this setup, sites can now be served via a global CDN. Jamstack apps also support a clean and minimal architecture, eliminating unneeded resource allocation since the entire frontend is isolated from the build process. This, of course, comes with many benefits, least of all cost savings on infrastructure and maintenance.
Elder.js, one among many static site generators for Jamstack sites, provides a better solution for complex, data-intensive websites for which SEO is of particular importance. From its website, Elder.js solves the problem of building highly complex, SEO-oriented sites with anywhere from 10 to 100K pages.
Built on top of Jamstack technologies, Elder.js was born of the need for a more viable solution to building complex, data-oriented, search-optimized apps. The creator of the framework felt the need for a standard way to build static sites of all sizes, without having to bother with the number of pages or amount of data involved.
Elder.js is based on the Svelte template. Svelte is a JavaScript web framework with a whole new approach to building UIs; templates are built on top of HTML with a data layer. In turn, Svelte converts application code into JavaScript at build/compile time.
According to the author, the scope of Elder.js is limited to building a pluggable static site generator/server-side rendered framework for Svelte with SEO as a major priority. Elder basks in the numerous benefits of this framework and comes with some other impressive features, including:
Before we begin exploring Elder.js, readers should be quite familiar with Svelte and how to build minimal applications with this web framework. Also, while it would be a big plus to know a little bit of building static sites or working with the Jamstack in general, this title covers these concepts and ideas, and are therefore not absolutely necessary for readers to know.
To get started with Elder.js, we can make use of degit, which allows for quick scaffolding of Git-based projects by making copies of Git repositories. You might be wondering why we’re not using the native git clone functionality. Well, degit fetches only the relevant parts from a Git repo by downloading only the latest commit instead of the entire Git history.
The easiest way to get started with Elder.js is by cloning the template from the GitHub repo (as Elder.js expects a specific file structure) using degit, as discussed above. We can do so by running:
npx degit Elderjs/template elderjs-app
The result of running the above command is shown below:
npx: installed 1 in 9.946s
> cloned Elderjs/template#master to elderjs-app
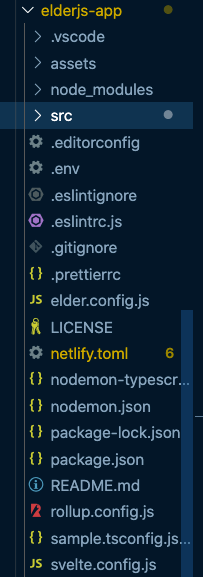
As we can see from the output above, the command first installs npx, then clones the Elder.js template master branch from GitHub. Now we can simply navigate into the elderjs-app directory, install the dependencies using npm or yarn, and then start the app. The folder structure should look like this:
In order to start the dev server, we can run npm start, which runs npm run build:rollup && npm run dev:server. Note that npm run dev:rollup rebuilds the Svelte components when we make a change.
Note: We can run
npm run build, which runs this command:node ./src/cleanPublic.js && npm run build:rollup && npm run build:html. This basically cleans thepublic dirand builds the components for serving. For more details, check the script section of the template’spackage.jsonfile.
Now let’s explore the Elder.js template. To view the template running, we can navigate to localhost:3000 in our browser after running the npm start command. To see a sample blog site, we can navigate to http://localhost:3000/how-to-build-a-blog-with-elderjs/.
Now let’s explore the blog section of the template to understand how it works. First, navigate to the routes/blog folder. There, we will see the routes.js file, the contents of which are shown below:
module.exports = {
  data: {},
  all: () => [],
  permalink: ({ request }) => `/${request.slug}/`,
};
As we can see above, we are exporting the data, all, and permalink functions. The data function passes data as a prop to the Svelte template. The all function returns an array of all possible request objects for this particular route.
Lastly, the permalink function transforms the request object returned from the all function to their respective relative urls. This is indeed where the magic happens. More details will be discussed on the Elder.js routing section later on.
The data and the all functions for the blog route are populated from a Markdown plugin defined in the /plugins/packages/markdown/index.js file in our template’s GitHub repository. So in our code, we can use the plugin by running npm install --save @elderjs/plugin-markdown. There is no need to do that in this case, however, since the plugin is bundled with the template.
To understand how the the plugin is configured, let’s take a look at the elder.config.js file in the root dir. Here’s the part we are interested in:
plugins: {
    '@elderjs/plugin-markdown': {
    routes: ['blog'],
},
From the above configuration, we can see that we are making use of the Markdown plugin to determine what route to control. In this case, we want to make use of the blog route. This plugin reads and collects Markdown content/files from the specified route/blog folder and automatically adds the found and parsed Markdown files as requests to the allRequests hook.
The plugin uses the allRequests hook to register processed Markdown files and their slugs in Elder.js. What we mean here is that the allRequests hook adds the collected files to the allRequests array using the front matter or the filename as the slug.
Before that, however, the bootstrap hook adds the parsed Markdown content/data to the data function. This will then be available in the Blog.svelte template file as the data prop. Let’s explore below:
<script>
export let data;
// destructure data prop
const { html, frontmatter } = data;
</script>
<style>
</style>
<svelte:head>
<title>{frontmatter.title}</title>
</svelte:head>
<a href="/">← Home</a>
<div class="title">
<h1>{frontmatter.title}</h1>
{#if frontmatter.author}<small>By {frontmatter.author}</small>{/if}
</div>
{#if html}
{@html html}
{:else}
<h1>Oops!! Markdown not found!</h1>
{/if}
In the Blog.svelte file above, the data prop is being populated from the elderjs-plugin-markdown file, as we discussed earlier. In the next line, we are destructuring the data object into the html and frontmatter objects, which we then use to populate the UI. The if statement checks whether there is an html object from the data prop and renders it; if not, an error is displayed.
Further, we can visit the parent route dir, which is the homepage, located in the routes/home folder. In it, we will find two files: route.js and Home.svelte. As usual, the route.js file contains the all, permalink, and data functions, which we’ve already covered.
Note: The
all()query returns an object that represents the parameters required to generate a specific page on a specific route — in this case, thehomeroute.
Looking at the script section of the Home.svelte file, we can see where the imports of all the components on the homepage are happening:
<script>
  import BlogTeaser from '../../components/BlogTeaser.svelte';
  export let data, helpers;
  // add permalinks to the hook list so we can link to the posts.
  const hooks = data.hookInterface.map((hook) => ({ ...hook, link: helpers.permalinks.hooks({ slug: hook.hook }) }));
</script>
Specifically, on line 2, we can see the import of the BlogTeaser component from the '../../components/BlogTeaser.svelte path. As usual, we are passing the data prop and the helpers prop (an object of helpers available in the data function and all hooks) from the route file to the homepage file on the next line.
Also, on the Home.svelte component, we are doing a loop for each blog post from the parsed Markdown file already available in the data prop. We pass the blog and helpers data as props to the imported BlogTeaser component to be rendered, as shown below:
<div class="blog">
  <div class="entries">
    {#each data.markdown.blog as blog}
      <BlogTeaser {blog} {helpers} />
    {/each}
  </div>
</div>
Finally, on the src/components path in the template, we have the BlogTeaser.svelte component, which now has access to the blog and helpers passed as props from the Home.svelte component above. Here it is:
<script>
  export let blog;
  export let helpers;
</script>

<div class="entry">
  <a href={helpers.permalinks.blog({ slug: blog.slug })}>{blog.frontmatter.title}</a>
  <p>{blog.frontmatter.excerpt}</p>
</div>
As we can see from the above script tag, we have access to the blog and helpers objects passed as props from the homepage earlier. On line 6, helpers.permalinks.blog({ slug: blog.slug })} is one of the Elder.js default helpers, which is a permalink resolver. This allows us to simply pass in a request object and resolve the permalink. The general structure is shown below:
helpers.permalink\[routeName\]({requestObject})
The approach to routing in Elder.js — though dissimilar to the parameter-based routing found in other popular frameworks — offers several advantages. This is because we have full control over the URL structure we want. Additionally, we do not have to crawl all the links of a site to know what pages need to be generated.
Routes in Elder.js are made up of two files that live in the src/routes directory. For example, when we navigate into the Hooks folder in the template, we will find Hooks.svelte (a Svelte component used as a template) and a route.js file (for defining route details such as the permalink, all, and data functions).
Note: Svelte templates are defined for each route and are only rendered on the server. This is because they receive sensitive props containing database credentials, env variables, etc. that may contain data we don’t want in our HTML.
The permalink, all, and the data functions have been previously discussed, as has a typical route.js file. A link to the spec for these functions are available in the Elder.js documentation.
For performance reasons, we must include all the details required to query our database, APIs, or other data sources on the request object and not store large data. Additionally if we intend to fetch, prepare, or process data, we should handle that in the data function, as this returns all the data required by a page.
Furthermore, if we intend to use some piece of data in multiple routes, we can share that data by populating the data object on the bootstrap hook. This is because data defined at this stage of the page generation process is available on all routes.
Want to customize the core page generation process in Elder.js apps? Well, hooks for the win! The interesting thing about hooks is that they can be bundled and shared as plugins for most use cases.
According to the author, “The goal of Elder.js’ hook implementation is that any changes that can’t go in the route.js file can instead be placed in a single hooks.js file where anyone can go to find any hidden details, thereby allowing users have complete control over the Elder.js page generation process.”
The Elder.js hook system is based on a hookInterface. This interface defines what each hook can do and the properties they have.
Each hook defines which props are available to a function registered on a hook, along with the props that are mutable or can be changed by that function. This, in essence, defines a contract that the hook interface implements.
Note: Hooks are present at every major step of the page generation process, from system bootstrap (i.e., the
bootstraphook) to writing HTML to thepublicfolder (i.e., therequestCompletehook).
Notable hooks include bootstrap (executed after Elder.js has bootstrapped itself and users can run arbitrary functions), request, requestComplete, data, and others. For a full overview of the hooks available, reference the hookInterface.ts file. Details such as where and how to organize hooks, as well as the full list of available hooks, can be found in the documentation.
According to the official guide, plugins are a group of hooks and/or routes that can be used to add extra functionality to an Elder.js site — for example, a plugin that uploads files to an s3 bucket. Between hooks invocations, plugins can store data since data added in any hook or in the init function will be persisted for the entire lifecycle.
Note: To use a plugin, it must be registered in the
elder.config.jsfile and can be loaded from the entry point of an npm package:./node_modules/${pluginName}/.
For a list of official plugins, check this section of the documentation. Also, to write your own plugin, you can clone the Elder.js plugin template. We can make use of degit to clone it locally by running:
npx degit Elderjs/plugin-template elderjs-plugin
To see the structure of a sample plugin, you can check here.
Note: The
init()function is a sync function that handles the plugin initialization. It receives the plugin definition, including the Elder.js and plugin config.
The Jamstack offers a novel way to develop, deploy, and power web applications. By nature, these sites are pre-built and highly optimized before being served. It offers a new approach that doesn’t require traditional frontend infrastructure; instead, HTML is pre-rendered into static files.
To quickly get going with building elegant and heavily data-intensive static sites with a special focus on SEO — from 10 to 100K pages — Elder.js should be at the forefront of your mind. To learn more about this web framework, have a look at the source code on Github.
To really wrap your head around the entire data flow for an Elder.js application, check this section of the documentation. The docs will also be helpful to learn other topics not covered here, including common specifications and config requirements, partial hydration, shortcode, and others.
There’s no doubt that frontends are getting more complex. As you add new JavaScript libraries and other dependencies to your app, you’ll need more visibility to ensure your users don’t run into unknown issues.
LogRocket is a frontend application monitoring solution that lets you replay JavaScript errors as if they happened in your own browser so you can react to bugs more effectively.

LogRocket works perfectly with any app, regardless of framework, and has plugins to log additional context from Redux, Vuex, and @ngrx/store. Instead of guessing why problems happen, you can aggregate and report on what state your application was in when an issue occurred. LogRocket also monitors your app’s performance, reporting metrics like client CPU load, client memory usage, and more.
Build confidently — start monitoring for free.

Learn how to use Gemini CLI subagents to delegate frontend, backend, testing, and docs tasks to specialized agents with guardrails and clear ownership.

Learn how next-browser gives AI agents runtime context for debugging Next.js apps, including React props, hydration, PPR, forms, and performance.

Build dynamic LLM routing in Next.js with OpenRouter, TanStack AI, task classification, model fallbacks, and cost-aware routing.

TSRX adds first-class control flow, conditional hooks, and scoped styles to React via a TypeScript compiler extension — no new framework required.
Would you be interested in joining LogRocket's developer community?
Join LogRocket’s Content Advisory Board. You’ll help inform the type of content we create and get access to exclusive meetups, social accreditation, and swag.
Sign up now

