Editor’s note: This type safety article was last updated on 29 August 2023.
Maintaining consistent types throughout a project can be challenging. Without proper tooling, altering types in one section might disrupt the entire app. To enhance the developer experience and minimize errors, it’s crucial to use consistent typings across the stack.
In this tutorial, we’ll explore end-to-end type safety by building a simple wishlist application that allows users to bookmark items from the internet. We’ll build our type-safe, full-stack application using Next.js, GraphQL, and Prisma.
Jump ahead:
To follow along with this tutorial, you’ll need the following:
We’ll use the following stack and tools:
You can view the final code on for this tutorial on GitHub.
In modern web development, the tools you choose shape the experience for both developers and users. We’ve intentionally selected Next.js, Prisma, and GraphQL for specific reasons.
Next.js is a versatile React framework designed to simplify development while also enhancing applications with powerful features. One of its strengths is enabling server-side rendering (SSR) and static site generation (SSG), ensuring that webpages load rapidly and achieve high SEO scores. Next.js also provides the freedom to create API routes directly within the app, removing the need to manage a separate backend server. Notably, Next.js is also pre-configured for TypeScript, facilitating the creation of type-safe code without any added stress.
Prisma serves as an advanced ORM (Object-Relational Mapping) tool, enhancing and streamlining database management. It stands out with its type-safe query builder, ensuring that interactions with the database remain safe and predictable. For those who find altering their database difficult, Prisma offers Prisma Migrate, which maintains all schema changes in a tidy and manageable fashion. Additionally, Prisma offers Prisma Studio, a tool that makes routine database tasks more user-friendly and enjoyable.
GraphQL is a contemporary query language and runtime that has transformed how we approach APIs. Unlike traditional systems, GraphQL allows users to specify exactly the data they need, ensuring that data is neither over-fetched nor under-fetched. GraphQL relies on strongly-typed schemas, providing a clear structure for the data that can be queried and manipulated. A defining feature is its consolidation of operations under a single endpoint, eliminating the need to manage multiple endpoints as was previously common.
To get started with our Next.js app, navigate to your working directory and initialize Next.js by running the following command:
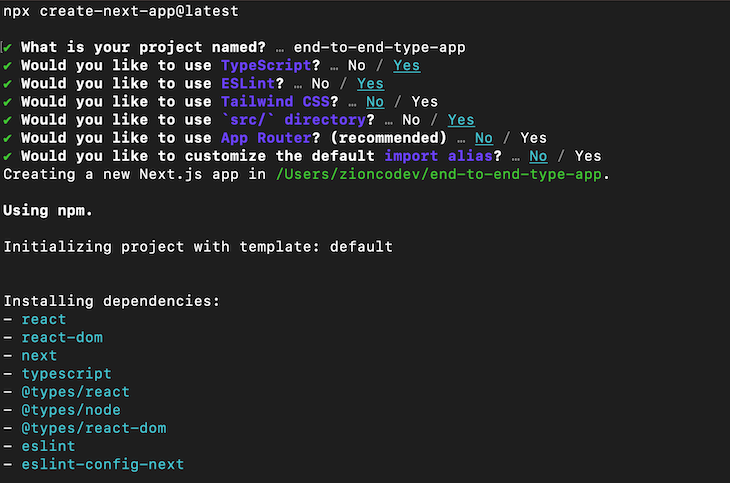
npx create-next-app@latest
This command will prompt you to select how you want your project to be configured. Ensure your selections match the image below:
Now, open the new app on the editor of your choice. If you’re using VS Code, you can open the app from the terminal using the code . shorthand:
cd myapp
code .  #for vs-code users
To install development dependencies, run the following command:
npm install -D prisma @genql/cli ts-node-dev nodemon
This command will install prisma, the @genql/cli CLI tools, and nodemon as developement dependencies. To install further project dependencies, run the following command:
npm install graphql nexus graphql-scalars @prisma/client graphql-yoga graphql-ws swr
Now, create a file called nexus.tsconfig.json at the root of your project:
touch nexus.tsconfig.json
To allow the schema to regenerate, add the following code to nexus.tsconfig.json:
{
  "compilerOptions": {
    "sourceMap": true,
    "outDir": "dist",
    "strict": true,
    "lib": ["esnext"],
    "esModuleInterop": true
  }
}
In your package.json file, add the following two scripts, generate:nexus and generate:genql:
"scripts": {
  //next scripts
  "generate:nexus": "nodemon --exec 'ts-node --transpile-only -P nexus.tsconfig.json src/pages/api/graphql' --ext 'ts' --watch '*/graphql/**/*.ts'",
  "generate:genql": "nodemon --exec 'genql --schema ./graphql/schema.graphql --output ./graphql/generated/genql'  --watch 'graphql/schema.graphql'"
}
When building the GraphQL API, generate:nexus generates types on file changes in the graphql folder. When the GraphQL schema is updated, generate:genql will regenerate the Genql client. By default, the types generated by generate:genql will be stored in graphql/generated/genql. However, you can update the output path as you see fit.
Now that we have our Next.js app up and running, let’s set up Prisma to connect the app to a database. To set up Prisma in your project, run the following command:
npx prisma init
This command creates a new .env file and a prisma folder at the root of your project. The prisma folder contains a schema.prisma file for modeling our data.
To use PostgreSQL, the default database provider, update .env with a valid connection string pointing to your database. To change providers, simply change the provider in the datasource db block in schema.prisma. At the time of writing, Prisma supports PostgreSQL, MySQL, SQL Server, and MongoDB as a preview.
When modeling data, Prisma uses the Prisma schema language, which nearly resembles the GraphQL syntax and makes the database schema easy to read and update. For auto-completion and syntax highlighting, you can install the Prisma VS Code extension.
We’ll use SQLite for the database provider, but feel free to use the provider of choice. Update the provider and URL as follows:
datasource db {
  provider = "sqlite"
  url      = "file:./dev.db"
}
generator client {
  provider = "prisma-client-js"
}
Let’s create a new model Item to map to a table in the database. Add the following fields:
/// schema.prisma
model Item {
  id          String  @id @default(cuid())
  title       String
  description String?
  url         String?
  imageUrl    String?
  createdAt   DateTime @default(now())
  updatedAt   DateTime @default(now()) @updatedAt
}
Our table has fields for id, title, description, webpage url, imageUrl, and time stamps for createdAt and updatedAt.
id serves as the primary key for our table, represented by @id. The ? operator denotes that the field is optional, and the default value is null. Prisma automatically creates and updates the createdAt and updatedAt values.
Next, we’ll create a database migration in SQL, which you can find inside /prisma/migrations. After applying the migration against your database, it generates the Prisma Client, which will access the database:
npx prisma migrate dev --name project_init
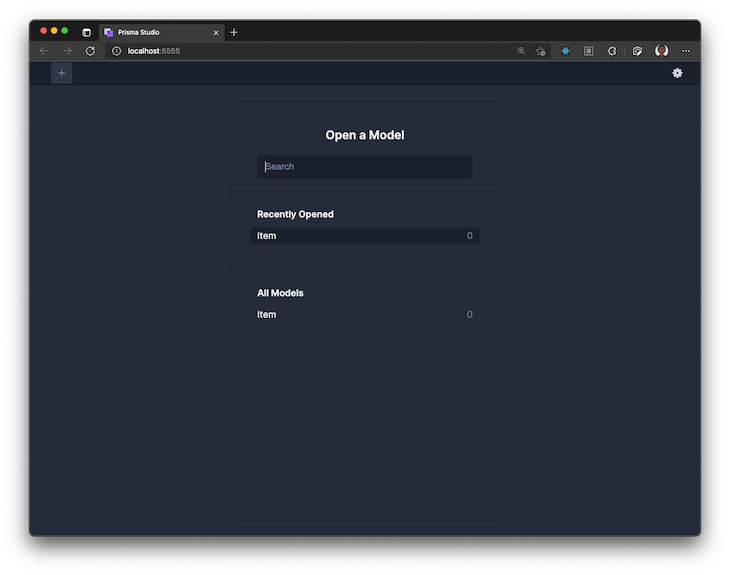
Now, let’s open up Prisma Studio and add some data to test in our application:
npx prisma studio
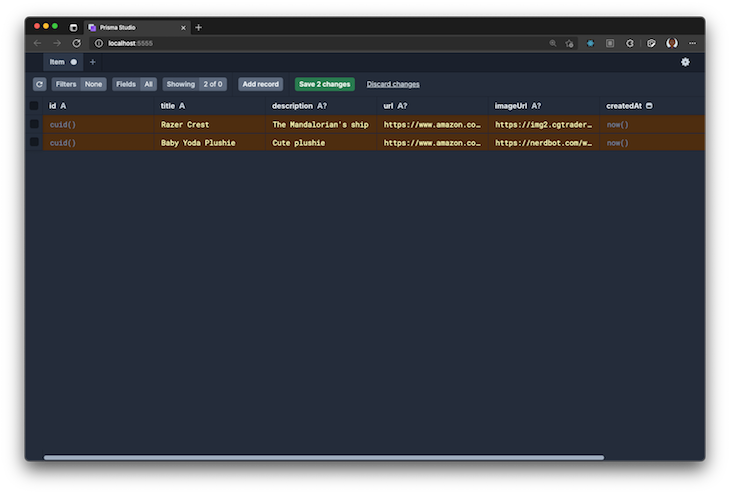
Select Item Model and the Add record button to add some data to the wishlist database. I chose two items from Amazon. To apply the changes, click Save 2 changes:
We’ll contain our GraphQL API code in a graphql folder at the root of the project, creating a separation of concerns. Create the graphql folder by running the code below:
mkdir graphql
In the graphql folder, create two files called schema.ts and context.ts:
touch graphql/schema.ts graphql/context.ts
Then, in your schema.ts file, add the following code:
// /graphql/schema.ts
import { makeSchema, queryType, mutationType } from "nexus";
import * as path from 'path'

const Query = queryType({
  definition(t) {
    // your queries will go here
  }
})

const Mutation = mutationType({
  definition(t) {
    // your mutations will go here
  }
})

export const schema = makeSchema({
  types: [Query, Mutation],
  outputs: {
    schema: path.join(process.cwd(), 'graphql/schema.graphql'),
    typegen: path.join(process.cwd(), 'graphql/generated/nexus.d.ts'),
  },
  contextType: {
    module: path.join(process.cwd(), 'graphql/context.ts'),
    export: 'Context'
  },
  sourceTypes: {
    modules: [
      {
        module: '@prisma/client',
        alias: 'db'
      }
    ]
  }
})
The code snippet above contains the default configuration that we’ll use in the rest of our application. It imports the makeSchema method, which defines the following:
graphql/schema.graphql)graphql/generated/nexus.d.ts)@prisma/client module that Nexus should use to access the databaseThe configuration will also empty queryType and mutationType, where we’ll add our queries and mutations.
In the graphql/context.ts file, add the following code:
// /graphql/context.ts
import { PrismaClient } from '@prisma/client'

const db = new PrismaClient()

export type Context = {
  db: PrismaClient
}
export const context: Context = {
  db
}
The code snippet above imports @prisma/client, creates a new instance of Prisma Client, and creates the context type, which can be replaced with an interface. It also creates a context object that will add db to the GraphQL context, making it available in the GraphQL resolvers.
Inside the /pages/api/ folder, create a file called graphql.ts, which we’ll use to define API routes with Next.js:
// /pages/api/graphql.ts
import { schema } from '../../../graphql/schema'
import { createServer } from 'node:http'
import { createYoga } from 'graphql-yoga'

const yoga = createYoga({ schema, context })
const server = createServer(yoga)
server.listen(4000, () => {
  console.info('Server is running on http://localhost:4000/graphql')
})
export default server;
With the code above, we import our GraphQL schema and use createYoga from graphql-yoga to integrate it. We then set up a server using Node’s createServer method, passing in our yoga configuration. This server starts up and listens on http://localhost:4000/graphql, as indicated by the log in the callback function. Whenever a user visits this address in a browser, they should be presented with the GraphQL Playground or interface.
Now that we’ve set up the foundation for our GraphQL API with the schema and context configuration, let’s move on to generating the necessary GraphQL types and schema files. This step is crucial for ensuring seamless communication between our frontend and backend components.
Now, start the Next.js application server in a terminal window by running this command:
npm run dev
In a second terminal window, run this command to generate your Nexus types and GraphQL schema:
npm run generate:nexus
Finally, in a third terminal window, run the command below to generate the GraphQL types for the frontend:
npm run generate:genql
Inside of graphql, a new directory called generated is created, which contains the following files:
nexus.d.ts: Contains types automatically generated by Nexusgenql: Generates types located in graphql/generated/genqlThe contents of this folder will be updated as as you build your GraphQL API.
To avoid running the previous three commands simulatenously, you can automate the process using the concurrently command. First, install concurrently as a development dependency:
npm install --save-dev concurrently
Then, add a new script in your package.json file that will run both npm run generate:nexus and npm run generate:genql:
"scripts": {
  //other scripts
  "generate": "concurrently \"npm run generate:nexus\" \"npm run generate:genql\"",
}
Now, you can cancel the npm run generate:nexus and npm run generate:genql scripts and run the new script as follows:
npm run generate
Now that we have generated the necessary GraphQL types and schema files, let’s define custom GraphQL object types and an enumeration type to enhance the functionality and structure of our GraphQL.
To do that, let’s define a custom DateTime GraphQL scalar from the graph-scalars library. Nexus provides the asNexusMethod property, making the scalar available in the rest of your GraphQL API:
// /graphql/schema.ts
import { asNexusMethod, /** other imports */ } from "nexus";
import { DateTimeResolver, } from 'graphql-scalars'

const DateTime = asNexusMethod(DateTimeResolver, 'DateTime')
To add the DateTime scalar to the GraphQL schema of your API, use the following code:
// /graphql/schema.ts
export const schema = makeSchema({
  types: [/** existing types */, DateTime],
)}
Then, create a new Item variable that will define the fields and properties of the GraphQL object type:
// /graphql/schema.ts
import { objectType, /** other imports */ } from "nexus";

const Item = objectType({
  name: 'Item',
  definition(t) {
    t.nonNull.id('id')
    t.nonNull.string('title')
    t.string('description')
    t.string('url')
    t.string('imageUrl')
    t.field('createdAt', { type: 'DateTime' })
    t.field('updatedAt', { type: 'DateTime' })
  }
})
objectType enables you to define GraphQL object types, which are also a root type. The objectType fields map to the properties and fields in your database. The Item object type includes id and title fields, both of which are non-nullable. If nonNull is not specified, fields are nullable by default. Feel free to modify the other fields as needed.
Update the types with the newly created GraphQL object type:
// /graphql/schema.ts
export const schema = makeSchema({
  types: [/** existing types */, Item],
)}
Every time you update the contents of types, the generated types and the GraphQL schema will be updated.
In this section, we will define a custom enumeration type called SortOrder and add queries to our GraphQL API for reading data. The SortOrder enum value will be used to order values in either an ascending or descending order:
// /graphql/schema.ts
import { enumType, /** other imports */ } from "nexus";

const SortOrder = enumType({
  name: "SortOrder",
  members: ["asc", "desc"]
})

export const schema = makeSchema({
  types: [/** existing types */, SortOrder],
})
Queries allow us to read data from an API. Update your Query file to contain the following code:
// /graphql/schema.ts
const Query = queryType({
  definition(t) {
    t.list.field('getItems', {
      type: 'Item',
      args: {
        sortBy: arg({ type: 'SortOrder' }),
      },
      resolve: async (_, args, ctx) => {
        return ctx.db.item.findMany({
          orderBy: { createdAt: args.sortBy || undefined }
        })
      }
    })

    t.field('getOneItem', {
      type: 'Item',
      args: {
        id: nonNull(stringArg())
      },
      resolve: async (_, args, ctx) => {
        try {
          return ctx.db.item.findUnique({ where: { id: args.id } })
        } catch (error) {
          throw new Error(`${error}`)
        }
      }
    })
  }
})
In the code above, we define two queries:
getItems: Returns an Item array and allows you to sort the values in either an ascending or descending order based on the createdAt valuegetOneItem: Returns an Item array based on the ID, a unique value that can’t be nullWhen writing the database query ctx.db._query here_, VS Code provides auto-complete.
GraphQL mutations are used for manipulating data. Let’s review the three mutations for creating, updating, and deleting data and add them into our application.
First, let’s add a createItem mutation in the Mutation definition block:
t.field('createItem', {
  type: 'Item',
  args: {
    title: nonNull(stringArg()),
    description: stringArg(),
    url: stringArg(),
    imageUrl: stringArg(),
  },
  resolve: (_, args, ctx) => {
    try {
      return ctx.db.item.create({
        data: {
          title: args.title,
          description: args.description || undefined,
          url: args.url || undefined,
          imageUrl: args.imageUrl || undefined,
        }
      })
    } catch (error) {
      throw Error(`${error}`)
    }
  }
})
The mutation will accept the following arguments:
title: Compulsorydescription: Optionalurl: OptionalimageUrl: OptionalIf optional values are not provided, Prisma will set the values to null. The mutation also returns an Item if the GraphQL operation is successful.
Next, we’ll establish an updateItem mutation. While it accepts arguments similar to the createItem mutation, it mandates an id argument and offers an optional title one. If optional values aren’t given, the Prisma Client wont update the existing database values, using || undefined instead:
t.field('updateItem', {
  type: 'Item',
  args: {
    id: nonNull(idArg()),
    title: stringArg(),
    description: stringArg(),
    url: stringArg(),
    imageUrl: stringArg(),
  },
  resolve: (_, args, ctx) => {
    try {
      return ctx.db.item.update({
        where: { id: args.id },
        data: {
          title: args.title || undefined,
          description: args.description || undefined,
          url: args.url || undefined,
          imageUrl: args.imageUrl || undefined,
        }
      })
    } catch (error) {
      throw Error(`${error}`)
    }
  }
})
Finally, we’ll create a deleteItem mutation, which expects an id argument for the operation to be executed:
t.field('deleteItem', {
  type: 'Item',
  args: {
    id: nonNull(idArg())
  },
  resolve: (_, args, ctx) => {
    try {
      return ctx.db.item.delete({
        where: { id: args.id }
      })
    } catch (error) {
      throw Error(`${error}`)
    }
  }
})
To test your queries and mutations, you can check out the API on the GraphQL Playground on http://localhost:3000/api/graphql:
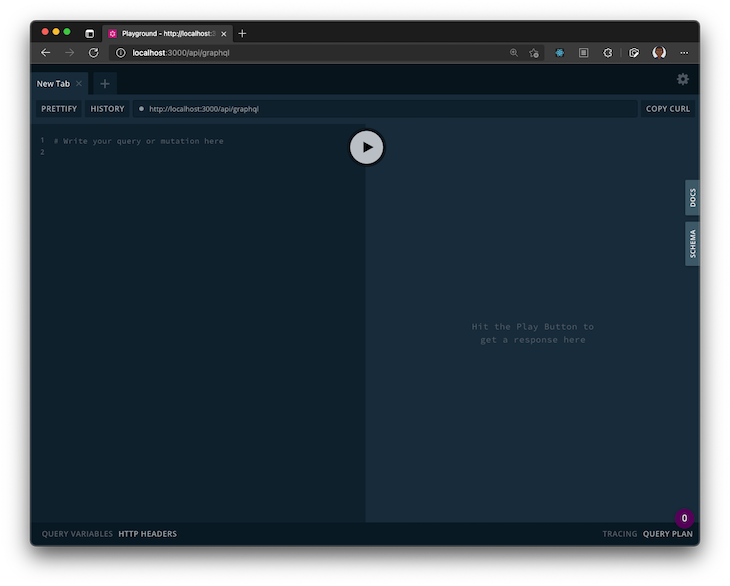
As an example, try running the following query on the Playground:
query GET_ITEMS {
  getItems {
    id
    title
    description
    imageUrl
  }
}
Now that we’ve finished setting up our API, let’s try interacting with it from the frontend of our application. First, let’s add the following code, which reduces the number of times we’ll create a new genql instance:
mkdir util
touch util/genqlClient.ts
Instantiate your client as follows:
// /util/genqlClient.ts
import { createClient } from "../graphql/generated/genql"

export const client = createClient({
  url: '/api/graphql'
})
The client requires a url property, which defines the path of your GraphQL API. Given that ours is a full-stack application, set it to /api/graphql and customize it based on the environment.
Other properties include headers and a custom HTTP fetch function that handles requests to your API. For styling, you can add the contents from GitHub in global.css.
To list all the items in our wishlist, add the following code snippet to index.tsx:
// /pages/index.tsx
import Link from 'next/link'
import useSWR from 'swr'
import { client } from '../util/genqlClient'
export default function Home() {
const fetcher = () =>
client.query({
getItems: {
id: true,
title: true,
description: true,
imageUrl: true,
createdAt: true,
}
})
const { data, error } = useSWR('getItems', fetcher)
return (
<div>
<div className="right">
<Link href="/create">
<a className="btn"> Create Item →</a>
</Link>
</div>
{error && <p>Oops, something went wrong!</p>}
<ul>
{data?.getItems && data.getItems.map((item) => (
<li key={item.id}>
<Link href={`/item/${item.id}`}>
<a>
{item.imageUrl ?
<img src={item.imageUrl} height="640" width="480" /> :
<img src="https://user-images.githubusercontent.com/33921841/132140321-01c18680-e304-4069-a0f0-b81a9f6d5cc9.png" height="640" width="480" />
}
<h2>{item.title}</h2>
<p>{item.description ? item?.description : "No description available"}</p>
<p>Created At: {new Date(item?.createdAt).toDateString()}</p>
</a>
</Link>
</li>
))}
</ul>
</div>
)
}
SWR handles data fetching to the API. getItems identifies the query and cached values. Lastly, the fetcher function makes the request to the API.
Genql uses a query builder syntax to determine which fields should be retrieved from a type. data is precisely typed according to the made request. To pass arguments, the query utilizes an array composed of two objects: the first contains the arguments, while the second specifies the field selection:
client.query({
    getItems: [
      { sortBy: "asc" },
      {
        id: true,
        title: true,
        description: true,
        url: true,
        imageUrl: true,
        createdAt: true,
      }
    ]
})
To query all the fields, you can use the …everything object as follows:
import { everything } from './generated'

client.query({
  getItems: {
     ...everything
   }
})
Alternately, you can use the chain syntax to execute requests that specify which arguments and fields should be returned. The chain syntax is available on mutations as well:
client.chain.query.
  getItems({ sortBy: 'desc' }).get({
    id: true,
    title: true,
    description: true,
    url: true,
    imageUrl: true,
    createdAt: true,
})
To display a single item in our wishlist, let’s create a new folder in pages called item. Add a file called [id].tsx in the created directory.
The [_file_name_] annotation indicates to Next.js that this route is dynamic:
mkdir pages/item
touch pages/item/[id].tsx
Add the following code to your page:
// /pages/item/[id].tsx
import { useRouter } from 'next/router'
import useSWR from 'swr'
import Link from 'next/link'
import { client } from '../../util/genqlClient'
export default function Item() {
const router = useRouter()
const { id } = router.query
const fetcher = async (id: string) =>
client.query({
getOneItem: [
{ id },
{
id: true,
title: true,
description: true,
imageUrl: true,
url: true,
createdAt: true,
}]
})
const { data, error } = useSWR([id], fetcher)
return (
<div>
<Link href="/">
<a className="btn">← Back</a>
</Link>
{error && <p>Oops, something went wrong!</p>}
{data?.getOneItem && (
<>
<h1>{data.getOneItem.title}</h1>
<p className="description">{data.getOneItem.description}</p>
{data.getOneItem.imageUrl ?
<img src={data.getOneItem.imageUrl} height="640" width="480" /> :
<img src="https://user-images.githubusercontent.com/33921841/132140321-01c18680-e304-4069-a0f0-b81a9f6d5cc9.png" height="640" width="480" />
}
{data.getOneItem.url &&
<p className="description">
<a href={data.getOneItem.url} target="_blank" rel="noopener noreferrer" className="external-url">
Check out item ↗
</a>
</p>
}
<div>
<em>Created At: {new Date(data.getOneItem?.createdAt).toDateString()}</em>
</div>
</>
)
}
</div >
)
}
When the page is initialized, the id will be retrieved from the route and used as an argument in the getOneItem GraphQL request.
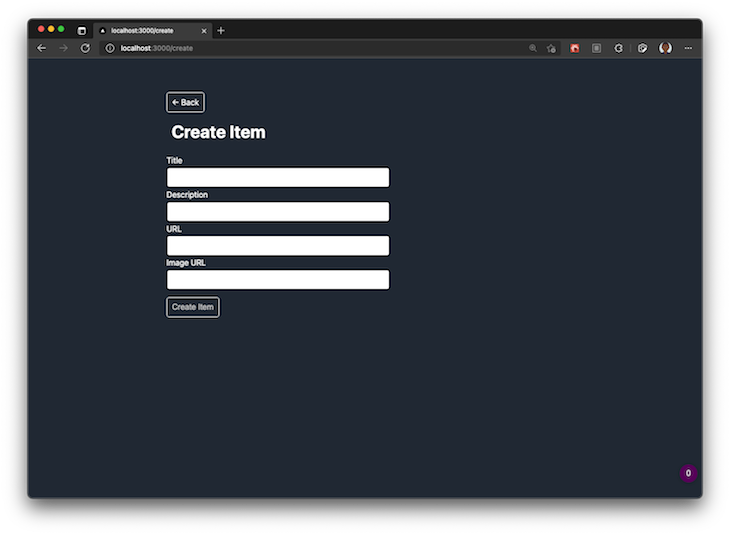
To create a new item in our application, let’s create a new page that will serve as the /create route by adding the following code:
touch pages/create.tsx
Add the code block below to the file we just created:
// /pages/create.tsx
import React, { useState } from "react"
import { useRouter } from "next/router"
import Link from 'next/link'
import { client } from '../util/genqlClient'
export default function Create() {
const router = useRouter()
const [title, setTitle] = useState("")
const [description, setDescription] = useState("")
const [url, setUrl] = useState("")
const [imageUrl, setImageUrl] = useState("")
const [error, setError] = useState()
const handleSubmit = async (event: React.SyntheticEvent) => {
event.preventDefault()
await client.mutation({
createItem: [{
title,
description,
url,
imageUrl,
}, {
id: true,
}]
}).then(response => {
console.log(response)
router.push('/')
}).catch(error => setError(error.message))
}
return (
<>
{error && <pre>{error}</pre>}
<Link href="/">
<a className="btn">← Back</a>
</Link>
<form onSubmit={handleSubmit}>
<h2>Create Item</h2>
<div className="formItem">
<label htmlFor="title">Title</label>
<input name="title" value={title} onChange={(e) => setTitle(e.target.value)} required />
</div>
<div className="formItem">
<label htmlFor="description">Description</label>
<input name="description" value={description} onChange={(e) => setDescription(e.target.value)} />
</div>
<div className="formItem">
<label htmlFor="url">URL</label>
<input name="url" value={url} onChange={(e) => setUrl(e.target.value)} />
</div>
<div className="formItem">
<label htmlFor="imageUrl">Image URL</label>
<input name="imageUrl" value={imageUrl} onChange={(e) => setImageUrl(e.target.value)} />
</div>
<button type="submit"
disabled={title === ""}
>Create Item</button>
</form>
</>
)
}
In the code snippet above, the form values’ state is stored inside of useState values. The handleSubmit function will be triggered when a user selects the Create button. Then, the form values will be retrieved when handleSubmit is called:
In the event of an error, the form values will be saved in the error state and displayed to the user.
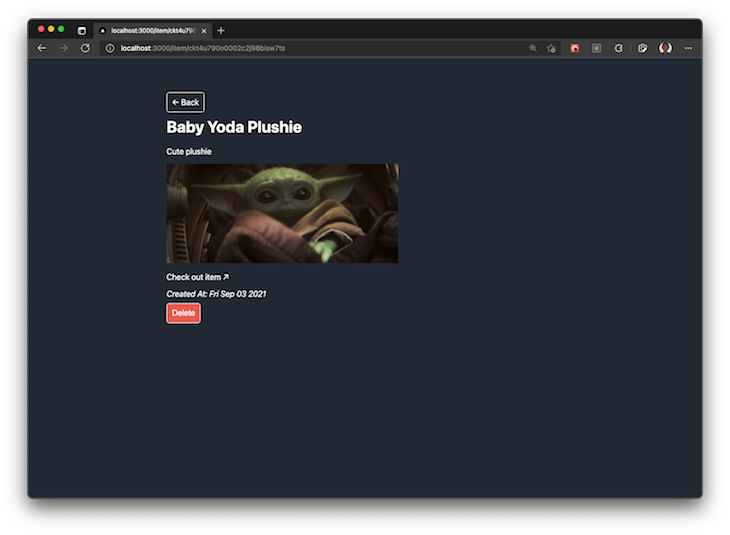
Finally, in the [id].tsx page, let’s add an option to delete a wishlist item. When the request is successful, it will return an id and navigate to the index route /:
// /pages/item/[id].tsx

export default function Item() {
  /** exiting code/ functionality */
  const deleteItem = async (id: string) => {
    await client.mutation({
      deleteItem: [{ id }, { id: true }],
    }).then(_res => router.push('/'))
  }

  return (
  <div>
         {data?.getOneItem && (
        <>
          {/* existing code */}
          <button className="delete" onClick={(evt) => deleteItem(data?.getOneItem.id)}>Delete</button>
        </>
      )
      }
    )
}
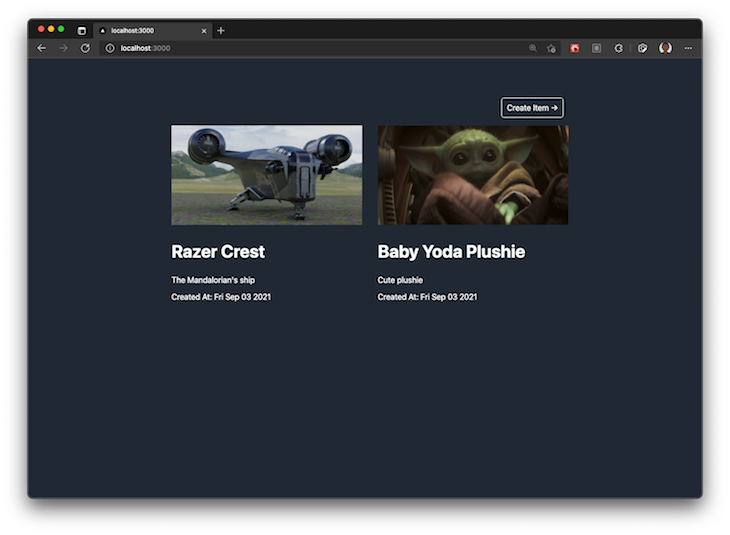
If everything runs correctly, your final application will resemble the image below:
The UI will look like this when we are deleting an item:
Play around with the application to make sure everything is running as expected. You should be able to view your wishlist items, create a new item, and delete items.
Type safety is crucial for ensuring consistent and error-free code. Here’s some advice to optimize your development:
any temptation: Relying on any in TypeScript may seem convenient, but it’s best to remain specific with your typesFinally, watch out for these:
Congratulations! 🚀 You’ve built an end-to-end, type-safe, full-stack application using Next.js, Prisma, and GraphQL. Following the methodology in this tutorial can reduce errors caused by using inconsistent types. I hope you enjoyed this tutorial!
Debugging Next applications can be difficult, especially when users experience issues that are difficult to reproduce. If you’re interested in monitoring and tracking state, automatically surfacing JavaScript errors, and tracking slow network requests and component load time, try LogRocket.
LogRocket captures console logs, errors, network requests, and pixel-perfect DOM recordings from user sessions and lets you replay them as users saw it, eliminating guesswork around why bugs happen — compatible with all frameworks.
LogRocket's Galileo AI watches sessions for you, instantly identifying and explaining user struggles with automated monitoring of your entire product experience.
The LogRocket Redux middleware package adds an extra layer of visibility into your user sessions. LogRocket logs all actions and state from your Redux stores.


Modernize how you debug your Next.js apps — start monitoring for free.

Learn how to set up Meilisearch, index documents, and build keyword, semantic, and hybrid search with AI-powered retrieval.

Compare pnpm and npm across security defaults, disk usage, dependency strictness, and workspace policy to decide which package manager fits your project.

I migrated 20 production-style components from Tailwind to StyleX. Here’s what the data showed about LOC, CSS bundle size, build time, and type safety.

A guide for using JWT authentication to prevent basic security issues while understanding the shortcomings of JWTs.
Hey there, want to help make our blog better?
Join LogRocket’s Content Advisory Board. You’ll help inform the type of content we create and get access to exclusive meetups, social accreditation, and swag.
Sign up now

