
Quality assurance strategy is a key aspect of software development. High-end tests such as unit and end-to-end tests are important aspects of a QA strategy.
In this post, our focus will be on creating end-to-end tests in NestJS. NestJS comes with Jest and Supertest out of the box for creating unit tests. We’ll explore the thought process behind test-driven development and unit tests for development.
We’ll use unit tests to guide development of the product creation feature in our API, while end-to-end tests will simulate the end user of the application. TypeORM and PostgreSQL provide database connectivity in our application.
NestJS provides a framework for building server-side applications. NestJS relies on TypeScript and dependency injection, enabling developers to write tests. The NestJS CLI scaffolds projects, enables the creation of controllers and services, and generates test files on the creation of servers or controllers.
Jump ahead:
The Replay is a weekly newsletter for dev and engineering leaders.
Delivered once a week, it's your curated guide to the most important conversations around frontend dev, emerging AI tools, and the state of modern software.
Test-driven development (TDD) enables developers to build software guided by tests. This enables rapid testing, coding, and refactoring. Kent Beck developed TDD in the late 1990s.
There are three simple rules to abide by test-driven development:
Test-driven development provides great advantages when practiced. Developers working with TDD have to model the interface of the code, which enables the separation of the interface from the implementation. The tests are created from the perspective of a class’s public interface, which means the key focus is on the class’s behavior and not the implementation.
In a production pipeline, these tests run on almost every build, ensuring the behavior of the code. If a team member makes a change to the code that changes the behavior, the tests fail, signaling a mistake. This saves time on debugging.
The image below underlies the philosophy behind test-driven development:
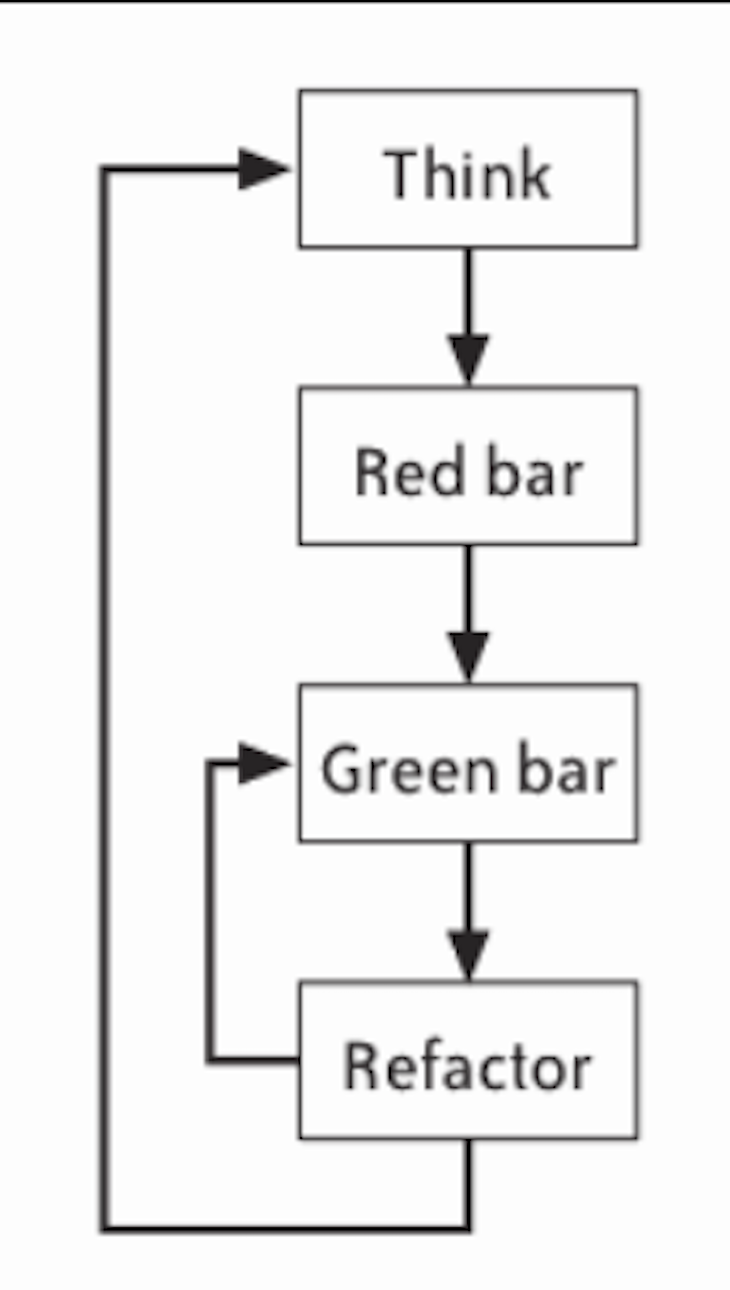
To use TDD, the “red”, “green”, and “refactor” cycle is mandatory. The cycle is to run until the new feature is ready and all tests pass.
Let’s explore the steps behind our approach to TDD.
The point of TDD is to create small tests and write code that forces the tests to pass. The iterative process continues until the feature is complete. In the “think” step, it’s important to imagine and note what behavior the code should exhibit. The smallest increment that requires the fewest lines of code is key — you can create a small unit of tests that fail until the behavior is present this way.
In the Red bar, the unit tests that exist should cover the current increment of behavior. The test can contain method and class names that don’t exist yet. The design of the class’s interface is created from the perspective of the user of the class.
Once the tests are in place and you run the entire suite, the new test should fail. In most TDD testing tools, the failed test produces a red bar where we gain insights into the cause of the failure.
In this step, we focus on writing production-ready code to get the test to pass. Once the tests run, our result should be a green progress bar, depending on the TDD testing tool that is in use. The green bar step provides another opportunity to check our intent against reality.
Create a NestJS project with the NestJS CLI. We’ll create a product management application.
Run the following command to install the NestJS CLI:
$ npm install -g @nestjs/cli
The code base we’ll test is available in this GitHub repository. Clone and navigate to the root directory of the project.
Run the following command, depending on the package manager.
For Yarn:
$ yarn
For npm:
$ npm install
After installing the dependencies, start the project using the command below.
$ yarn start:dev
If there are no dependency issues or bugs, the project should start in the terminal:

The product controller handles the creation of products and retrieves the products.
Using the terminal, create the product controller and service using the CLI tool. The test files are now available for the controller and service.
$ nest g controller product
$ nest g service product
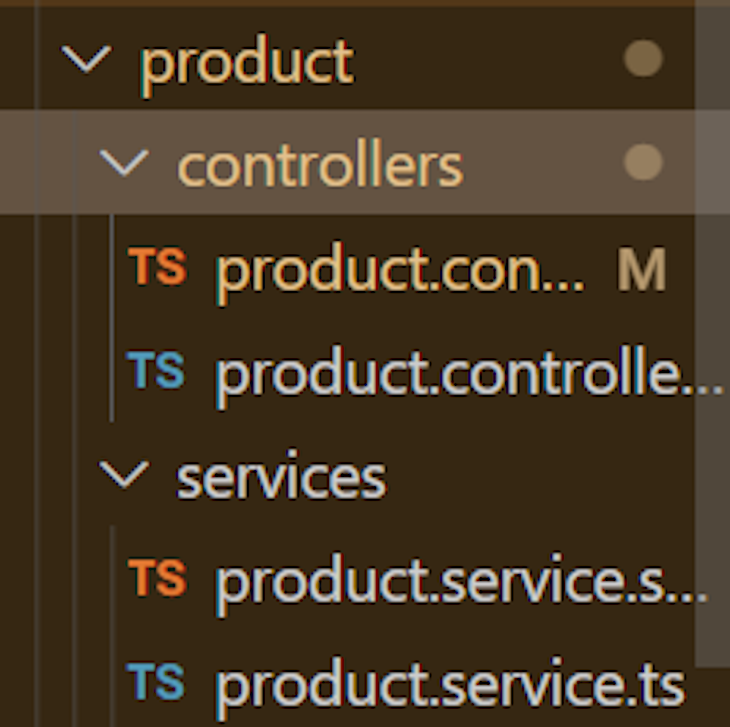
When a controller and service is created using the Nest CLI, an accompanying test file is created:
The first behavior we desire in the product controller is the ability to create a new product. To think of the structure of the data in our product table, let’s create a product interface and our entity object.
Write the following in the terminal window:
$ mkdir src/product/models
$ touch src/product/models/product.interface.ts
$ touch src/product/models/product.entity.ts
$ code src/product/models/product.entity.ts
The last script opens product.entity.ts file in the code editor. Copy and paste the below code into the file:
import {
  Column,
  CreateDateColumn,
  Entity,
  ManyToOne,
  PrimaryGeneratedColumn,
} from "typeorm";
import { UserEntity } from "../../auth/models/user.entity";

@Entity("product")
export class ProductEntity {
  @PrimaryGeneratedColumn()
  id: number;

  @Column({ default: "" })
  body: string;

  @CreateDateColumn()
  createdAt: Date;

  @ManyToOne(() => UserEntity, (userEntity) => userEntity.products)
  creator: UserEntity;
}
Open the product.entity.ts file in the code editor with the below command:
$ code src/product/models/product.interface.ts
Paste the below code block in the product.interface.ts file:
import { User } from "src/auth/models/user.class";

export interface Product {
  id?: number;
  body?: string;
  createdAt: Date;
  creator?: User;
}
A unit test needs to be in place before we create the product creation route. This unit test confirms the implementation of the function.
In the terminal window, run the command below to open the test file in the code editor:
$ code src/product/controllers/product.controller.spec.ts
Our first test needs to confirm that the product creation service creates a product. The test mocks the UserService and ProductService. Jest creates a mock of the implementation of the functions in the services.
A describe block implemented in the product.controller.spec.ts is available. Create the mockImplementation of the product service; this hosts the createProduct implementation. This createProduct method accepts a request and returns a created product and ID.
To assist with mocking HTTP objects, we’ll use the node-mocks-http library. Add the following code to our product.controller.spec.ts file:
import { Test, TestingModule } from "@nestjs/testing";
import { DeleteResult, UpdateResult } from "typeorm";
import { User } from "../../auth/models/user.class";
import { JwtGuard } from "../../auth/guards/jwt.guard";
import { UserService } from "../../auth/services/user.service";
import { ProductController } from "./product.controller";
import { ProductService } from "../services/product.service";
import { Product } from "../models/product.interface";

const httpMocks = require("node-mocks-http");

describe("ProductController", () => {
  let productController: ProductController;

  const mockRequest = httpMocks.createRequest();
  mockRequest.user = new User();
  mockRequest.user = "DUE";

 const mockProduct: Product = {
    body: "nivea",
    createdAt: new Date(),
    creator: mockRequest.user,
  };

  const mockProductService = {
    createProduct: jest
      .fn()
      .mockImplementation((user: User, product: Product) => {
        return {
          id: 1,
          ...product,
        };
      })
  };
  const mockUserService = {};

  // create fake module
  beforeEach(async () => {
    const moduleRef: TestingModule = await Test.createTestingModule({
      controllers: [ProductController],
      providers: [
        ProductService,
        { provide: UserService, useValue: mockUserService },
        {
          provide: JwtGuard,
          useValue: jest.fn().mockImplementation(() => true),
        },
      ],
    })
      .overrideProvider(ProductService)
      .useValue(mockProductService)
      .compile();

    productController = moduleRef.get<ProductController>(ProductController);
  });
});
To close out the unit test, the action and its response are set. Paste the below code at the end of the describe function.
 it("should create a product", () => {
    expect(productController.create(mockProduct, mockRequest)).toEqual({
      id: expect.any(Number),
      ...mockProduct,
    });
  });
In the product.controller.ts file, set up the create method. Import the dependencies, the product interface, and the product entity.
import { Body, Controller, Post, Request, UseGuards } from "@nestjs/common";
import { Observable } from "rxjs";

import { JwtGuard } from "../auth/guards/jwt.guard";
import { Product } from "../product/models/product.interface";
import { ProductService } from "../product/services/product.service";

@Controller("product")
export class ProductController {
  constructor(private productService: ProductService) {}
  @UseGuards(JwtGuard)
  @Post()
  create(@Body() product: Product, @Request() req): Observable<Product> {
    return this.productService.createProduct(req.user, product);
  }
}
In a new terminal window, run the created test with the following command:
$ yarn test product.controller
The test should fail because the implementation isn’t complete yet. This provides insight into how we can make use of TDD to improve our development and catch bugs. Our test is failing because the method isn’t in place in the product.service.ts file.

In the terminal window, open the product.service.ts file and paste the code block below:
import { Inject, Injectable } from "@nestjs/common";
import { InjectRepository } from "@nestjs/typeorm";
import { from, Observable } from "rxjs";
import { DeleteResult, Repository, UpdateResult } from "typeorm";

import { User } from "src/auth/models/user.class";
import { ProductEntity } from "../models/product.entity";
import { Product } from "../models/product.interface";

@Injectable()
export class ProductService {
  constructor(
    @InjectRepository(ProductEntity)
    private readonly productRepository: Repository<ProductEntity>
  ) {}

  createProduct(user: User, product: Product): Observable<Product> {
    product.creator = user;
    return from(this.productRepository.save(product));
  }
}
In the terminal window, re-run the product.controller test using the command below:
$ yarn test product.controller
Fix the issue by adding the createProduct method in our service class.

This cycle is greater for developing new features in applications. The cycle provides assurance that the created methods are well thought out.
The Create Product route has an AuthGuard for protection, so in order to test it, we need to create a user and login credentials. Once logged in, the token authenticates the user creating the product.
The below screenshots show how to register and login a user.
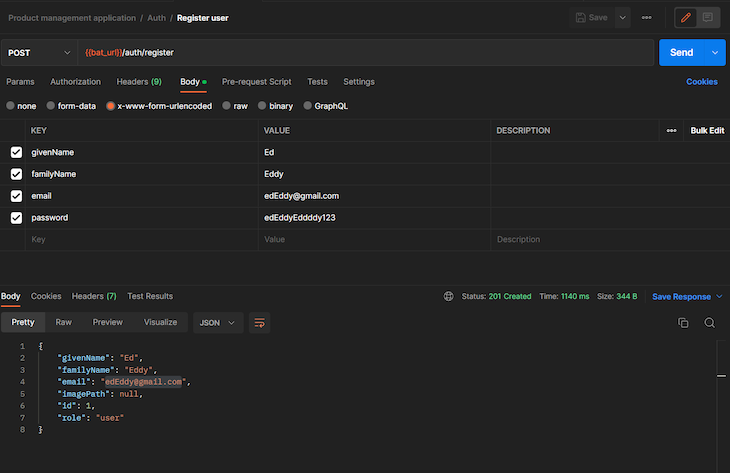
How to register a user:
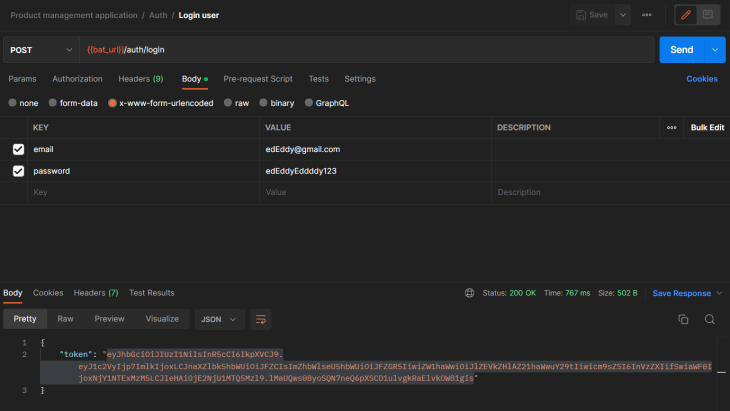
After the user logs in, retrieve the token and use it to create a product.
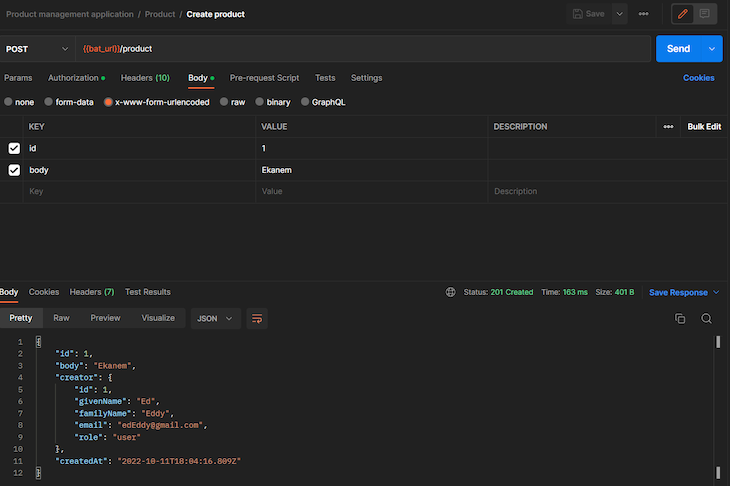
The Create Product feature works without a hitch. 👌
Here, we’ll explore the TDD technique we just used to create the Get Product feature. The Get Product feature allows the retrieval of a product based on the input values.
In the product.controller.spec.ts file, propagate a unit test to test the behavior for retrieving an item.
In the product.controller.spec.ts file, create a new mock request to serve as the representation of the expected object on request, and then create a mockProducts variable.
const mockProducts: Product[] = [
    mockProduct,
    { ...mockProduct, body: "Vanilla" },
    { ...mockProduct, body: "Ice" },
  ];
The mockProductService object holds a new method that can receive values during retrieval.
  const mockProductService = {
    createProduct: jest
      .fn()
      .mockImplementation((user: User, product: Product) => {
        return {
          id: 1,
          ...product,
        };
      }),
    findProducts: jest
      .fn()
      .mockImplementation((numberToTake: number, numberToSkip: number) => {
        const productsAfterSkipping = mockProducts.slice(numberToSkip);
        const filteredProducts = productsAfterSkipping.slice(0, numberToTake);
        return filteredProducts;
      }),
  };
The next step is to define the test that we want to run. Our take and skip values are 2 and 1, respectively. Those values serve as parameters.
 it("should get 2 products, skipping the first", () =>
    expect(productController.findSelected(2, 1)).toEqual(mockProducts.slice(1));
  });
Run the test. It should fail, as the necessary methods aren’t available in the controller.
In the product.controller.ts file, create the GET route:
import {
  Body,
  Controller,
  Get,
  Param,
  Post,
  Query,
  Req,
  Request,
  Res,
  UseGuards,
} from "@nestjs/common";
import { Observable } from "rxjs";
import { JwtGuard } from "../../auth/guards/jwt.guard";
import { Product } from "../models/product.interface";
import { ProductService } from "../services/product.service";

@Controller("product")
export class ProductController {
  constructor(private productService: ProductService) {}

  @UseGuards(JwtGuard)
  @Post()
  create(@Body() product: Product, @Request() req): Observable<Product> {
    return this.productService.createProduct(req.user, product);
  }

  @UseGuards(JwtGuard)
  @Get()
  findSelected(
    @Query("take") take: number = 1,
    @Query("skip") skip: number = 1
  ): Observable<Product[]> {
    take = take > 20 ? 20 : take;
    return this.productService.findProducts(take, skip);
  }
}
In the product.service.ts file, define the findProduct method; the findSelected route calls this method.
import { Inject, Injectable } from "@nestjs/common";
import { InjectRepository } from "@nestjs/typeorm";
import { from, Observable } from "rxjs";
import  Repository} from "typeorm";

import { User } from "src/auth/models/user.class";
import { ProductEntity } from "../models/product.entity";
import { Product } from "../models/product.interface";

@Injectable()
export class ProductService {
  constructor(
    @InjectRepository(ProductEntity)
    private readonly productRepository: Repository<ProductEntity>
  ) {}

  createProduct(user: User, product: Product): Observable<Product> {
    product.creator = user;
    return from(this.productRepository.save(product));
  }

  findProducts(take: number = 10, skip: number = 0): Observable<Product[]> {
    return from(
      this.productRepository
        .createQueryBuilder("product")
        .innerJoinAndSelect("product.creator", "creator")
        .orderBy("product.createdAt", "DESC")
        .take(take)
        .skip(skip)
        .getMany()
    );
  }
}
In the terminal window, run the product.controller.spec test.
$ yarn test product.controller
Our test successfully passes.

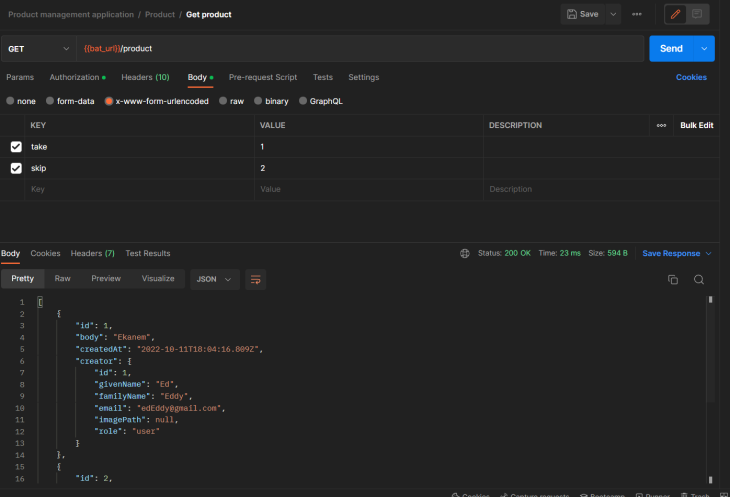
The token authenticates the route after it receives a successful login. This route can retrieve the list of created products.
An end-to-end testing suite enables developers to test the software product. The end goal of this test is to ensure that the application behaves as expected.
Simulating how users interact with the application in end-to-end test suites is key. The simulation enables developers to confirm how the system operates under test. We would set up an end-to-end testing suite for the authentication controller.
NestJS provides E2E testing by default. To create an instance of our application, we rely on Supertest. Supertest enables the detection of endpoints in our application and creates requests.
There are two approaches to explore when creating E2E tests:
Our approach enables direct requests to the endpoints of the API.
In the auth controller, the implementation of E2E tests for registering a user and login are key. An auth.e2e-spec.ts file holds the E2E tests we need.
In the root directory, locate the test folder, and create an auth.e2e-spec.ts file. The describe method and auth URL for the authController will live in this file with our E2E tests for it.
$ touch test/auth.e2e-spec.ts
$ code test/auth.e2e-spec.ts
Paste the code block below into the auth.e2e-spec.ts file:
import { HttpStatus } from '@nestjs/common';

import * as jwt from 'jsonwebtoken';
import * as request from 'supertest';

import { User } from '../src/auth/models/user.class';

describe('AuthController (e2e)', () => {
      const authUrl = `http://localhost:3000/api/auth`;
});
Test the registration service and controller to check the user object after registration.
The code block below is the registerAccount method to test.
 doesUserExist(email: string): Observable<boolean> {
    return from(this.userRepository.findOne({ email })).pipe(
      switchMap((user: User) => {
        return of(!!user);
      })
    );
  }

registerAccount(user: User): Observable<User> {
    const { givenName, familyName, email, password } = user;

    return this.doesUserExist(email).pipe(
      tap((doesUserExist: boolean) => {
        if (doesUserExist)
          throw new HttpException(
            "A user has already been created with this email address",
            HttpStatus.BAD_REQUEST
          );
      }),
      switchMap(() => {
        return this.hashPassword(password).pipe(
          switchMap((hashedPassword: string) => {
            return from(
              this.userRepository.save({
                givenName,
                familyName,
                email,
                password: hashedPassword,
              })
            ).pipe(
              map((user: User) => {
                delete user.password;
                return user;
              })
            );
          })
        );
      })
    );
  }
The code snippet above provides information on the variables needed to register users. The returned user object represents the response received in the client application.
Inside the describe block, there is a nested describe block for targeting the '/auth/register/' endpoint. In the it block, create a request, and return the mockUser object as part of the response. The expect variable is key for checking the validity of the responses.
import { HttpStatus } from "@nestjs/common";

import * as jwt from "jsonwebtoken";
import * as request from "supertest";

import { User } from "../src/auth/models/user.class";

describe("AuthController (e2e)", () => {
  const authUrl = `http://localhost:6000/auth`;

  const mockUser: User = {
    givenName: "givenName",
    familyName: "familyName",
    email: "[email protected]",
    password: "password",
  };

  describe("/auth/register (POST)", () => {
    it("it should register a user and return the new user object", () => {
      return request(authUrl)
        .post("/register")
        .set("Accept", "application/json")
        .send(mockUser)
        .expect((response: request.Response) => {
          const {
            id,
            givenName,
            familyName,
            password,
            email,
            imagePath,
            role,
          } = response.body;

          expect(typeof id).toBe("number"),
            expect(givenName).toEqual(mockUser.givenName),
            expect(familyName).toEqual(mockUser.familyName),
            expect(email).toEqual(mockUser.email),
            expect(password).toBeUndefined();
          expect(imagePath).toBeNull();
          expect(role).toEqual("user");
        })
        .expect(HttpStatus.CREATED);
    });
  });
});
Run the test:
$ yarn run test:e2e
The result of the test on the endpoint is below.
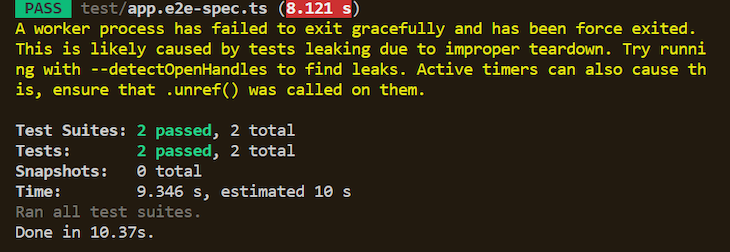
Create another it function to check if a bad request fires on the use of an existing email on register.
it('it should not register a new user if the passed email already exists', () => {
      return request(authUrl)
        .post('/register')
        .set('Accept', 'application/json')
        .send(mockUser)
        .expect(HttpStatus.BAD_REQUEST);
    });
Run the test:
$ yarn run test:e2e
Our test fires and returns the following result:
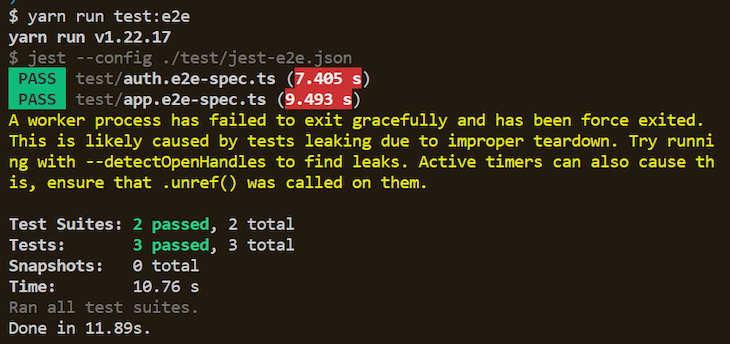
The implemented tests are running, and a new layer of quality assurance is available. A key point to note in NestJS is to import dependencies as relative paths. I hope this article serves as a solid guide to creating extensive E2E tests in your application.

LogRocket lets you replay user sessions, eliminating guesswork by showing exactly what users experienced. It captures console logs, errors, network requests, and pixel-perfect DOM recordings — compatible with all frameworks, and with plugins to log additional context from Redux, Vuex, and @ngrx/store.
With Galileo AI, you can instantly identify and explain user struggles with automated monitoring of your entire product experience.
Modernize how you understand your web and mobile apps — start monitoring for free.

React Server Components and the Next.js App Router enable streaming and smaller client bundles, but only when used correctly. This article explores six common mistakes that block streaming, bloat hydration, and create stale UI in production.

Gil Fink (SparXis CEO) joins PodRocket to break down today’s most common web rendering patterns: SSR, CSR, static rednering, and islands/resumability.

@container scroll-state: Replace JS scroll listeners nowCSS @container scroll-state lets you build sticky headers, snapping carousels, and scroll indicators without JavaScript. Here’s how to replace scroll listeners with clean, declarative state queries.

Explore 10 Web APIs that replace common JavaScript libraries and reduce npm dependencies, bundle size, and performance overhead.
Hey there, want to help make our blog better?
Join LogRocket’s Content Advisory Board. You’ll help inform the type of content we create and get access to exclusive meetups, social accreditation, and swag.
Sign up now