For more than a decade after Django was first released in 2005, pages were mostly static, AJAX was used only in limited use cases, and things were relatively uncomplicated. Over the past five years, real-time web applications have evolved, trending toward more client-server and peer-to-peer interaction. This type of communication is achievable with WebSockets, a new protocol that provides full-duplex communication and maintains a persistent, open connection between client and server.

Django Channels facilitates support of WebSockets in Django in a manner similar to traditional HTTP views. It wraps Django’s native asynchronous view support, allowing Django projects to handle not only HTTP, but also protocols that require long-running connections, such as WebSockets, MQTT, chatbots, etc.
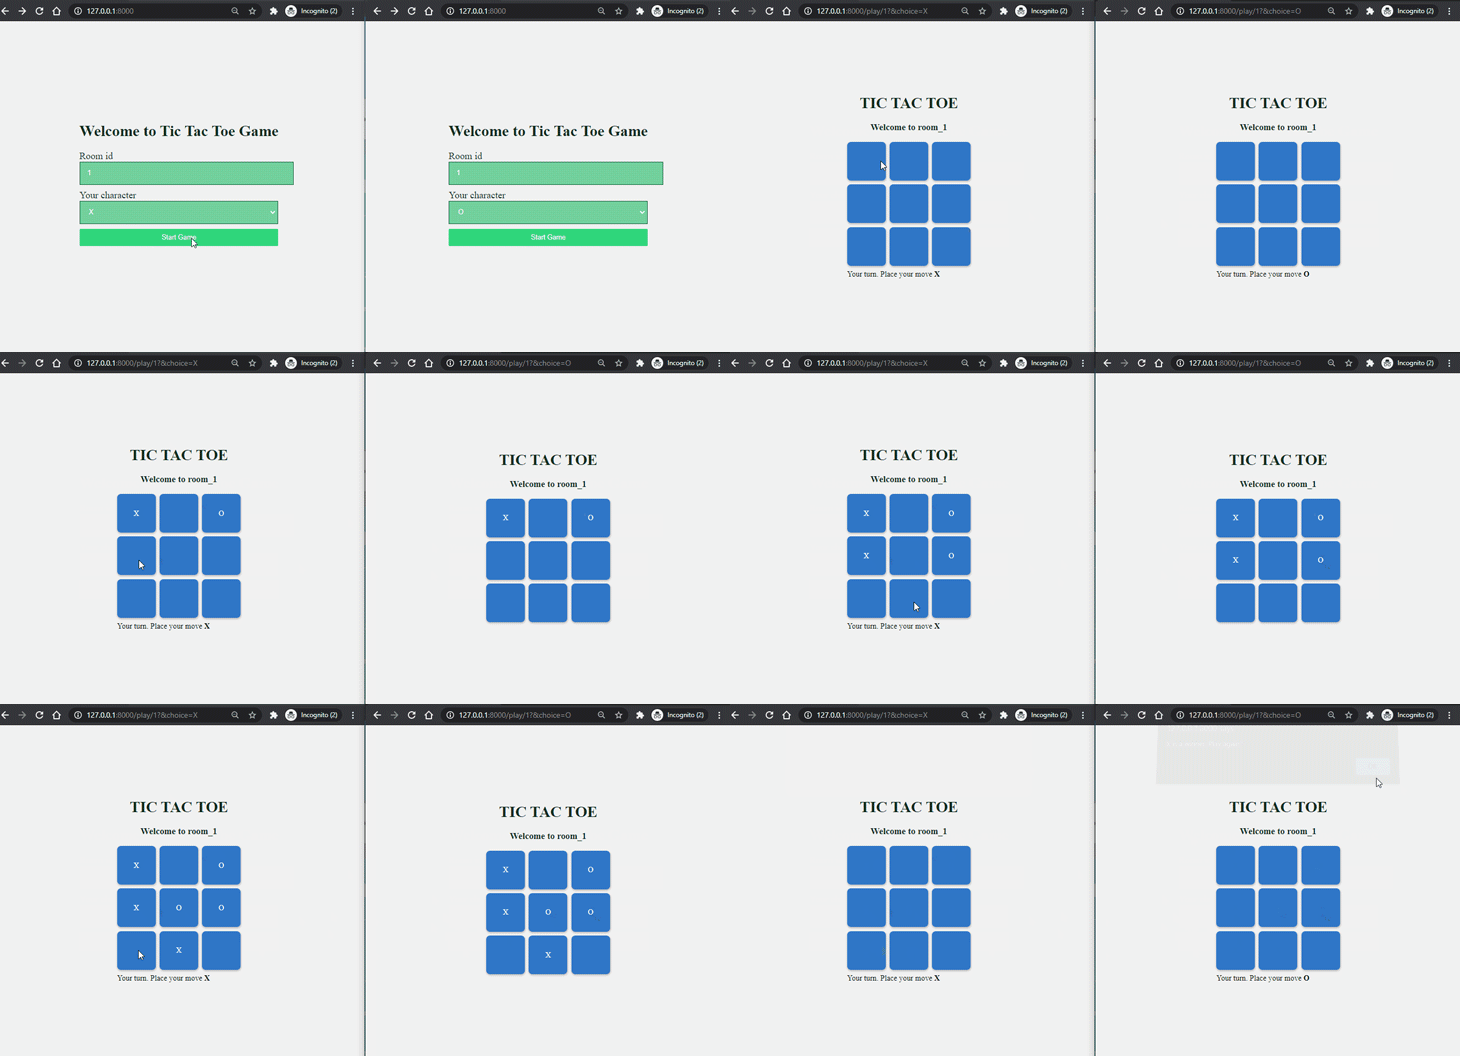
In this tutorial, we’ll show you how to create a real-time app with Django Channels. To demonstrate with a live example, we’ll create a two-player tic-tac-toe game, as illustrated below. You can access the full source code in my GitHub repository.

The Replay is a weekly newsletter for dev and engineering leaders.
Delivered once a week, it's your curated guide to the most important conversations around frontend dev, emerging AI tools, and the state of modern software.
Follow the steps outlined below to configure your Django project.
First, install Django and channels. You must also install channels_redis so that channels knows how to interface with Redis.
Run the following command:
pip install django==3.1
pip install channels==3.0
pip install channels_redis==3.2
You should use pip3 for Linux/mac instead of pip and python3 in place of python. I used django==3.1 and channels==3.0, channels_redis==3.2.0 for this guide.
Start the Django project:
django-admin startproject tic_tac_toe
Next, create an app with the name game:
python manage.py startapp game
Add channels and game in the INSTALLED_APPS inside your settings.py:
## settings.py
INSTALLED_APPS = [
    'django.contrib.admin',
    'django.contrib.auth',
    'django.contrib.contenttypes',
    'django.contrib.sessions',
    'django.contrib.messages',
    'django.contrib.staticfiles',
    'channels',
    'game'
]
Run migrate to apply unapplied migrations:
python manage.py migrate
Also, add STATICFILES_DIRS inside your settings.py:
## settings.py
import os
STATICFILES_DIRS = [
    os.path.join(BASE_DIR, "static"),
]
Now it’s time to create the necessary files for our Django project. Throughout the guide, you may refer to the following directory structure:
├── db.sqlite3
├── game
│   ├── consumers.py
│   ├── routing.py
│   ├── templates
│   │   ├── base.html
│   │   ├── game.html
│   │   └── index.html
│   └── views.py
├── manage.py
├── requirements.txt
├── static
│   ├── css
│   │   └── main.css
│   └── js
│       └── game.js
└── tic_tac_toe
    ├── __init__.py
    ├── asgi.py
    ├── settings.py
    ├── urls.py
    └── wsgi.py
Now let’s integrate Channels into the Django project.
Django >2 doesn’t have built-in ASGI support, so you need to use Channel’s fallback alternative.
Update the asgi.py as shown below:
## tic_tac_toe/asgi.py
import os

import django
from channels.http import AsgiHandler
from channels.routing import ProtocolTypeRouter

os.environ.setdefault('DJANGO_SETTINGS_MODULE', 'tic_tac_toe.settings')
django.setup()

application = ProtocolTypeRouter({
  "http": AsgiHandler(),
  ## IMPORTANT::Just HTTP for now. (We can add other protocols later.)
})
Update settings.py and change the Django application from WSGI to ASGI by making the following changes. This will point the channels at the root routing configuration.
## settings.py
# WSGI_APPLICATION = 'tic_tac_toe.wsgi.application'
# Channels
ASGI_APPLICATION = "tic_tac_toe.asgi.application"
Next, enable the channel layer, which allows multiple consumer instances to talk with each other.
Note that you could the Redis as the backing store. To enable Redis, you could use Method 1 if you want Redis Cloud or Method 2 for local Redis. In this guide, I used Method 3 — In-memory channel layer — which is helpful for testing and for local development purposes.
To enable the channel layer, add the following CHANNEL_LAYERS in settings.py:
## settings.py
CHANNEL_LAYERS = {
    'default': {
        ### Method 1: Via redis lab
        # 'BACKEND': 'channels_redis.core.RedisChannelLayer',
        # 'CONFIG': {
        #     "hosts": [
        #       'redis://h:<password>;@<redis Endpoint>:<port>'
        #     ],
        # },

        ### Method 2: Via local Redis
        # 'BACKEND': 'channels_redis.core.RedisChannelLayer',
        # 'CONFIG': {
        #      "hosts": [('127.0.0.1', 6379)],
        # },

        ### Method 3: Via In-memory channel layer
        ## Using this method.
        "BACKEND": "channels.layers.InMemoryChannelLayer"
    },
}
Make sure that the channels development server is working correctly. Run the following command:
python manage.py runserver
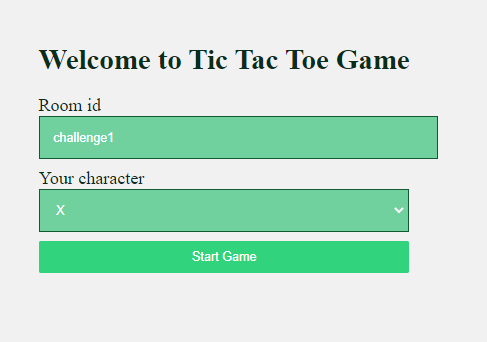
Let’s start by building the index page, where the user is asked for room code and character choice (X or O).
Create the function-based view in game/views.py:
# game/views.py
from django.shortcuts import render, redirect

def index(request):
    if request.method == "POST":
        room_code = request.POST.get("room_code")
        char_choice = request.POST.get("character_choice")
        return redirect(
            '/play/%s?&choice=%s'
            %(room_code, char_choice)
        )
    return render(request, "index.html", {})
Next, create the route for the index view in tic_tac_toe/urls.py:
## urls.py
from django.urls import path
from game.views import index

urlpatterns = [
    ## ... Other URLS
    path('', index),
]
Now, create the base template in game/templates/base.html (ignore if you have already created it). This template is going to be inherited to other template views.
{% comment %} base.html {% endcomment %}
{% load static %}
<!DOCTYPE html>
<html lang="en">
<head>
    <meta charset="UTF-8">
    <meta name="viewport" content="width=device-width, initial-scale=1.0">
    <title>Tic Tac Toe</title>
     <link rel='stylesheet' href='{% static "/css/main.css" %}'>
</head>
<body>
{% block content %}
{% endblock content %}
<script src = "{% static 'js/game.js' %}"></script>
{% block javascript %}
{% endblock javascript %}
</body>
</html>
Create the view template for the index view in game/templates/index.html:
{% comment %} index.html {% endcomment %}

{% extends 'base.html' %}
{% block content %}
<div class="wrapper">
  <h1>Welcome to Tic Tac Toe Game</h1>
  <form method="POST">
    {% csrf_token %}
    <div class='form-control'>
      <label for="room">Room id</label>
      <input id="room" type="text" name="room_code" required />
    </div>
    <div class='form-control'>
      <label for="character_choice">Your character</label>
      <select for="character_choice" name = "character_choice">
      <option value="X">X</option>
      <option value="O">O</option>
      </select>
    </div>
    <input type="submit" class="button" value="Start Game" />
</div>
</form>
{% endblock content %}
Start the Django development server and navigate to http://127.0.0.1:8000 to check whether the index page is working:

Now that the index page is done, let’s build the game page.
Start by creating game/views.py:
## game/views.py
from django.shortcuts import render, redirect
from django.http import Http404

def game(request, room_code):
    choice = request.GET.get("choice")
    if choice not in ['X', 'O']:
        raise Http404("Choice does not exists")
    context = {
        "char_choice": choice,
        "room_code": room_code
    }
    return render(request, "game.html", context)
Add the URL route of the above view:
## urls.py
from django.urls import path
from game.views import game

urlpatterns = [
    ## other url routes
    path('play/<room_code>', game),
]
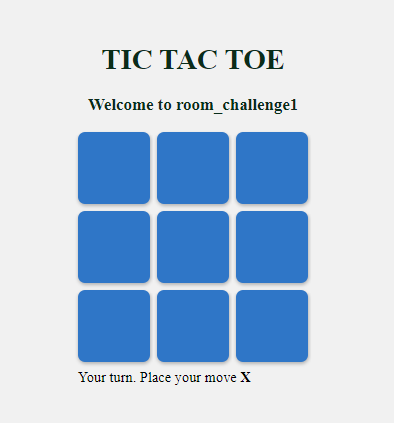
Now that the backend is done, let’s create the frontend of the game board. Below is the game/templates/game.html Django template:
{% extends 'base.html' %}
{% comment %} game.html {% endcomment %}
{% load static %}

{% block content %}
<div class="wrapper">
    <div class="head">
        <h1>TIC TAC TOE</h1>
        <h3>Welcome to room_{{room_code}}</h3>
    </div>
    <div id = "game_board" room_code = {{room_code}} char_choice = {{char_choice}}>
        <div class="square" data-index = '0'></div>
        <div class="square" data-index = '1'></div>
        <div class="square" data-index = '2'></div>
        <div class="square" data-index = '3'></div>
        <div class="square" data-index = '4'></div>
        <div class="square" data-index = '5'></div>
        <div class="square" data-index = '6'></div>
        <div class="square" data-index = '7'></div>
        <div class="square" data-index = '8'></div>
    </div>
    <div id = "alert_move">Your turn. Place your move <strong>{{char_choice}}</strong></div>
</div>
{% endblock content %}
To make the grid and index page look good, add the CSS, as shown below:
/* static/css/main.css */
body {
    /* width: 100%; */
    height: 90vh;
    background: #f1f1f1;
    display: flex;
    justify-content: center;
    align-items: center;
}
#game_board {
    display: grid;
    grid-gap: 0.5em;
    grid-template-columns: repeat(3, 1fr);
    width: 16em;
    height: auto;
    margin: 0.5em 0;
}
.square{
    background: #2f76c7;
    width: 5em;
    height: 5em;
    display: flex;
    justify-content: center;
    align-items: center;
    border-radius: 0.5em;
    font-weight: 500;
    color: white;
    box-shadow: 0.025em 0.125em 0.25em rgba(0, 0, 0, 0.25);
}
.head{
    width: 16em;
    text-align: center;
}
.wrapper h1, h3 {
    color: #0a2c1a;
}
label {
    font-size: 20px;
    color: #0a2c1a;
}
input, select{
    margin-bottom: 10px;
    width: 100%;
    padding: 15px;
    border: 1px solid #125a33;
    font-size: 14px;
    background-color: #71d19e;
    color: white;
}
.button{
    color: white;
    white-space: nowrap;
    background-color: #31d47d;
    padding: 10px 20px;
    border: 0;
    border-radius: 2px;
    transition: all 150ms ease-out;
}
When you run the development server, you’ll see the game board, as shown below:

Now that the pages are created, let’s add the WebSockets to it.
Enter the following code in game/consumers.py:
## game/consumers.py
import json
from channels.generic.websocket import AsyncJsonWebsocketConsumer

class TicTacToeConsumer(AsyncJsonWebsocketConsumer):
    async def connect(self):
        self.room_name = self.scope['url_route'\]['kwargs']['room_code']
        self.room_group_name = 'room_%s' % self.room_name

        # Join room group
        await self.channel_layer.group_add(
            self.room_group_name,
            self.channel_name
        )
        await self.accept()

    async def disconnect(self, close_code):
        print("Disconnected")
        # Leave room group
        await self.channel_layer.group_discard(
            self.room_group_name,
            self.channel_name
        )

    async def receive(self, text_data):
        """
        Receive message from WebSocket.
        Get the event and send the appropriate event
        """
        response = json.loads(text_data)
        event = response.get("event", None)
        message = response.get("message", None)
        if event == 'MOVE':
            # Send message to room group
            await self.channel_layer.group_send(self.room_group_name, {
                'type': 'send_message',
                'message': message,
                "event": "MOVE"
            })

        if event == 'START':
            # Send message to room group
            await self.channel_layer.group_send(self.room_group_name, {
                'type': 'send_message',
                'message': message,
                'event': "START"
            })

        if event == 'END':
            # Send message to room group
            await self.channel_layer.group_send(self.room_group_name, {
                'type': 'send_message',
                'message': message,
                'event': "END"
            })

    async def send_message(self, res):
        """ Receive message from room group """
        # Send message to WebSocket
        await self.send(text_data=json.dumps({
            "payload": res,
        }))
Create a routing configuration for the game app that has a route to the consumer. Create a new file game/routing.py and paste the following code:
## game/routing.py
from django.conf.urls import url
from game.consumers import TicTacToeConsumer

websocket_urlpatterns = [
    url(r'^ws/play/(?P<room_code>\w+)/$', TicTacToeConsumer.as_asgi()),
]
The next step is to point the root routing configuration at the game.routing module. Update tic_tac_toe/asgi.py as follows:
## tic_tac_toe/asgi.py
import os

from django.core.asgi import get_asgi_application
from channels.auth import AuthMiddlewareStack
from channels.routing import ProtocolTypeRouter, URLRouter
import game.routing

os.environ.setdefault('DJANGO_SETTINGS_MODULE', 'tic_tac_toe.settings')

# application = get_asgi_application()
application = ProtocolTypeRouter({
    "http": get_asgi_application(),
    "websocket": AuthMiddlewareStack(
        URLRouter(
            game.routing.websocket_urlpatterns
        )
    ),
})
Let’s build the final part of the code by creating the JavaScript, which is the client side that talks to the server asynchronously. Put the following code in static/js/game.js:
// static/js/game.js

var roomCode = document.getElementById("game_board").getAttribute("room_code");
var char_choice = document.getElementById("game_board").getAttribute("char_choice");

var connectionString = 'ws://' + window.location.host + '/ws/play/' + roomCode + '/';
var gameSocket = new WebSocket(connectionString);
// Game board for maintaing the state of the game
var gameBoard = [
    -1, -1, -1,
    -1, -1, -1,
    -1, -1, -1,
];
// Winning indexes.
winIndices = [
    [0, 1, 2],
    [3, 4, 5],
    [6, 7, 8],
    [0, 3, 6],
    [1, 4, 7],
    [2, 5, 8],
    [0, 4, 8],
    [2, 4, 6]
]
let moveCount = 0; //Number of moves done
let myturn = true; // Boolean variable to get the turn of the player.

// Add the click event listener on every block.
let elementArray = document.getElementsByClassName('square');
for (var i = 0; i < elementArray.length; i++){
    elementArray[i].addEventListener("click", event=>{
        const index = event.path[0].getAttribute('data-index');
        if(gameBoard[index] == -1){
            if(!myturn){
                alert("Wait for other to place the move")
            }
            else{
                myturn = false;
                document.getElementById("alert_move").style.display = 'none'; // Hide
                make_move(index, char_choice);
            }
        }
    })
}

// Make a move
function make_move(index, player){
    index = parseInt(index);
    let data = {
        "event": "MOVE",
        "message": {
            "index": index,
            "player": player
        }
    }

    if(gameBoard[index] == -1){
        // if the valid move, update the gameboard
        // state and send the move to the server.
        moveCount++;
        if(player == 'X')
            gameBoard[index] = 1;
        else if(player == 'O')
            gameBoard[index] = 0;
        else{
            alert("Invalid character choice");
            return false;
        }
        gameSocket.send(JSON.stringify(data))
    }
    // place the move in the game box.
    elementArray[index].innerHTML = player;
    // check for the winner
    const win = checkWinner();
    if(myturn){
        // if player winner, send the END event.
        if(win){
            data = {
                "event": "END",
                "message": `${player} is a winner. Play again?`
            }
            gameSocket.send(JSON.stringify(data))
        }
        else if(!win && moveCount == 9){
            data = {
                "event": "END",
                "message": "It's a draw. Play again?"
            }
            gameSocket.send(JSON.stringify(data))
        }
    }
}

// function to reset the game.
function reset(){
    gameBoard = [
        -1, -1, -1,
        -1, -1, -1,
        -1, -1, -1,
    ];
    moveCount = 0;
    myturn = true;
    document.getElementById("alert_move").style.display = 'inline';
    for (var i = 0; i < elementArray.length; i++){
        elementArray[i].innerHTML = "";
    }
}

// check if their is winning move
const check = (winIndex) => {
    if (
      gameBoard[winIndex[0]] !== -1 &&
      gameBoard[winIndex[0]] === gameBoard[winIndex[1]] &&
      gameBoard[winIndex[0]] === gameBoard[winIndex[2]]
    )   return true;
    return false;
};

// function to check if player is winner.
function checkWinner(){
    let win = false;
    if (moveCount >= 5) {
      winIndices.forEach((w) => {
        if (check(w)) {
          win = true;
          windex = w;
        }
      });
    }
    return win;
}

// Main function which handles the connection
// of websocket.
function connect() {
    gameSocket.onopen = function open() {
        console.log('WebSockets connection created.');
        // on websocket open, send the START event.
        gameSocket.send(JSON.stringify({
            "event": "START",
            "message": ""
        }));
    };

    gameSocket.onclose = function (e) {
        console.log('Socket is closed. Reconnect will be attempted in 1 second.', e.reason);
        setTimeout(function () {
            connect();
        }, 1000);
    };
    // Sending the info about the room
    gameSocket.onmessage = function (e) {
        // On getting the message from the server
        // Do the appropriate steps on each event.
        let data = JSON.parse(e.data);
        data = data["payload"];
        let message = data['message'];
        let event = data["event"];
        switch (event) {
            case "START":
                reset();
                break;
            case "END":
                alert(message);
                reset();
                break;
            case "MOVE":
                if(message["player"] != char_choice){
                    make_move(message["index"], message["player"])
                    myturn = true;
                    document.getElementById("alert_move").style.display = 'inline';
                }
                break;
            default:
                console.log("No event")
        }
    };

    if (gameSocket.readyState == WebSocket.OPEN) {
        gameSocket.onopen();
    }
}

//call the connect function at the start.
connect();
Now we’re finally finished coding and ready to play our tic-tac-toe game!
We covered a lot of topics in this tutorial: Django Channels, WebSockets, and some frontend. Our game so far has only minimal, basic functionality. You’re welcome to use your new foundational knowledge to play around and add more functionality to it. Some additional exercises you can do include:
Check out my GitHub repository for the complete source code used in this example.
Install LogRocket via npm or script tag. LogRocket.init() must be called client-side, not
server-side
$ npm i --save logrocket

// Code:

import LogRocket from 'logrocket';
LogRocket.init('app/id');
// Add to your HTML:

<script src="https://cdn.lr-ingest.com/LogRocket.min.js"></script>
<script>window.LogRocket && window.LogRocket.init('app/id');</script>

Compare the top AI development tools and models of February 2026. View updated rankings, feature breakdowns, and find the best fit for you.

Broken npm packages often fail due to small packaging mistakes. This guide shows how to use Publint to validate exports, entry points, and module formats before publishing.

Discover what’s new in The Replay, LogRocket’s newsletter for dev and engineering leaders, in the February 11th issue.

Cut React LCP from 28s to ~1s with a four-phase framework covering bundle analysis, React optimizations, SSR, and asset/image tuning.
Would you be interested in joining LogRocket's developer community?
Join LogRocket’s Content Advisory Board. You’ll help inform the type of content we create and get access to exclusive meetups, social accreditation, and swag.
Sign up now
6 Replies to "Django Channels and WebSockets"
Great tutorial!
Everything works right out of the box except for the following minor details
– move extends directive to top of file in game/templates/main.html
– remove extraneous backslashes from game/consumers.py
self.room_name = self.scope\[‘url_route’\][‘kwargs’][‘room_code’]
none of this works for me…
GEThttp://localhost:8081/favicon.ico
[HTTP/1.1 404 Not Found 0ms]
GETws://localhost:8081/ws/play/xxx/
[HTTP/1.1 404 Not Found 7ms]
Firefox can’t establish a connection to the server at ws://localhost:8081/ws/play/xxx/. game.js:5:17
Socket is closed. Reconnect will be attempted in 1 second. game.js:132:17
I am new here. I read the whole tutorial and got an amazing experience from your article. Thank you for sharing.
Thank very much ……
Great tutorial, in addition to Silkentrance updates, for django 4 I had to make the following changes:
– game.js – change event.path[0] to event.composedPath()[0]
– routing.py – change django.conf.urls import url to from django.urls import re_path
– routing.py – change url to re_path in websocket_urlpatterns
Thank you for putting this together!
how to deploy it on heroku?