Editor’s note: This article was last updated by Isaac Okoro on 29 August 2024 to cover how Server Actions allow developers to use event handlers in Server Components, as well as to present commonly asked questions about using Server Actions.

Next.js Server Actions are functions that execute on the server side. Having these special functions that only run on the server means that developers can offload responsibilities like data fetching and mutations to them, avoiding the vulnerabilities and security concerns of fetching and mutating data from the client.
To fully understand Server Actions, it is important to understand the problems they address, what we did prior to them, and their evolution. We’ll delve into all of these aspects as we progress through this post. But first, let’s start from the beginning.
The journey began with server-side rendering (SSR) in PHP. Things like data fetching, mutations, and CPU-intensive tasks happened on the server so that the browser only got a lightweight, rendered page to show users:
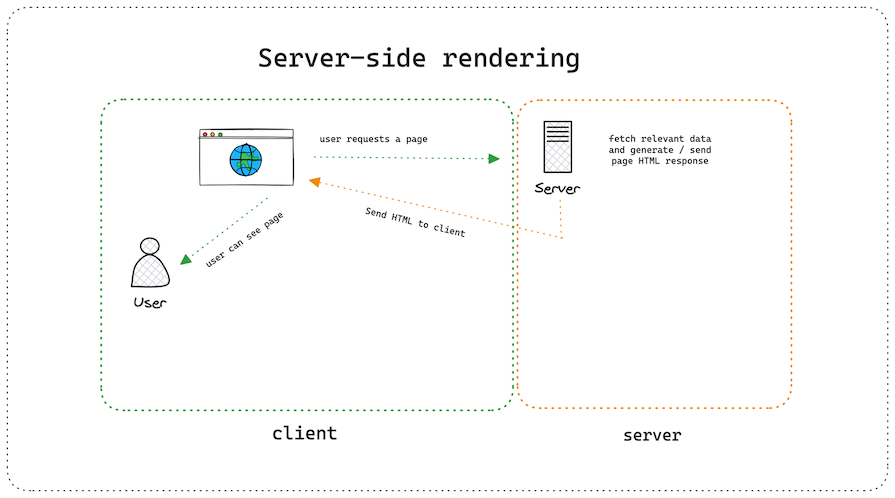
However, this meant that for every user navigation, we needed to perform that round trip again: send a request to the server, generate that page, and send it to the client. The user had to wait for that process to complete each time before they could see and interact with the page — we didn’t like that.
Enter the next wave of innovation: client-side rendering (CSR). Instead of sending a new request to the server every time a user navigation happens, what if we made the client handle that navigation?
That would mean that the first time the server responds, it will send the rendering code to the client. This enables the client to handle the page rendering as the user navigates through the site:
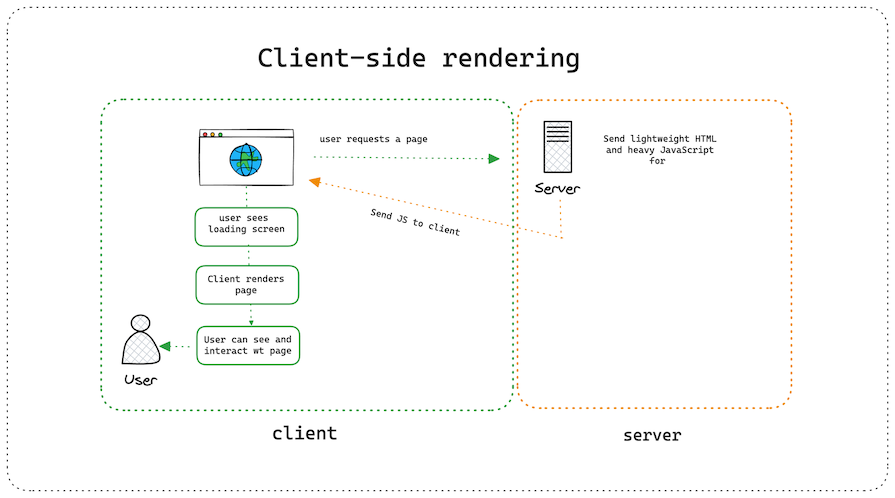
With CSR, we solved the problem of round trips, achieving faster and more responsive page transitions. But we also introduced a new problem for ourselves.
When the server sends JavaScript to the browser, search engines aren’t able to index the site properly because the actual HTML of the site is not fully formed yet. The browser will have to first download and execute the JavaScript from the server and then hydrate the page to form the complete markup of the site.
This is where static site generation (SSG) came in. It was the latest innovation in achieving faster page loads with SEO-ready markup. The idea is to combine the best features of CSR and SSR to create the best of both worlds. We thought, why not pre-generate all the site’s pages on the server at build time?
A build script or static site generator tool processes the source code and contents to generate static HTML files for each page on the website:
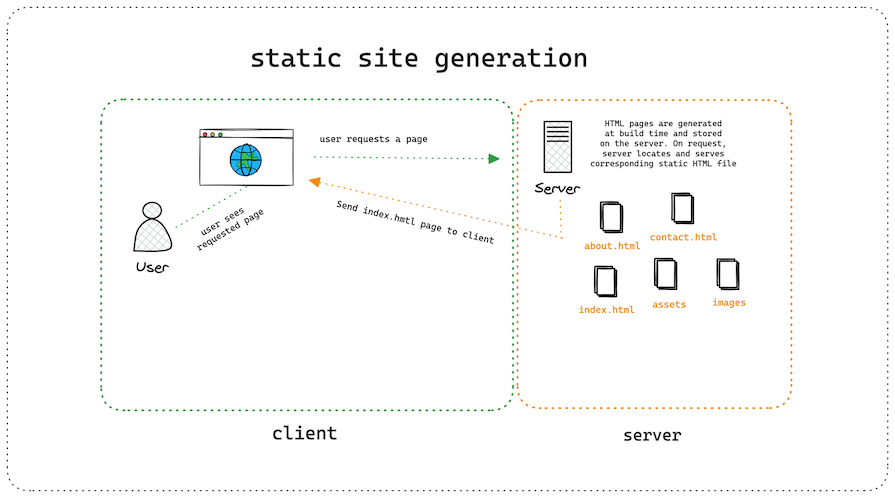
The build process may also involve fetching data from various sources, such as APIs or databases, and rendering static HTML pages. However, there were concerns about how it handles dynamic content updates and real-time data.
Having no clear path for those kinds of scenarios suggested that SSG may not be ideal for all kinds of websites. As a result, we now make our way back to SSR with React Server Actions.
With the journey we’ve been on from SSR to CSR to SSG, and everything in between, one thing became certain: there’s no one-size-fits-all solution. So React Server Components (RSCs) were released to give developers the ability to separate concerns.
With Server Actions, you can now say something like: “XYZ components should execute ONLY on the server, while ABC components should execute on the client.” This functionality is made possible by React Actions, which is the concept the Next.js Server Actions are built upon:
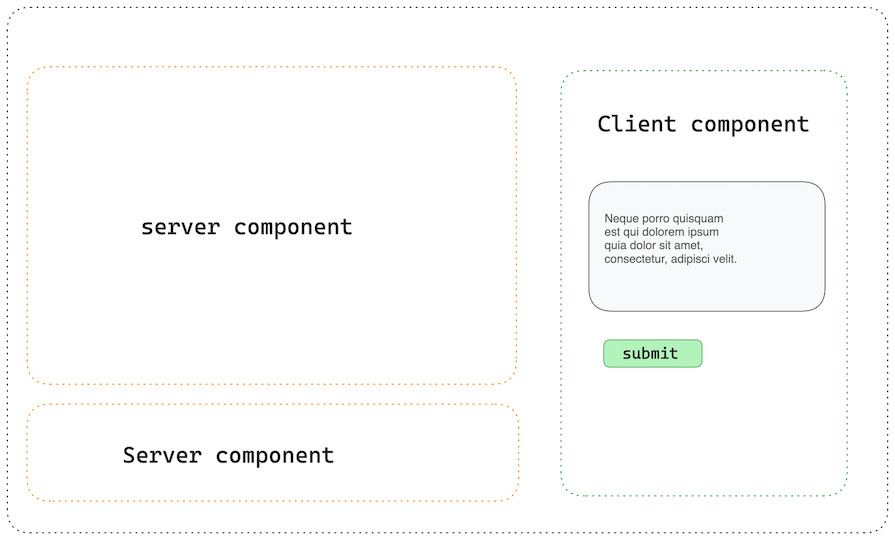
Server Actions were introduced in Next.js v14 as a way to write functions that are earmarked to execute either on the server or on the client. This is particularly helpful in the areas like data fetching and mutations.
The combination of RSCs and Server Actions in Next.js meant that we had a better way of thinking about data fetching. Previously, we fetched data in many different ways.
For example, you could use the useEffect Hook to fetch data and manage loading states. You could also do page-level data fetching with GetStaticProps and GetServerSideProps. When you need to make database calls with sensitive credentials, you set up an API route and define your functions there.
Now, with RSCs and Server Actions, it’s much easier to make sense of things. Every component can fetch its own data and mutations can happen right within the component that does it, alleviating the need for external API routes. Let’s see Server Actions in action (pun intended).
We’ll build a simple to-do project to show how we did things in the past and how we do things now, with Server Actions. This project will accept user input and update a MongoDB database.
To begin, we will create a new Next.js 14 app by running the following command:
npx create-next-app@latest server-action
Accept all the default prompts by pressing the Enter key until completion. When the project is set up, navigate into the project directory and run the development server:
cd server-action && yarn dev
Now the development server should be running on https://localhost:300.
Lastly, install the Supabase JavaScript package into the project if you will use Supabase for your database needs:
npm install @supabase/supabase-js
Here, we will create a form to handle user inputs — in this case, the user’s to-dos. To do this, add the following snippet to the app/page.tsx file:
// app/page.tsx
export default function TodoList() {
  return (
    <>
     <h2>Server Actions Demo</h2>
        <div>
          <form action="#" method="POST">
            <div>
              <label htmlFor="todo">Todo</label>
              <div>
                <input id="todo" name="text" type="text"
                  placeholder="What needs to be done?"
                  required
                />
              </div>
            </div>
            <div>
              <button type="submit"> Add Todo</button>
            </div>
          </form>
        </div>
    </>
  );
}
I have excluded the Tailwind classes on the snippet above to avoid clutter.
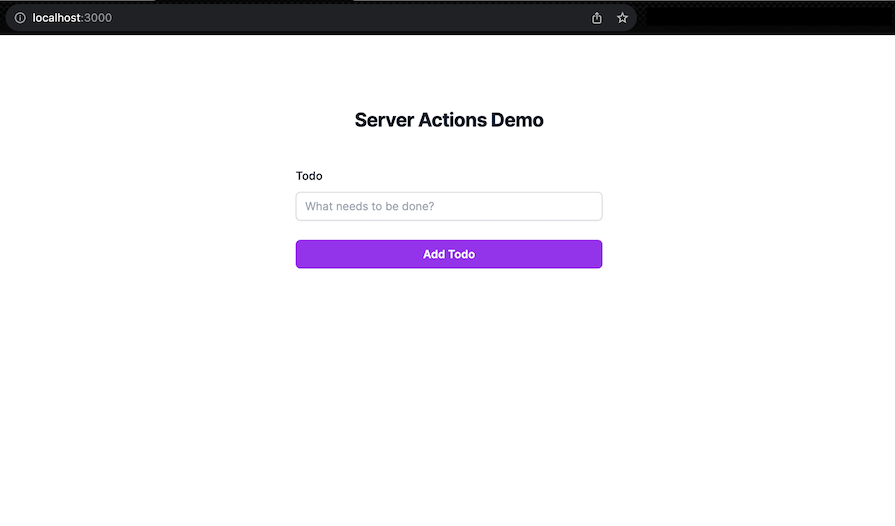
With that, we should now get a barebones form that we can start messing with:
In the past, when we wanted to handle data mutations in Next.js, we set up an API route like pages/api/form.js. In there, we define a function that receives our form submission and stores it in the database. The file will typically look like this:
// pages/api/form.js
export default async function handler(req, res) {
  if (req.method === 'POST') {
    const { todoItem } = req.body;

    if (!todoItem) {
      // fail fast
    }

    try {
      // save todo item to database
    } catch (error) {
      // handle error
    }
  } else {
    // handle req.methong != POST
  }
}
We then need to set up the client to post the form data (to-do item) to that route when a user submits a to-do item:
// pages/index.tsx
import { useState } from 'react';

export default function Home() {
  const [todoItem, setTodoItem] = useState('');

  const handleSubmit = async (event: React.FormEvent<HTMLFormElement>) => {
    event.preventDefault();
    try {
      // Send a POST request to the API route with the todo item
      const response = await fetch('/api/form', {
        method: 'POST',
        headers: {
          'Content-Type': 'application/json',
        },
        body: JSON.stringify({ todoItem }),
      });

      if (response.ok) {
        console.log('Todo item added successfully');
      } else {
        console.error('Failed to add todo item');
      }
    } catch (error) {
      console.error('Error:', error);
    }
  };

  return (
    <div>
      <h1>Todo Application</h1>
      <form onSubmit={handleSubmit}>
        <label>
          Todo Item:
          <input
            type="text"
            value={todoItem}
            onChange={(e) => setTodoItem(e.target.value)}
          />
        </label>
        <button type="submit">Add Todo</button>
      </form>
    </div>
  );
}
This would successfully post the form data to our api/form route, which would in turn post that data to our database. Practically, we also need to update the UI to show the to-do item that just got added.
So the following operations need to happen for this form submission process to be completed:
api/form routeThat was how we handled form submissions in the past, but this process was simplified with the introduction of Server Actions.
As I mentioned earlier, Server Actions allow us to create functions that can only run on the server, which means that we can handle database mutations right inside our components. To post the form data to our database using Server Actions, let’s update the app/page.tsx file like so:
// app/page.tsx
import { createClient } from '@supabase/supabase-js';
export default function TodoList() {

  const addTodo = async (formData: FormData) => {
    'use server';
    const supabaseUrl = 'YOUR_SUPABASE_URL';
    const supabaseKey = process.env.SUPABASE_KEY;
    const supabase = createClient( supabaseUrl, supabaseKey);
    const todoItem = formData.get('todo');
    if (!todoItem) {
      return;
    }
    // Save todo item to database
    const { data, error } = await supabase.from('todos').insert({
      todo: todoItem,
    });
  };

  return (
    <>
     <h2>Server Actions Demo</h2>
        <div>
          <form action={addTodo} method="POST">
            <div>
              <label htmlFor="todo">Todo</label>
              <div>
                <input id="todo" name="text" type="text"
                  placeholder="What needs to be done?"
                  required
                />
              </div>
            </div>
            <div>
              <button type="submit"> Add Todo</button>
            </div>
          </form>
        </div>
    </>
  );
}
That’s it. We updated the action attribute on the form to call the addTodo function. The addTodo function is a Server Action that receives a formData prop for easy access to the form values. The 'use server' directive specifies that this function should only execute on the server. As such, we can perform database mutations in it as we just did.
At this point, if a user clicks the AddTodo button, sure enough, we can see that the provided to-do item gets added to the database:
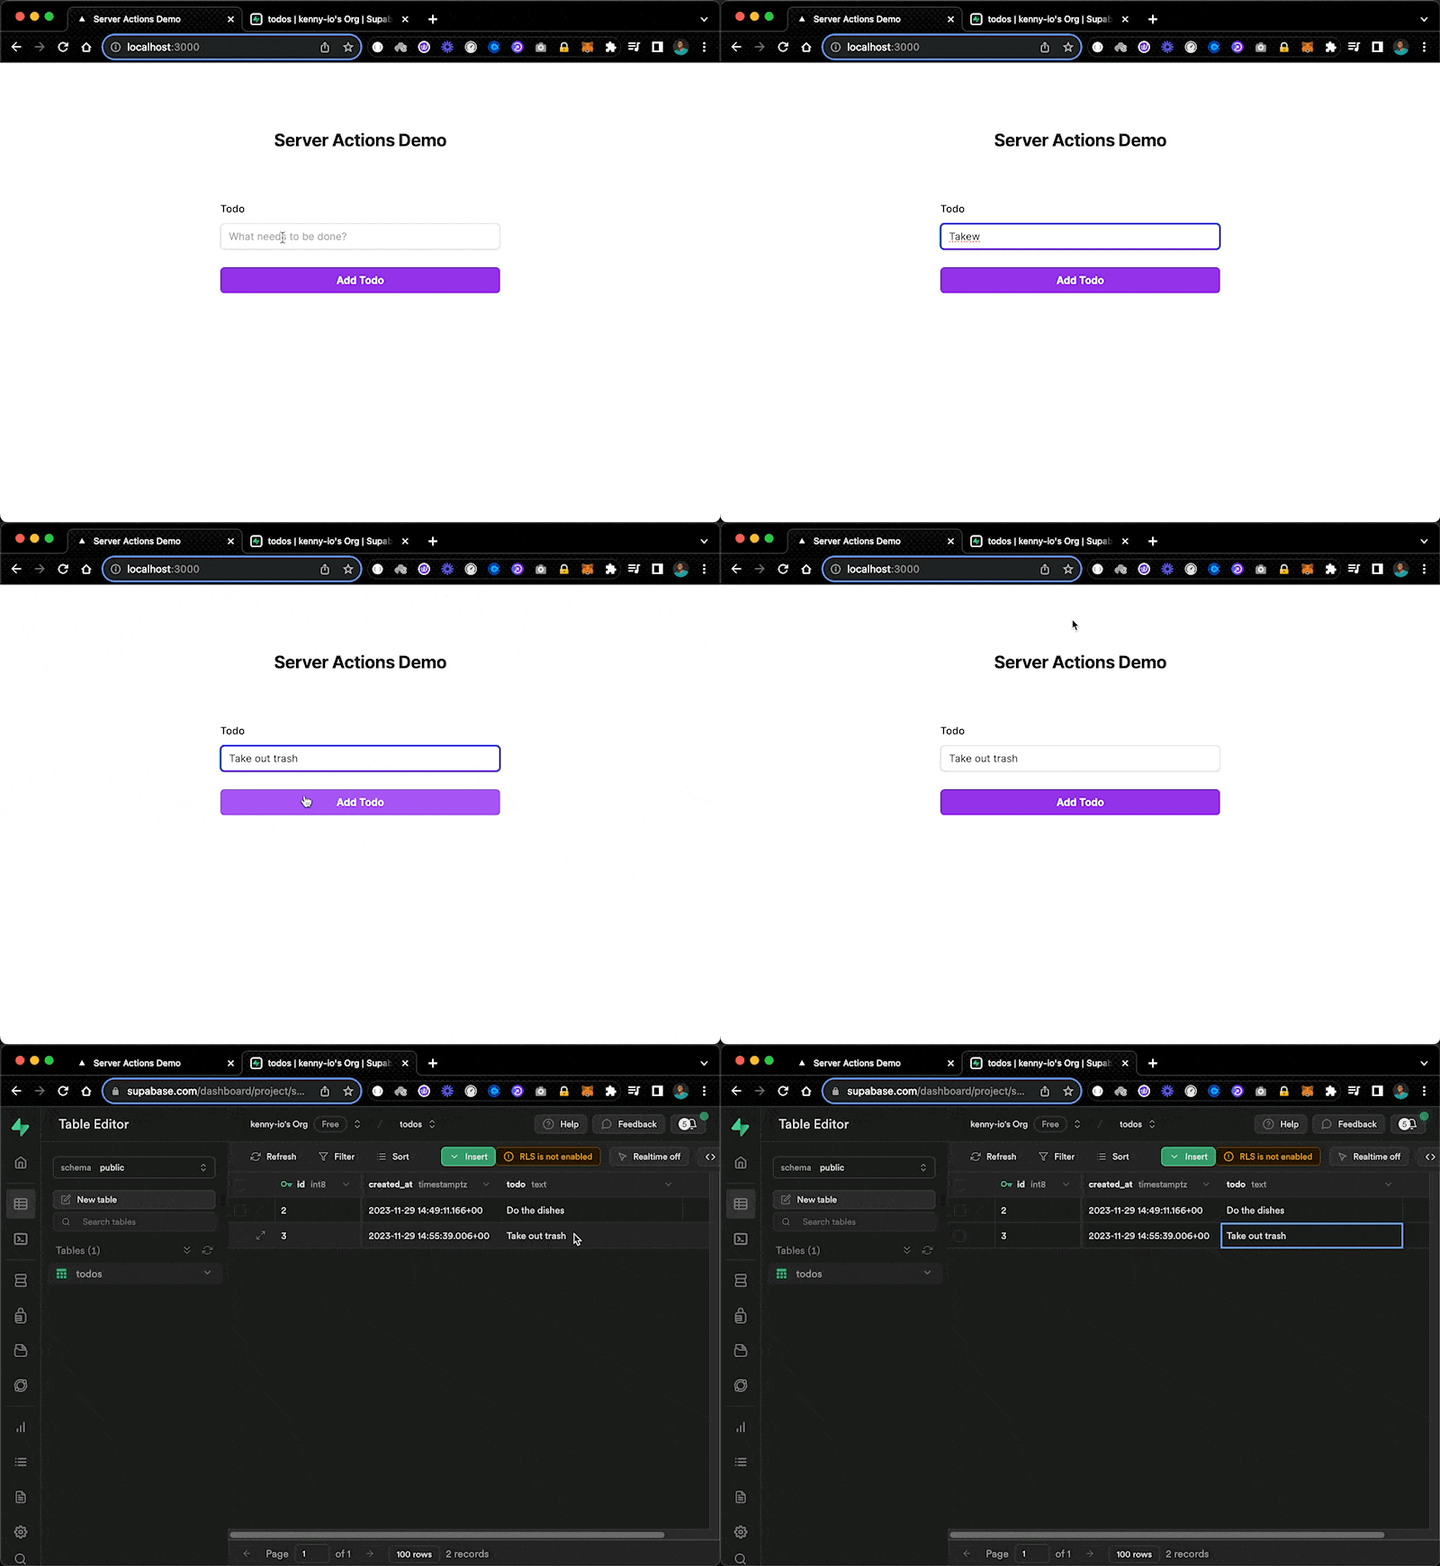
You may notice from the GIF above that the database updates with the form data as expected, but the UI doesn’t update. Let’s fix that by fetching the to-dos and listing them on the page.
First, let’s fetch the to-do data from the database by updating the app/page.tsx file like so:
// app/page.tsx
import { createClient } from '@supabase/supabase-js';
export default function TodoList() {
+  const supabaseUrl = 'YOUR_SUPABASE_URL';
+  const supabaseKey = process.env.SUPABASE_KEY;
+  const supabase = createClient( supabaseUrl, supabaseKey);

+ const { data, error } = await supabase.from('todos').select('todo');

  const addTodo = async (formData: FormData) => {
    'use server';
  const supabaseUrl = 'YOUR_SUPABASE_URL';
  const supabaseKey = process.env.SUPABASE_KEY;
  const supabase = createClient( supabaseUrl, supabaseKey);
    // add todo to DB
  };

  return (
    <>
     <h2>Server Actions Demo</h2>
        <div>
          <form action={addTodo} method="POST">
            <div>
              <label htmlFor="todo">Todo</label>
              <div>
                <input id="todo" name="text" type="text"
                  placeholder="What needs to be done?"
                  required
                />
              </div>
            </div>
            <div>
              <button type="submit"> Add Todo</button>
            </div>
          </form>
 +           <ul>
 +           {data &&
 +           data.map((todo: any) => (
 +                <li
 +                  key={todo._id}                  >
 +                  <span>{todo.todo}</span>
 +                </li>
 +              ))}
 +          </ul>
        </div>
    </>
  );
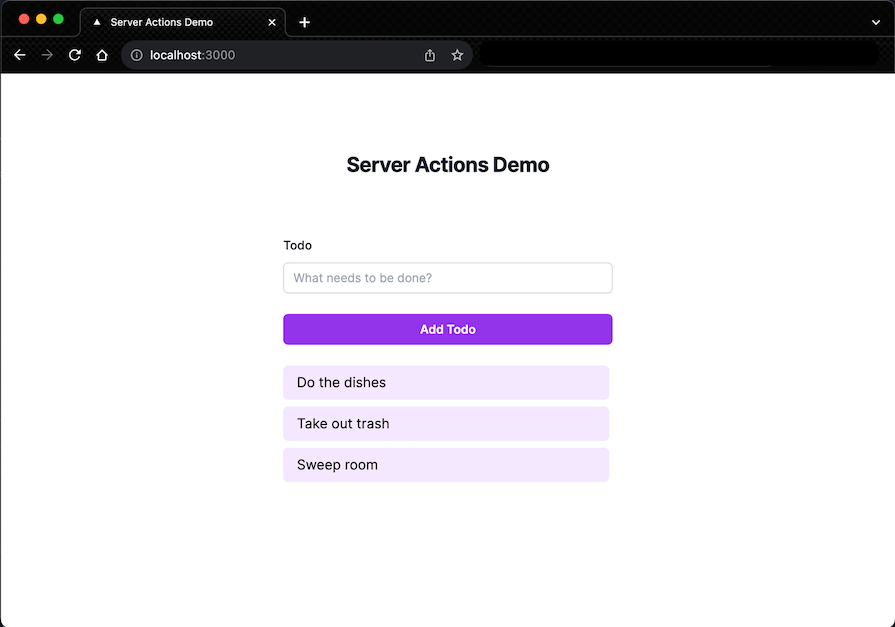
With this new addition, we should now see a list of all the to-do items we’ve added to the database:
However, you may notice that we initialized the database twice in that file: first inside the parent TodoList() to fetch to-dos on the client, and second inside the addTodos Server Action where we post to-do items to the database.
This is because we can’t use variables and props initialized in the client in a Server Action. So, in simpler terms, you can’t define and use Server Actions directly inside a Client Component. So how should we use Server Actions in Client Components?
To use the addTodos Server Action properly in our Client Component, we need to extract it into a different file, and then import it into the Client Component. This is a good way to enforce separation of concerns as it ensures that every piece of code the Action needs is contained within the Action itself and doesn’t get mixed with client-side code.
To solve this, move the Server Action into an actions directory and define it there. Create a app/src/actions/addTodo.ts file and update it like this:
'use server';
import { createClient } from '@supabase/supabase-js';
const supabaseUrl = 'YOUR_SPB_URL';
const supabaseKey = process.env.SUPABASE_KEY;
const supabase = createClient(supabaseUrl, supabaseKey ?? '');
export default async function addTodo(formData: FormData) {
  'use server';
  const todoItem = formData.get('todo');
  if (!todoItem) {
    return;
  }
  // Save todo item to supabase database
  const { data, error } = await supabase.from('todos').insert({
    todo: todoItem,
    created_at: new Date().toISOString(),
  });
}
Here, we’ve extracted the addTodo Server Action from the Client Component into its own directory. To use it again in the client, we can simply import it into the component like so:
import addTodo from '@/actions/addTodo';
This pattern also allows us to define multiple Server Actions in the same file and import them where they are needed without mixing it up with client-side logic. Now that we’ve organized the codebase into a more composable architecture, let’s continue with the demo.
So far, we’ve been able to POST to-dos to our database using the Server Action and also fetch the to-do data from the database and display it for users. However, if a user adds a new to-do item, the UI won’t update — even with a page reload. This is due to the way Next.js caches requests.
To fix that, we need to revalidate the path we are on when we submit the form to burst the cache and fetch the latest data after the form submission. So update the Server Action like this:
// src/app/actions/addTodo.ts
'use server';
+ import { revalidatePath } from 'next/cache';
  import { createClient } from '@supabase/supabase-js';
  const supabaseUrl = 'https://spzrankpwrdffeakqkbi.supabase.co';
  const supabaseKey = process.env.SUPABASE_KEY;
  const supabase = createClient(supabaseUrl, supabaseKey ?? '');
  export default async function addTodo(formData: FormData) {
    'use server';
    const todoItem = formData.get('todo');
    if (!todoItem) {
      return;
    }
    // Save todo item to supabase database
    const { data, error } = await supabase.from('todos').insert({
      todo: todoItem,
      created_at: new Date().toISOString(),
    });
 +   revalidatePath('/');
  }
With the revalidation piece in place, adding a new to-do item will now also update the UI with the latest item in the database:
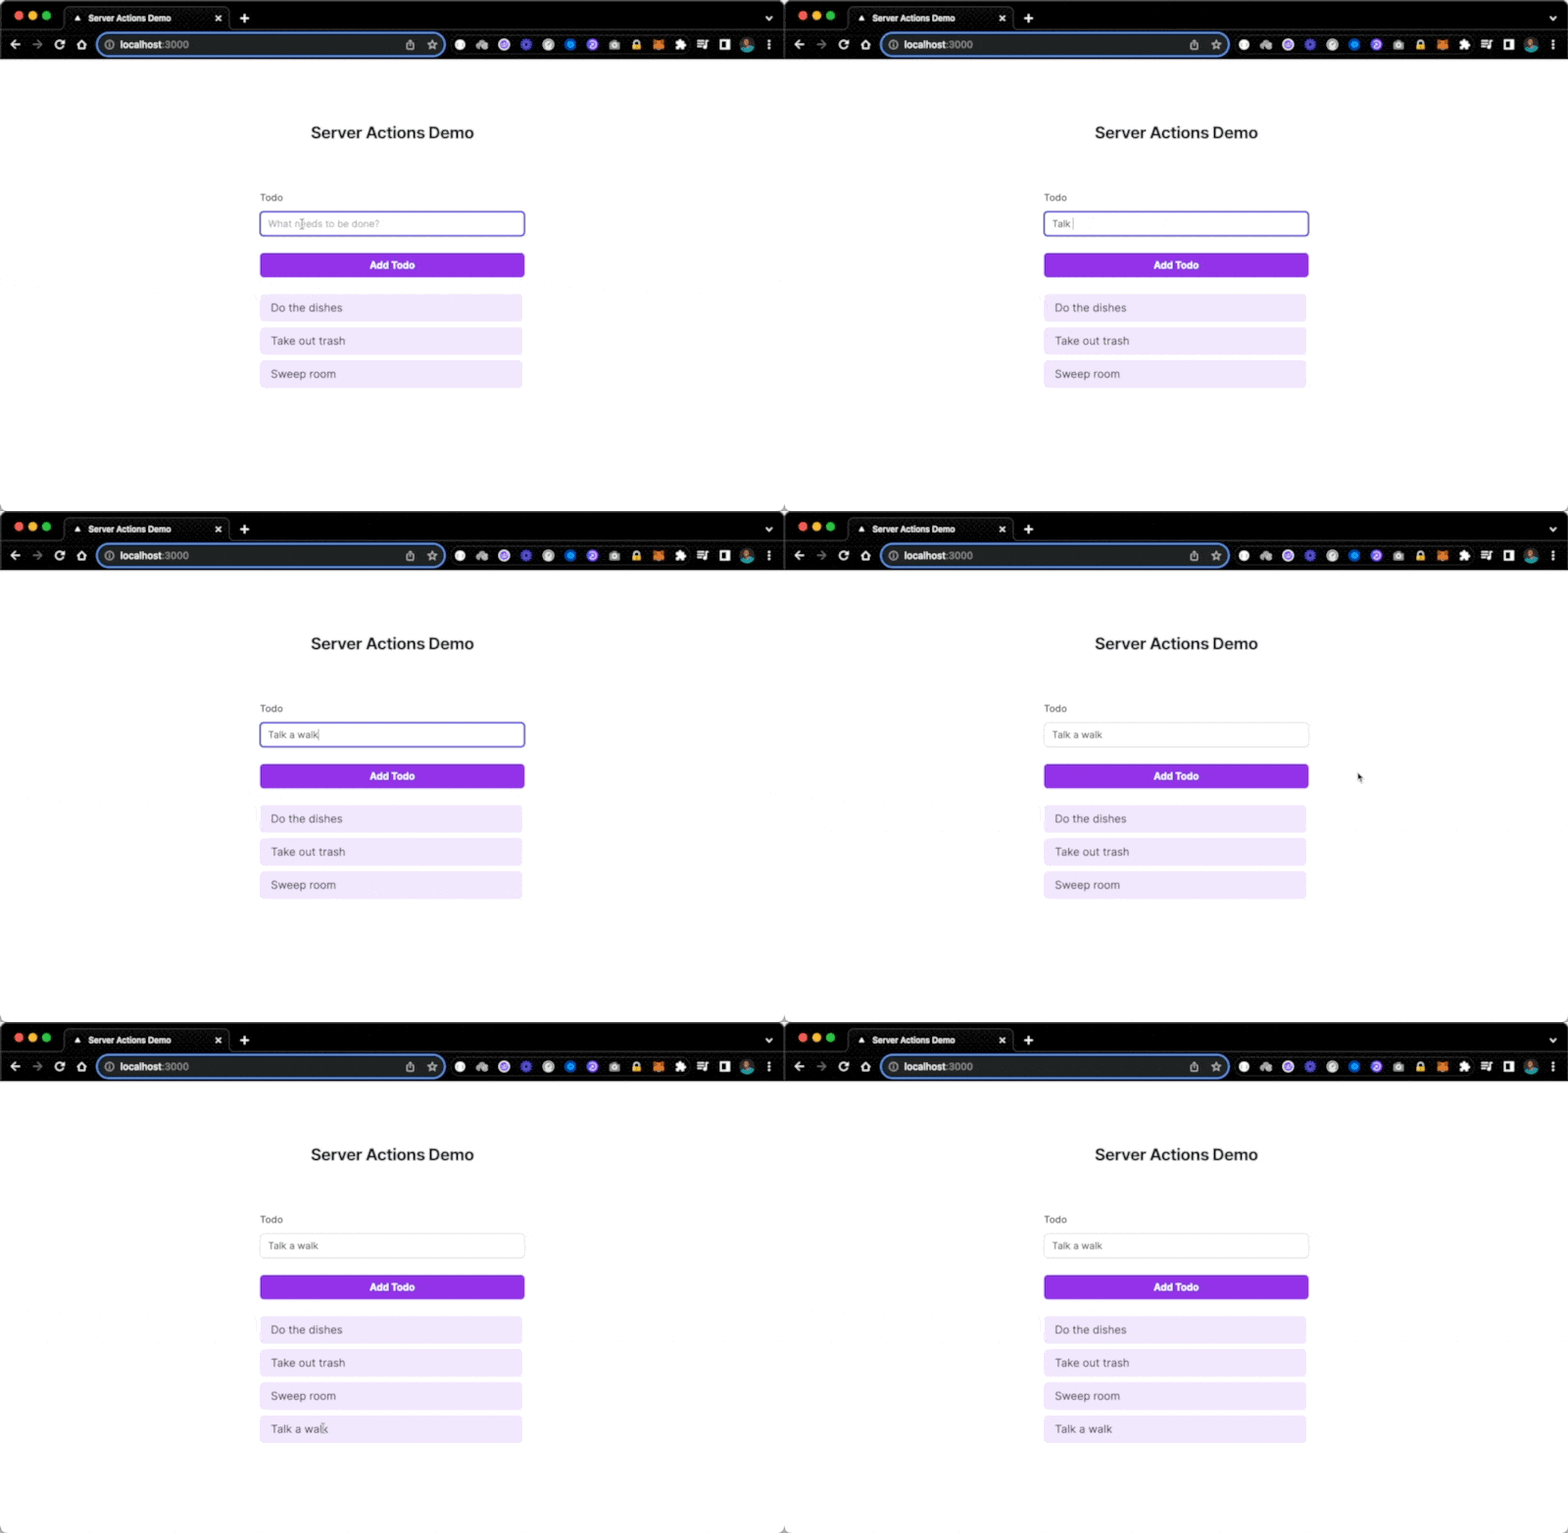
With this, we’ve completed our working demo of a to-do application powered by Server Actions in Next.js. You can extend this demo further by extracting the to-do functionality into a component and then rendering the component on the homepage in line with the component-based architecture of React.
You can also optimistically update the UI to achieve a faster response time and a better user experience using the React useOptimistic Hook.
Lastly, if you want to go all the way, you can use the React useTransition API to show loading states for the Add Todo button when a user submits a new to-do item.
revalidatePath functionBefore we look at some gotchas that come with Server Actions, let’s take a moment to delve more into the revalidatePath function and possible use cases for it.
The revalidatePath function is used to dynamically update stale content on a page without refreshing the whole page. This ensures that the page cache is purged and new data or changes are reflected.
Some use cases for the revalidatePath function include:
revalidatePath function to provide real-time content to usersrevalidatePath function to periodically refresh and update new contentrevalidatePath functionThe introduction of Server Components, while great for performance and security, adds some complexity when dealing with event handlers in Next.js. It was common practice before Server Components to define a component, wire up an event handler with some functionality, and be done. But with Server Components, you have to find a way to work around this as Server Components can’t use event handlers.
A good workaround is to use Server Actions. Let’s see an example of how we can use event handlers in a Server Component with Server Actions.
Say we want to be able to delete a completed to-do item from our sample application. To do that, we first need a delete button component with an event handler that runs when clicked, but because we can’t do that here, let’s see how Server Actions can help.
First, create a deleteTodo file in our Actions folder and paste the code below into the file:
'use server';
import { createClient } from '@supabase/supabase-js';
const supabaseUrl = 'YOUR_SPB_URL';
const supabaseKey = process.env.SUPABASE_KEY;
const supabase = createClient(supabaseUrl, supabaseKey ?? '');
export default async function deleteTodo(id) {
  // Delete todo item from supabase database
  const { data, error } = await supabase.from('todos').delete().eq('id', id)

  revalidatePath('/');
}
In the code above, our delete Server Action takes in the id of the item we want to delete and then deletes it from the database.
The next step is to wire up the Server Action in the Server Component:
// app/page.tsx
import { createClient } from "@supabase/supabase-js";
import addTodo from "@/actions/addTodo";
import deleteTodo from "@/actions/deleteTodo";

export default function TodoList() {
  return (
    <>
      <h2>Server Actions Demo</h2>
      <div>
        {/* The code here remains the same */}

        <ul>
          {data &&
            data.map((todo: any) => (
              <li key={todo._id}>
                <span>{todo.todo}</span>

                <form action={deleteCommentAction.bind(null, id)}>
                  <button className="text-red-400">Delete</button>
                </form>
              </li>
            ))}
        </ul>
      </div>
    </>
  );
}
In the code above, we added a delete button, which we wrapped in a form element to each of our to-do items. Next, we passed the created delete Server Action to the form. Now, when the delete button is clicked, the to-do item is deleted.
As much as Server Actions are a good addition to Next.js 14, there are still some valid concerns that you need to be aware of before adopting it:
Certain things like handling user-initiated data updates can result in you needing to revalidate a Client Component in Next.js. One way to do this is to create a revalidation function, which takes in a path and revalidates it, imports it into the Client Component, and then uses it. If this approach fails, you can use the router.refresh method from the useRouter Hook to force a refresh, which will in turn cause the page to revalidate.
Revalidation strategies refer to methods of refreshing stale data, whether static to dynamic pages, to make sure that they serve data that’s up to date.
These revalidation strategies include Time-Based Revalidation, Static Site Generation (SSG) with Incremental Static Regeneration (ISR), On-Demand Revalidation, Server-Side revalidation via API routes (SSR), Client-Side Data Fetching, and Revalidation.
API routes and Server Actions are both features that allow you to handle server-side logic in your application. API routes allow you to create endpoints that handle HTTP requests (i.e., GET, POST, PUT, DELETE) while Server Actions allow you to create functions that can execute server-side logic from Client Components.
Use API routes when you need to expose a public endpoint from your application to third-party libraries or other web applications. Use Server Actions to handle things like mutations and data fetching.
In this post, we reviewed the history that led to Server Actions and how the rendering pattern has evolved over time on the web. To practically demonstrate Server Actions and their benefits, we built a demo that showed how we handle functionalities like form submission before Server Actions and the improvements that they introduced.
We also looked at how to use Server Actions in Client Components and how to revalidate the cache to fetch new content. I hope all of this helps you make more informed decisions about this feature and about Next.js in general as you work with it.
Debugging Next applications can be difficult, especially when users experience issues that are difficult to reproduce. If you’re interested in monitoring and tracking state, automatically surfacing JavaScript errors, and tracking slow network requests and component load time, try LogRocket.
LogRocket captures console logs, errors, network requests, and pixel-perfect DOM recordings from user sessions and lets you replay them as users saw it, eliminating guesswork around why bugs happen — compatible with all frameworks.
LogRocket's Galileo AI watches sessions for you, instantly identifying and explaining user struggles with automated monitoring of your entire product experience.
The LogRocket Redux middleware package adds an extra layer of visibility into your user sessions. LogRocket logs all actions and state from your Redux stores.


Modernize how you debug your Next.js apps — start monitoring for free.
Hey there, want to help make our blog better?
Join LogRocket’s Content Advisory Board. You’ll help inform the type of content we create and get access to exclusive meetups, social accreditation, and swag.
Sign up now
This guide explores how to use Anthropic’s Claude 4 models, including Opus 4 and Sonnet 4, to build AI-powered applications.

Which AI frontend dev tool reigns supreme in July 2025? Check out our power rankings and use our interactive comparison tool to find out.

Learn how OpenAPI can automate API client generation to save time, reduce bugs, and streamline how your frontend app talks to backend APIs.

Discover how the Interface Segregation Principle (ISP) keeps your code lean, modular, and maintainable using real-world analogies and practical examples.
2 Replies to "Diving into Server Actions in Next.js 14"
What about runtime type checking? Zod? I don’t see it in your example. Not needed you think?
So the main issue was that if we posted a new item into a list, we had to do the POST request and then pull data again with a GET to have the UI updated? And this was expensive because there are 2 requests for 1 action, basically, right?
What we did was:
– we had a layer for state management (i.e Redux)
– a layer for API calls (middleware on client side)
Upon a request, we updated UI optimistically or pessimistically, depending on what the team wanted.
So, when someone does a POST request, it calls the middleware API, We await the status code, if it’s 200, we update the UI (redux state) and this way, we achieve consistency between server and client’s UI in 1 request, not 2. Which means only 1 server is needed (some S3 bucket for the react site files) and 1 action needed (like the pessimistically update mentioned above). No need for having a second server running the server-side components, no need to trigger a GETall after a POST to see the updated UI. Nothing. Just a well structured and organized application. And it still adheres to separation of concerns since on the backend I run edge functions for the updates etc. It’s just more things on the client. And I am totally fine with SSG because yes, first load is larger but then everything else is a breeze, not requiring calls to a server. But yeah, I guess anything goes nowadays.