Storing application data offline has become a necessity in modern web development. The inbuilt browser localStorage can serve as a data store for simple and lightweight data, but it falls short when it comes to structuring that data or storing a considerable amount of it.

On top of that, we can only store string data in localStorage, which are susceptible to XSS attacks, and it does not provide much functionality for querying data.
This is where IndexedDB shines. With IndexedDB, we can create structured databases in the browser, store almost anything in those databases, and perform various types of queries for our data.
In this article, we’ll see what IndexedDB is all about and how we can use Dexie.js, a minimalistic wrapper for IndexedDB, to handle offline data storage in our web applications.
The Replay is a weekly newsletter for dev and engineering leaders.
Delivered once a week, it's your curated guide to the most important conversations around frontend dev, emerging AI tools, and the state of modern software.
IndexedDB is an inbuilt non-relational database for browsers. It gives developers the ability to persistently store data in the browser, allowing for a seamless usage of web applications, even when offline. Two frequent terms you’ll see when working with IndexedDB are database and object store. Let’s explore those below.
IndexedDB databases are unique to each web application. This means that an application can only access data from an IndexedDB database that runs on the same domain or subdomain as itself. The database is what houses the object stores, which in turn contain the stored data. To work with IndexedDB databases, we’ll need to open (or connect to) them:
const initializeDb = indexedDB.open('name_of_database', version)
The name_of_database argument in the indexedDb.open() method will serve as the name of the database being created, and the version argument is a number that represents the database version.
In IndexedDB, we use object stores to structure the database, and whenever we want to update our database structure, we’ll need to upgrade the version to a higher value. This means that if we start with version 1, the next time we want to update the structure of our database, we’ll need to change the version in the indexedDb.open() method to 2 or higher.
Object stores are similar to tables in relational databases like PostgreSQL and collections in document databases like MongoDB. To create object stores in IndexedDB, we’ll need to call an onupgradeneeded() method from the initializeDb variable we declared earlier:
initializeDb.onupgradeneeded = () => {
  const database = initializeDb.result
  database.createObjectStore('name_of_object_store', {autoIncrement: true})
}
In the above block, we got our database from the initializeDb.result property and then used its createObjectstore() method to create our object store. The second argument, { autoIncrement: true }, tells IndexedDB to auto-provide/increment the ID of items in the object store.
I’ve left out other terms like transaction and cursor because working with the low-level IndexedDB API is a lot of work. This is why we need Dexie.js, a minimalistic wrapper for IndexedDB. Let’s see how Dexie simplifies the whole process of creating a database, object stores, storing data, and querying data from our database.
With Dexie, creating IndexedDB databases and object stores is so much easier:
const db = new Dexie('exampleDatabase')
db.version(1).stores({
  name_of_object_store: '++id, name, price',
  name_of_another_object_store: '++id, title'
})
In the above block, we created a new database named exampleDatabase and assigned it as a value to the db variable. We used the db.version(version_number).stores() method to create object stores for our database.
The value of each object store represents its structure. For example, when storing data in the first object store, we’ll need to provide an object with the properties name and price. The ++id option works just like the {autoIncrement: true} argument we used earlier when creating object stores.
Note that we’ll need to install and import the dexie package before using it in our app. We’ll see how to do that when we start building our demo project.
For our demo project, we’ll build a market list app with Dexie.js and React. Our users will be able to add items they intend to purchase in their market list, delete the items, or mark them as purchased.
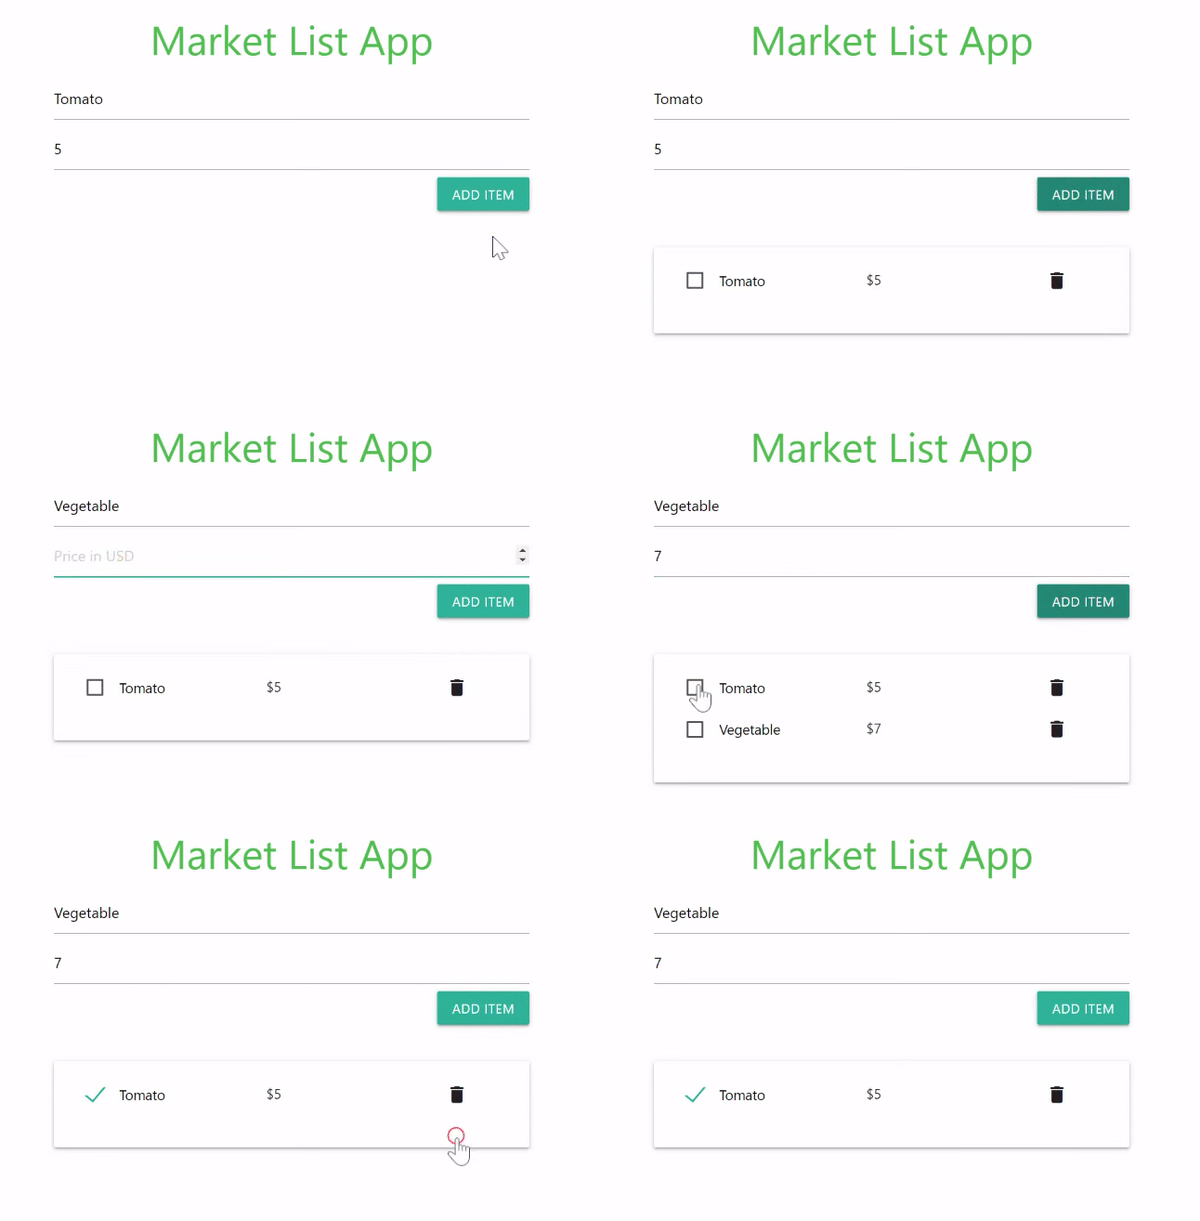
We’ll see how to use the Dexie useLiveQuery hook to watch for changes in our IndexedDB database and re-render our React component when the database is updated. Here’s what our app will look like:

To get started, we’ll use a GitHub template I’ve created for our app’s structure and design. Here’s a link to the template. Clicking on the Use this template button will create a new repository for you with the existing template, which you can then clone and use.
Alternatively, with GitHub CLI installed on your machine, you can run the following command to create a repo named market-list-app from the market list GitHub template:
gh repo create market-list-app --template ebenezerdon/market-list-template
With that done, you can go ahead to clone and open up your new application in a code editor. Using your terminal to run the following command in your app directory should install the npm dependencies and start up your new app:
npm install && npm start
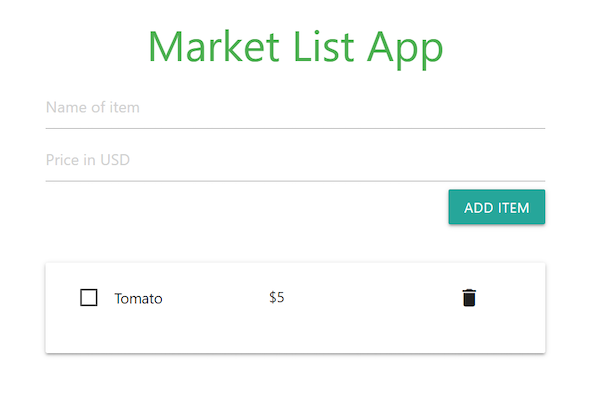
You should be able to see your new React application when you navigate to the local URL in the success message, usually http://localhost:3000. Your new app should look like this:

When you open up the ./src/App.js file, you’ll notice that our App component contains only the JSX code for the market list app. We’re using classes from the Materialize framework for the styling and we’ve included its CDN link in the ./public/index.html file. Next, we’ll see how we can use Dexie to create and manage our data.
To use Dexie.js for offline storage in our React app, we’ll start by running the following command in our terminal to install the dexie and dexie-react-hooks packages:
npm i -s dexie@next dexie-react-hooks
We’ll use the useLiveQuery hook from the dexie-react-hooks package to watch for changes and re-render our React component when an update is made to the IndexedDB database.
Let’s add the following import statements to our ./src/App.js file. This will import Dexie and the useLiveQuery hook:
import Dexie from 'dexie'
import { useLiveQuery } from "dexie-react-hooks";
Next, we’ll create a new database named MarketList and then declare our object store, items:
const db = new Dexie('MarketList');
db.version(1).stores(
  { items: "++id,name,price,itemHasBeenPurchased" }
)
Our items object store will be expecting an object with the properties name, price, and itemHasBeenPurchased, while the id will be provided by Dexie. When adding new data to our object store, we’ll use a default Boolean value of false for the itemHasBeenPurchased property and then update this to true whenever we purchase an item in our market list.
Let’s create a variable to store all our items. We’ll use the useLiveQuery hook to get data from the items object store and watch for changes in it so that when there’s an update to the items object store, our allItems variable will be updated and our component re-rendered with the new data. We’ll do this inside the App component:
const App = () => {
  const allItems = useLiveQuery(() => db.items.toArray(), []);
  if (!allItems) return null
  ...
}
In the above block, we created a variable named allItems and called the useLiveQuery hook as its value. The syntax for our useLiveQuery hook is similar to React’s useEffect hook. It expects a function and an array of its dependencies as arguments. Our function argument returns the database query.
Here, we’re getting all the data in the items object store in an array format. In the next line, we used a condition to tell our component that if the allItems variable is undefined, that means the queries are still loading.
Still in the App component, let’s create a function named addItemToDb, which we’ll be using to add items to our database. We’ll call this function whenever we click on the ADD ITEM button. Remember that our component will re-render each time the database is updated.
...
const addItemToDb = async event => {
    event.preventDefault()
    const name = document.querySelector('.item-name').value
    const price = document.querySelector('.item-price').value
    await db.items.add({
      name,
      price: Number(price),
      itemHasBeenPurchased: false
    })
  }
...
In our addItemToDb function, we’re getting the item name and price values from the form input fields then using the db.[name_of_object_store].add method to add our new item data to the items object store. We’re also using a default value of false for the itemHasBeenPurchased property.
Now that we have the addItemToDb function, let’s create a function named removeItemFromDb for removing data from our items object store:
...
const removeItemFromDb = async id => {
  await db.items.delete(id)
}
...
Next, we’ll create a function named markAsPurchased for marking items as purchased. Our function will be expecting the item’s primary key as its first argument when called — in this case, id. It’ll use this primary key to query our database for the item we want to mark as purchased. After getting the item, it’ll update its markAsPurchased property to true:
...
const markAsPurchased = async (id, event) => {
  if (event.target.checked) {
    await db.items.update(id, {itemHasBeenPurchased: true})
  }
  else {
    await db.items.update(id, {itemHasBeenPurchased: false})
  }
}
...
In our markAsPurchased function, we’re using the event parameter to get the particular input element being clicked by our user. If its value is checked, we’ll update the itemHasBeenPurchased property to true and, if not, false. The db.[name_of_object_store].update() method expects the item’s primary key as its first argument and the new object data as its second argument.
Here’s what our App component should look like at this stage:
...
const App = () => {
  const allItems = useLiveQuery(() => db.items.toArray(), []);
  if (!allItems) return null

  const addItemToDb = async event => {
    event.preventDefault()
    const name = document.querySelector('.item-name').value
    const price = document.querySelector('.item-price').value
    await db.items.add({ name, price, itemHasBeenPurchased: false })
  }

  const removeItemFromDb = async id => {
    await db.items.delete(id)
  }

  const markAsPurchased = async (id, event) => {
    if (event.target.checked) {
      await db.items.update(id, {itemHasBeenPurchased: true})
    }
    else {
      await db.items.update(id, {itemHasBeenPurchased: false})
    }
  }
  ...
}
Now let’s create a variable named itemData to house the JSX code for our all our item data:
...
const itemData = allItems.map(({ id, name, price, itemHasBeenPurchased }) => (
  <div className="row" key={id}>
    <p className="col s5">
      <label>
        <input
          type="checkbox"
          checked={itemHasBeenPurchased}
          onChange={event => markAsPurchased(id, event)}
        />
        <span className="black-text">{name}</span>
      </label>
    </p>
    <p className="col s5">${price}</p>
    <i onClick={() => removeItemFromDb(id)} className="col s2 material-icons delete-button">
      delete
    </i>
  </div>
))
...
In our itemData variable, we’re mapping through all the items in the allItems array of data and then getting the properties id, name, price, and itemHasBeenPurchased from each item object. We then went ahead and replaced the previously static data with our new dynamic values from the database.
Notice that we also used our markAsPurchased and removeItemFromDb methods as click event listeners to their respective buttons. We’ll add the addItemToDb method to our form’s onSubmit event in the next block.
With our itemData ready, let’s update the return statement for our App component to the following JSX code:
...
return (
  <div className="container">
    <h3 className="green-text center-align">Market List App</h3>
    <form className="add-item-form" onSubmit={event => addItemToDb(event)} >
      <input type="text" className="item-name" placeholder="Name of item" required/>
      <input type="number" step=".01" className="item-price" placeholder="Price in USD" required/>
      <button type="submit" className="waves-effect waves-light btn right">Add item</button>
    </form>
    {allItems.length > 0 &&
      <div className="card white darken-1">
        <div className="card-content">
          <form action="#">
            { itemData }
          </form>
        </div>
      </div>
    }
  </div>
)
...
In our return statement, we’ve included the itemData variable to our items list. We also used the addItemToDb method as the onsubmit value for our add-item-form.
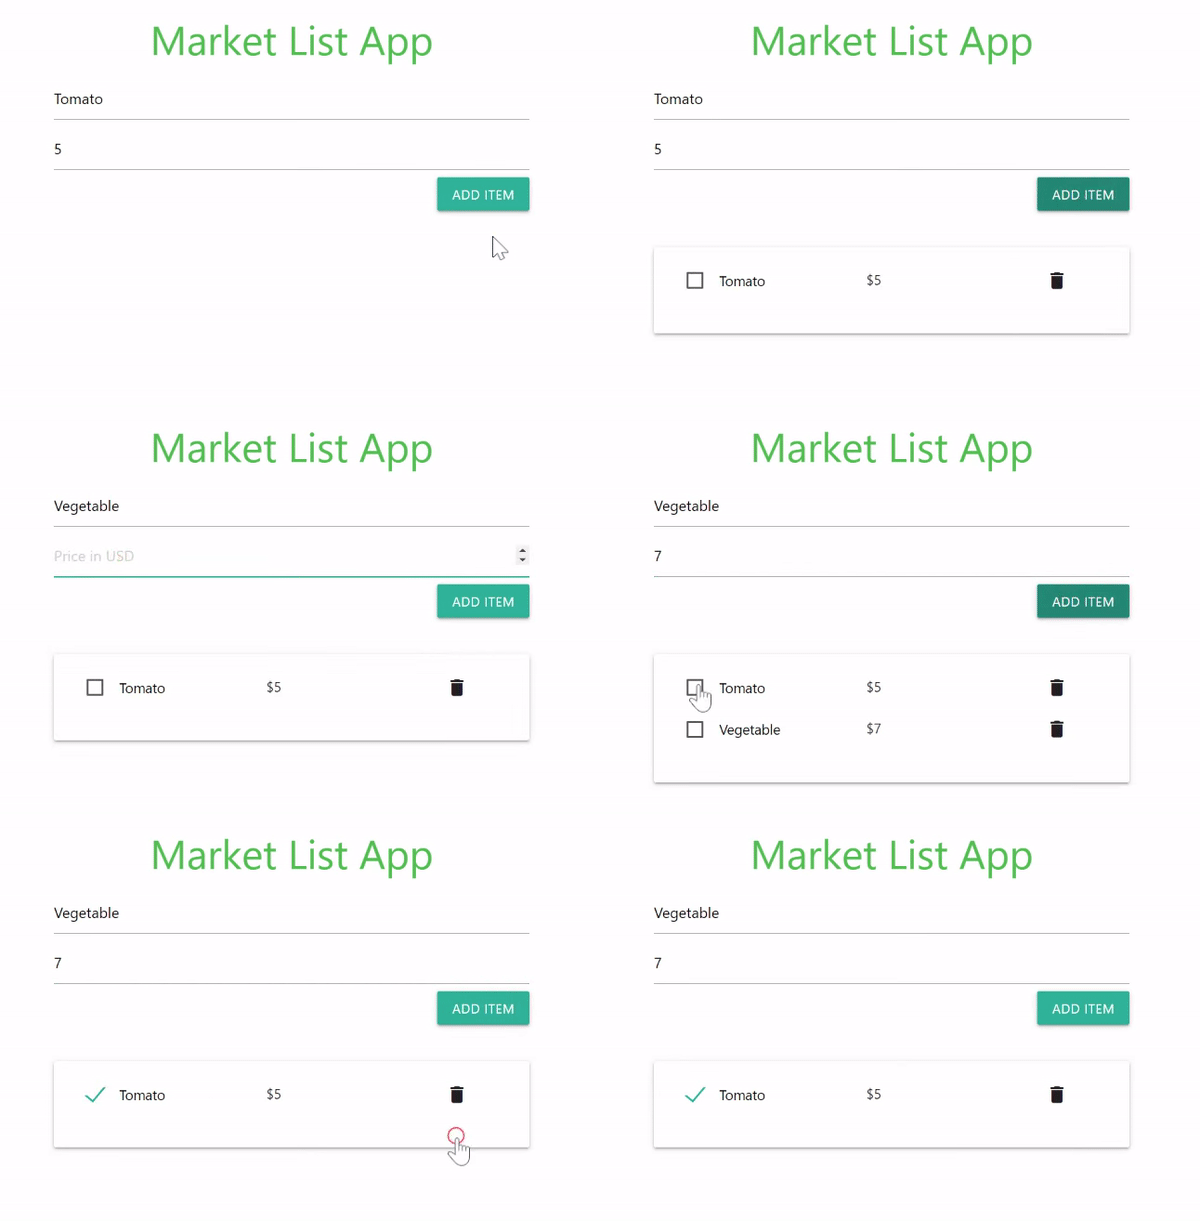
To test our app, we can go back to the React webpage we opened earlier. Remember that your React app has to be running. If it’s not, run the command npm start on your terminal. Your app should be able to function like the demo below:

We can also use conditions to query our IndexedDB database with Dexie. For example, if we want to get all items with price above 10 USD, we can do this:
const items = await db.friends
  .where('price').above(10)
  .toArray();
You can see other query methods in the Dexie documentation.
In this article, we’ve learned how to use IndexedDB for offline storage and how Dexie.js simplifies the process. We’ve also seen how to use the Dexie useLiveQuery hook to watch for changes and re-render our React component whenever the database is updated.
With IndexedDB being browser-native, querying and retrieving data from our database is a lot faster than having to send server-side API requests every time we need to work with data in our app, and we can store almost anything in IndexedDB databases.
Browser support would have been a big issue with using IndexedDB in the past, but all the major browsers now support it. The many advantages of using IndexedDB for offline storage in web applications outweigh the disadvantages, and using Dexie.js along with IndexedDB makes web development a lot more interesting than it’s ever been.
Here’s a link to the GitHub repo for our demo application. If you like it, please give it a star and follow me on GitHub. You can also reach out to me on LinkedIn if you need further help with integrating IndexedDB and Dexie.js in React applications.
Install LogRocket via npm or script tag. LogRocket.init() must be called client-side, not
server-side
$ npm i --save logrocket

// Code:

import LogRocket from 'logrocket';
LogRocket.init('app/id');
// Add to your HTML:

<script src="https://cdn.lr-ingest.com/LogRocket.min.js"></script>
<script>window.LogRocket && window.LogRocket.init('app/id');</script>

@container scroll-state: Replace JS scroll listeners nowCSS @container scroll-state lets you build sticky headers, snapping carousels, and scroll indicators without JavaScript. Here’s how to replace scroll listeners with clean, declarative state queries.

Explore 10 Web APIs that replace common JavaScript libraries and reduce npm dependencies, bundle size, and performance overhead.

Russ Miles, a software development expert and educator, joins the show to unpack why “developer productivity” platforms so often disappoint.

Discover what’s new in The Replay, LogRocket’s newsletter for dev and engineering leaders, in the February 18th issue.
Hey there, want to help make our blog better?
Join LogRocket’s Content Advisory Board. You’ll help inform the type of content we create and get access to exclusive meetups, social accreditation, and swag.
Sign up now
3 Replies to "Using Dexie.js in React apps for offline data storage"
Thanks for writing about the new dexie-react-hooks! Just a small note: In the blog it examplifies that to install dexie using npm i dexie, but it is still nescessary to do npm i dexie@next to use dexie-react-hooks (will soon be possible without @next, but for the time being, 3.1.0 is still released behind the @next tag in npm).
Oh, thanks, David. I didn’t see that in the docs.
We’ll make the update.
How do you access nested objects with dexie? The problem in detail: https://stackoverflow.com/questions/70603304/indexeddb-schemaerror-when-trying-to-access-nested-object-inside-a-table