Developing, testing, and deploying smart contracts is an important job of a blockchain developer, and this tutorial will show you how to get started with smart contracts.

Before we jump in, it’s important to understand basic concepts in crypto and the blockchain. If you aren’t familiar with crypto, I recommend you watch this short video.
The Replay is a weekly newsletter for dev and engineering leaders.
Delivered once a week, it's your curated guide to the most important conversations around frontend dev, emerging AI tools, and the state of modern software.
Smart contracts are immutable programs stored on a blockchain. They automate the execution of transactions based on predetermined conditions being met, and they are widely used to execute agreements in a decentralized manner without middlemen.
Smart contracts have particular outcomes, which are governed by immutable code, so the participants in the contract can be confident in the contract execution. No third-party involvement, no time lost — agreements are executed immediately when the conditions are met.
Smart contracts can be deployed on the blockchain for use. Ethereum supports smart contracts written in the Solidity programming language.
This tutorial uses JavaScript and Solidity for developing, testing, and deploying smart contracts on the Ethereum blockchain.
So, you’ll need a basic knowledge of JavaScript, Node.js, and Solidity.
Solidity is similar to JavaScript, so the concepts are fairly easy to grasp.
This tutorial is going to be fairly simple. Check out this GitHub repo to see the code in this tutorial.
We’ll be using these tools to develop and test smart contracts:
npm i truffle -g)Truffle provides you with all the necessary utilities to develop and test smart contracts. You can initialize a Truffle project with truffle init.
$ truffle init

✔ Preparing to download
✔ Downloading
✔ Cleaning up temporary files
✔ Setting up box

Unbox successful. Sweet!

Commands:

  Compile:        truffle compile
  Migrate:        truffle migrate
  Test contracts: truffle test

$ ~
This should create a new project with three folders (/contracts , /migrations, and /tests) and one configuration file, truffle-config.js.
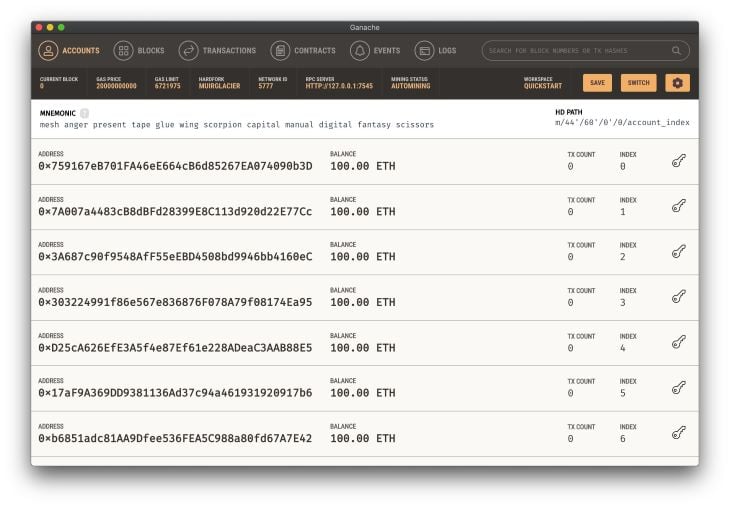
After you download Ganache, quick-start a blockchain instance. You should see a screen like this:

Check the port in RPC Server configuration., which is usually 7545. Now, make the following change in truffle-config.js and fill out the correct port number:
module.exports = {
  networks: {
    development: {
     host: "127.0.0.1",     // Localhost (default: none)
     port: 7545,            // Standard Ethereum port (default: none)
     network_id: "*"        // Any network (default: none)
    }
  }
}
Now, run truffle migrate. If it does not throw any errors, you are good to go.
Contracts will be stored under the /contracts folder. You will find that migrations.sol already exists here.
Create a new file in that directory named TruffleTutorial.sol:
pragma solidity >=0.4.22 <0.9.0;

contract TruffleTutorial {
  address public owner = msg.sender;
  string public message;

  // this function runs when the contract is deployed
  constructor() public {
    // set initial message
    message = "Hello World!";
  }

  modifier ownerOnly() {
    require(
      msg.sender == owner,
      "This function is restricted to the contract's owner"
    );
    _;
  }

  // function that only contract owner can run, to set a new message
  function setMessage(string memory _message)
    public
    ownerOnly
    returns(string memory)
  {
    // message must not be empty
    require(bytes(_message).length > 0);

    // set new message
    message = _message;
    return message;
  }
}
Notice that this is the smart contract named TruffleTutorial. You can check the comments in the code to understand what every function and line of code does, but I’ll explain the gist here.
This smart contract stores a message and only allows the owner of the smart contract to change this message. The contract also allows everyone on the blockchain to be able to read this message. When the contract is first deployed, the message stored on the blockchain in the smart contract would be, “Hello World!”.
You can also quick-test smart contracts on remix.ethereum.org.
Now, let’s deploy this smart contract to the blockchain instance started by Ganache local test network.
If you have worked with databases like MySQL or Postgres before, I assume you are familiar with migrations.
In the /migrations folder, you’ll see the initial migration. You’ll have to create a new migration file for this new smart contract.
Create 2_TruffleTutorial_migration.js.
// Help Truffle find `TruffleTutorial.sol` in the `/contracts` directory
const TruffleTutorial = artifacts.require("TruffleTutorial");

module.exports = function(deployer) {
  // Command Truffle to deploy the Smart Contract
  deployer.deploy(TruffleTutorial);
};
You might be wondering what the artifacts and deployer functions are. They are taken care of by Truffle. When you run truffle migrate, it looks at the /migrations directory and deploys all the linked smart contracts to the blockchain, just as the migration files tell them to do.
When you create the file with this code, simply run truffle migrate --reset, which will deploy the smart contract to the local test network. It’ll also build the ABI and bytecode files that the Ethereum virtual machine is capable of understanding.
Now that your smart contract is on the blockchain, how do you interact with it? How do you retrieve the message, and how do you set it? Truffle console lets us do exactly that.
Easier GUI method to interact with the smart contract is through https://remix.ethereum.org/.
In the terminal, code truffle console, which starts a console that enables you to interact with the smart contract.
$ truffle console
truffle(development)> const truffleTutorial = await TruffleTutorial.deployed()
truffle(development)> const address = await truffleTutorial.address
truffle(development)> address
'0x46C00D73bF785000B3c3F93569E84415AB2381f2'
Try all those lines and see if you get the address. If you do, the smart contract is successfully deployed and your project can talk to it.
Now try getting the message stored on the smart contract:
truffle(development)> const message = await truffleTutorial.message()
truffle(development)> message
'Hello World!'
You can now read the value stored on the smart contract!
Let’s try setting a new message.
truffle(development)> await truffleTutorial.setMessage('Hi there!')
truffle(development)> await truffleTutorial.message()
'Hi there!'
There you go, you did it! The smart contract works!
Though, we tested this manually. Ideally, you would want to set up automatic tests that check if all of this works perfectly.
You’ll be writing tests in the /test folder. Create a new file there named TruffleTutorial.js.
const { assert } = require("chai")

const TruffleTutorial = artifacts.require("./TruffleTutorial.sol")

require("chai")
  .use(require("chai-as-promised"))
  .should()

contract('TruffleTutorial', ([contractOwner, secondAddress, thirdAddress]) => {
  let truffleTutorial

  // this would attach the deployed smart contract and its methods
  // to the `truffleTutorial` variable before all other tests are run
  before(async () => {
    truffleTutorial = await TruffleTutorial.deployed()
  })

  // check if deployment goes smooth
  describe('deployment', () => {
    // check if the smart contract is deployed
    // by checking the address of the smart contract
    it('deploys successfully', async () => {
      const address = await truffleTutorial.address

      assert.notEqual(address, '')
      assert.notEqual(address, undefined)
      assert.notEqual(address, null)
      assert.notEqual(address, 0x0)
    })

    // check if the message is stored on deployment as expected
    it('has a message', async () => {
      const message = await truffleTutorial.message()
      assert.equal(message, 'Hello World!')
    })
  })

  describe('message', () => {
    // check if owner can set new message, check if setMessage works
    it('contract owner sets a message', async () => {
      // set new message
      await truffleTutorial.setMessage('Hi there!', { from: contractOwner })
      // `from` helps us identify by any address in the test

      // check new message
      const message = await truffleTutorial.message()
      assert.equal(message, 'Hi there!')
    })

    // make sure only owner can setMessage and no one else
    it('address that is not the owner fails to set a message', async () => {
      await truffleTutorial.setMessage('Hi there!', { from: secondAddress })
        .should.be.rejected
      // this tells Chai that the test should pass if the setMessage function fails.

      await truffleTutorial.setMessage('Hi there!', { from: thirdAddress })
        .should.be.rejected
    })
  })
})
Here, we are using the Chai test framework to assert values and see if they stand true. If you see the code, you’ll realize it’s similar to what you tried in the Truffle console, except this time you are pairing those lines of code with the Chai test framework.
assert.equaltakes two arguments, if they match, the test passes, else it fails.
Now, run truffle test. You should see all of the tests pass:
$ truffle test
Using network 'development'.

  Contract: TruffleTutorial
    deployment
      ✓ deploys successfully
      ✓ has a message (236ms)
    message
      ✓ contract owner sets a message (165ms)
      ✓ address that is not the owner fails to set a message (250ms)

  4 passing (735ms)
You have now developed, tested, and deployed the smart contract using Truffle and Ganache.
Note that deploying on Ethereum Mainnet will require you to pay some gas fees. Also, every time you write on the blockchain (e.g., when executing the
setMessagefunction), it would cost you gas fees, but reading the smart contract would still be free of cost.
First, install the Metamask browser extension. Now, visit https://remix.ethereum.org.
Here, create or edit the existing project — create TruffleTutorial.sol in the /contracts folder and paste all the smart contract code there.
In the sidebar, you should see an option to toggle the SOLIDITY COMPILER pane in the sidebar. Click it and compile the solidity smart contract code. It should create the ABI and bytecode files.
After you compile, open the DEPLOY & RUN TRANSACTIONS pane from the sidebar. You can try deploying the smart contract on the Remix Ethereum Test JavaScript VM network. You may also test manually using the Remix tools themselves in the same pane.
Now it’s time to deploy to the Mainnet. First, make sure you have some Ethereum balance in your Metamask wallet so you can pay the gas fees. I usually put around $50-worth $ETH in my coinbase wallet, then transfer the $ETH to the Metamask wallet.
In the DEPLOY & RUN TRANSACTIONS pane, set the “Environment” from JavaScript VM to Injected Web3. When you do, you’ll connect your Metamask wallet to the Mainnet. Finally, click Deploy. You’ll have to sign a transaction with Metamask, but once that is done, your TruffleTutorial smart contract will be deployed!
Make sure you check the smart contract address after you deploy it so that the address can be used by other clients if they want to talk to your smart contract.
Web3 is booming, and this space is new and exciting. Smart contracts are the backend of most Dapps (Decentralized apps), and learning how to develop, test, and deploy them will be useful if you want to become a blockchain developer.
Client-side issues that impact users’ ability to activate and transact in your apps can drastically affect your bottom line. If you’re interested in monitoring UX issues, automatically surfacing JavaScript errors, and tracking slow network requests and component load time, try LogRocket.

LogRocket lets you replay user sessions, eliminating guesswork around why bugs happen by showing exactly what users experienced. It captures console logs, errors, network requests, and pixel-perfect DOM recordings — compatible with all frameworks.
LogRocket's Galileo AI watches sessions for you, instantly identifying and explaining user struggles with automated monitoring of your entire product experience.
Modernize how you debug web and mobile apps — start monitoring for free.

@container scroll-state: Replace JS scroll listeners nowCSS @container scroll-state lets you build sticky headers, snapping carousels, and scroll indicators without JavaScript. Here’s how to replace scroll listeners with clean, declarative state queries.

Explore 10 Web APIs that replace common JavaScript libraries and reduce npm dependencies, bundle size, and performance overhead.

Russ Miles, a software development expert and educator, joins the show to unpack why “developer productivity” platforms so often disappoint.

Discover what’s new in The Replay, LogRocket’s newsletter for dev and engineering leaders, in the February 18th issue.
Would you be interested in joining LogRocket's developer community?
Join LogRocket’s Content Advisory Board. You’ll help inform the type of content we create and get access to exclusive meetups, social accreditation, and swag.
Sign up now
One Reply to "How to develop, test, and deploy smart contracts using Ganache"
Great information Thanks for sharing this.