The Replay is a weekly newsletter for dev and engineering leaders.
Delivered once a week, it's your curated guide to the most important conversations around frontend dev, emerging AI tools, and the state of modern software.
Building modern applications today goes beyond simply knowing what to write or which tools you have, and it’s more than just understanding what you want to build. You have to think about maintenance, like how readable your code is, how much effort would it take to fix a bug or add a new feature, or update the project from breaking changes of the project’s library updates. With these questions in mind, it’s not as easy as simply writing and getting it done. There’s more to it.

For example, when writing a Flutter application, you will often need a class depending on the functions or methods of another. The way to fix this is to simply create a new instance in that class and you are good to go.
The problem arises when you need to run tests on a particular class or function that depends on multiple other classes. Dependency injection seeks to resolve this.
Dependency injection is simply a way of making a class independent of its own dependencies. It allows you to separate different parts of your application in a more maintainable way, because every class can make calls to any dependency it needs. This creates a loosely coupled application that helps in running and writing tests, and makes bug fixes and feature improvements easier and faster.
void loginBloc() {
  // Allows us to access authFacade implementation for login bloc by passing the interface they share
  final authFacade = locator<IAuthFacade>();
  group("LoginBlog test", () {
    blocTest<LoginFormBloc, LoginFormState>('emits LoginFormInitial',
      build: () => LoginFormBloc(authFacade),
      expect: () => LoginFormInitial());
  });
}
Even while dependency injection gives a lot of perks, there are certain parts of it that may not make everyone smile:
In this article, I will build a sample app and explain how to implement dependency injection in your own Flutter projects using GetIt and Injectable. Here’s what we’ll cover:
GetIt is a service locator that allows you to create interfaces and their implementations, and access those implementations globally, anywhere in your app. Injectable generates code that we would have otherwise written by using annotations. This allows us to worry more about logic and less about how we are going to access it.
For us to better understand how to use dependency injection in a Flutter application, we will be making a simple note taking application using Firebase and Bloc. We will learn how to make network calls and how we can separate repetitive functionalities into services that can be accessed anywhere.
In this project, I will not be showing you how to install Firebase or connect it, as it is beyond the scope of this topic. To learn how to install Firebase with Flutter, you can access the documentation here.
We are going to create a new project using Android Studio (or the command line, if you prefer).
For Android Studio you can use the GUI it provides to create a new project, or use the following command:
flutter create name_of_your_app
After the command completes, open it up from using your preferred IDE (either Visual Studio Code or Android Studio).
Add the following dependencies to your pubspec.yaml file:
dependencies:
  flutter:
  sdk: flutter
  // Our service locator
  get_it: ^7.2.0
  // For state management
  bloc: ^8.0.1
  // Allows value based equality for our classes e.g Eat() == Eat() is true
  equatable: ^2.0.3
  // Generates code for us by providing annotations we can use
  injectable: ^1.5.0
  // Allows converting json to dart class and back
  json_annotation: ^4.4.0
  // Allows easier routing
  auto_route: ^3.2.0
  // Required to work with firebase.
  firebase_core: ^1.11.0

dev_dependencies:
  flutter_test:
    sdk: flutter
  # add the generator to your dev_dependencies
  injectable_generator:
  # add build runner if not already added
  build_runner:
get_it will work as our service locator. Injectable will be used together with injectable_generator to generate code for us. We will give it specific instructions by using annotations on classes we want, and it will handle the rest.
Finally, build_runner allows us to generate files using the command line. Run flutter pub get from your command line to get all dependencies.
The process requires a global file to provision the resources that you’ll use. Create a file in your lib folder, name it injection.dart, and add the following code:
import 'package:get_it/get_it.dart';
import 'package:injectable/injectable.dart';

final getIt = GetIt.instance;

@InjectableInit()
void configureDependencies() => $initGetIt(getIt);
This will handle the generation of a new file for get_it. To generate the file, run the following command:
flutter pub run build_runner build --delete-conflicting-outputs
This code generates a new file called injection.config.dart, which will include all dependencies for all use cases.
We can then add configureDependencies() to the main function. This allows the services to be run first, in case there any generated tokens or async functions that need to be resolved before the app runs:
void main() {
  configureDependencies();
  runApp(MyApp());
}
Our app is now set up, and we can move on to more interesting features.
Before we start allowing users to login and register, we will need to create certain key features. We will begin with Firebase, our interfaces, implementation, and our state management, then complete with our UI. This flow is much better because it will explain how to handle building a similar app in a real world project.
First, to use Firebase in a Flutter application you need to first call an async function like so:
await Firebase.initializeApp()
This function makes necessary calls natively and connects the app to cloud services using the config file added to Android and iOS folders. This function needs to be called in the main function before the widgets are rebuilt. We can do so using GetIt, because there is a configureDependencies() function that we can use to make the async call.
Next, we will create a new service folder and within it, create an app module where we can register all our services (in this case, our Firebase service). We will add the service and create a static function that will await the initialization to complete. After completing we will return the class instance:
class FirebaseService {
  static Future<FirebaseService> init() async {
    await Firebase.initializeApp();
    return FirebaseService();
  }
}
Then, in our app module, we will add it using the preResolve annotation, meaning we will need the app to initialize the function before continuing with the rest:
@module
abstract class AppModule {
  @preResolve
  Future<FirebaseService> get fireService => FirebaseService.init();
}
The module annotation is used to mark the class as a module. After running the generator command, we get the following generated code inside injectable.config.dart:
Future<_i1.GetIt> $initGetIt(_i1.GetIt get,
    {String? environment, _i2.EnvironmentFilter? environmentFilter}) async {
  final gh = _i2.GetItHelper(get, environment, environmentFilter);
  final appModule = _$AppModule();
  await gh.factoryAsync<_i3.FirebaseService>(() => appModule.fireService,
      preResolve: true);
  return get;
}
Because it returns a future, we will need to add an async/await to configureDependencies, otherwise the code will never pass this stage.
In the injection.dart class we will make the following changes:
final locator = GetIt.instance;

@InjectableInit()
Future<void> configureDependencies() async => await $initGetIt(locator);
Now let’s add a return type of Future and then async/await the initGetIt function. After this, we will make another update in the main.dart file and call await on the function as follows:
void main() async {
  WidgetsFlutterBinding.ensureInitialized();
  await configureDependencies();
  runApp(Dependo());
}
When we run the application everything is running as it should be.

To allow for authentication using email and password, we will need to add Firebase Authentication. Add the following package to pubspec.yaml:
firebase_auth: ^3.3.5
Now run flutter pub get and restart to make sure everything is working well. Once it looks good, we will need to add an interface for authentication. Using interfaces is important because it will allow you to mock tests without affecting your primary implementation, which has access to your APIs.
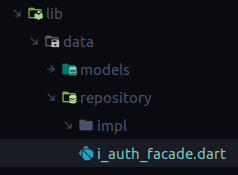
To create an interface in Flutter, we use the keyword abstract. But first, add a data folder right under the lib folder, then another called repository. Then, add an i_auth_facade.dart file.
Your structure should look like the following diagram:
Add the following functions to the last file:
abstract class IAuthFacade {
  Future<void> signIn({required String email, required String password,});
  Future<void> register({required String username, required String email, required String password});
  Future<User?> getUser();
  Future<void> logOut();
}
Create a new file under the impl folder called auth_facade.dart. This will serve to add implementation for the above functions.
We will implement the IAuthFacade class and supply it to GetIt, our service locator, by annotating the class with Injectable as the interface. This means we can use the interface anywhere, and Injectable will use the implementation created here (I will explain further when we get to the sign in and register bloc):
@Injectable(as: IAuthFacade)
class AuthFacade implements IAuthFacade {
  @override
  Future<User?> getUser() {
    // TODO: implement getUser
    throw UnimplementedError();
  }

  @override
  Future<void> register({required String username, required String email, required String password}) {
    // TODO: implement register
    throw UnimplementedError();
  }

  @override
  Future<void> signIn({required String email, required String password}) {
    // TODO: implement signIn
    throw UnimplementedError();
  }
}
Before we add functionality to the class, we need to create our User class, like so:
@JsonSerializable()
class User extends Equatable {
  String id;
  final String email;
  final String username;

  User({required this.id, required this.email, required this.username});

  @override
  List<Object?> get props => [this.id, this.email, this.username];

  factory User.fromJson(Map<String, dynamic> json) => _$UserFromJson(json);

  Map<String, dynamic> toJson() => _$UserToJson(this);
}
The function fromDocument will allow us to convert a user document stored in Firebase’s Cloud Firestore to our User class.
To use Cloud Firestore, add the following to your pubspec.yaml file:
cloud_firestore: ^3.1.6
Run flutter pub get from the terminal and make it accessible using our app.module:
@module
abstract class AppModule {
  // ....
  @injectable
  FirebaseFirestore get store => FirebaseFirestore.instance;

  @injectable
  FirebaseAuth get auth => FirebaseAuth.instance;
}
Now we can supply the service to our Facade as follows:
@Injectable(as: IAuthFacade)
class AuthFacade implements IAuthFacade {
  final FirebaseAuth _firebaseAuth;
  final FirebaseFirestore _firebaseFirestore;

  AuthFacade(this._firebaseAuth, this._firebaseFirestore);

  // ...Implementation..
  }
GetIt will look through the types that our AuthFacade requires and supply them. This is great, because we won’t have to instantiate the services from the Facade class.
The generated code will look as follows:
Future<_i1.GetIt> $initGetIt(_i1.GetIt get,
    {String? environment, _i2.EnvironmentFilter? environmentFilter}) async {
  final gh = _i2.GetItHelper(get, environment, environmentFilter);
  final appModule = _$AppModule();
  // The services are provided here
  gh.factory<_i3.FirebaseAuth>(() => appModule.auth);
  gh.factory<_i4.FirebaseFirestore>(() => appModule.store);

  await gh.factoryAsync<_i5.FirebaseService>(() => appModule.fireService,
      preResolve: true);

  // GetIt supplies the instances here
  gh.factory<_i6.IAuthFacade>(() =>
      _i7.AuthFacade(get<_i3.FirebaseAuth>(), get<_i4.FirebaseFirestore>()));
  return get;
}
Rerun the app to make sure everything is working fine.
We can now provide the implementation for IAuthFacade:
@Injectable(as: IAuthFacade)
class AuthFacade implements IAuthFacade {
  final FirebaseAuth _firebaseAuth;
  final FirebaseFirestore _firebaseFirestore;

  AuthFacade(this._firebaseAuth, this._firebaseFirestore);

  @override
  Future<u.User?> getUser() async {
    try {
      final uid = _firebaseAuth.currentUser!.uid;
      final currentUser = await _firebaseFirestore.doc("users/$uid").snapshots().first;
      return currentUser.toUser();
    } on FirebaseAuthException catch(e) {
      print("We failed ${e.message}");
    }
  }

  @override
  Future<void> register({required String username, required String email, required String password}) {
      return _firebaseAuth.createUserWithEmailAndPassword(email: email, password: password)
          .then((value) async {
            return _firebaseFirestore.doc("users/${value.user!.uid}")
        .set({"email": email, "username": username});
      });
  }

  @override
  Future<void> signIn({required String email, required String password}) {
    return _firebaseAuth.signInWithEmailAndPassword(email: email, password: password);
  }

  @override
  Future<void> logOut() => _firebaseAuth.signOut();
}

// Simple extension to convert firestore document snapshots to our class
extension DocumentSnapX on DocumentSnapshot<Map<String, dynamic>> {
  u.User toUser() {
    return u.User.fromJson(this.data()!)
        ..id = this.id;
  }
}
We need Firestore in IAuthFacade to allow us to access the signed-in user from Cloud Firestore. We can’t access the current user ID from Firebase Authentication, so to add a property like username you’ll need to use signIn, then create a new document in Cloud Firestore using the signed-in user ID.
With everything set up this way it makes working with repositories in bloc even easier. For example:
@injectable
class LoginFormBloc extends Bloc<LoginFormEvent, LoginFormState> {
  final IAuthFacade authFacade;

  LoginFormBloc(this.authFacade) : super(LoginFormInitial()) {
      // Update login state according to events
      on<LoginButtonPressed>((event, emit) async {
      final currentState = state as LoginFormState;
        final data = authFacade.signIn(currentState.email, currentState.password);
      })
    }
  }
GetIt and Injectable are a perfect match when it comes to dependency injection. When it comes to readable and easily maintainable code, you need to know the right tools. To get a feel of the app we built, you can find the repository in GitHub using this link.
Install LogRocket via npm or script tag. LogRocket.init() must be called client-side, not
server-side
$ npm i --save logrocket

// Code:

import LogRocket from 'logrocket';
LogRocket.init('app/id');
// Add to your HTML:

<script src="https://cdn.lr-ingest.com/LogRocket.min.js"></script>
<script>window.LogRocket && window.LogRocket.init('app/id');</script>

When should you move API logic out of Next.js? Learn when Route Handlers stop scaling and how ElysiaJS helps.

Explore how Dokploy streamlines app deployment with Docker, automated builds, and simpler infrastructure compared to traditional CI/CD workflows.

A side-by-side look at Astro and Next.js for content-heavy sites, breaking down performance, JavaScript payload, and when each framework actually makes sense.

AI-generated tests can speed up React testing, but they also create hidden risks. Here’s what broke in a real app.re
Hey there, want to help make our blog better?
Join LogRocket’s Content Advisory Board. You’ll help inform the type of content we create and get access to exclusive meetups, social accreditation, and swag.
Sign up now

