Every CSS developer should be familiar with three key CSS concepts: cascade, inheritance, and specificity. Specificity is a CSS method for resolving conflicts when selectors with different style rules are applied to the same element. Specificity is an essential component of CSS, and understanding how it works will save you a lot of time and trouble when debugging.

In this article, we’ll cover the following:
!important rule exception?Let’s dive in!
If an element has two or more selectors with conflicting style rules, a browser will look at the specificity score to determine which style should be applied. Property values with more relevance to the element will have a higher specificity value. Therefore, a browser will apply the style of the selector with the highest specificity score. Specificity only applies when multiple declarations target the same element.
The importance of specificity cannot be overstated. As developers, we occasionally make mistakes and attempt to target an HTML element more than once. Specificity determines which of the selector’s style rules will be applied to the element. Having a good understanding of specificity means you’ll be able to find and address issues faster and with less effort.
Specificity involves creating score to rank or compare selectors. The selector with the highest score will have its style rules applied to the element. An exception to this rule, which we’ll discuss later in this article, comes into play when the !important property is applied to a selector.
A selector’s specificity score is determined by a four-part specificity hierarchy:
style attribute. These selectors are given a specificity score of 1000 and, as such, take precedence over other selector types#modal, have a specificity score of 100.modal, :active, and [href] are examples of class and pseudo-class, and attribute selectors, respectivelydiv and :after are examples of element and pseudo-element selectors, respectivelyN.B., there is also a universal selector (denoted by the * character) which is used to apply a CSS style to all HTML elements on a page. The universal selector has a specificity of zero; therefore, its style rules will be overridden whenever there are conflicting selectors
Here’s a visual representation of CSS specificity hierarchy:
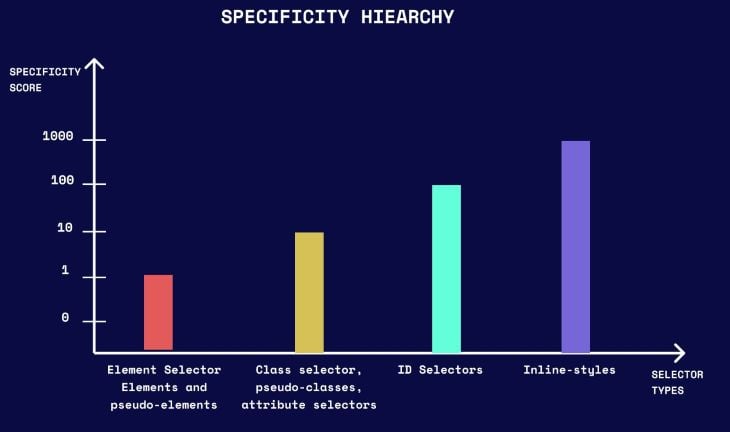
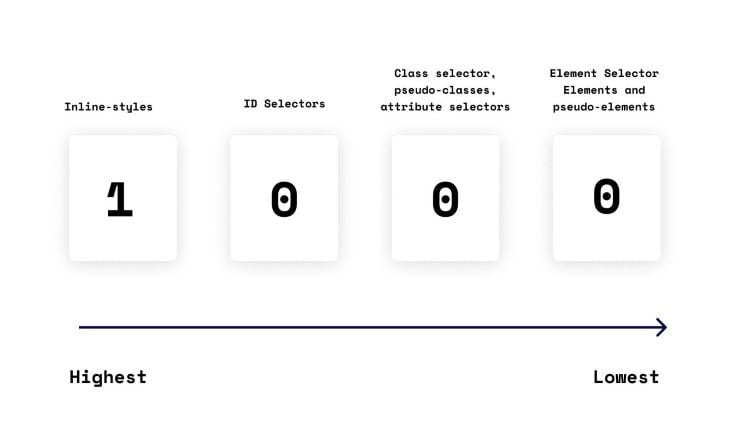
Now, let’s review another visual representation to help us fully grasp the concept of specificity.
In this example, we’ll take a closer look at the following selectors:
When inline style rules are applied to an element, the element will have an inline style specificity score of one and a score of zero for the other selectors, resulting in a total CSS specificity score of 1000. This means that the inline style rules will take precedence over any style rules associated with an ID, class, or element selector. The !important property can override the inline style rule, but we’ll cover that later in this article.
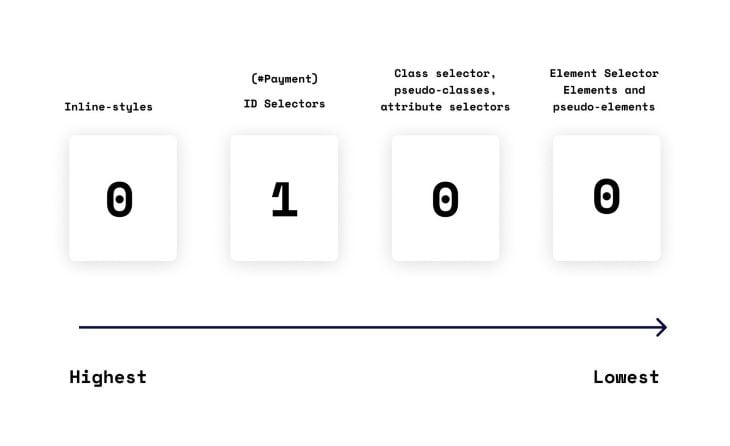
#payment)An element with an ID selector will have an ID specificity score of one, while the other selectors will have a score of zero, resulting in a total CSS specificity score of 100.
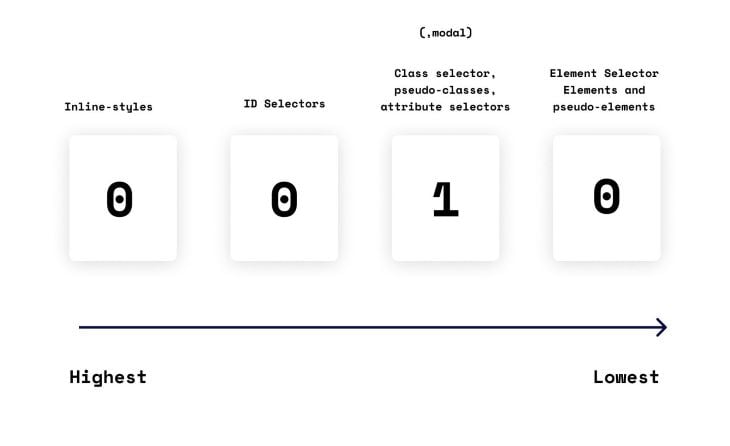
.modal)An element with a class selector will have a class specificity score of one, while the other selectors will have a score of zero, resulting in a total CSS specificity score of 10.
div)The div element would have an element selector specificity score of one, while the other selectors would have a score of zero, resulting in a total CSS specificity score of one.
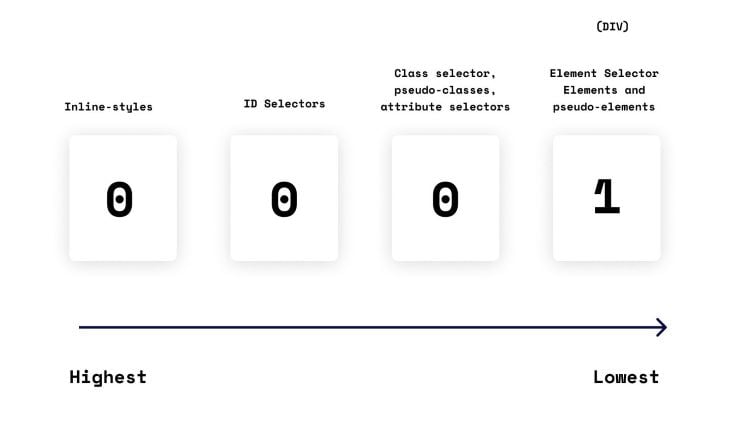
At this point, we have an idea of how specificity works and understand how each selector is given an individual specificity score. Now, let’s take a look at how to calculate a specificity score for multiple selectors.
The “Calculation” column in the below table shows the summation of the individual selector specificities. The “Specificity value” column shows the total calculated specificity for the multiple selectors.
| Selector | Calculation | Specificity value |
|---|---|---|
div |
1 | 1 |
.modal |
10 | 10 |
#payment |
100 | 100 |
<div style="background: #01``0101;> |
1000 | 1000 |
#payment.desc |
100+10 | 110 |
div.modal.test |
1+10+10 | 21 |
Here’s an example of a simple modal:
<div class="modal">
  <h1>Sign Up</h1>
  <div class="desc">
      <p id="desc-text">Please proceed to create an account in order to get all of our latest features</p>
  </div>
</div>
Let’s style the p element using two different selectors in order to demonstrate exactly how specificity works.
Here’s the first selector:
.modal .desc p{
  color:blue;
}
Here’s the second selector:
#desc-text{
  color:yellow;
}
Which of these two selectors do you think will be applied to the p element? If you chose the second selector, you’re correct! Here’s why:
As demonstrated below, the second selector, #desc-text, has a higher specificity score compared to the first selector, modal .desc p. Therefore, the style rules of the second selector will be applied to the p element. In this example, the p element would be yellow.
| Selector | Calculation | Specificity value |
|---|---|---|
.modal .desc p |
10 + 10 + 1 | 21 |
#desc-text |
100 | 100 |
It’s important to understand that the second selector wins in this case because it has a higher score, not due to the order in which it appears in the cascade.
A common misconception with CSS is that selectors are applied according to a cascade. This is not entirely correct. To illustrate this point, here’s a live example with the same two selectors, except this time the #desc-text selector is placed before the modal .desc p selector in the cascade.
As you can see, despite the change in order of appearance, the style of the #desc-text selector is still applied to the p element, as this selector has the highest specificity score:
See the Pen
CSS specificity example by King nelson (@D_kingnelson)
on CodePen.
It is also worth noting that the CSS cascade rule only takes effect when the conflicting selectors have an equal specificity score. In that case, the style rule of the selector that comes last in the cascade will be applied.
In the below example, both selectors targeting the element have the same specificity. Therefore, the CSS cascade rule comes into play and the last selector’s style rules are applied to the element:
See the Pen
CSS specificity example 2 by King nelson (@D_kingnelson)
on CodePen.
Our calculations up to this point show, in simple terms, how a selector is given a specificity score and how that score is used to weight a selector.
However, there are certain edge cases to be considered. One such case is when there are multiple classes that each result in a higher specificity score than a single ID selector. Regardless of how many classes or how high the specificity of each class, the single ID selector will still win.
!important rule exception?When an !important rule is used in a style declaration, it takes precedence over any other declarations and its styling is applied to the element. However, relying on the !important rule for every case is bad practice and should be avoided. The !important rule complicates debugging because it breaks the normal cascading in the stylesheets.
When two declarations with the !important rule conflict on the same element, the declaration with the greater specificity is applied.
Here’s an example:
<div class="empty">
  <p>An empty div</p>
</div>
.empty{
  background-color: #010101 !important;
}

div{
  background-color: #d40000 !important;
}
In this example, the class selector will have the style rule applied to the element because it has a higher specificity score than the element selector.
If two declarations with the !important rule have the same specificity, then the declaration that comes later in the cascade will win. Cascade comes into play when specificity no longer has enough deciding power.
Proximity ignorance simply means that it doesn’t matter how deeply nested a selector is compared to the referenced element, as this has no effect on specificity.
Here’s an example:
<section>
  <div>
    <p>Thank you for following up to this point, you're amazing!</p>
  </div>
</section>
div p {
  font-size:20px;
}

section p {
  font-size:30px;
}
In this example, it doesn’t matter that the p element is in close proximity to the div element. This does not have an effect on its specificity. Both selectors have the same specificity score; therefore, the CSS cascade rule takes effect and the last selector is applied.
CSS elements can have style rules directly targeted to them or they can inherit style rules from parent elements. Styles for a directly targeted element will always take precedence over inherited styles, regardless of the specificity of the inherited rule.
In the below example, the #parent selector has a specificity score of 100. However, its style rule will not be applied to the p element because it is an inherited style.
<div id="parent">
    <p>Congratulations, you made it this far!</p>
</div>
#parent {
  color: blue;
}

p {
  color: yellow;
}
In this article, we discussed what CSS specificity is and how it works. We reviewed how to calculate a specificity score and looked at examples for individual and multiple selectors. We also covered the !important rule exception and proximity ignorance.
Specificity is one of the main pillars of CSS and a very useful concept to understand. A deeper knowledge of specificity will help you quickly specify which selector’s style rules should be applied to a particular element and will also help you identify and address development bugs faster.
As web frontends get increasingly complex, resource-greedy features demand more and more from the browser. If you’re interested in monitoring and tracking client-side CPU usage, memory usage, and more for all of your users in production, try LogRocket.

LogRocket lets you replay user sessions, eliminating guesswork around why bugs happen by showing exactly what users experienced. It captures console logs, errors, network requests, and pixel-perfect DOM recordings — compatible with all frameworks.
LogRocket's Galileo AI watches sessions for you, instantly identifying and explaining user struggles with automated monitoring of your entire product experience.
Modernize how you debug web and mobile apps — start monitoring for free.
Would you be interested in joining LogRocket's developer community?
Join LogRocket’s Content Advisory Board. You’ll help inform the type of content we create and get access to exclusive meetups, social accreditation, and swag.
Sign up now
This guide walks you through creating a web UI for an AI agent that browses, clicks, and extracts info from websites powered by Stagehand and Gemini.

This guide explores how to use Anthropic’s Claude 4 models, including Opus 4 and Sonnet 4, to build AI-powered applications.

Which AI frontend dev tool reigns supreme in July 2025? Check out our power rankings and use our interactive comparison tool to find out.

Learn how OpenAPI can automate API client generation to save time, reduce bugs, and streamline how your frontend app talks to backend APIs.