Handling dynamic, structured data is a common challenge in modern web applications. Whether building spreadsheets, surveys, or data grids, developers need forms that can adapt to user input. Angular’s FormArray is a powerful container tool designed for this purpose.

FormArray makes it easy to create and manage dynamic rows and columns of input fields, providing a seamless way to build spreadsheet-like interfaces.
In this guide, you’ll learn how to:
FormArray containerBy the end of this guide, you’ll have a functional pseudo-spreadsheet application and a strong understanding of how Angular’s reactive forms simplify complex, dynamic data handling.
Let’s get started!
To get started, ensure you have Node.js and the Angular CLI installed. To create a new Angular project, run the following command:
ng new dynamic-formarray-app
During setup, enable routing (by running Yes) and choose your preferred CSS preprocessor. Once the project is created, navigate to the project folder and install the necessary dependencies, including Bootstrap for styling:
npm install bootstrap
Add Bootstrap to angular.json under the styles array:
 "styles": [
  "node_modules/bootstrap/dist/css/bootstrap.min.css",
  "src/styles.css"
]
Add PapaParse for robust CSV parsing:
npm install papaparse
Finally, generate a new component for the spreadsheet interface:
ng generate component components/spreadsheet
The Angular project is now set up and ready for development.
To dynamically generate form controls, we first need to upload and parse a CSV file. Add a file input element to your template:
<div class="mb-3">
  <label for="csvFile" class="form-label">Upload CSV File:</label>
  <input
    type="file"
    id="csvFile"
    class="form-control"
    accept=".csv"
    (change)="onFileUpload($event)"
  />
</div>
In your component file (spreadsheet.component.ts), use Angular’s FormBuilder and PapaParse to process the uploaded file:
import { Component, OnInit } from '@angular/core';
import { FormArray, FormBuilder, FormControl, FormGroup, Validators } from '@angular/forms';
import * as Papa from 'papaparse';

@Component({
  selector: 'app-spreadsheet',
  templateUrl: './spreadsheet.component.html',
  styleUrls: ['./spreadsheet.component.css']
})
export class SpreadsheetComponent implements OnInit {
  spreadsheetForm!: FormGroup;

  constructor(private fb: FormBuilder) {}

  ngOnInit(): void {
    this.spreadsheetForm = this.fb.group({ rows: this.fb.array([]) });
  }

  get formArray(): FormArray {
    return this.spreadsheetForm.get('rows') as FormArray;
  }

  onFileUpload(event: Event): void {
    const file = (event.target as HTMLInputElement).files?.[0];
    if (file) {
      Papa.parse(file, {
        complete: (result) => this.loadCsvData(result.data),
        skipEmptyLines: true
      });
    }
  }

  loadCsvData(data: any[]): void {
    const rows = this.formArray;
    rows.clear();
    data.forEach((row) => {
      const formRow = this.fb.array(row.map((value: string) => this.fb.control(value, Validators.required)));
      rows.push(formRow);
    });
  }
}
The code snippet above achieves the following:
<input> element captures the file and triggers the onFileUpload methodFormArray: Each row in the CSV becomes a FormArray of FormControls, allowing Angular to manage the data reactivelyAfter parsing the data, the next step is rendering it dynamically in a grid that mimics a spreadsheet. Each row in the FormArray corresponds to a FormArray of cells, represented as FormControl instances.
In the template (spreadsheet.component.html), use Angular’s structural directives to display rows and cells:
<form [formGroup]="spreadsheetForm">
  <div *ngFor="let row of formArray.controls; let i = index" class="row mb-2">
    <div *ngFor="let cell of (row as FormArray).controls; let j = index" class="col">
      <input
        type="text"
        [formControl]="cell"
        class="form-control"
        [ngClass]="{ 'is-invalid': cell.invalid && cell.touched }"
        placeholder="Cell {{ i + 1 }}, {{ j + 1 }}"
      />
      <div *ngIf="cell.invalid && cell.touched" class="invalid-feedback">
        <span *ngIf="cell.hasError('required')">This field is required.</span>
      </div>
    </div>
  </div>
</form>
Here’s what’s happening in the code block above:
*ngFor loops over the FormArray rows, creating a <div> for each row*ngFor loops through the cells, rendering an <input> for each FormControlValidation ensures that the input meets specific criteria. Angular supports built-in validators like Validators.required and allows for custom validation logic.
Create a custom validator to ensure numeric input:
function validateNumeric(): ValidatorFn {
  return (control: AbstractControl): { [key: string]: any } | null => {
    const value = control.value;
    return isNaN(value) || value.trim() === '' ? { numeric: true } : null;
  };
}
Update the loadCsvData method to include this validator:
loadCsvData(data: any[]): void {
  const rows = this.formArray;
  rows.clear();
  data.forEach((row) => {
    const formRow = this.fb.array(
      row.map((value: string) => this.fb.control(value, [Validators.required, validateNumeric()]))
    );
    rows.push(formRow);
  });
}
Once the user modifies the form, allow them to download the updated data as a CSV file using the Blob API.
Here is the code for the CSV export:
downloadCsv(): void {
  const headers = ['Column 1', 'Column 2', 'Column 3'];
  const rows = this.formArray.controls.map((row) =>
    (row as FormArray).controls.map((control) => control.value)
  );

  const csvArray = [headers, ...rows];
  const csvData = csvArray.map((row) => row.join(',')).join('\n');

  const blob = new Blob([csvData], { type: 'text/csv;charset=utf-8;' });
  const url = window.URL.createObjectURL(blob);

  const link = document.createElement('a');
  link.href = url;
  link.setAttribute('download', 'modified-data.csv');
  document.body.appendChild(link);
  link.click();
  document.body.removeChild(link);
  window.URL.revokeObjectURL(url);
}
Finally, we’ll include a button in the template to trigger the download:
<button type="button" class="btn btn-secondary" (click)="downloadCsv()">
  Download Modified CSV
</button>
And that’s it! We’ve successfully built a fully functional pseudo-spreadsheet application capable of dynamically generating form controls, validating user inputs, and exporting modified data — all powered by Angular’s FormArray.
By following this guide, you learned how to:
FormArrayThis solution is highly adaptable, making it suitable for various real-world scenarios like data grids, surveys, or interactive spreadsheets.
By mastering Angular’s FormArray, you can build flexible, dynamic form applications that meet real-world needs, such as data grids, spreadsheets, and surveys. Now you have the tools to simplify complex form handling with Angular.
Happy coding!
Debugging Angular applications can be difficult, especially when users experience issues that are difficult to reproduce. If you’re interested in monitoring and tracking Angular state and actions for all of your users in production, try LogRocket.
LogRocket lets you replay user sessions, eliminating guesswork by showing exactly what users experienced. It captures console logs, errors, network requests, and pixel-perfect DOM recordings—compatible with all frameworks.
With Galileo AI, you can instantly identify and explain user struggles with automated monitoring of your entire product experience.
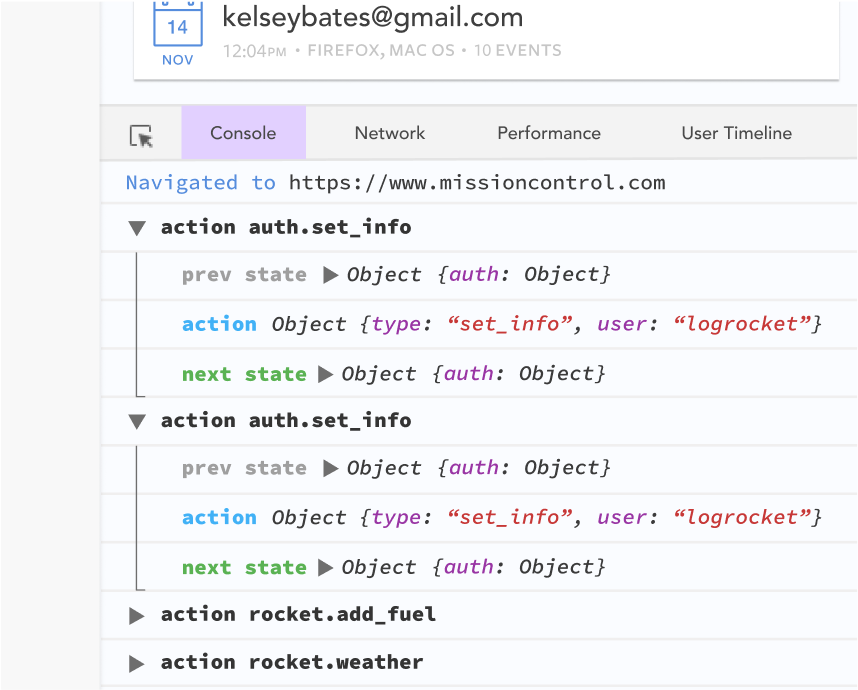
The LogRocket NgRx plugin logs Angular state and actions to the LogRocket console, giving you context around what led to an error, and what state the application was in when an issue occurred.
Modernize how you debug your Angular apps — start monitoring for free.
Would you be interested in joining LogRocket's developer community?
Join LogRocket’s Content Advisory Board. You’ll help inform the type of content we create and get access to exclusive meetups, social accreditation, and swag.
Sign up now
Discover how the Interface Segregation Principle (ISP) keeps your code lean, modular, and maintainable using real-world analogies and practical examples.

<selectedcontent> element improves dropdowns

Learn how to implement an advanced caching layer in a Node.js app using Valkey, a high-performance, Redis-compatible in-memory datastore.

Learn how to properly handle rejected promises in TypeScript using Angular, with tips for retry logic, typed results, and avoiding unhandled exceptions.


