Maintaining data integrity on the frontend has always been tricky. Imagine this: a user orders a laptop, and your app needs to deduct one free order from their account, create a new order record, and update the product’s inventory.

Now, what if the second step succeeds but the third fails? You’ve just created inconsistent data, the user lost a free order, but the inventory never changed.
State management tools like Redux or Context API don’t handle these kinds of transactional failures. They leave you to manage rollbacks, retries, and cleanup yourself.
TanStack DB changes that by bringing atomic transactions to the front end. Every set of operations either succeeds entirely or fails completely – no partial updates, no corrupted state.
In this blog, we’ll see how TanStack DB transactions help maintain consistency by building a client-side order management app with atomic operations, rollback logic, and optimistic UI updates.
The Replay is a weekly newsletter for dev and engineering leaders.
Delivered once a week, it's your curated guide to the most important conversations around frontend dev, emerging AI tools, and the state of modern software.
Before we jump into building the order management demo, it helps to understand what makes TanStack DB transactions so effective.
TanStack DB follows the ACID principles to maintain data integrity:
Unlike traditional databases that lock data during transactions, TanStack DB uses optimistic updates. The UI updates instantly for a smoother experience, but if any operation fails, the transaction automatically rolls back to its previous state.
Every TanStack DB transaction follows a simple flow:
mutationFnmutationFn (API calls, validations, etc.)Here’s a basic example of how a transaction works:
const tx = createTransaction({
  mutationFn: async ({ transaction }) => {
    // Send all mutations to API
    await api.saveChanges(transaction.mutations)
  }
})
tx.mutate(() => {
  collection.insert({ id: "1", text: "Buy milk" })
  collection.update("2", draft => { draft.completed = true })
})
await tx.isPersisted.promise
To put TanStack DB transactions into practice, we’ll build a small order management system that solves the data consistency problem we discussed earlier.
The app will handle:
Let’s start by creating a new Next.js project and installing the required dependencies:
npx create-next-app@latest tanstack-db-order-manager --typescript --tailwind --eslint --app --src-dir --import-alias "@/*"
The above command creates a new Next.js project with TypeScript and TailwindCSS.
Navigate to the project directory and run the following commands to install TanStack DB and other required dependencies:
npm install @tanstack/react-db zod uuid
npm install --save-dev @types/uuid
In the src/app folder, create provider.tsx file and add the following:
'use client'
import { QueryClientProvider } from '@tanstack/react-query'
import { QueryClient } from '@tanstack/react-query'

const queryClient = new QueryClient()
export function Providers({ children }: { children: React.ReactNode }) {
  return (
    <QueryClientProvider client={queryClient}>
      {children}
    </QueryClientProvider>
  )
}
This sets up TanStack Query for global state management. The QueryClient instance is responsible for handling queries, mutations, and caching logic.
Update app/layout.tsx with the following:
import type { Metadata } from "next";
import { Inter } from "next/font/google";
import "./globals.css";
import { Providers } from './providers'

const inter = Inter({ subsets: ["latin"] });

export const metadata: Metadata = {
  title: "TanStack DB Transactions Demo",
  description: "An order management application demonstrating TanStack DB Transactions features",
};

export default function RootLayout({
  children,
}: Readonly<{
  children: React.ReactNode;
}>) {
  return (
    <html lang="en">
      <body className={inter.className}>
        <Providers>
          {children}
        </Providers>
      </body>
    </html>
  );
}
The addition of the custom Providers component wraps the app with global context providers for state management.
Next, update app/page.tsx as follows:
'use client'
import OrderManager from '@/components/OrderManager'
export default function Home() {
  return <OrderManager />
}
Let’s set up our TanStack DB collections with proper schemas.
Create lib/collections.ts in the src folder and add the following:
// src/lib/collections.ts
import { createCollection, localOnlyCollectionOptions } from '@tanstack/react-db'
import { z } from 'zod'
export const UserSchema = z.object({
  id: z.string(),
  name: z.string(),
  freeOrders: z.number().min(0),
  email: z.string().email(),
})
export const OrderSchema = z.object({
  id: z.string(),
  userId: z.string(),
  productId: z.string(),
  quantity: z.number().min(1),
  status: z.enum(['pending', 'completed', 'failed']),
  createdAt: z.date(),
})
export const ProductSchema = z.object({
  id: z.string(),
  name: z.string(),
  price: z.number().min(0),
  quantity: z.number().min(0),
  description: z.string().optional(),
})
Next, create the users collection with local-only persistence:
// src/lib/collections.ts
export const usersCollection = createCollection(
  localOnlyCollectionOptions({
    id: 'users',
    getKey: (user: User) => user.id,
    schema: UserSchema,
  })
)
Create the orders collection with local-only persistence:
// src/lib/collections.ts
export const ordersCollection = createCollection(
  localOnlyCollectionOptions({
    id: 'orders',
    getKey: (order: Order) => order.id,
    schema: OrderSchema,
  })
)
Now, create the products collection with local-only persistence:
// src/lib/collections.ts
export const productsCollection = createCollection(
  localOnlyCollectionOptions({
    id: 'products',
    getKey: (product: Product) => product.id,
    schema: ProductSchema,
  })
)
We’ll build our transaction logic progressively, understanding each piece as we go. First, we need the core imports and a way to simulate real-world API failures.
Create lib/transactions.ts in the src folder and add the following:
// src/lib/transactions.ts
import { createTransaction } from '@tanstack/react-db'
import { v4 as uuidv4 } from 'uuid'
import { usersCollection, ordersCollection, productsCollection, type User, type Order, type Product } from './collections'

async function simulateApiCall(operation: string, data: unknown): Promise<void> {
  await new Promise(resolve => setTimeout(resolve, 100))
  if (Math.random() < 0.1) {
    throw new Error(`${operation} failed: Network error`)
  }
  console.log(`${operation} succeeded:`, data)
}
Here, we import TanStack DB’s createTransaction function and our collections. The simulateApiCall function mimics real API behaviour with network delays and random failures, which is needed for testing our transaction rollback logic.
Before creating any transaction for processing an order, we’ll validate our inputs as follows:
// src/lib/transactions.ts
export async function processOrder(
  userId: string,
  productId: string,
  quantity: number
): Promise<{ success: boolean; rollbackOccurred: boolean }> {
  const user = usersCollection.get(userId)
  const product = productsCollection.get(productId)
  if (!user) throw new Error('User not found')
  if (!product) throw new Error('Product not found')
  if (user.freeOrders <= 0) throw new Error('No free orders remaining')
  if (product.quantity < quantity) throw new Error('Insufficient inventory')
  let rollbackOccurred = false
The processOrder function checks that the user exists, has free orders available, and that the product has sufficient inventory. This prevents us from starting transactions that are doomed to fail.
Now let’s create the atomic transaction with its mutation function. Add the following to the processOrder function:
// src/lib/transactions.ts
  const orderTransaction = createTransaction({
    autoCommit: true,
    mutationFn: async ({ transaction }) => {
      try {
        const mutations = transaction.mutations
        for (const mutation of mutations) {
          switch (mutation.collection.id) {
            case 'users':
              await simulateApiCall('updateUser', mutation.modified)
              break
            case 'orders':
              await simulateApiCall('createOrder', mutation.modified)
              break
            case 'products':
              await simulateApiCall('updateInventory', mutation.modified)
              break
            default:
              throw new Error(`Unknown collection: ${mutation.collection.id}`)
          }
        }
      } catch (error) {
        rollbackOccurred = true
        throw error
      }
    },
  })
The mutationFn is where the main logic runs. TanStack DB passes this function to all the mutations queued for the transaction. In our case, we’ll simulate API calls for each mutation, and if any one of them fails, the entire transaction automatically rolls back.
By setting autoCommit: true, TanStack DB automatically takes care of committing successful transactions and rolling back failed ones.
Now, let’s define the mutations that will apply optimistic updates and reflect changes in the UI right away:
  // src/lib/transactions.ts
  orderTransaction.mutate(() => {
    usersCollection.update(userId, (draft) => {
      draft.freeOrders -= 1
    })
    const newOrder: Order = {
      id: uuidv4(),
      userId,
      productId,
      quantity,
      status: 'pending',
      createdAt: new Date(),
    }
    ordersCollection.insert(newOrder)
    productsCollection.update(productId, (draft) => {
      draft.quantity -= quantity
    })
  })
Inside mutate(), we define all the data changes that make up our transaction. Each call inside mutate() is tracked by TanStack DB as part of a single atomic operation.
Here’s what happens in this step:
usersCollection.update deducts one free order from the userordersCollection.insert creates a new order recordproductsCollection.update reduces the product’s inventory countThese updates appear instantly in the UI through optimistic updates, but TanStack DB keeps them staged. If the mutationFn fails, every change is automatically rolled back.
Finally, let’s add the next block to wait for the transaction to finish and handle the outcome:
// src/lib/transactions.ts
  try {
    await orderTransaction.isPersisted.promise
    return { success: true, rollbackOccurred: false }
  } catch (error) {
    return { success: false, rollbackOccurred: true }
  }
}
Here, we wait for isPersisted.promise to resolve. If the mutationFn succeeds, this resolves, and our changes are committed. If it fails, this is rejected and all changes are rolled back.
Let’s add some demo data to make our app functional:
// src/lib/transactions.ts
export function initializeDemoData() {
  const demoUser: User = {
    id: 'user-1',
    name: 'John Doe',
    email: '[email protected]',
    freeOrders: 4,
  }
  const demoProducts: Product[] = [
    {
      id: 'product-1',
      name: 'Laptop',
      price: 999.99,
      quantity: 10,
      description: 'High-performance laptop',
    },
    {
      id: 'product-2',
      name: 'Mouse',
      price: 29.99,
      quantity: 50,
      description: 'Wireless mouse',
    },
    {
      id: 'product-3',
      name: 'Keyboard',
      price: 79.99,
      quantity: 25,
      description: 'Mechanical keyboard',
    },
  ]
  const existingUser = usersCollection.get('user-1')
  const existingProducts = Array.from(productsCollection.values())
  if (!existingUser) {
    usersCollection.insert(demoUser)
  }
  if (existingProducts.length === 0) {
    demoProducts.forEach(product => {
      productsCollection.insert(product)
    })
  }
}
Here, we’re creating a demo user with four free orders and a few sample products to populate the app. The duplicate checks make sure we don’t insert the same data again when the component re-renders.
Let’s start by setting up our imports and the basic component structure.
Create a new file called components/OrderManager.tsx inside the src folder and add the following:
// src/components/OrderManager.tsx
'use client'
import { useState, useEffect } from 'react'
import { usersCollection, ordersCollection, productsCollection, type User, type Product, type Order } from '@/lib/collections'
import { processOrder, initializeDemoData } from '@/lib/transactions'
Here, we import React Hooks for state management and our TanStack DB collections. The 'use client' directive ensures this component runs on the client side, which is essential for TanStack DB’s reactivity.
Now, let’s create a custom Hook for SSR-safe data fetching that subscribes to collection changes:
// src/components/OrderManager.tsx
function useSSRSafeData() {
  const [mounted, setMounted] = useState(false)
  const [user, setUser] = useState<User[]>([])
  const [products, setProducts] = useState<Product[]>([])
  const [orders, setOrders] = useState<Order[]>([])
  useEffect(() => {
    setMounted(true)


    // Subscribe to collection changes for real-time updates
    const unsubscribeUsers = usersCollection.subscribeChanges(() => {
      const userData = Array.from(usersCollection.values())
      setUser(userData.filter((u: User) => u.id === 'user-1'))
    }, { includeInitialState: true })


    const unsubscribeProducts = productsCollection.subscribeChanges(() => {
      const productData = Array.from(productsCollection.values())
      setProducts(productData)
    }, { includeInitialState: true })


    const unsubscribeOrders = ordersCollection.subscribeChanges(() => {
      const orderData = Array.from(ordersCollection.values())
      setOrders(orderData)
    }, { includeInitialState: true })
    initializeDemoData()
    return () => {
      unsubscribeUsers()
      unsubscribeProducts()
      unsubscribeOrders()
    }
  }, [])
  return { mounted, user, products, orders }
}
This Hook forms the core of our reactive UI. The subscribeChanges method keeps the component state in sync by automatically updating it whenever a collection changes. Setting includeInitialState: true ensures we get the latest data right away on mount. The cleanup function handles unsubscriptions to prevent memory leaks when the component unmounts.
Let’s set up our component’s state for user interactions:
// src/components/OrderManager.tsx
export default function OrderManager() {
  const [selectedProduct, setSelectedProduct] = useState<string>('')
  const [quantity, setQuantity] = useState<number>(1)
  const [isProcessing, setIsProcessing] = useState<boolean>(false)
  const [error, setError] = useState<string>('')
  const [success, setSuccess] = useState<string>('')
  const { mounted, user, products, orders } = useSSRSafeData()
We manage form state (selectedProduct, quantity), processing state (isProcessing), and user feedback (error, success). The mounted state ensures we only render after client-side hydration.
Now let’s create the function that handles order processing with transaction feedback:
// src/components/OrderManager.tsx
  const handleOrder = async () => {
    if (!selectedProduct || quantity <= 0) {
      setError('Please select a product and enter a valid quantity')
      return
    }
    setIsProcessing(true)
    setError('')
    setSuccess('')
    try {
      const result = await processOrder('user-1', selectedProduct, quantity)


      if (result.success) {
        setSuccess('Order processed successfully!')
        setSelectedProduct('')
        setQuantity(1)
      } else if (result.rollbackOccurred) {
        setError('Order failed and was rolled back due to API error')
      } else {
        setError('Order failed for an unknown reason')
      }
    } catch (err) {
      setError(err instanceof Error ? err.message : 'An error occurred')
    } finally {
      setIsProcessing(false)
    }
  }
This function calls our processOrder transaction and provides clear feedback to users. The result.success and result.rollbackOccurred flags distinguish between successful orders and rollback scenarios.
Next, we’ll build the user information section:
// src/components/OrderManager.tsx
  const selectedProductData = products?.find(p => p.id === selectedProduct)
  if (!mounted) {
    return <div className="p-8 text-center">Loading...</div>
  }
  return (
    <div className="min-h-screen bg-gray-50 p-8">
      <div className="max-w-4xl mx-auto">
        <h1 className="text-3xl font-bold text-gray-900 mb-8">
          Order Management System
        </h1>


        {/* User Information */}
        <div className="bg-white rounded-lg shadow p-6 mb-6">
          <h2 className="text-xl font-semibold mb-4">User Information</h2>
          {user.length > 0 && (
            <div className="grid grid-cols-1 md:grid-cols-3 gap-4">
              <div>
                <span className="font-medium">Name:</span> {user[0].name}
              </div>
              <div>
                <span className="font-medium">Email:</span> {user[0].email}
              </div>
              <div>
                <span className="font-medium">Free Orders:</span>
                <span className={`ml-2 px-2 py-1 rounded text-sm ${
                  user[0].freeOrders > 0 ? 'bg-green-100 text-green-800' : 'bg-red-100 text-red-800'
                }`}>
                  {user[0].freeOrders}
                </span>
              </div>
            </div>
          )}
        </div>
This section displays user information with real-time updates. The free orders count changes color based on availability, and updates instantly when transactions occur.
Now, let’s build the order form with product selection:
// src/components/OrderManager.tsx
        {/* Product Selection */}
        <div className="bg-white rounded-lg shadow p-6 mb-6">
          <h2 className="text-xl font-semibold mb-4">Place Order</h2>


          <div className="grid grid-cols-1 md:grid-cols-2 gap-6">
            <div>
              <label className="block text-sm font-medium text-gray-700 mb-2">
                Select Product
              </label>
              <select
                value={selectedProduct}
                onChange={(e) => setSelectedProduct(e.target.value)}
                className="w-full px-3 py-2 border border-gray-300 rounded-md focus:outline-none focus:ring-2 focus:ring-blue-500"
                disabled={isProcessing}
              >
                <option value="">Choose a product...</option>
                {products.map((product) => (
                  <option key={product.id} value={product.id}>
                    {product.name} - ${product.price} (Stock: {product.quantity})
                  </option>
                ))}
              </select>
            </div>
            <div>
              <label className="block text-sm font-medium text-gray-700 mb-2">
                Quantity
              </label>
              <input
                type="number"
                min="1"
                value={quantity}
                onChange={(e) => setQuantity(parseInt(e.target.value) || 1)}
                className="w-full px-3 py-2 border border-gray-300 rounded-md focus:outline-none focus:ring-2 focus:ring-blue-500"
                disabled={isProcessing}
              />
            </div>
          </div>
The product dropdown shows real-time inventory levels, and the quantity input is validated. Both inputs are disabled during transaction processing to prevent conflicts.
Let’s add the order summary and processing button:
// src/components/OrderManager.tsx
          {selectedProductData && (
            <div className="mt-4 p-4 bg-blue-50 rounded-lg">
              <h3 className="font-medium text-blue-900">Order Summary</h3>
              <p className="text-blue-700">
                {quantity} × {selectedProductData.name} = ${(selectedProductData.price * quantity).toFixed(2)}
              </p>
              <p className="text-sm text-blue-600">
                Remaining stock: {selectedProductData.quantity - quantity}
              </p>
            </div>
          )}
          <button
            onClick={handleOrder}
            disabled={isProcessing || !selectedProduct || user[0]?.freeOrders <= 0}
            className="mt-4 w-full bg-blue-600 text-white py-2 px-4 rounded-md hover:bg-blue-700 disabled:bg-gray-400 disabled:cursor-not-allowed"
          >
            {isProcessing ? 'Processing...' : 'Place Order'}
          </button>
          {error && (
            <div className="mt-4 p-4 bg-red-50 border border-red-200 rounded-md">
              <p className="text-red-800">{error}</p>
            </div>
          )}
          {success && (
            <div className="mt-4 p-4 bg-green-50 border border-green-200 rounded-md">
              <p className="text-green-800">{success}</p>
            </div>
          )}
        </div>
The order summary displays the total cost and remaining stock for the selected product. The Place Order button stays disabled while processing or when the form inputs are invalid. Success and error messages give clear feedback on each transaction’s result.
Next, let’s render the current product inventory:
// src/components/OrderManager.tsx
        {/* Product Inventory */}
        <div className="bg-white rounded-lg shadow p-6 mb-6">
          <h2 className="text-xl font-semibold mb-4">Product Inventory</h2>
          <div className="grid grid-cols-1 md:grid-cols-3 gap-4">
            {products.map((product) => (
              <div key={product.id} className="border rounded-lg p-4">
                <h3 className="font-medium text-gray-900">{product.name}</h3>
                <p className="text-gray-600">${product.price}</p>
                <p className="text-sm text-gray-500">Stock: {product.quantity}</p>
                {product.description && (
                  <p className="text-sm text-gray-400 mt-2">{product.description}</p>
                )}
              </div>
            ))}
          </div>
        </div>
This section lists all products along with their current inventory levels. Stock values update in real time as orders are placed or rolled back.
Finally, let’s add the order history section:
// src/components/OrderManager.tsx
        {/* Order History */}
        <div className="bg-white rounded-lg shadow p-6">
          <h2 className="text-xl font-semibold mb-4">Order History</h2>
          {orders.length === 0 ? (
            <p className="text-gray-500">No orders yet</p>
          ) : (
            <div className="space-y-3">
              {orders.map((order) => {
                const product = products.find(p => p.id === order.productId)
                return (
                  <div key={order.id} className="border rounded-lg p-4">
                    <div className="flex justify-between items-start">
                      <div>
                        <h3 className="font-medium">{product?.name}</h3>
                        <p className="text-sm text-gray-600">
                          Quantity: {order.quantity} |
                          Status: <span className={`px-2 py-1 rounded text-xs ${
                            order.status === 'completed' ? 'bg-green-100 text-green-800' :
                            order.status === 'pending' ? 'bg-yellow-100 text-yellow-800' :
                            'bg-red-100 text-red-800'
                          }`}>
                            {order.status}
                          </span>
                        </p>
                      </div>
                      <div className="text-right">
                        <p className="text-sm text-gray-500">
                          {order.createdAt.toLocaleDateString()}
                        </p>
                      </div>
                    </div>
                  </div>
                )
              })}
            </div>
          )}
        </div>
      </div>
    </div>
  )
}
The order history displays every transaction along with its current status. New orders show up immediately, and any failed transactions reflect their rollback state in real time.
Here’s what the final build looks like:
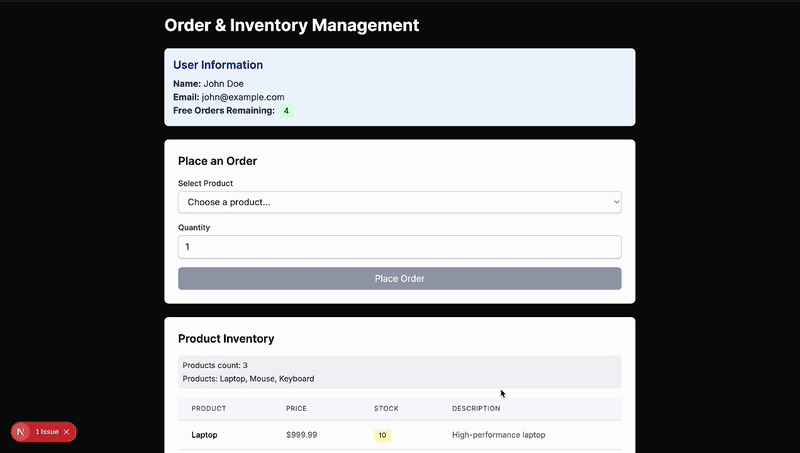
Notice how the UI instantly reverts when a transaction fails – all changes are rolled back automatically after one of the simulated API calls throws an error.
You can find the complete source code for this demo on GitHub.
Data integrity isn’t just a backend problem – it’s equally important on the frontend. TanStack DB transactions bring database-level consistency to client-side applications, addressing one of the hardest challenges in modern frontend development.
Rather than writing manual error-handling logic for multi-step operations, you can rely on transactions to guarantee atomicity and predictable rollbacks.
In this tutorial, we built an order management app that demonstrates atomic operations, rollback handling, and optimistic updates – showing how these features work together to deliver a consistent and reliable user experience.
For more insight into TanStack’s ecosystem, check out this PodRocket episode with Tanner Linsley, where he discusses TanStack and TanRouter.

Learn how inline props break React.memo, trigger unnecessary re-renders, and hurt React performance — plus how to fix them.

This article showcases a curated list of open source mobile applications for Flutter that will make your development learning journey faster.

Discover what’s new in The Replay, LogRocket’s newsletter for dev and engineering leaders, in the April 1st issue.

This post walks through a complete six-step image optimization strategy for React apps, demonstrating how the right combination of compression, CDN delivery, modern formats, and caching can slash LCP from 8.8 seconds to just 1.22 seconds.
Would you be interested in joining LogRocket's developer community?
Join LogRocket’s Content Advisory Board. You’ll help inform the type of content we create and get access to exclusive meetups, social accreditation, and swag.
Sign up now

