React Native is an amazing library for developers looking to build mobile apps with ease. It provides an efficient way of displaying information to the frontend. But how do we get the data so that our components can render it?

In this article, you will learn how to fetch data from an API and display it to the user. We’ll cover several approaches with comprehensive code samples to help you determine the best method for your app.
We’ll cover the following options for fetching data in React Native:
To show data procurement in React Native, we’ll construct a basic app that fetches a list of items from Coffee API. Moreover, we will use the NativeBase UI library for rendering our data to the client.
In the end, your example app will look like this:
You can get the full source code for this application from this GitHub repository.
To scaffold a React Native project with Expo, run the following terminal command:
expo init reactnative-data-fetching
Here, we will install the following modules:
@apollo/client : for making GraphQL queriesgraphql: peer dependency for Apollo Clientnative-base, styled-components, styled-system: to use the NativeBase libraryTo acquire these packages, write the following terminal command:
npm i @apollo/client graphql native-base styled-components styled-system
As the next step, install NativeBase’s peer dependencies like so:
expo install react-native-svg
expo install react-native-safe-area-context
When that’s done, it’s time to demonstrate data fetching.
There are three reasons you’d need to fetch data:
We will write code for each of these use cases.
The Fetch API is the most common method of retrieving data because it comes bundled with React.
In your components folder, create a file called CoffeeAutonomous.js. There, start by writing the following code:
import React, { useState, useEffect } from "react";
import { Box, FlatList, Center, NativeBaseProvider, Text } from "native-base";

export default function CoffeeAutonomous() {
  const [data, setData] = useState([]);
  const [loading, setLoading] = useState(true);

  const fetchData = async () => {
    const resp = await fetch("https://api.sampleapis.com/coffee/hot");
    const data = await resp.json();
    setData(data);
    setLoading(false);
  };

  const renderItem = ({ item }) => {
    return (
      <Box px={5} py={2} rounded="md" bg="primary.300" my={2}>
        {item.title}
      </Box>
    );
  };
Let’s dissect this code piece by piece.
In the beginning, we created two Hooks called data and loading. The data Hook will hold fetched data and loading will tell the user if the data is on its way.
Furthermore, the fetchData method will use the fetch method to get the response from the server and then store it into the data Hook. In the end, we set the loading Hook to false. Other than that, the renderItem function will display each item’s title field.
Now we need to render it. To do so, add the following code in the same file:
useEffect(() => {
  fetchData();
}, []);

return (
  <NativeBaseProvider>
    <Center flex={1}>
    <Box> Fetch API</Box>
      {loading && <Box>Loading..</Box>}
      {data && (
        <FlatList
          data={data}
          renderItem={renderItem}
          keyExtractor={(item) => item.id.toString()}
        />
      )}
    </Center>
  </NativeBaseProvider>
);
}
Notice that we left the useEffect dependency array empty. This means that React will call the fetchData method on the first render. Next, we used the FlatList component to display the contents of the data array.
Finally, go to App.js and render the CoffeeAutonomous component:
import React from "react";
import CoffeeAutonomous from "./components/CoffeeAutonomous";
export default function App() {
  return <CoffeeAutonomous />;
}
This will be the output:

In the next section, you will learn how to render data when the user clicks a button.
In the end, CoffeeAutonomous.js should look like this:
import React, { useState, useEffect } from "react";
import { Box, FlatList, Center, NativeBaseProvider, Text } from "native-base";

export default function CoffeeAutonomous() {
  const [data, setData] = useState([]);
  const [loading, setLoading] = useState(true);

  const fetchData = async () => {
    const resp = await fetch("https://api.sampleapis.com/coffee/hot");
    const data = await resp.json();
    setData(data);
    setLoading(false);
  };

  useEffect(() => {
    fetchData();
  }, []);

  const renderItem = ({ item }) => {
    return (
      <Box px={5} py={2} rounded="md" bg="primary.300" my={2}>
        {item.title}
      </Box>
    );
  };

  return (
    <NativeBaseProvider>
      <Center flex={1}>
      <Box> Fetch API</Box>
        {loading && <Box>Loading..</Box>}
        {data && (
          <FlatList
            data={data}
            renderItem={renderItem}
            keyExtractor={(item) => item.id.toString()}
          />
        )}
      </Center>
    </NativeBaseProvider>
  );
}
Create a file called CoffeeClick.js and write the following code:
import React, { useState } from "react";
import { Box, FlatList, Center, NativeBaseProvider, Button } from "native-base";

export default function CoffeeClick() {

  const [data, setData] = useState(null);
  const [visible, setVisible] = useState(true);

  const fetchData = async () => {
    const resp = await fetch("https://api.sampleapis.com/coffee/hot");
    const data = await resp.json();
    setData(data);
    setVisible(false);
  };

  const renderItem = ({ item }) => {
    return (
      <Box px={5} py={2} rounded="md" bg="primary.300" my={2}>
        {item.title}
      </Box>
    );
  };
}
The first part of this code is similar to that of CoffeeAutonomous. The only difference is that we have declared a visible Hook. Other than that, in the fetchData function, we told React that if the data is now present, then set the visible Hook to false.
To render the UI, append the following code:
return (
    <NativeBaseProvider>
      <Center flex={1}>
        {visible && <Button onPress={() => fetchData()}>Press</Button>}
        {data && (
          <FlatList
            data={data}
            renderItem={renderItem}
            keyExtractor={(item) => item.id.toString()}
          />
        )}
      </Center>
    </NativeBaseProvider>
  );
}
On line 4, we used conditional rendering. This will hide the component when clicked.

In the next section, you will learn how to fetch data in regular intervals.
Our CoffeeClick.js file should look like this:
import React, { useState } from "react";
import { Box, FlatList, Center, NativeBaseProvider, Button } from "native-base";

export default function CoffeeClick() {
  const [data, setData] = useState(null);
  const [visible, setVisible] = useState(true);

  const fetchData = async () => {
    const resp = await fetch("https://api.sampleapis.com/coffee/hot");
    const data = await resp.json();
    setData(data);
    setVisible(false);
  };

  const renderItem = ({ item }) => {
    return (
      <Box px={5} py={2} rounded="md" bg="primary.300" my={2}>
        {item.title}
      </Box>
    );
  };

  return (
    <NativeBaseProvider>
      <Center flex={1}>
        {visible && <Button onPress={() => fetchData()}>Press</Button>}
        {data && (
          <FlatList
            data={data}
            renderItem={renderItem}
            keyExtractor={(item) => item.id.toString()}
          />
        )}
      </Center>
    </NativeBaseProvider>
  );
}
This step is straightforward. Create a file called CoffeeInterval.js.
After that, copy the code from CoffeeAutonomous.js and paste it. We will make changes to add interval functionality.
In CoffeeInterval.js, change your useEffect handler:
useEffect(() => {
  fetchData();
  const dataInterval = setInterval(() => fetchData(), 5 * 1000);

  return () => clearInterval(dataInterval);
}, []);
In this piece of code, we used the setInterval function to run the fetchData method every 5 seconds. Later on, we specified that if this component gets deleted from the tree, then clear this interval. This will prevent memory leaks.
That’s all there is to it! Your code should run without any issues:
Your CoffeeInterval.js file should look like this:
import React, { useState, useEffect } from "react";
import { Box, FlatList, Center, NativeBaseProvider, Text } from "native-base";

export default function CoffeeInterval() {
  const [data, setData] = useState([]);
  const [loading, setLoading] = useState(true);

  const fetchData = async () => {
    const resp = await fetch("https://api.sampleapis.com/coffee/hot");
    const data = await resp.json();
    setData(data);
    setLoading(false);
  };

  useEffect(() => {
    fetchData();
    const dataInterval = setInterval(() => fetchData(), 5 * 1000);
    return () => clearInterval(dataInterval);
  }, []);

  const renderItem = ({ item }) => {
    return (
      <Box px={5} py={2} rounded="md" bg="primary.300" my={2}>
        {item.title}
      </Box>
    );
  };

  return (
    <NativeBaseProvider>
      <Center flex={1}>
        {loading && <Box>Loading..</Box>}
        {data && (
          <FlatList
            data={data}
            renderItem={renderItem}
            keyExtractor={(item) => item.id.toString()}
          />
        )}
      </Center>
    </NativeBaseProvider>
  );
}
One alternative to Fetch is Axios, which is compatible for Node, React and React Native. In addition to making GET requests, this module can even allow you to make POST, PUT and DELETE requests.
To install the package, run this terminal command:
npm install axios
To retrieve data using the Axios library, write the following code:
import axios from "axios"
export default function App() {
  const fetchData = () => {
    const baseURL = "https://api.sampleapis.com/coffee";
    axios.get(`${baseURL}/hot`).then((response) => console.log(response.data));
  };
  useEffect(() => {
    fetchData();
  }, []);
}
In this piece of code, we instructed Axios is perform a GET r
We have a whole post covering data fetching with Axios and React Native if you want in-depth information on using Axios to manage your API requests.
One alternative to Fetch is Axios. But since Axios is not compatible with React Native, we can use Apisauce instead. It is a wrapper for Axios and can even allow you to make POST, PUT, and DELETE requests.
To install the package, run this terminal command:
npm i apisauce
This is how you can make requests with the Apisauce library:
import React from "react";
import { useEffect } from "react";
import { create } from "apisauce";

//file name: SauceExample.js
//extra code removed for brevity purposes

//The baseURL will be our starting point.
const api = create({
  baseURL: "https://api.sampleapis.com/coffee",
});

const fetchData = () => {
  //make request to baseURL + '/hot'
  api
    .get("/hot")
    .then((response) => response.data)
    .then((data) => console.log(data));
};

useEffect(() => {
  fetchData();
}, []);
In the end, we told React to execute the fetchData function on the first render. This will log out the API’s response to the terminal.
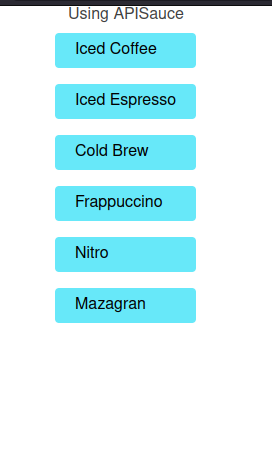
This will be the output:
We will use Hooks to render this data.
In components/SauceExample.js, write the following code:
import { FlatList, Box, NativeBaseProvider, Center } from "native-base";
import React from "react";
import { useEffect } from "react";
import { create } from "apisauce";
import { useState } from "react";

export default function SauceExample() {
  const [data, setData] = useState([]);
  const api = create({
    baseURL: "https://api.sampleapis.com/coffee",
  });

  const fetchData = () => {
    //make request to baseURL + 'hot'
    api
      .get("/hot")
      .then((response) => response.data)
      .then((data) => setData(data));
  };

  const renderItem = ({ item }) => {
    return (
      <Box px={5} py={2} rounded="md" bg="primary.300" my={2}>
        {item.title}
      </Box>
    );
  };

  useEffect(() => {
    fetchData();
  }, []);

  return (
    <NativeBaseProvider>
      <Center flex={1}>
      <Box> Using Apisauce </Box>
        {data && (
          <FlatList
            data={data}
            renderItem={renderItem}
            keyExtractor={(item) => item.id.toString()}
          />
        )}
      </Center>
    </NativeBaseProvider>
  );
}
This will be the output:

If you want to get data from the iced route, all you need to do is alter a line within your fetchData function:
const fetchData = () => {
  //make request to baseURL + 'iced'
  api
    .get("/iced")
    .then((response) => response.data)
    .then((data) => setData(data));
};

Want to use async and await in your code? No problem. You can write your code like this:
const fetchData = async () => {
  //make request to baseURL + 'iced'
  const response = await api.get("/iced");
  setData(response.data);
};
Props in React allow for modularity and cleanliness in our code. For example, to render data, we wrote the following:
return (
  <NativeBaseProvider>
    <Center flex={1}>
      {data && (
        <FlatList
          data={data}
          renderItem={renderItem}
          keyExtractor={(item) => item.id.toString()}
        />
      )}
    </Center>
  </NativeBaseProvider>
);
To shorten this block, you can use render props.
Create a custom component called DataRenderer.js:
import { FlatList, Box } from "native-base";
import React from "react";

export default function DataRenderer({ data }) {

  const renderItem = ({ item }) => {
    return (
      <Box px={5} py={2} rounded="md" bg="primary.300" my={2}>
        {item.title}
      </Box>
    );
  };

  return (
    <FlatList
      data={data}
      renderItem={renderItem}
      keyExtractor={(item) => item.id.toString()}
    />
  );
}
Use it in your other files like so:
 return (
    <NativeBaseProvider>
      <Center flex={1}>{data && <DataRenderer data={data} />}</Center>
    </NativeBaseProvider>
  );
Our code looks cleaner! The output should be the same as before.
GraphQL is a technology that is completely different from REST while still maintaining ease of use.
For example, to make a standard request to our Coffee API using REST, you would do the following:
const response = await fetch(https://api.sampleapis.com/coffee/hot)
//further code ...
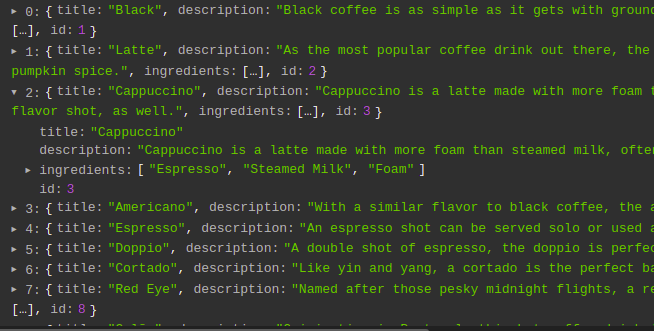
This would give the following response:
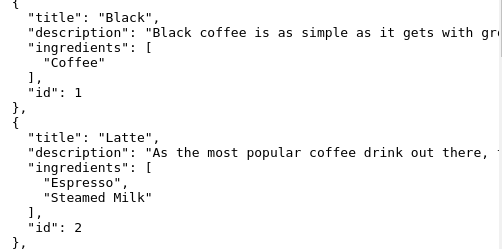
Even though this is fine, there is a minor flaw. Our app only needs the title field. The rest of the data is unnecessary to us.
This is where GraphQL comes in. To retrieve only the title and data fields of our items, we will perform the following query:
query HotCoffees{
  allHots {
    title
    id
  }
}
This will be the response from the server:

To summarize, GraphQL only gives you the data that you require.
In your components folder, create a file called CoffeeGraphQL.js. Here, start by writing the following piece of code:
import {
  ApolloClient,
  InMemoryCache,
  ApolloProvider,
  useQuery,
  gql,
} from "@apollo/client";
import { Box, Center, NativeBaseProvider } from "native-base";
import React from "react";
import DataRenderer from "./DataRenderer";

//connect to GraphQL server:
const client = new ApolloClient({
  uri: "https://api.sampleapis.com/coffee/graphql",
  cache: new InMemoryCache(),
});

function RenderQuery() {
//define our query
  const query = gql`
    query HotCoffees {
      allHots {
        title
        id
      }
    }
  `;
  //make a query
  const { loading, error, data } = useQuery(query);
  if (error) console.log(error);

  return (
    <NativeBaseProvider>
      <Center flex={1}>
        <Box> Using GraphQL </Box>
        {loading && <Box>Loading data.. please wait</Box>}
        {data && <DataRenderer data={data.allHots} />}
      </Center>
    </NativeBaseProvider>
  );
}
A few inferences from this code:
client variable connects our application to the GraphQL servertitle and id fieldsAs a final step, we now have to bind our RenderQuery component to our GraphQL client.
To do so, add the following code in CoffeeGraphQL.js:
export default function CoffeeGraphQL() {
  return (
    <ApolloProvider client={client}>
      <RenderQuery />
    </ApolloProvider>
  );
}
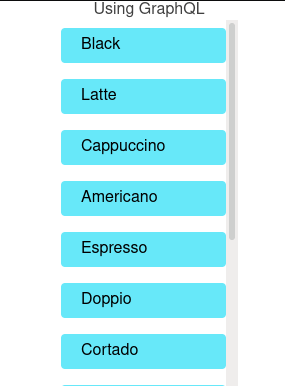
This will be the result:
Your CoffeeGraphQL.js file should look like this:
import {
  ApolloClient,
  InMemoryCache,
  ApolloProvider,
  useQuery,
  gql,
} from "@apollo/client";
import { Box, Center, NativeBaseProvider } from "native-base";
import React from "react";
import DataRenderer from "./DataRenderer";

//connect to GraphQL server:
const client = new ApolloClient({
  uri: "https://api.sampleapis.com/coffee/graphql",
  cache: new InMemoryCache(),
});CoffeeClass

function RenderQuery() {
  const query = gql`
    query HotCoffees {
      allHots {
        title
        id
      }
    }
  `;
  //make a query
  const { loading, error, data } = useQuery(query);
  if (error) console.log(error);
  return (
    <NativeBaseProvider>
      <Center flex={1}>
        <Box>Using GraphQL</Box>
        {loading && <Box>Loading data.. please wait</Box>}
        {data && <DataRenderer data={data.allHots} />}
      </Center>
    </NativeBaseProvider>
  );
}

export default function CoffeeGraphQL() {
  return (
    <ApolloProvider client={client}>
      <RenderQuery />
    </ApolloProvider>
  );
}
While modern React favors the use of functional components, the option to build your app with class components is still present. This is useful in maintaining legacy React Native code.
Create a class called CoffeeClass.js and write the following block:
import { Center, NativeBaseProvider, Box } from "native-base";
import React, { Component } from "react";
import DataRenderer from "./DataRenderer";
export default class CoffeeClass extends Component {
constructor(props) {
super(props);
this.state = {
data: [],
};
}
componentDidMount() {
this.fetchUsersAsync();
}
fetchUsersAsync() {
const URL = "https://api.sampleapis.com/coffee/hot";
fetch(URL)
.then((response) => response.json())
.then((list) => this.setState({ data: list }));
}
render() {
return (
<NativeBaseProvider>
<Center flex={1}>
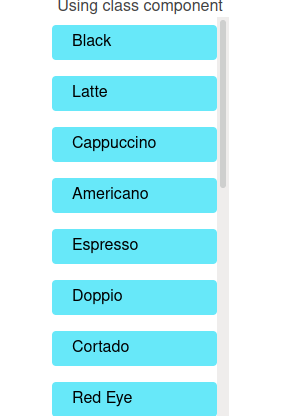
<Box>Using class component</Box>
{this.state.data && <DataRenderer data={this.state.data} />}
</Center>
</NativeBaseProvider>
);
}
}
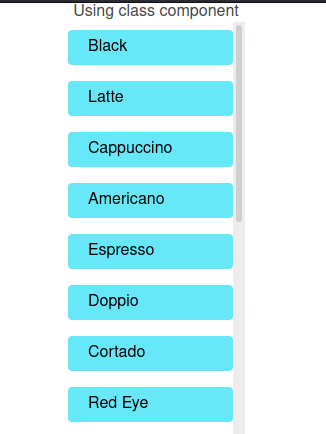
In this code, we told React to execute fetchCoffee on the first render (componentDidMount). This will fetch data from the API and store its response into the data state variable. In the end, we rendered the data array.
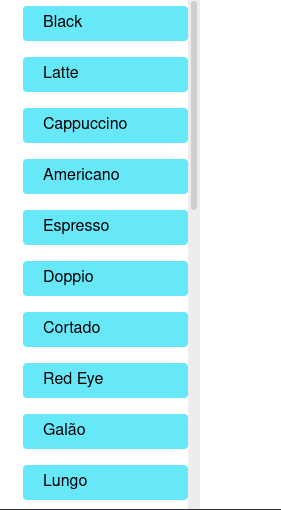
Run the code. This will be the output:
Some people might think that it is better to fetch data in the componentWillMount function instead, which is executed right before the component is mounted. There are two justifications why you shouldn’t do it:
componentWillMount(), React Native will render your data without waiting for the first render. This will cause a blank screen for the first time. For this reason, the time saved won’t be substantialIn this article, we explored a handful of common strategies to fetch data in React Native. At this moment, I would opt for using Apisauce and Hooks for my project. Not only are they an absolute breeze to use, but they are also robust. Consequently, this brings app security and efficiency to the table.
Thank you so much for reading! Happy coding!

LogRocket's Galileo AI watches sessions for you and and surfaces the technical and usability issues holding back your React Native apps.
LogRocket also helps you increase conversion rates and product usage by showing you exactly how users are interacting with your app. LogRocket's product analytics features surface the reasons why users don't complete a particular flow or don't adopt a new feature.
Start proactively monitoring your React Native apps — try LogRocket for free.
Hey there, want to help make our blog better?
Join LogRocket’s Content Advisory Board. You’ll help inform the type of content we create and get access to exclusive meetups, social accreditation, and swag.
Sign up now
This guide walks you through creating a web UI for an AI agent that browses, clicks, and extracts info from websites powered by Stagehand and Gemini.

This guide explores how to use Anthropic’s Claude 4 models, including Opus 4 and Sonnet 4, to build AI-powered applications.

Which AI frontend dev tool reigns supreme in July 2025? Check out our power rankings and use our interactive comparison tool to find out.

Learn how OpenAPI can automate API client generation to save time, reduce bugs, and streamline how your frontend app talks to backend APIs.


2 Replies to "Data fetching with React Native"
Awesome Guide, but are you sure Axios is not compatible with react native? Last I used it, it was?
Yeah, and they have an article named “Using Axios with React Native to manage API requests”
https://blog.logrocket.com/using-axios-react-native-manage-api-requests/