When we build an application with Gatsby, we need data to make it functional. We can add the data directly within the application component or we store the data outside of the component and allow Gatsby to fetch it for us at build time.

While the former is not maintainable as the application grows, our focus will be on the latter. With Gatsby, we can fetch data from different sources which includes the file system, external APIs, databases, and CMSs like Contentful or WordPress.
Here, we will cover how to fetch data from a Gatsby configuration file and a source outside of Gatsby using GraphQL. We will do this by building a Gatsby blog site where we fetch MDX files from the file system and render the content as blog posts. You can see the finished project here.
At the end of this guide, we will understand the Gatsby data-fetching techniques and how to source data from any backend of our choice.
To follow this tutorial, ensure you are familiar with Gatsby and make sure you have Node.js, Git, and Gatsby CLI installed. It will also be beneficial if you are familiar with GraphQL. But if not, do not worry, because we’ll cover all you need in this tutorial.
The Replay is a weekly newsletter for dev and engineering leaders.
Delivered once a week, it's your curated guide to the most important conversations around frontend dev, emerging AI tools, and the state of modern software.
Let’s start by downloading a starter project by running the following command in our computer terminal:
git clone https://github.com/Ibaslogic/gatsby-starter-data-fetching
Once finished, change the directory inside the project, cd gatsby-starter-data-fetching and run npm install. After that, open the project with a code editor and run gatsby develop. Finally, we can open the project in the browser at http://localhost:8000.
If we take a look at the project structure, we should have this:
project_folder
    ├── node_modules
    ├── public
    ├── src
    │    ├── components
    │    │      ├── Footer.js
    │    │      ├── Header.js
    │    │      ├── Hero.js
    │    │      ├── layout.css
    │    │      └── ...
    │    ├── images
    │    ├── pages
    │    │      ├── ...
    │    │      ├── blog.js
    │    │      └── index.js
    │    └── menuItems.js
    ├── ...
    ├── gatsby-config.json
    └── ...
Be aware that the project CSS styles live in the components/layout.css file, which includes the styles for the JSX we will create later in the project. Now that we’ve set up the project, it’s time to get started with data fetching.
siteMetadata objectIn any web project, it is common that we have some pieces of data that we reuse across our site. For instance, we can use the site URL or social handles in multiple components of our application.
With Gatsby, we can store this set of data in the siteMetadata object inside the Gatsby configuration file called gatsby-config.js.
This object is also a good place to store any static data like the hero title and page description. That way, we can make updates in one central place without modifying the source code.
If we take a look at the home page of our starter project, we have the heading text, description, Twitter handle (in the Twitter URL) and the author name:
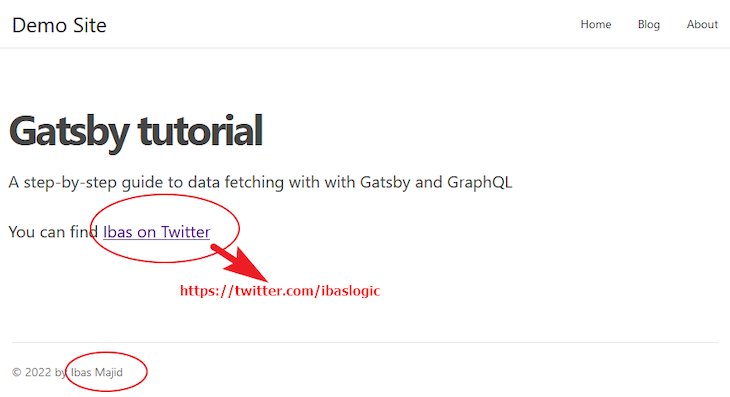
We will store this information in the siteMetadata object. So, let’s open the gatsby-config.js file in the root directory and update the siteMetadata so we have the following:
module.exports = {
 siteMetadata: {
  title: `Gatsby tutorial`,
  description: `A step-by-step guide to data fetching with with Gatsby and GraphQL`,
  twitterHandle: "ibaslogic",
  author: "Ibas Majid",
 },
 plugins: [],
};
Save the file.
To fetch this data and use it in our application components, let’s talk about the Gatsby’s data layer.
In Gatsby, there are different ways to pull data into an application component. One of these ways is using GraphQL.
GraphQL is a query language that allows us to query the data that is available somewhere and use in our project files. In GraphQL, the location where our data is kept to fetch it is called the data layer. Fortunately, Gatsby has a built-in data layer powered by GraphQL.
For the data that we store inside the siteMetadata of the configuration file, it automatically gets pulled into the Gatsby’s data layer. This will not be the case for data stored outside of Gatsby, which we will touch on later.
To explore the data layer and see the siteMetadata info, we need to use a tool called GraphiQL. We can access this tool at localhost:8000/_graphql, but only when running gatsby develop; be aware that there are three underscores in the URL.
Let’s open the tool via the link above and click on the Explorer button to view the Explorer pane. We should see this GraphiQL interface:

We can construct queries by toggling the dropdowns in the Explorer pane and clicking through the available data fields.
siteMetadata contentIn the Explorer pane, we find the siteMetadata object in the site dropdown field. There, we have two siteMetadatas, but the one that holds our data is the one in blue. Let’s click on it and select the fields for the data we want.
In the case we can’t find the data in the Explorer pane, restart the development server and refresh the GraphiQL tool. This is necessary if we modify the gatsby-config.js file. Now that we’ve checked the data, let’s click on the Execute Query button (that is, the Play button) to run the query.
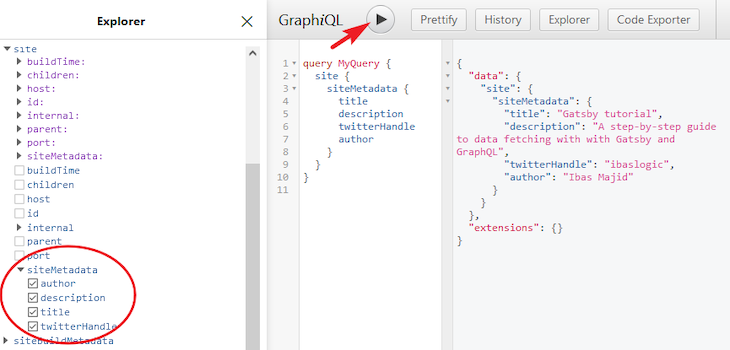
As seen in the result window, we get the response containing our data in JSON format. Also, in the query editor, we can always delete the query name, MyQuery, because it can cause issues if there is more than one query with the same name. So, the above query now looks like so:
query {
 site {
  siteMetadata {
   title
   description
   twitterHandle
   author
  }
 }
}
Now that we have a query that fetches data, next we’ll learn how to use it to load data in our component.
StaticQueryTo load data using the GraphQL query, we will use either a page query or StaticQuery. When we want to perform a query in a page component (i.e components that live inside the src/pages folder), we can use any of the query types.
However, for nonpage components (that is, components that we can embed in other components like the Header or Footer), we must use only the StaticQuery or its Hook version called useStaticQuery.
useStaticQuery to pull data into the Hero componentIn the src/components/Hero.js file, we have hardcoded the title, description, and Twitter handle. Instead, we’ll get this data from the data layer using the GraphQL query.
Remember, we can use StaticQuery or useStaticQuery to load the data. But in this project, we will use the useStaticQuery Hook because of its flexibility and the options it provides to create a custom reusable Hook so we don’t need to manually write queries in multiple files that need the siteMetadata info.
Now, open the Hero.js file and import the useStaticQuery function and the graphql like so:
import { useStaticQuery, graphql } from "gatsby";
Then, add the following above the return statement:
const data = useStaticQuery(graphql`
 query {
  site {
   siteMetadata {
    title
    description
    twitterHandle
   }
  }
 }
`);
We invoke the useStaticQuery function that accepts a graphql tagged template with the query we created earlier added between two backticks. Notice that we are only fetching the data that we need; we are not fetching the author because we don’t need it in this file.
Next, we‘ll render the data in the JSX like so:
const { title, description, twitterHandle } = data.site.siteMetadata;

return (
 <div className="hero">
  <h1>{title}</h1>
  <p>{description}</p>
  <p>You can find{" "}
   <a
    href={`https://twitter.com/${twitterHandle}`}
    // ...
   >
    Ibas on Twitter
   </a>
  </p>
 </div>
);
Notice how we get our data by destructuring the data.site.siteMetadata object. Let’s save the file and test our project. If we modify and resave the data in the gatsby-config.js file, we will see the changes in the frontend immediately.
useStaticQuery HookIf we open the components/Footer.js file, we also hardcoded the author name. And earlier, we learned how to fetch data from the data layer.
In this file, instead of writing another query to fetch the author field from the siteMetadata, we will write a custom reusable Hook for this functionality.
In the src folder, let’s create a file called useSiteMetadata.js and add the following code:
import { useStaticQuery, graphql } from "gatsby";

export const useSiteMetadata = () => {
 const data = useStaticQuery(graphql`
  query {
   site {
    siteMetadata {
     title
     description
     twitterHandle
     author
    }
   }
  }
 `);

 return data.site.siteMetadata;
};
Here, we created a custom Hook called useSiteMetadata and returned the siteMetadata object holding our data. The query should be familiar. Also, notice that we’ve included all the data that we added in the siteMetadata of the gatsby-config.js file. Save the file.
Let’s revisit the components/Hero.js and delete the query and the useStaticQuery, graphql import. Then, we import the useSiteMetadata custom Hook and use it like so:
import React from "react";
import { useSiteMetadata } from "../useSiteMetadata";

const Hero = () => {
 const { title, description, twitterHandle } = useSiteMetadata();

 return (
  // ...
 );
};

export default Hero;
Let’s save and test our project. It should work.
Now, we can use the custom Hook in the components/Footer.js file to fetch the author name from the Gatsby data layer like so:
import React from "react";
import { useSiteMetadata } from "../useSiteMetadata";
const Footer = () => {
const { author } = useSiteMetadata();
return (
// ...
<p>
© {new Date().getFullYear().toString()} by {author}
</p>
// ...
);
};
export default Footer;
Let’s save and test our project.
Up to this moment, we learned how to fetch data from a Gatsby file. Up next, we will source data that is outside of Gatsby.
The procedure for fetching data from the file system is similar to any other sources including the content management system (CMS).
Unlike the data in the siteMetadata object that is automatically pulled into the GraphQL data layer, content from other sources will not be available by default.
Instead, we need a specific source plugin that communicates with the source and pulls data into the Gatsby’s GraphQL data layer. From there, we can write GraphQL queries in our component files to load the data we want.
In our project, we want to display a list of the blog posts from the file system on the blog page and the individual post. To do this, we must create post files.
Let’s start by creating a posts folder in the root directory, then create .mdx files and an images folder. Our directory should look like so:
project_folder
   ...
    ├── node_modules
    ├── posts
    │    ├── images
    │    ├── first-post.mdx
    │    ├── second-post.mdx
Next, we can add some Markdown content in our files. In my case, I will add the following content inside the first-post.mdx file:
---
title: "The first post"
date: "2022-01-28"
---

Lorem ipsum dolor sit amet consectetur adipisicing elit.

## Ipsam mollitia alias temporibus

Explicabo eligendi necessitatibus

1. omnis earum nobis
2. architecto
Then, add the following content inside the second-post.mdx:
---
title: "The second post"
date: "2022-02-03"
---

Lorem ipsum dolor sit amet consectetur adipisicing elit.

## Consectetur adipisicing

Consectetur adipisicing elit

- omnis earum nobis
- architecto hello
In the MDX files, we added simple markdown content alongside the front matter where we specify the title and date. Let’s save our files.
As mentioned earlier, the .mdx data will not be pulled automatically into the data layer. We will need the help of a source plugin called gatsby-source-filesystem that will create File nodes from the file system and allow us to query data about the files.
In addition to the source plugin, we will also need a transformer plugin called gatsby-plugin-mdx that takes the File nodes and creates new nodes called MDX nodes that contain the data in the format we need.
The gatsby-plugin-mdx requires the following extra dependencies to run: @mdx-js/mdx and @mdx-js/react.
In the terminal, let’s run the following commands to install the necessary plugins:
npm install gatsby-source-filesystem gatsby-plugin-mdx @mdx-js/mdx @mdx-js/react
Then, add them to the gatsby-config.js file:
module.exports = {
 siteMetadata: { ... },
 plugins: [
  {
   resolve: `gatsby-source-filesystem`,
   options: {
    name: `posts`,
    path: `${__dirname}/posts/`,
   },
  },
  `gatsby-plugin-mdx`,
 ],
};
This configuration tells Gatsby to source data from the path we specified. So, we must ensure that we have the files to fetch in the specified directory, else, we need to add a similar configuration object that captures where the data is located.
Let’s save the file and restart the development server.
If we refresh the GraphiQL IDE, we should see additional nodes added by the plugins that we installed. The source plugin creates the File nodes and the transformer plugin transforms those nodes to the MDX nodes, which is what we need.
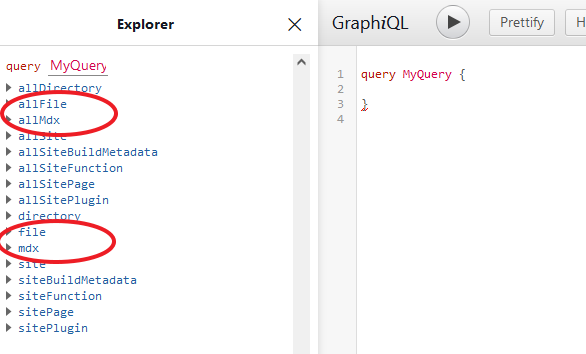
Let’s now use the allMdx to fetch all blog posts on our blog page and use the mdx to fetch individual posts. If we explore some of the available fields on the nodes of the allFile and allMdx, we will have the following:
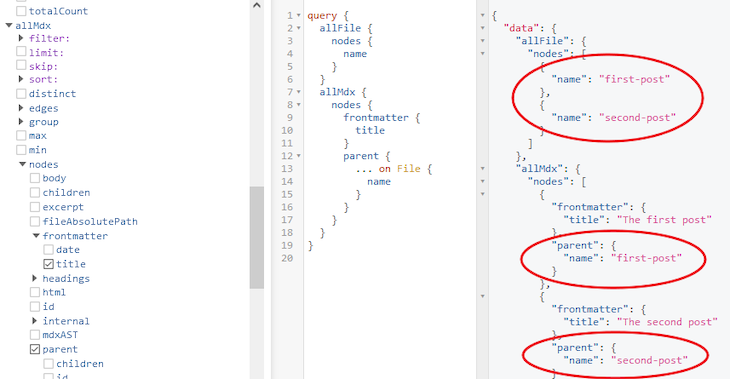
Notice that the name field in the allFile returns the same file names as the parent in the allMdx. This happens because when the transformer plugin creates a new MDX node from the File node, it allows us to access to the data of the parent File node via the parent field.
So, we can ignore the allFile root field since we can get the same data plus extras (like the front matter or body content) via the allMdx.
Remember, the focus here is on the allMdx fields. If we explore some of the fields once again, we will have the following:
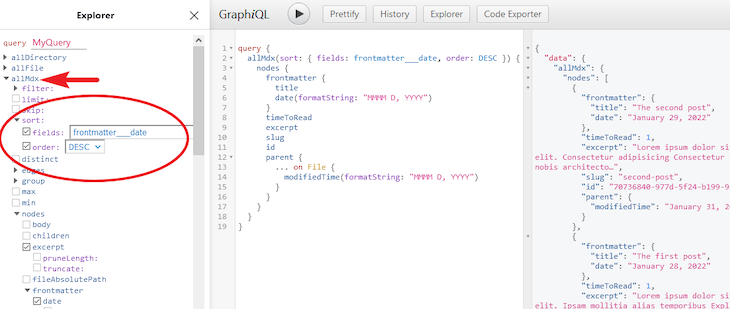
In the GraphQL data layer, our data is stored in the nodes, which is returned as an array of objects as seen in the result window. Notice that we used the sort argument to structure the posts in reverse-chronological order and we sorted by the front matter date.
Also notice how we get the data about the files in the File node via the parent field. The modifiedTime field in the File node returns the date the file was revised. We will later use it to distinguish a fresh post from an updated post.
Next, let’s render the data on the blog page of our site.
useStaticQuery to pull blog posts into the blog pageAs we learned earlier, we can use either of StaticQuery, its Hook version, or a page query to load data into a page component. Here, we will again use the Hook version. Later, we will learn how to use the page query.
In the src/pages/blog.js file, include the necessary imports and add the generated query above the return statement:
// ...
import { useStaticQuery, graphql, Link } from "gatsby";

const BlogPage = () => {

 const data = useStaticQuery(
  graphql`
   query {
    allMdx(sort: { fields: frontmatter___date, order: DESC }) {
     nodes {
      frontmatter {
       title
       date(formatString: "MMMM D, YYYY")
      }
      timeToRead
      excerpt
      slug
      id
      parent {
       ... on File {
        modifiedTime(formatString: "MMMM D, YYYY")
       }
      }
     }
    }
   }
  `
 );

 const posts = data.allMdx.nodes;

 return (
  <Layout>
   {/* ... */}
  </Layout>
 );
};

export default BlogPage;
Remember that the query returns our data as an array of objects in the nodes. We will loop through the nodes which we assigned to the posts variable to render our posts. The JSX in the return statement should now look like this:
return (
 <Layout>
  <h1>Blog page.</h1>
  <ul>
   {posts.map((post) => {
    const { id, frontmatter, parent, timeToRead, excerpt, slug } = post;
    const { title, date } = frontmatter;

    const postStatus =
     date === parent.modifiedTime ? "Published " : "Updated ";

    return (
     <li className="post_item" key={id}>
      <Link to={`/${slug}`}>
       <article>
        <h2>{title}</h2>
        <div className="post__meta">
         <span>
          {postStatus} {parent.modifiedTime}
         </span>{" "}
         . <span>{timeToRead} min read</span>
        </div>
        <p>{excerpt}</p>
       </article>
      </Link>
     </li>
    );
   })}
  </ul>
 </Layout>
);
Let’s save our file and visit the frontend blog page. We should have our MDX posts listed.
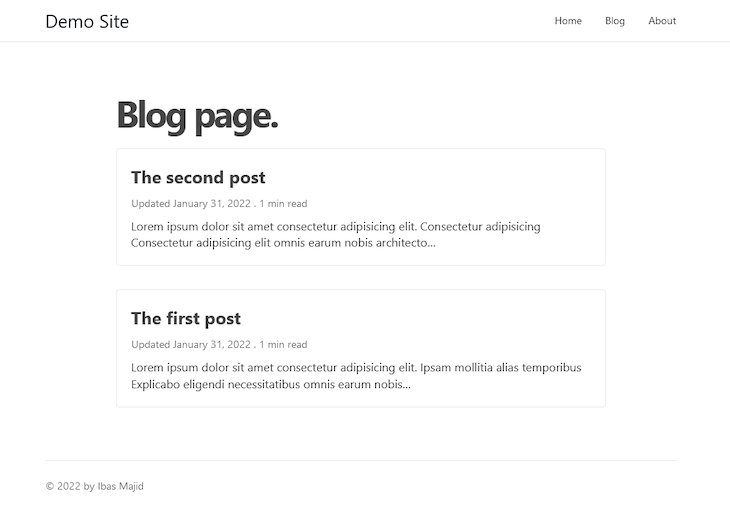
This is great. Each of the posts is linked to the single post page using the Link component as seen in the code above.
If we click any of the posts, we see a Gatsby error page. This is because the single post page doesn’t exist yet. Next, we will create this page to render the MDX body.
To fetch and render the MDX body, we must create a page template that Gatsby will use to programmatically create the single post pages. With the Gatsby file system route API, creating this template is a piece of cake.
Let’s open the src/pages directory and create a file called {mdx.slug}.js. Inside the file, add the following starting code:
import React from "react";
import Layout from "../components/layout";

const BlogPost = () => {
 return (
  <Layout>
   <article className="single__post">Single post page</article>
  </Layout>
 );
};

export default BlogPost;
Now, Gatsby will use this single template to dynamically render a single post page based on the MDX slug.
As stated earlier, we will use the mdx field to fetch individual posts instead of the allMdx that fetches all posts. If we open the GraphiQL IDE and explore the fields on the mdx root, we will have something like this:
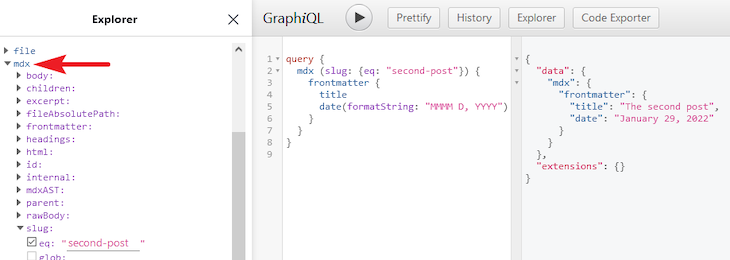
The way the single post works is that we must pass arguments to the mdx field to change the data we get back from the query. Here we are changing the data based on the slug.
If we manually replace the "second-post" slug with "first-post", we get back the data in the first-post.mdx file.
Now, instead of replacing the slug manually, we can use the query variables to dynamically send the slug along with the request. If we implement the query variables in the IDE, our query should look like so:

GraphiQL also provides a section to add the slug to be passed to our query. Then in the query, we must define and use the variable with $ prepended to the slug. However, in the page template file, Gatsby automatically makes the individual page slug available to use as query variables in our query.
To use the query variable in our query, we must construct a page query instead of a static query. In this page query, we must export a GraphQL query assigned to a variable. And, this type of query is placed outside of the component.
Let’s see how it works. Open the pages/{mdx.slug}.js file and add the constructed query above the component definition so we have the following:
// ...
import { graphql } from "gatsby";
import { MDXRenderer } from "gatsby-plugin-mdx";

export const query = graphql`
 query ($slug: String) {
  mdx(slug: { eq: $slug }) {
   frontmatter {
    title
    date(formatString: "MMMM D, YYYY")
   }
   timeToRead
   parent {
    ... on File {
     modifiedTime(formatString: "MMMM D, YYYY")
    }
   }
   body
  }
 }
`;

const BlogPost = () => {
 return (
  // ...
 );
};

export default BlogPost;
Let’s ensure we import the graphql and MDXRenderer from their respective modules. We will use the MDXRenderer to render the MDX body content. Notice we also queried for the body field above.
When we use a page query, Gatsby automatically injects the result of the query into the page component as a data prop. Let’s use this prop to render our content in the JSX by updating the component so we have the following:
// ...
const BlogPost = ({ data }) => {
 const { frontmatter, parent, timeToRead, body } = data.mdx;
 const { title, date } = frontmatter;
 const postStatus =
  date === parent.modifiedTime ? "Published on" : "Updated on";

 return (
  <Layout>
   <article className="single__post">
    <header>
     <h1>{title}</h1>
     <span className="post__meta">
      {postStatus} {parent.modifiedTime}
      <span> . </span> {timeToRead} min read{" "}
     </span>
    </header>
    <div>
     <MDXRenderer>{body}</MDXRenderer>
    </div>{" "}
   </article>
  </Layout>
 );
};

export default BlogPost;
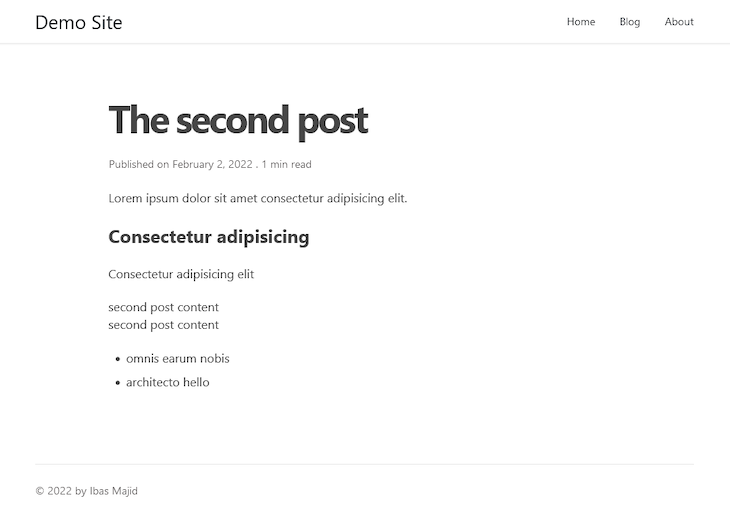
Save the file and revisit one of the single post pages. We should see the content rendered like so:
In a markdown or MDX file, we can add images to our posts via front matter or within the markdown body. But with Gatsby, by default, adding images in the MDX file will not render on the post page.
We must provide support for Gatsby to render these images instead, which is necessary for Gatsby to provide an optimized version of the images. Let’s add these images.
In the posts/first-post.mdx, add a front matter field called featured and an inline markdown image so we have the following:
--- title: "The first post" date: "2022-01-28" featured: "./images/first-post-featured.png" --- 
The image path is relative to the page file. Remember we have an images folder in the posts folder. Open this Gatsby project on GitHub, grab the images, and save them in the images folder.
Next, open the posts/second-post.mdx file and update like so:
--- title: "The second post" date: "2022-02-03" featured: "./images/second-post-featured.jpg" --- 
Let’s save our files.
Next, we can install a couple of plugins to tell Gatsby about these images. Head over to the terminal and run the following command:
npm install gatsby-plugin-image gatsby-plugin-sharp gatsby-remark-images gatsby-transformer-sharp
Here, each plugin does the following:
gatsby-plugin-image provides an image component called GatsbyImage to render our featured imagegatsby-transformer-sharp creates a special node field for processing the featured imagesgatsby-remark-images processes images within the markdown bodygatsby-plugin-sharp processes images and reduces image sizeOnce installed, open the gatsby-config.js file and add the plugins so it looks like this:
module.exports = {
 siteMetadata: {...},
 plugins: [
  `gatsby-plugin-image`,
  `gatsby-plugin-sharp`,
  `gatsby-transformer-sharp`,
  {
   resolve: `gatsby-source-filesystem`,
   options: {...},
  },
  `gatsby-remark-images`,
  {
   resolve: `gatsby-plugin-mdx`,
   options: {
    gatsbyRemarkPlugins: [
     {
      resolve: `gatsby-remark-images`,
      options: {
       maxWidth: 750,
       linkImagesToOriginal: false,
      },
     },
    ],
   },
  },
 ],
};
Notice that we’ve added the gatsby-remark-images as a string and within the options field of the gatsby-plugin-mdx.
Let’s save the file and restart the development server. We should see the body image appear in the post.
Since the featured image lives in the front matter, we will fetch it using the GraphQL query. If we refresh the GraphiQL IDE, we should have an additional field for the featured that looks like so:
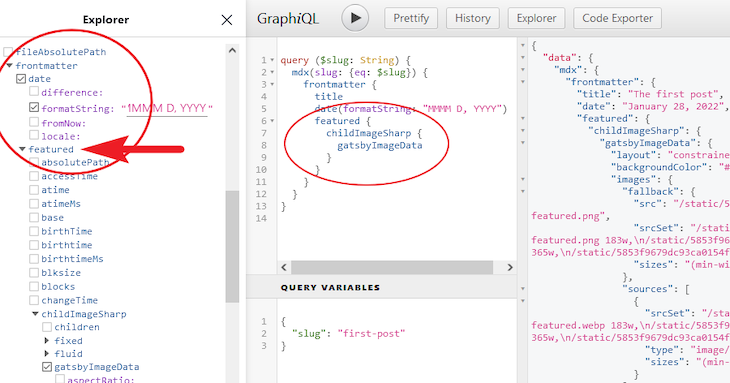
As seen above, the gatsbyImageData field contains information about our featured image, and it is located in the childImageSharp field.
GatsbyImage componentLet’s open the src/pages/{mdx.slug}.js file and update the front matter field of the query to include the featured field like so:
frontmatter {
 title
 date(formatString: "MMMM D, YYYY")
 featured {
  childImageSharp {
   gatsbyImageData
  }
 }
}
Next, we will destructure the featured object from the frontmatter. So in the file, find the following line:
const { title, date } = frontmatter;
And update to this:
const { title, date, featured } = frontmatter;
After that, import the GatsbyImage component like so:
import { GatsbyImage } from "gatsby-plugin-image";
And then use the GatsbyImage component to render the featured image like so:
return (
 <Layout>
  <article className="single__post">
   <header>
    {/* ... */}
    <GatsbyImage
     image={featured.childImageSharp.gatsbyImageData}
     alt={title}
    />
   </header>
   <div>
    <MDXRenderer>{body}</MDXRenderer>
   </div>{" "}
  </article>
 </Layout>
);
Save the file and revisit a single post page; we should see the featured image rendered.
I am glad we are here. We learned how to fetch data from the file system and the siteMetadata object of the Gatsby configuration file using GraphQL. Now, we can replicate what we learned and fetch data from any source of our choice using their specific plugins from the Gatsby plugins page.
If you like this tutorial, ensure you share it around the web. And, if you have questions or contributions, I’m in the comment section.
Here is the project source code on GitHub.
While GraphQL has some features for debugging requests and responses, making sure GraphQL reliably serves resources to your production app is where things get tougher. If you’re interested in ensuring network requests to the backend or third party services are successful, try LogRocket.


LogRocket lets you replay user sessions, eliminating guesswork around why bugs happen by showing exactly what users experienced. It captures console logs, errors, network requests, and pixel-perfect DOM recordings — compatible with all frameworks.
LogRocket's Galileo AI watches sessions for you, instantly aggregating and reporting on problematic GraphQL requests to quickly understand the root cause. In addition, you can track Apollo client state and inspect GraphQL queries' key-value pairs.

Compare the top AI development tools and models of June 2026. View updated rankings, feature breakdowns, and find the best fit for you.

Learn how Bloom filters reduce database lookups for username availability checks while preserving correctness at scale.

Learn how to test Nuxt apps with Vitest, @nuxt/test-utils, runtime mocks, server route mocks, and Playwright e2e tests.

I had four weeks to build a complete app from scratch using AI tools like OpenCode and Claude Opus: here’s how it went.
Hey there, want to help make our blog better?
Join LogRocket’s Content Advisory Board. You’ll help inform the type of content we create and get access to exclusive meetups, social accreditation, and swag.
Sign up now

