From social media apps to ecommerce apps, most modern applications have some sort of image carousel to show products, images, or advertisements.

Implementing an image carousel from scratch is not as hard as you think because of the inbuilt widgets provided by the flutter.
In this article, you will learn how to create an image carousel from scratch and customize based on your need. In the end, you will learn how to use the carousel_slider plugin to create an image carousel with less code.
These are the topics we are going to cover.
Before we jump into the coding part, let’s understand the widget structure we need to have.
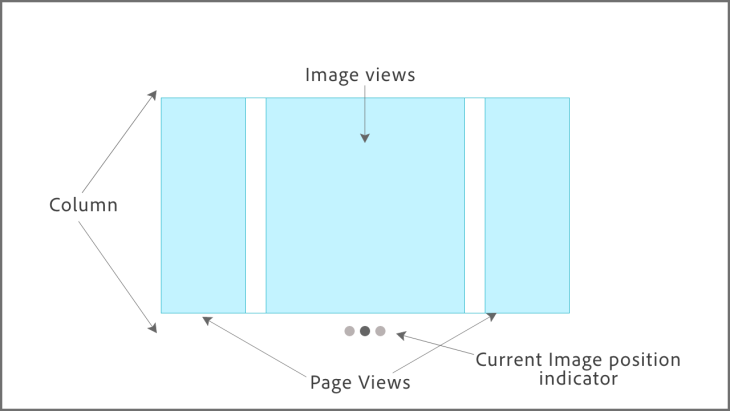
The page view widget is required to implement image sliding functionality in the app and the image views to show actual images. Other than that, you need a container widget to implement a page indicator on the bottom of the slider.
To get started, let’s create a stateful widget with the name of Carousel. This is the widget that we are going to use to implement our carousel.
First, let’s create a list that contains image URLs:
List<String> images = [
    "https://encrypted-tbn0.gstatic.com/images?q=tbn:ANd9GcQTIZccfNPnqalhrWev-Xo7uBhkor57_rKbkw&usqp=CAU",
    "https://wallpaperaccess.com/full/2637581.jpg"
  ];
Now you can use the PageView widget builder method to create a carousel page:
         PageView.builder(
            itemCount: 2,
            pageSnapping: true,
            itemBuilder: (context,pagePosition){
              return Container(
                margin: EdgeInsets.all(10),
                child: Image.network());
            })
itemCount represents the number of pages, and it will decide how many times the itemBuilder needs to be executed. Therefore, you can set each image URL by accessing the index of it.
PageView.builder(
            itemCount: 2,
            pageSnapping: true,
            itemBuilder: (context,pagePosition){
            return Container(
              margin: EdgeInsets.all(10),
              child: Image.network(images[pagePosition]));
          })
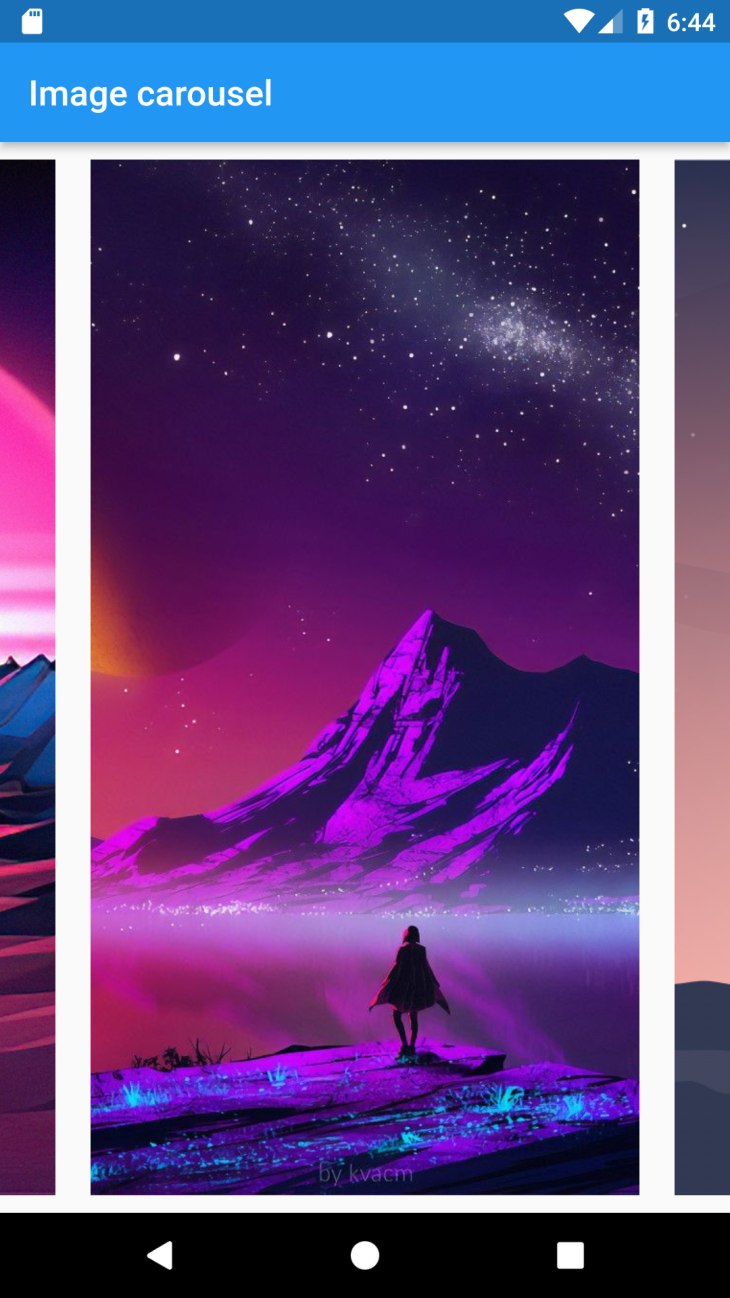
Now you can see those images on the screen, and you can swipe the images.
If you show images like this, the user will not have any clue whether there are more images or not. Therefore, showing the fraction of the left and right images while showing the middle image will improve the UX of the image carousel.
First, you should create PageController and set that to our PageView widget. Also, I have added the third image and changed the itemCount to get the count from the length of the image’s array itself. Then you can set the viewportFraction property in PageController to show the fraction of the other images as well:
late PageController _pageController;
  List<String> images = [
    "https://images.wallpapersden.com/image/download/purple-sunrise-4k-vaporwave_bGplZmiUmZqaraWkpJRmbmdlrWZlbWU.jpg",
    "https://wallpaperaccess.com/full/2637581.jpg",
    "https://uhdwallpapers.org/uploads/converted/20/01/14/the-mandalorian-5k-1920x1080_477555-mm-90.jpg"
  ];

  @override
  void initState() {
    super.initState();
    _pageController = PageController(viewportFraction: 0.8);
  }

@override
  Widget build(BuildContext context) {
    return PageView.builder(
        itemCount: images.length,
        pageSnapping: true,
        controller: _pageController,
        onPageChanged: (page) {
          setState(() {
            activePage = page;
          });
        },
        itemBuilder: (context, pagePosition) {
          return Container(
            margin: EdgeInsets.all(10),
            child: Image.network(images[pagePosition]),
          );
        });
  }
Even though images are shown in the middle of the PageView, it actually takes the entire screen space. If you change the fit type to cover, you can see it takes the entire screen.
To control that, you can wrap the widget inside the SizedBox widget:
SizedBox(
        height: 200,
        width: MediaQuery.of(context).size.width,
        child:   PageView.builder(
                itemCount: images.length,
                pageSnapping: true,
                controller: _pageController,
                onPageChanged: (page) {
                  setState(() {
                    activePage = page;
                  });
                },
                itemBuilder: (context, pagePosition) {
                  return Container(
                    margin: EdgeInsets.all(10),
                    child: Image.network(images[pagePosition],fit: BoxFit.cover,),
                  );
                }),
      )
The carousel loads the first image as a default page when it loads the first time. But if you need to change the initial image to start from a different page, you can provide the initialPage property in the PageController. It accepts the index as a position:
_pageController = PageController(viewportFraction: 0.8,initialPage: 1);
First, move the PageView widget along with SizedBox to the inside of the Column widget:
Column(
      children: [
        SizedBox(
          width: MediaQuery.of(context).size.width,
          height: 200,
          child: PageView.builder(
              itemCount: images.length,
              pageSnapping: true,
              controller: _pageController,
              onPageChanged: (page) {
                setState(() {
                  activePage = page;
                });
              },
              itemBuilder: (context, pagePosition) {
                return Container(
                  margin: EdgeInsets.all(10),
                  child: Image.network(images[pagePosition]),
                );
              }),
        ),
      ],
    )
Then you can create a method to return a list of indicators, and you should change the color of the indicator based on the currently active position. Therefore, let’s create a method that accepts currentIndex and imagesLength as a parameter. By checking the index, you can change the active position indicator color like below:
List<Widget> indicators(imagesLength,currentIndex) {
  return List<Widget>.generate(imagesLength, (index) {
    return Container(
      margin: EdgeInsets.all(3),
      width: 10,
      height: 10,
      decoration: BoxDecoration(
          color: currentIndex == index ? Colors.black : Colors.black26,
          shape: BoxShape.circle),
    );
  });
}
There should be a way to get the currently active position when the user slides the images. The onPageChanged method works well for that:
int activePage = 1;

  PageView.builder(
              itemCount: images.length,
              pageSnapping: true,
              controller: _pageController,
              onPageChanged: (page) {
                setState(() {
                  activePage = page;
                });
              })
Now you can pass the activePage value to the method that we created. Create a Row widget inside the Column widget as a second child. Then you can assign the return indicators from the indicators method as children to a Row widget:
    Row(
         mainAxisAlignment: MainAxisAlignment.center,
         children: indicators(images.length,activePage))
Even though our carousel works fine, it’s nice to have an animation when sliding between images. Let’s see how to add animation when the images change.
There are multiple methods available to apply the enlarge animation. But here we are going to use the inbuilt Flutter AnimationContainer widget to create this animation because out of the box, AnimationContainer provides all the functionalities we need.
In the current slider image, sizes are the same throughout all containers. By changing the margins of the image, you can add an enlarge effect.
AnimationContainer contains properties like duration, curve, margin, and decoration that you can use to implement this animation.
Let’s create a separate slider method, and as a parameter, expect the list of images, current page position, and whether the current image is active or not. This active state can be checked inside the itemBuilder by checking the page position along with the currently active page position.
The curve property can be used to specify how the animation curve needs to be placed. Please check out this Flutter article to get an understanding of available values and their behavior:
itemBuilder: (context, pagePosition) {
      //checking active position
      bool active = pagePosition == activePage;
      return slider(images,pagePosition,active);
}
AnimatedContainer slider(images,pagePosition,active){
  double margin = active ? 10 : 20;
  return AnimatedContainer(
    duration: Duration(milliseconds: 500),
    curve: Curves.easeInOutCubic,
    margin: EdgeInsets.all(margin),
    decoration: BoxDecoration(
      image: DecorationImage(image: NetworkImage(images[pagePosition]))
    ),
    );
}

Even though implementing a carousel from scratch is easy, adding different functionalities can be hard based on your project and timeline. Therefore, plugins like carousel_slider can be used in your project to create a carousel with less hassle.
First, add the plugin to pubspec.yaml:
dependencies:
  carousel_slider: ^4.0.0
Next, import the library where are you going to use the slider:
import 'package:carousel_slider/carousel_slider.dart';
The CarouselSlider class accepts mainly two parameters: options and items. For the options, you can configure the behavior you need for the slider. I have mentioned some of the properties that are available in the CarouselOptions class.
| Property | Description |
height |
Set the slider height |
enableInfiniteScroll |
Set whether the pages need to scroll infinitely. By default, this option is on and you can turn it off if required |
autoplay |
The slider will change the image automatically. Default time is 4 seconds |
autoPlayInterval |
Change the autoplay interval, default 4 seconds |
onPageChanged |
Callback trigger when the page gets changed. It contains two parameters: current position and reason. The reason value can be timed, manual, or controller |
enlargeCenterPage |
Enlarge the middle page, like we implemented previously |
For the items, you can use the map method to create a list of images:
SliderPlugin(images) {
  return CarouselSlider(
    options: CarouselOptions(
      height: 200.0,
      enlargeCenterPage: true,
      onPageChanged: (position,reason){
        print(reason);
        print(CarouselPageChangedReason.controller);
      },
      enableInfiniteScroll: false,
    ),
    items: images.map<Widget>((i) {
      return Builder(
        builder: (BuildContext context) {
          return Container(
              width: MediaQuery.of(context).size.width,
              decoration: BoxDecoration(
                  image: DecorationImage(image: NetworkImage(i))));
        },
      );
    }).toList(),
  );
}
As we discussed, if you have reasonable time and require more customization, you can implement a carousel widget on your own. But if you need a quick solution, using carousel_slider will save you time because it contains all the necessary features, which may take quite a bit of time to implement from scratch.
Even though we have implemented an image carousel for this example, you can use this same technique to implement an onboarding experience in your application as well.
You can access the full code here.

Discover how React Fiber works under the hood. Learn how React builds the DOM, handles concurrent rendering, and works alongside React 19 features and the new React Compiler.

Learn how to use Skybridge, an open-source React framework, to build and deploy cross-platform AI apps and interactive UI widgets for ChatGPT, Claude, and MCP clients from a single codebase.

Learn how to set up Meilisearch, index documents, and build keyword, semantic, and hybrid search with AI-powered retrieval.

Compare pnpm and npm across security defaults, disk usage, dependency strictness, and workspace policy to decide which package manager fits your project.
Hey there, want to help make our blog better?
Join LogRocket’s Content Advisory Board. You’ll help inform the type of content we create and get access to exclusive meetups, social accreditation, and swag.
Sign up now

