Firebase is a development platform by Google that is quick and easy to set up. In this tutorial, we are going to set up a basic application integrating Firebase/Firestore and Angular. We will be using a package called AngularFire — the official Angular library for Firebase — as well as the Firebase SDK itself.

Using cloud services is becoming more and more popular, as it saves time not having to create your own security, maintenance, etc. With Google’s Firebase, we will set up a free Firestore to act as our database.
Firebase does also offer a Realtime Database, but it stores everything in one large JSON tree.
This makes for a simpler database, but with the cloud Firestore, which is what we will use, there are flexible documents, making it more scalable for larger data. Firestore is also faster and overall more intuitive if your aren’t familiar with databases.
The Replay is a weekly newsletter for dev and engineering leaders.
Delivered once a week, it's your curated guide to the most important conversations around frontend dev, emerging AI tools, and the state of modern software.
You will need to start by setting up your project on the Firebase console. First, go here to find the console.
Create a project, give it a name, and go through the steps. Once you are finished, you will be at the Project Overview.
No we need to add an app. You should be on the Project Overview page. Here you’ll see “Get started by adding Firebase to your app”.
Do this by clicking on the “</>” button (this is to add a web application). You can set up hosting here, but we won’t cover that in this tutorial.
Go ahead and register the app. On the next page, you will see scripts to set up the Firebase SDK. These are useful, but we will see later how to get everything we need if you miss them on this page. Go ahead and continue to console.
In the Firebase console, on the left pane, under Develop, you can find the Database Tab. Click it, and you will be brought to a page where you can click “Create Database”. A modal will appear where you can select production mode or test mode; we want test mode. It’s insecure, but fine for testing.
If you continue, you’ll be asked to select a location. Go ahead and pick the appropriate one. Once you press done, it will take a few minutes setting up the Firestore.
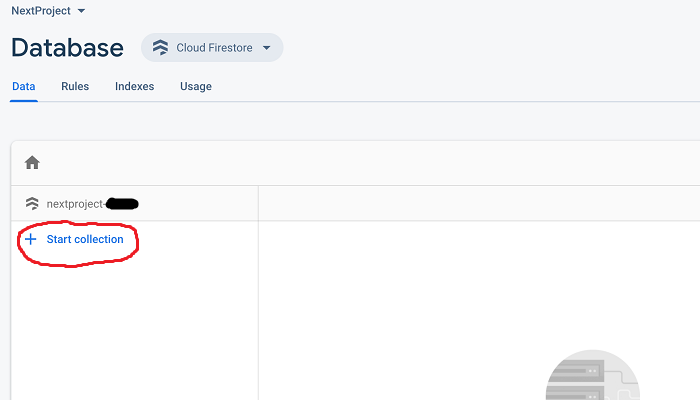
When complete, you will be at your Firestore. Go ahead and select “Start collection”.

It will ask you to create a Collection ID; for our example, let’s just name it “testCollection”. Hit next and it will bring you to the form for creating your first document.
We will leave the Document ID blank — Firestore will automatically generate this for you. Under Field, just type “field”. Then you will see “string” as the default Type. There’s no reason to change this for now, so just leave it as is. Under Value, type in “value1”. Click save and you will see you have created your first document!
For our example later, let’s create a second document. In the middle column you will see “+ Add Document.” go ahead and click that and you will be brought back to the document creation form.
Here, just type “field” under Field and “value2” under Value. Click save. Now we have two documents.
Let’s make our frontend project with the Angular CLI (command line interface). Open up the terminal window and install the Angular CLI globally:
npm install -g @angular/cli
With this installed, you can run the ng command.
In the terminal, type the following:
ng new your-app-name
You can name your project whatever you desire.
Once you get it started, the Angular CLI will lead you through a couple configuration options.
You can add routing, then choose what stylesheet format you want Angular to generate for your application.
After that it will go through the rest and create your Angular app.
Once that is finished, go ahead and change the terminal directory to the one we just made:
cd your-app-name
In the Angular app’s directory, you can run ng serve build and serve your app locally.
Let’s get the Firebase SDK by running the following in your terminal within your Angular project directory:
npm i --save firebase
Now Firebase is added to your project.
Go to the Firebase console. On the left menu you will see “Project Overview” with a gear icon next to it. Click the icon, then Project settings in the pop-up window. Here, go to the General Tab, and scroll to the bottom.
Under “Firebase SDK snippet”, click on the radio bottom next to CDN (it’s default is on Automatic). Here, you will find everything you need to connect your app to Firebase. F
ind the firebaseConfig variable — we will need to copy this information into the Angular App. Looks like this (except everything will be filled in correctly):
var firebaseConfig = {
  apiKey: "************************************",
  authDomain: "*************.firebaseapp.com",
  databaseURL: "https://************.firebaseio.com",
  projectId: "***************",
  storageBucket: "****************.appspot.com",
  messagingSenderId: "*************",
  appId: "********************************",
  measurementId: "****************",
};
Inside your Angular app, navigate to the generated file app.module.ts (if you created your Angular project through the CLI: src > app > app.module.ts). In this file, you can paste the entirety of the firebaseConfig variable (just under the imports is fine).
The next order of business is downloading the npm package angular/fire. With this package you will be able to interact with Firebase with ease.
You can install the package in your project with the following line of code:
npm i angular/fire
With this installed, we can add it here in the app.module.ts file:
import { AngularFireModule } from @angular/fire';
Now, down in the imports array, initialize Firebase in your app by adding the following line of code:
AngularFireModule.initializeApp(firebaseConfig)
This import is for Firebase in general, but if we want to add certain services, you will need to add those individually.
For the Firestore, add this the top of the file:
import { AngularFirestoreModule } from '@angular/fire/firestore';
Then, in the imports array near the bottom:
AngularFirestoreModule
At this juncture, it might make sense to create a component or two in our Angular application. You can create a new component in your application using the CLI in your project.
Let’s make a home component by typing the command in the terminal:
ng g c home
The “g c” stands for “generate component”. This will generate a home folder with four files under it: an HTML file, a SCSS file (or whatever styling you are using), a TypeScript file, and a .spec file.
If you want to skip adding the .spec file, propend this flag to your generate command:
ng g c home --skipTests=true
We will be doing our logic in our home component, but let’s not forget to add it in our app.component.html file. You could always add home component to the router, but for simplicity, let’s just add it in the HTML.
If you set up a home component just as I did, the selector will be “app-home”, so you can add it somewhere in the app.component.html file like this
<app-home></app-home>
After that, let’s get to doing our operations in the home component.
Earlier we created a collection in our Firestore named testCollection; within it, there are two documents or objects. Let’s first look into “Reading” these two documents from our Firestore.
In home.component.ts file, we can import the Firestore through our Angular/fire package:
import { AngularFirestore } from "@angular/fire/firestore";
After importing, we can initialize it in our constructor like this:
constructor(private firestore: AngularFirestore) {}
That is assigning our imported AngularFirestore the alias of “Firestore” — give it whatever name you like.
The ngOnInit function is a perfect place to read from the Firestore right off the gitgo.
Take a look at this code:
this.firestore
  .collection("testCollection")
  .get()
  .subscribe((ss) => {
    ss.docs.forEach((doc) => {
      this.myArray.push(doc.data());
    });
  });
Let’s go through this step by step: as you probably know, this.firestore refers to the alias we created for our AngularFirestore in our constructor.
The .collection('testCollection') is how we refer to the collection we created earlier, and the .get() is simply getting us that entire collection (we will cover querying single documents within the collection later).
When we .subscribe to the firestore, it is essentially asynchronously waiting on API to return data. Technically, subscribe comes from RxJS and is an Observable that will update when there is a change.
Now, the Firestore always returns snapshots of data, which is why we gave it the alias of ss. Under the snapshot of our database is the docs, which is the data we want, and we can use the .forEach array method, to loop over the array of docs.
In the example above, we got the doc.data() from Firebase Firestore. This will be the entire document, which in our case is an object with one property. Therefore, when we push it into our array, we will need to initialize our array as the following code:
myArray: any[] = []
This allows us to see it in our HTML, erase what is there, and replace it with the following:
<ul>
        <li *ngFor='let doc of myArray'>
            {{doc.field}}
        </li>
    </ul

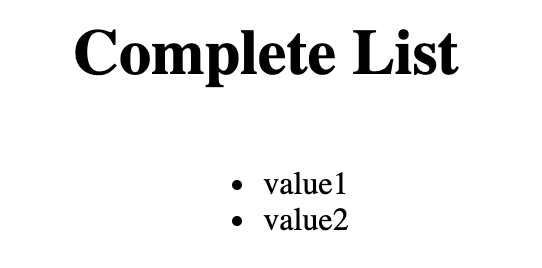
Great! We have successfully read data from our Firestore.
First, let’s add ReactFormsModule to app.module.ts, like this:
import { ReactiveFormsModule } from "@Angular/forms";
Also, add ReactiveFormsModule to the import array near the bottom.
In our home.component.html file, let’s add a form to capture and send new data. Write something like this:
<form [formGroup]="this.form">
  <input
    placeholder="New Value"
    formControlName="newValue"
    type="text"
    class="input-field col s12"
  />
  <button (click)="onSubmit()">
    Submit
  </button>
</form>
Now, if you used the HTML above, add the following import to our home.component.ts file:
import { FormControl, FormGroup } from "@Angular/forms";
Then, in our class, add:
form = new FormGroup({
        newValue: new FormControl('')
    })`
This will accept from the HTML, the form and the input we made, with the formControlName of newValue.
So, we will get the string entered in from the user in the HTML and will send it to be the value of a new document in our Firestore. We can do that by using the following function:
onSubmit() {
        this.firestore.collection('testCollection').add({
            field: this.form.value.newValue
        })
        .then(res => {
            console.log(res);
            this.form.reset();
        })
        .catch(e => {
            console.log(e);
        })
    }
In the same way we read from our Firestore, we will be writing this time using the same reference to get our collection:
this.firestore.collection('testCollection')
This time, we will be adding a document with .add. We want to add the object with our text we received:
.add({field: this.form.valule.newValue})
This may look strange, but it is because we are getting the value of the Form. In there, we get the property we named newValue. That’s why it is value.newValue.
The rest of the function is simply a .then and .catch to handle the response from the Firestore.
When writing to the Firestore, the response (when successful) will be a large, strange object.
Since we aren’t reading anything, the only use of these handlers is if we want to do something immediately after writing to the Firestore (like we do when calling .reset() to clear the form).
If you go ahead and run the app as it is (ng serve), you will notice it won’t show up on our list after entering a new value and submitting it to Firebase. You can refresh the page and it should show up, if the write was successful. Why is that?
It’s because after we wrote to our Firestore, we didn’t read the new change. With the way our current ngOnInit function is set up, we aren’t observing changes.
In order to see the new data, we need to change how we are reading the data:
ngOnInit() {
        this.docs = [];
        const collectionRef = this.db.collection('testCollection');
        const collectionInstance = collectionRef.valueChanges();
        collectionInstance.subscribe(ss => this.myArray = ss);
    }
Now we have subscribed. You’ll see that after adding a new document to the database, it will also be added to the list in our app. The main difference is that we are now subscribed to .valueChanges().
Let’s add another form we can use to query the Firestore based on a document’s value:
<form [formGroup]="this.secondForm">
  <input
    placeholder="value1"
    formControlName="valueToGet"
    type="text"
    class="input-field col s12"
  />
  <button (click)="onQuery()">
    Query
  </button>
</form>
For simplicity, it is exactly like the first form, but with different names and a different function. Go ahead and name it as you please, but just make sure to use the new names and not the ones we used in the previous form.
Over in the typescript file, make sure to initialize the form at the top of the class:
secondForm = new FormGroup({ valueToGet: new FormControl('') })
Also, up here where we initialize everything, add single: any; as a variable to put our queried document, and message: string; as a variable for error messages.
With that, let’s start building our onQuery function.
onQuery() {
    if (!this.secondForm.value.valueToGet) {
      this.message = 'Cannot be empty';
      this.single = null;
    } else {
      this.firestore.collection('testCollection', ref => ref.where("field", "==", this.secondForm.value.valueToGet)).get()
        .subscribe(ss => {
          if (ss.docs.length === 0) {
            this.message = 'Document not found! Try again!';
            this.single = null;
          } else {
            ss.docs.forEach(doc => {
              this.message = '';
              this.single = doc.data();
            })
          }
        })
    }
  }
First, we see whether the user input anything at all. The input can be found in this.secondForm.value.valueToGet.
So, if that is empty, we want to return a message and not send an empty string to query Firebase. In this “if” check, I also make sure our “single” variable is empty, because we might have successfully queried before, but now we want to only send the message that the form cannot be empty.
If it isn’t empty, we go ahead and query our Firestore. You will notice something new in the “collection” parameter — in Angular we actually do the query right inside that parameter. ref is a reference to the collection, and .where is the most common way to query documents in a Firestore collection.
In the .where method, we first tell Firebase what field to query within each document. All our fields are simply “field,” so that makes it easy.
Then, we use a comparator, ==, which is to ask whether the field isEqual. You can also use other comparators like <, >=, and so on.
Finally, the third parameter is telling Firebase what to compare the field to — in our case, we want to put the input value from the user here and see whether it appears as a value anywhere in our Firestore.
A quick note on a Firestore limitation: querying with the .where method is limited.
You can check for something that is off by one letter, or is lowercase where the Firestore has it saved as an uppercase, and it will not return it. You can do things on the frontend to help, like making every user input lowercase to match the Firestore, but that can only go so far.
Of course, you could pull the whole Firestore into the frontend (as we are doing). While querying would be better, it might not be ideal if your Firestore is gigantic. The suggested way to do a full-text search is to use Algolia.
We will .get() since we are reading the value, and we will .subscribe as we did when reading the entire collection.
However, after we get the snapshot from the Firestore, we want to put in an “if” check, to see whether anything is returned. You can console.log the snapshot and see if it won’t be empty even if there was no match in the Firestore.
But, the docs property on the snapshot will be empty (an empty array to be exact) if there is no match for our query. This is how we can tell whether our query matches anything or not.
Again, we will send back the message and set the single variable to null. If we do find a match, then we want to do the opposite, setting the message to empty, and setting the single variable to the returned data.
Now that we have the data, let’s go back to home.component.html. Let’s add some HTML to handle our “message” and “single” variables:
<p style="color: red;">{{message || null}}</p>

<div *ngIf="single">
  <h1>{{single.field}}</h1>
  <button style="background-color: lightblue">Edit</button>
  <button style="background-color: red">Delete</button>
</div>
Pretty simple here. We use the *ngIf directive to only show the matched document if it is found. As you will recall, we set “single” to null if it wasn’t found, thus the entire *ngIf div would be hidden. Same with the “message” — if it is set to an empty string.
You will also notice we added buttons for our next section, since we still need to be able to edit and delete!
Something that will greatly help us from here on out is getting the id of the document we have queried.
We know that we will only edit or delete that queried document, so let’s get its id. As you may notice, when we create documents from our app, we don’t give them an id.
Plus, when we created our documents in the Firestore at the beginning, we let the Firestore automatically generate the ids; the same happens with the ones we create from our app. So, how do we get the ids?
In our onQuery function, let’s set a reference to our database query like this:
const docRef = this.firestore.collection('testCollection', ref => ref.where("field", "==", this.secondForm.value.valueToGet));
Break off the .get() and everything after it, then, on another line, use our reference, like this:
docRef.get().subscribe(ss => ...)
…And so on. It is essentially the same thing.
Now, underneath the subscribe method, let’s add another line to get the document id:
docRef.snapshotChanges().forEach((changes) => {
  changes.map((a) => {
    this.id = a.payload.doc.id;
  });
});
Obviously, we will need to initialize this.id at the top: id: string = ''. But, now we have the id to use in both our edit and delete functions we will create.
Back in our home.component.html file, change the edit button we previously created to the following:
<button style='background-color: lightblue' (click)='openEdit()'>Edit</button>
With this openEdit() function, in our TypeScript file, we can initialize an edit variable:
edit: boolean = false
And create the openEdit function to toggle it:
openEdit() { this.edit = !this.edit};
Every time the function is called, it will make the edit variable go from false to true, or true to false.
Now, in our HTML file, add the following form. It will come up when edit is true:
<form *ngIf="edit" [formGroup]="this.editForm">
  <input
    placeholder="{{single.field}}"
    formControlName="replaceValue"
    type="text"
    class="input-field col s12"
  />
  <button (click)="onRename()">
    Rename
  </button>
</form>
<p style="color: red;">{{message2 || null}}</p>
Again, another form. The important thing here is that we aren’t going to overwrite the entire doc — we’ll keep the id, but the field will change to whatever we input here — that’s the goal.
In home.component.ts, initialize the message2 variable to handle an empty input and initialize the form like we did with the other ones. Then create an onRename function.
onRename() {
        if (!this.editForm.value.replaceValue) {
            this.message2 = "Cannot Be Empty!";
        } else {
            this.firestore.collection('testCollection').doc(this.id).update({ field: this.editForm.value.replaceValue });
            this.edit = false;
            this.message2 = '';
            this.single = null;
        }
    }
There are a couple new things to notice here.
First, we use .doc method and put in the id we got from the previous steps. That gets the document based on the id, not a query.
Next, we use the .update method. This will only overwrite the property we specify, instead of .set which overwrites the entire document. In other words, if we had three fields in the document, we could overwrite only one with the update method like so.
Again, we reread our list of docs from the Firestore. Then, we can zip up the single query, edit box, and any messages previously there.
The delete we will do is basically the same as our update, except we will use the delete method.
First, in our html, let’s change the delete button:
<button style='background-color: red' (click)='delete()'>Delete</button>
Now, all there is, is to create the delete function.
It might be wise to put in a warning, before allowing the user to delete the object. Add the following code to the TypeScript file:
delete() {
        if (confirm('Delete?')) {
            this.db.collection('testCollection').doc(this.id).delete();
            this.edit = false;
            this.single = null;
        }
    }
The confirm('Delete') will pop up an alert which must be confirmed before deleting — it just saves the user from accidentally deleting something unintentionally.
After that, we simply get the document by the id we stored, and call the delete method on it. Simple as that.
You have now successfully created an Angular app that can Create, Read, Update, and Delete Firestore documents! As you can see, Firebase Firestore is easy to use and ready to go. This can easily be upscaled to thousands of complex documents.
Now that you have a good idea of Firestore Basics, check out the official docs for more advanced topics.
Debugging Angular applications can be difficult, especially when users experience issues that are difficult to reproduce. If you’re interested in monitoring and tracking Angular state and actions for all of your users in production, try LogRocket.

LogRocket lets you replay user sessions, eliminating guesswork by showing exactly what users experienced. It captures console logs, errors, network requests, and pixel-perfect DOM recordings—compatible with all frameworks.
With Galileo AI, you can instantly identify and explain user struggles with automated monitoring of your entire product experience.
The LogRocket NgRx plugin logs Angular state and actions to the LogRocket console, giving you context around what led to an error, and what state the application was in when an issue occurred.
Modernize how you debug your Angular apps — start monitoring for free.

Compare the top AI development tools and models of February 2026. View updated rankings, feature breakdowns, and find the best fit for you.

Broken npm packages often fail due to small packaging mistakes. This guide shows how to use Publint to validate exports, entry points, and module formats before publishing.

Discover what’s new in The Replay, LogRocket’s newsletter for dev and engineering leaders, in the February 11th issue.

Cut React LCP from 28s to ~1s with a four-phase framework covering bundle analysis, React optimizations, SSR, and asset/image tuning.
Hey there, want to help make our blog better?
Join LogRocket’s Content Advisory Board. You’ll help inform the type of content we create and get access to exclusive meetups, social accreditation, and swag.
Sign up now
One Reply to "Creating CRUD Firebase documents in Angular"
It was pretty good, I can say!! 🙂