Speed is becoming increasingly valuable in the web world.

Developers launching new releases of softwares, frameworks and libraries have certainly invested a lot of time in decreasing numbers regarding loading time, request processing, and resources consuming.
HTTP/2, for example, was born through a myriad of optimizations that led the web to a more robust, faster, and lighter zone than we’ve ever been before.
The RPC (that stands for Remote Procedure Call) is a well-known way to get traction when you need to be a bit remote or distributed. In the era of enterprise servers and complicated massive amounts of code needed to set things up, it used to reign.
After years of isolation, Google redesigned it and has put new light into it.
gRPC is a modern open source high performance RPC framework that can run in any environment.
It can efficiently connect services in and across data centers with pluggable support for load balancing, tracing, health checking, and authentication.
It is also applicable in the last mile of distributed computing to connect devices, mobile applications, and browsers to back-end services.
It’s backed in HTTP/2, cross platform, and open source. It’s also compact in regards to its size.
gRPC works with many programming languages like Java, Go, Ruby, Python and more.
Go ahead and check their official documentation link (as well as its GitHub page) to check if there’s support for yours.
Even if your language is not listed there, you can make use of the web features in a Docker image.
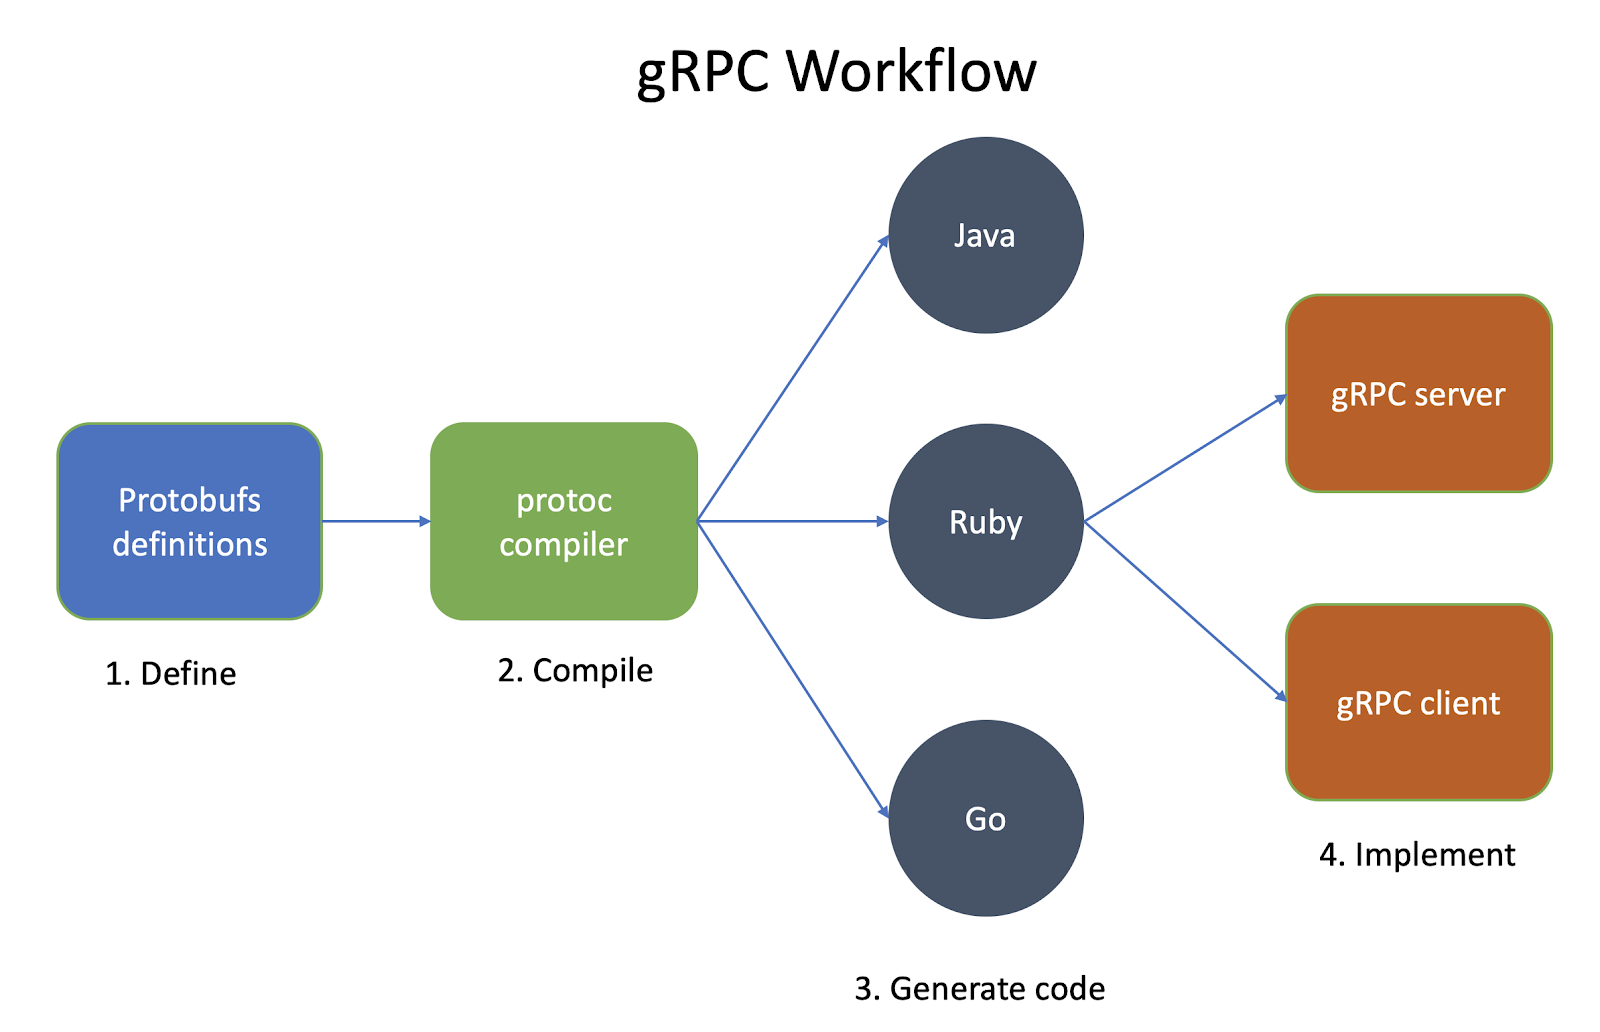
This is how its workflow looks:

The whole architecture is based in the known client-server structure.
A gRPC client app can make direct requests to a server application. Both client and server embrace a common interface, like a contract, in which it determines what methods, types, and returns each of the operations is going to have.
The server assures that the interface will be provided by its services, while the client has stubs to guarantee that the methods are alike.
It also uses the Protocol Buffer to serialize and deserialize request and response data, instead of JSON or XML, for example.
Protocol buffers are Google’s language-neutral, platform-neutral, extensible mechanism for serializing structured data — think XML, but smaller, faster, and simpler.
You define how you want your data to be structured once, then you can use special generated source code to easily write and read your structured data to and from a variety of data streams in each of the supported languages.
First, you need to create and define the protobuf file, which will contain code made under the Interface Definition Language specified by the protocol itself (more on that later).
With the file in hand, you can compile it via protoc compiler to the desired language code.
This whole process is made under the hood, so don’t worry, you won’t see lots of boilerplate code around. In the end, along with the generated code, you can go to the implementation of the server and client.
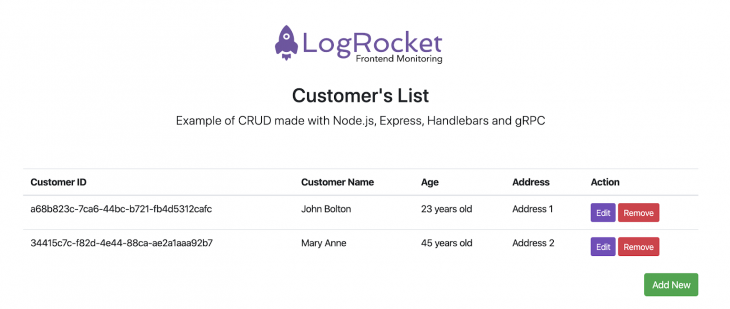
Rather than imagining, we’re going to build a fully-functional CRUD API application with a Bootstrap interface to manage the operations of an in-memory list of customers (to be managed by the server app).
This is how our application will look in the end:

The requirements for this tutorial are very simple:
For the sake of simplicity, we’re not going to use any sort of database — the list of items will be kept in memory in the server application.
This will simulate very closely the use of a database, since the data will be there when the server is up, while the client can be restarted as many times as you wish. Feel free to incorporate whatever framework or features you want.
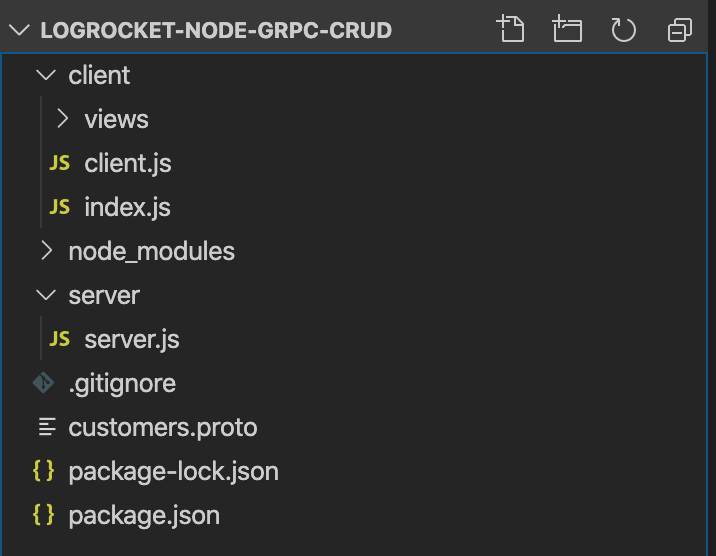
Next, in a folder of your choice, create the following structure of folders and files:

You can also opt to create client and server applications separately.
We kept them together to simplify the final structure.
Now, run the following command at the root folder in the command line:
npm install --save grpc @grpc/proto-loader uuid express hbs body-parser
The first two installs will handle the gRPC server and the load of our protobuf file to the implementation of both client and server codes. Uuid will be useful for creating random hash ids for our customers, but you can use numbers as well to simplify (although this way your code would already be prepared to switch to a MongoDB, for example).
You may be wondering why we’re using Express (for HTTP handling) here if we’re developing an API under a different protocol.
Express will just serve the routing system for our view. Each CRUD operation will need to get to the client (which is a HTTP server, by the way) that, in turn, will communicate via gRPC with the server application.
While you can call gRPC methods from a web page, I wouldn’t recommend it since there’s a lot of cons.
Remember, gRPC was made to speed up things in the back-end, like from a microservice to another. In order to serve to a front page, mobile apps, or any other types of GUIs, you have to adapt your architecture.
Finally, we have Handlebars for the templating of our page (we won’t cover details on it here, but you can use EJS or any other templating system for Node apps), and body-parser for converting the incoming request bodies in a middleware before your handlers, available under the req.body property.
It’s going to make our life easier when accessing request params.
Your final package.json file should look like this:
{
  "name": "logrocket_customers_grpc",
  "version": "1.0.0",
  "description": "LogRocket CRUD with gRPC and Node",
  "main": "server.js",
  "scripts": {
    "start": "node server/server.js"
  },
  "author": "Diogo Souza",
  "license": "MIT",
  "dependencies": {
    "@grpc/proto-loader": "^0.5.3",
    "body-parser": "^1.18.3",
    "express": "^4.17.1",
    "grpc": "^1.24.2",
    "hbs": "^4.1.0",
    "uuid": "^7.0.2"
  }
}
Let’s move to the code, starting with our protobuf file, customers.proto:
syntax = "proto3";

service CustomerService {
    rpc GetAll (Empty) returns (CustomerList) {}
    rpc Get (CustomerRequestId) returns (Customer) {}
    rpc Insert (Customer) returns (Customer) {}
    rpc Update (Customer) returns (Customer) {}
    rpc Remove (CustomerRequestId) returns (Empty) {}
}

message Empty {}

message Customer {
    string id = 1;
    string name = 2;
    int32 age = 3;
    string address = 4;
}

message CustomerList {
    repeated Customer customers = 1;
}

message CustomerRequestId {
    string id = 1;
}
The first line states the version of protobuf we’ll use — in this case, the latest one.
The syntax of the content reassembles a lot of JSON. The service is the interface contract we’ve talked about. Here you’ll place the method names, params, and return types of each gRPC call.
The types, when not a primitive one, must be stated through the message keyword. Please refer to the docs to see all the allowed types.
Each of a message’s properties has to receive a number value that represents the order of this property in the stack, starting with 1.
Finally, for arrays, you need to use the repeated keyword before the declaration’s property.
With the proto in hand, let’s create our server.js code:
const PROTO_PATH = "./customers.proto";

var grpc = require("grpc");
var protoLoader = require("@grpc/proto-loader");

var packageDefinition = protoLoader.loadSync(PROTO_PATH, {
    keepCase: true,
    longs: String,
    enums: String,
    arrays: true
});

var customersProto = grpc.loadPackageDefinition(packageDefinition);

const { v4: uuidv4 } = require("uuid");

const server = new grpc.Server();
const customers = [
    {
        id: "a68b823c-7ca6-44bc-b721-fb4d5312cafc",
        name: "John Bolton",
        age: 23,
        address: "Address 1"
    },
    {
        id: "34415c7c-f82d-4e44-88ca-ae2a1aaa92b7",
        name: "Mary Anne",
        age: 45,
        address: "Address 2"
    }
];

server.addService(customersProto.CustomerService.service, {
    getAll: (_, callback) => {
        callback(null, { customers });
    },

    get: (call, callback) => {
        let customer = customers.find(n => n.id == call.request.id);

        if (customer) {
            callback(null, customer);
        } else {
            callback({
                code: grpc.status.NOT_FOUND,
                details: "Not found"
            });
        }
    },

    insert: (call, callback) => {
        let customer = call.request;

        customer.id = uuidv4();
        customers.push(customer);
        callback(null, customer);
    },

    update: (call, callback) => {
        let existingCustomer = customers.find(n => n.id == call.request.id);

        if (existingCustomer) {
            existingCustomer.name = call.request.name;
            existingCustomer.age = call.request.age;
            existingCustomer.address = call.request.address;
            callback(null, existingCustomer);
        } else {
            callback({
                code: grpc.status.NOT_FOUND,
                details: "Not found"
            });
        }
    },

    remove: (call, callback) => {
        let existingCustomerIndex = customers.findIndex(
            n => n.id == call.request.id
        );

        if (existingCustomerIndex != -1) {
            customers.splice(existingCustomerIndex, 1);
            callback(null, {});
        } else {
            callback({
                code: grpc.status.NOT_FOUND,
                details: "Not found"
            });
        }
    }
});

server.bind("127.0.0.1:30043", grpc.ServerCredentials.createInsecure());
console.log("Server running at http://127.0.0.1:30043");
server.start();
Since it’s a server, it looks a lot like the structure of an Express code, for example. You have an IP and a port, and then you start something up.
Some important points:
First, import the proto file path to a constant.
Then, require both grpc and @grpc/proto-loader packages. They’re the ones that’ll make the magic happen. In order to have a proto transcripted into a JavaScript object, you need to set its package definition first. protoLoader will take care of this task by receiving the path where the proto file is located as the first param, and the setting properties as the second.
Once you have the package definition object in hand, you pass it over to the loadPackageDefinition function of grpc object that, in turn, will return it to you. Then, you can create the server via Server() function.
The customers array is our in-memory database.
We’re initializing it with two customers already so you can see some data when the apps start up. On the server, we need to tell the server object which services it’ll take care of (in our case, the CustomerService we’ve created in the proto file). Each of the operations must match their names with the proto ones respectively. Their codes are easy and very straightforward, so go ahead and take a look at them.
In the end, bind the server connection to the desired IP and port and start it up. The bind() function received the authentication object as the second parameter, but for simplicity we’ll use it insecurely as you may notice (not recommended for production).
The server’s done. Simple, isn’t it? You can now start it up by issuing the following command:
npm start
However, it can’t be tested because you need a proper client that understands the protobuf contract the server serves.
Let’s build our client application now, starting with the client.js code:
const PROTO_PATH = "../customers.proto";

const grpc = require("grpc");
const protoLoader = require("@grpc/proto-loader");

var packageDefinition = protoLoader.loadSync(PROTO_PATH, {
    keepCase: true,
    longs: String,
    enums: String,
    arrays: true
});

const CustomerService = grpc.loadPackageDefinition(packageDefinition).CustomerService;
const client = new CustomerService(
    "localhost:30043",
    grpc.credentials.createInsecure()
);

module.exports = client;
This file will exclusively handle our communication with the gRPC server.
Note that its initial structure is exactly the same as in the server file because the same gRPC objects handle the client and server instances.
The only difference here is that there’s no such method like Client().
All we need is to load the package definition and create a new service — the same one we’ve created in the server — over the same IP and port. If you have credentials set, the second param must meet the settings as well.
That’s it.
To use this service contract, we need first to implement our Express code. So, in the index.js file, insert the following:
const client = require("./client");

const path = require("path");
const express = require("express");
const bodyParser = require("body-parser");

const app = express();

app.set("views", path.join(__dirname, "views"));
app.set("view engine", "hbs");

app.use(bodyParser.json());
app.use(bodyParser.urlencoded({ extended: false }));

app.get("/", (req, res) => {
    client.getAll(null, (err, data) => {
        if (!err) {
            res.render("customers", {
                results: data.customers
            });
        }
    });
});

app.post("/save", (req, res) => {
    let newCustomer = {
        name: req.body.name,
        age: req.body.age,
        address: req.body.address
    };

    client.insert(newCustomer, (err, data) => {
        if (err) throw err;

        console.log("Customer created successfully", data);
        res.redirect("/");
    });
});

app.post("/update", (req, res) => {
    const updateCustomer = {
        id: req.body.id,
        name: req.body.name,
        age: req.body.age,
        address: req.body.address
    };

    client.update(updateCustomer, (err, data) => {
        if (err) throw err;

        console.log("Customer updated successfully", data);
        res.redirect("/");
    });
});

app.post("/remove", (req, res) => {
    client.remove({ id: req.body.customer_id }, (err, _) => {
        if (err) throw err;

        console.log("Customer removed successfully");
        res.redirect("/");
    });
});

const PORT = process.env.PORT || 3000;
app.listen(PORT, () => {
    console.log("Server running at port %d", PORT);
});
After you’ve imported the requires, created the app from express() function and set each of the CRUD HTTP functions, what’s left is just the call for each of the actions provided by the interface contract.
Note also that, for all of them, we’re recovering the input values from the request body (courtesy of body-parser).
Don’t forget that each client function must meet the exact same name as was defined in the proto file.
Last but not least, this is the code for customers.hbs file:
<html lang="en">
<head>
<meta charset="utf-8">
<title>LogRocket CRUD with gRPC and Node</title>
<link rel="stylesheet" href="https://stackpath.bootstrapcdn.com/bootstrap/4.3.1/css/bootstrap.min.css"
integrity="sha384-ggOyR0iXCbMQv3Xipma34MD+dH/1fQ784/j6cY/iJTQUOhcWr7x9JvoRxT2MZw1T" crossorigin="anonymous">
<style>
.logrocket {
background-color: #764abc;
color: white;
}
</style>
</head>
<body>
<div class="container">
<div class="py-5 text-center">
<img class="d-block mx-auto mb-4"
src="https://blog.logrocket.com/wp-content/uploads/2020/01/logrocket-blog-logo.png" alt="Logo"
height="72">
<h2>Customer's List</h2>
<p class="lead">Example of CRUD made with Node.js, Express, Handlebars and gRPC</p>
</div>
<table class="table" id="customers_table">
<thead>
<tr>
<th>Customer ID</th>
<th>Customer Name</th>
<th>Age</th>
<th>Address</th>
<th>Action</th>
</tr>
</thead>
<tbody>
{{#each results}}
<tr>
<td>{{ id }}</td>
<td>{{ name }}</td>
<td>{{ age }} years old</td>
<td>{{ address }}</td>
<td>
<a href="javascript:void(0);" class="btn btn-sm edit logrocket" data-id="{{ id }}"
data-name="{{ name }}" data-age="{{ age }}" data-address="{{ address }}">Edit</a>
<a href="javascript:void(0);" class="btn btn-sm btn-danger remove" data-id="{{ id }}">Remove</a>
</td>
</tr>
{{else}}
<tr>
<td colspan="5" class="text-center">No data to display.</td>
</tr>
{{/each}}
</tbody>
</table>
<button class="btn btn-success float-right" data-toggle="modal" data-target="#newCustomerModal">Add New</button>
</div>
<!-- New Customer Modal -->
<form action="/save" method="post">
<div class="modal fade" id="newCustomerModal" role="dialog">
<div class="modal-dialog" role="document">
<div class="modal-content">
<div class="modal-header">
<h4 class="modal-title">New Customer</h4>
<button type="button" class="close" data-dismiss="modal">
<span>×</span>
</button>
</div>
<div class="modal-body">
<div class="form-group">
<input type="text" name="name" class="form-control" placeholder="Customer Name"
required="required">
</div>
<div class="form-group">
<input type="number" name="age" class="form-control" placeholder="Age" required="required">
</div>
<div class="form-group">
<input type="text" name="address" class="form-control" placeholder="Address"
required="required">
</div>
</div>
<div class="modal-footer">
<button type="button" class="btn btn-secondary" data-dismiss="modal">Close</button>
<button type="submit" class="btn logrocket">Create</button>
</div>
</div>
</div>
</div>
</form>
<!-- Edit Customer Modal -->
<form action="/update" method="post">
<div class="modal fade" id="editCustomerModal" role="dialog">
<div class="modal-dialog" role="document">
<div class="modal-content">
<div class="modal-header">
<h4 class="modal-title">Edit Customer</h4>
<button type="button" class="close" data-dismiss="modal">
<span>×</span>
</button>
</div>
<div class="modal-body">
<div class="form-group">
<input type="text" name="name" class="form-control name" placeholder="Customer Name"
required="required">
</div>
<div class="form-group">
<input type="number" name="age" class="form-control age" placeholder="Age"
required="required">
</div>
<div class="form-group">
<input type="text" name="address" class="form-control address" placeholder="Address"
required="required">
</div>
</div>
<div class="modal-footer">
<input type="hidden" name="id" class="customer_id">
<button type="button" class="btn btn-secondary" data-dismiss="modal">Close</button>
<button type="submit" class="btn logrocket">Update</button>
</div>
</div>
</div>
</div>
</form>
<!-- Remove Customer Modal -->
<form id="add-row-form" action="/remove" method="post">
<div class="modal fade" id="removeCustomerModal" role="dialog" aria-labelledby="myModalLabel">
<div class="modal-dialog">
<div class="modal-content">
<div class="modal-header">
<h4 class="modal-title"></h4>Remove Customer</h4>
<button type="button" class="close" data-dismiss="modal"><span>×</span></button>
</div>
<div class="modal-body">
Are you sure?
</div>
<div class="modal-footer">
<input type="hidden" name="customer_id" class="form-control customer_id_removal"
required="required">
<button type="button" class="btn btn-default" data-dismiss="modal">Close</button>
<button type="submit" class="btn logrocket">Remove</button>
</div>
</div>
</div>
</div>
</form>
<script src="https://code.jquery.com/jquery-3.3.1.slim.min.js"
integrity="sha384-q8i/X+965DzO0rT7abK41JStQIAqVgRVzpbzo5smXKp4YfRvH+8abtTE1Pi6jizo"
crossorigin="anonymous"></script>
<script src="https://stackpath.bootstrapcdn.com/bootstrap/4.3.1/js/bootstrap.min.js"
integrity="sha384-JjSmVgyd0p3pXB1rRibZUAYoIIy6OrQ6VrjIEaFf/nJGzIxFDsf4x0xIM+B07jRM"
crossorigin="anonymous"></script>
<script>
$(document).ready(function () {
$('#customers_table').on('click', '.edit', function () {
$('#editCustomerModal').modal('show');
$('.customer_id').val($(this).data('id'));
$('.name').val($(this).data('name'));
$('.age').val($(this).data('age'));
$('.address').val($(this).data('address'));
}).on('click', '.remove', function () {
$('#removeCustomerModal').modal('show');
$('.customer_id_removal').val($(this).data('id'));
});
});
</script>
</body>
</html>
It’s a little lengthy, especially because I decided to create the whole CRUD UIs into the same page, via Bootstrap modals, rather than redirecting and setting up a lot of different pages.
By the beginning and the end of the page, we find the imports for the CSS and JS files of Bootstrap and jQuery, respectively.
The main table is making use of Handlebars foreach instruction via:
{{#each results}}
…
{{else}}
…
{{/each}}
The else here helps to configure a text for when no elements are available to the listing. Regarding the links of editing and removing operations, we’re setting HTML data attributes to help out with the modals when they open.
Every time we open the edit a modal, each of its inputs have to be filled with the correspondent value for that row’s values. The same goes for the removing action, even though here we only need the id.
At the end of the first div, we can see the link for adding new customers, which also triggers the respective modal.
Right below, there are the three modals.
They’re very similar to each other, since they only hold the HTML structure.
The logic is actually going to be placed at the JavaScript section that comes at the end of the HTML.
Here, we’re using jQuery to open the modal itself, and to facilitate the work of changing the values (via val function) of each modal’s input to their corresponding data attribute value.
We’re done. Now you can start the client in another command line window by issuing:
node index
Then, with the server also up, go to the http://localhost:3000/ and test it out.
You can find the final source code of this project here.
Now you can deploy it to the cloud or a production server, or start with a modest POC in your own projects to see how fast it performs compared to your REST APIs.
But there’s a lot more you can do with gRPC. You can insert authentication to make it safer, timeouts, bidirectional streaming, robust error handling mechanisms, channeling, and more.
Make sure to read the docs to check more of its power.
 Monitor failed and slow network requests in production
Deploying a Node-based web app or website is the easy part. Making sure your Node instance continues to serve resources to your app is where things get tougher. If you’re interested in ensuring requests to the backend or third-party services are successful, try LogRocket.

LogRocket lets you replay user sessions, eliminating guesswork around why bugs happen by showing exactly what users experienced. It captures console logs, errors, network requests, and pixel-perfect DOM recordings — compatible with all frameworks.
LogRocket's Galileo AI watches sessions for you, instantly identifying and explaining user struggles with automated monitoring of your entire product experience.
LogRocket instruments your app to record baseline performance timings such as page load time, time to first byte, slow network requests, and also logs Redux, NgRx, and Vuex actions/state. Start monitoring for free.
Hey there, want to help make our blog better?
Join LogRocket’s Content Advisory Board. You’ll help inform the type of content we create and get access to exclusive meetups, social accreditation, and swag.
Sign up now
Learn how OpenAPI can automate API client generation to save time, reduce bugs, and streamline how your frontend app talks to backend APIs.

Discover how the Interface Segregation Principle (ISP) keeps your code lean, modular, and maintainable using real-world analogies and practical examples.

<selectedcontent> element improves dropdowns

Learn how to implement an advanced caching layer in a Node.js app using Valkey, a high-performance, Redis-compatible in-memory datastore.
4 Replies to "Creating a CRUD API with Node, Express, and gRPC"
Have you looked at the gRPC gateway?
https://github.com/grpc-ecosystem/grpc-gateway
Exposes gRPC directly as REST endpoint.
Wow, I didn’t know this one. Thanks for sharing! 🙂
Thanks very much now have a better grasp of GRPC
thanks , it helped alot..