Editor’s note: This post was updated 22 February 2022 to fix the connection to Diesel and make other improvements.
There are quite a few frameworks that make it easy to create a REST API while reducing the amount of boilerplate you have to write. I personally prefer Rust because it is simple, strongly typed, extremely fast, and safer than almost any language out there.
To proceed with this tutorial, you’ll need a basic understanding of API development. You must at least understand the concept of CRUD.
We’ll cover:
Before we dive into coding, let’s establish what we’ll be building and review some fundamental requirements and assumptions to complete the demo.
We’ll create all the CRUD API endpoints for a sample employee management application. This will be a bare-bones project designed to demonstrate all the fundamental building blocks for writing APIs in Rust.
I chose the Actix web 3.0 framework because it’s one of the most popular, has great documentation, and uses patterns similar to Express in Node.js. Other popular alternatives include Rocket and Tower.
Our data layer will consist of Postgres and Diesel, with Diesel serving as the ORM and query builder.
I’ve written this guide to be easily understood by anyone with a basic understanding of the Rust language, but to be clear, here are some terms you should be familiar with.
async / await tool for writing asynchronous behaviorFirst, let’s go over how to set up a basic Rust project, structure the folders, and install dependencies. If you’re coming from a Node.js background, you’ll already be familiar with using npm for package management and registry. The equivalent in Rust is called cargo.
Unfortunately, as of the time of writing, cargo does not have a way to update dependencies automatically, except with a crate called cargo-update or cargo install --force crate-name, You can decide to write out the name and version of the dependency in the cargo.toml file, as well.
If you don’t have Rust installed, follow the installation guide. Otherwise, create a new project.
cargo new emply
Below is the folder structure for this project; you can also choose your desired structure. This one is meant to be self-explanatory with the naming convention of the files.
employee/
  - src/
    - employees/
      - mod.rs
      - model.rs
      - routes.rs
    - db.rs
    - error_handlers.rs
    - main.rs
  - .env
  - Cargo.toml
Our mod.rs file helps to manage the relative path of the files in the employees directory and looks like this:
mod model;
mod routes;
pub use model::*;
pub use routes::init_routes;
Here’s our Cargo.toml file for the app:
[package]
name = "employee"
version = "0.1.0"
authors = ["Ola John <[email protected]>"]
edition = "2018"
# See more keys and their definitions at https://doc.rust-lang.org/cargo/reference/manifest.html
[dependencies]
actix-web = "3.0"
actix-rt = "1.0"
chrono = { version = "0.4", features = ["serde"] }
dotenv = "0.11"
diesel = { version = "1.4", features = ["postgres", "r2d2", "uuid", "chrono"] }
diesel_migrations = "1.4"
env_logger = "0.6"
lazy_static = "1.4"
listenfd = "0.3"
serde = "1.0"
serde_json = "1.0"
r2d2 = "0.8"
uuid = { version = "0.6", features = ["serde", "v4"] }
Here’s our main program that contains a few crates and config:
db::init(): A function that initiates the database connection, which is referenced from another file called db.rsemployees::init_routes: A function that abstracts all routes used in this projectThe other part of the code is the actix-web server setup, with respect to the listenfd crate.
#[actix_rt::main]
async fn main() -> std::io::Result<()> {
    dotenv().ok();
    db::init();
    let mut listenfd = ListenFd::from_env();
    let mut server = HttpServer::new(|| App::new().configure(employees::init_routes));
    server = match listenfd.take_tcp_listener(0)? {
        Some(listener) => server.listen(listener)?,
        None => {
            let host = env::var("HOST").expect("Please set host in .env");
            let port = env::var("PORT").expect("Please set port in .env");
            server.bind(format!("{}:{}", host, port))?
        }
    };
    server.run().await
}
Our endpoints are created in a file called routes.rs. Our routes are also needed to return JSON responses, which is why we added the serde crate to handle the serialization and deserialization of data across our server.
Our endpoint for our CRUD operations includes:
/employees/employees/{id}/employees/employee/{id}/employee/{id}#[get("/employees")]
async fn find_all() -> Result<HttpResponse, CustomError> {
let employees = web::block(|| Employees::find_all()).await.unwrap();
Ok(HttpResponse::Ok().json(employees))
}
#[get("/employees/{id}")]
async fn find(id: web::Path) -> Result<HttpResponse, CustomError> {
let employee = Employees::find(id.into_inner())?;
Ok(HttpResponse::Ok().json(employee))
}
#[post("/employees")]
async fn create(employee: web::Json) -> Result<HttpResponse, CustomError> {
let employee = Employees::create(employee.into_inner())?;
Ok(HttpResponse::Ok().json(employee))
}
#[put("/employees/{id}")]
async fn update(
id: web::Path,
employee: web::Json,
) -> Result<HttpResponse, CustomError> {
let employee = Employees::update(id.into_inner(), employee.into_inner())?;
Ok(HttpResponse::Ok().json(employee))
}
#[delete("/employees/{id}")]
async fn delete(id: web::Path) -> Result<HttpResponse, CustomError> {
let deleted_employee = Employees::delete(id.into_inner())?;
Ok(HttpResponse::Ok().json(json!({ "deleted": deleted_employee })))
}
pub fn init_routes(config: &mut web::ServiceConfig) {
config.service(find_all);
config.service(find);
config.service(create);
config.service(update);
config.service(delete);
}
Async functions are created to abstract all of our CRUD operations into an implementation type called Employees. They return Result<HttpResponse, CustomError>, where the CustomError is declared in our error_handler.rs file, which is more like having a custom exception handler.
We registered our routes in a function called init_routes(), as seen above, to have a cleaner and more modular code.
Notice we added spawn blocking to get all of the employees’ endpoints, so that this process doesn’t block other task execution in case we’re querying huge records from the database.
let employees = web::block(|| Employees::find_all()).await.unwrap();
The db.rs file contains the connection pool to our PostgreSQL database, with connection() and init() used as public functions for accessibility in other files. We also use the lazy_static crate to require that static code is executed at runtime in order to be initialized; in this case, it’s our database connection.
use crate::error_handler::CustomError;
use diesel::pg::PgConnection;
use diesel::r2d2::ConnectionManager;
use lazy_static::lazy_static;
use r2d2;
use std::env;
type Pool = r2d2::Pool<ConnectionManager<PgConnection>>;
pub type DbConnection = r2d2::PooledConnection<ConnectionManager<PgConnection>>;
embed_migrations!();
lazy_static! {
    static ref POOL: Pool = {
        let db_url = env::var("DATABASE_URL").expect("Database url not set");
        let manager = ConnectionManager::<PgConnection>::new(db_url);
        Pool::new(manager).expect("Failed to create db pool")
    };
}
pub fn init() {
    lazy_static::initialize(&POOL);
    let conn = connection().expect("Failed to get db connection");
    embedded_migrations::run(&conn).unwrap();
}
pub fn connection() -> Result<DbConnection, CustomError> {
    POOL.get()
        .map_err(|e| CustomError::new(500, format!("Failed getting db connection: {}", e)))
}
Diesel is used as our object relational mapper (ORM) for easy querying and object mapping with database tables. Check out diesel.rs for a full guide to setup and installation.
#[derive(Serialize, Deserialize, AsChangeset, Insertable)]
#[table_name = "employees"]
pub struct Employee {
    pub first_name: String,
    pub last_name: String,
    pub department: String,
    pub salary: i32,
    pub age: i32,
}

#[derive(Serialize, Deserialize, Queryable)]
pub struct Employees {
    pub id: i32,
    pub first_name: String,
    pub last_name: String,
    pub department: String,
    pub salary: i32,
    pub age: i32,
}

impl Employees {
    pub fn find_all() -> Result<Vec<Self>, CustomError> {
        let conn = db::connection()?;
        let employees = employees::table.load::<Employees>(&conn)?;
        Ok(employees)
    }
    pub fn find(id: i32) -> Result<Self, CustomError> {
        let conn = db::connection()?;
        let employee = employees::table.filter(employees::id.eq(id)).first(&conn)?;
        Ok(employee)
    }
    pub fn create(employee: Employee) -> Result<Self, CustomError> {
        let conn = db::connection()?;
        let employee = Employee::from(employee);
        let employee = diesel::insert_into(employees::table)
            .values(employee)
            .get_result(&conn)?;
        Ok(employee)
    }
    pub fn update(id: i32, employee: Employee) -> Result<Self, CustomError> {
        let conn = db::connection()?;
        let employee = diesel::update(employees::table)
            .filter(employees::id.eq(id))
            .set(employee)
            .get_result(&conn)?;
        Ok(employee)
    }
    pub fn delete(id: i32) -> Result<usize, CustomError> {
        let conn = db::connection()?;
        let res = diesel::delete(employees::table.filter(employees::id.eq(id))).execute(&conn)?;
        Ok(res)
    }
}
impl Employee {
    fn from(employee: Employee) -> Employee {
        Employee {
            first_name: employee.first_name,
            last_name: employee.last_name,
            department: employee.department,
            salary: employee.salary,
            age: employee.age,
        }
    }
}
Diesel model mapping is used to identify the columns in tables. The macros AsChangeset, Insertable, and Queryable are specified to perform operations such as querying records, and insertion on our tables. The serde crate can also serialize and deserialize annotations, and are used for converting our model to and from JSON.
// Insertion and other operation
#[derive(Serialize, Deserialize, AsChangeset, Insertable)]
#[table_name = "employees"]
pub struct Employee {
    pub first_name: String,
    pub last_name: String,
    pub department: String,
    pub salary: i32,
    pub age: i32,
}
// Diesel ORM object mapping for to query table
#[derive(Serialize, Deserialize, Queryable)]
pub struct Employees {
    pub id: i32,
    pub first_name: String,
    pub last_name: String,
    pub department: String,
    pub salary: i32,
    pub age: i32,
}
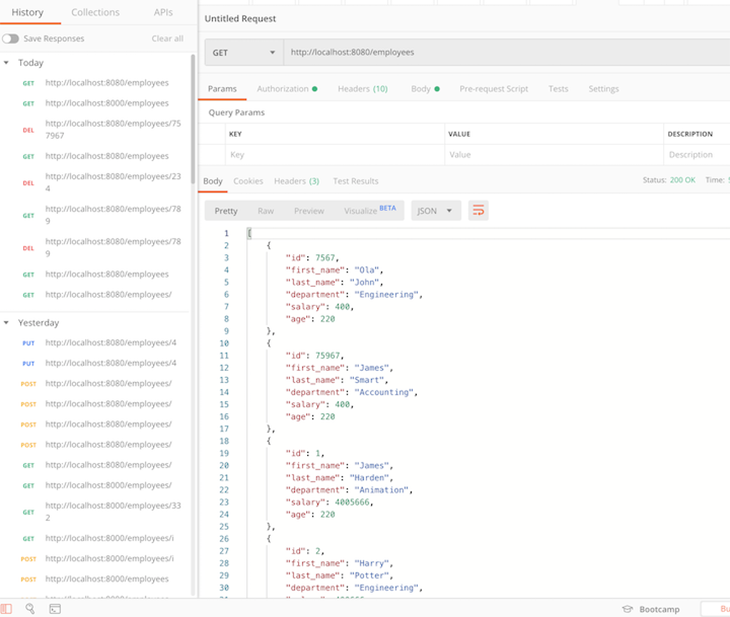
Let’s test that everything works as expected. If you run the cargo watch command, you should be able to create, read, update, and delete (CRUD) an employee from the database through your API endpoints.
See the full code referenced in this tutorial on GitHub.
You should now understand how to create API endpoints and handle a simple request response cycle in Rust using Actix. We covered how to build endpoints to handle the fundamental CRUD operations, manage data with Diesel ORM.
What I really like about building APIs with Rust is that it enforces good practices by engaging you to think critically about your code. If your code compiles, it is virtually guaranteed to do what it is intended to do.
For a deeper dive, refer to the finished GitHub repo.
Debugging Rust applications can be difficult, especially when users experience issues that are hard to reproduce. If you’re interested in monitoring and tracking the performance of your Rust apps, automatically surfacing errors, and tracking slow network requests and load time, try LogRocket.
LogRocket lets you replay user sessions, eliminating guesswork around why bugs happen by showing exactly what users experienced. It captures console logs, errors, network requests, and pixel-perfect DOM recordings — compatible with all frameworks.
LogRocket's Galileo AI watches sessions for you, instantly identifying and explaining user struggles with automated monitoring of your entire product experience.

Modernize how you debug your Rust apps — start monitoring for free.

Learn how to protect full-stack projects from NPM supply chain attacks with a practical security checklist.

Explore 15 essential MCP servers for web developers to enhance AI workflows with tools, data, and automation.

Learn how contrast-color() automatically picks accessible text colors using native CSS, without JavaScript.

Learn how to build a harness-style AI workflow using Claude Code with specialized Dev, QE, and Ops subagents, gated handoffs, MCP telemetry, and LEARNING.md.
Would you be interested in joining LogRocket's developer community?
Join LogRocket’s Content Advisory Board. You’ll help inform the type of content we create and get access to exclusive meetups, social accreditation, and swag.
Sign up now

