One crucial aspect of any frontend framework is how it creates components. Interestingly, Vue.js offers not one, but two methods for this process — the Options API and the Composition API. But is this beneficial for developers or not? Let’s find out.

In this article, we’ll compare each option for component creation and discuss how to choose the best method for your needs. We will cover:
At the end of the article, we’ll summarize what we’ve learned in a comparison table for you to reference as you choose between the Composition API or Options API for your project. Let’s jump right in.
You might wonder why Vue provides two ways to construct components and whether both methods are necessary. To answer this question, we need to trace back to the origins of Vue.
Vue emerged as a simple and user-friendly library in contrast to Angular’s complexity and React’s disorganization. The goal of Vue was to offer developers a straightforward way to build apps quickly and easily or to inject interactivity into existing projects or websites.
The Options API successfully achieved this goal by providing a clear and straightforward way to describe a component by grouping its code into options. You don’t need extensive thought or code engineering — just place the code in its group of options.
This simplicity is one of the primary reasons developers love Vue so much. However, as Vue gained traction, it matured into a serious framework for building more complex and demanding projects.
This evolution led to the addition of the Composition API in Vue 3, providing a more powerful and flexible approach to creating reusable components. Many people argued against this addition, but when we take a closer look, the reasoning behind this new feature becomes clear.
The Composition API was developed to address the limitations of the Options API, particularly its code organization. In more complex apps, the Options API can lead to spaghetti code and fragmentation. The image below illustrates these differences:
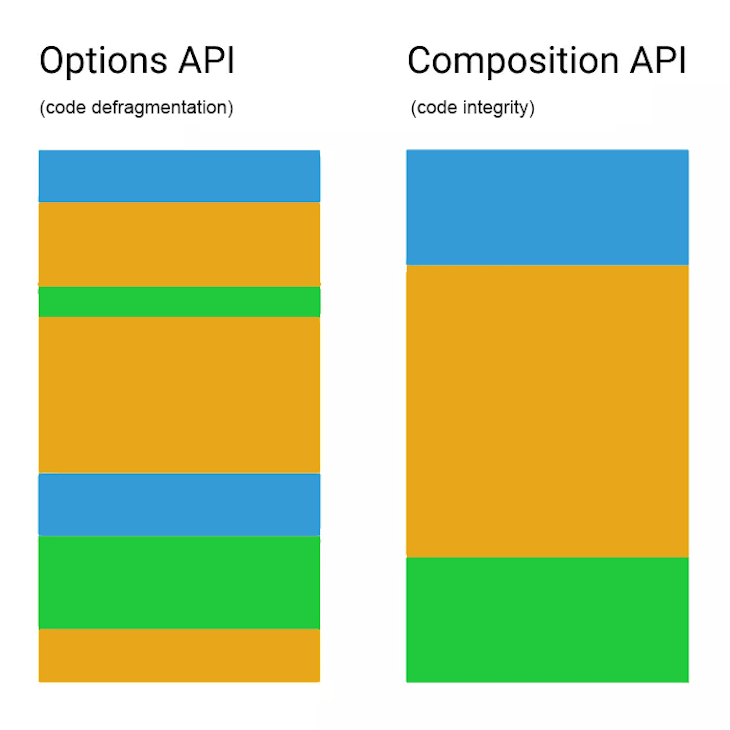
When we use the Options API, we often divide a cohesive unit of code into several pieces and place them into their appropriate options groups. This arrangement works fine for small and simple components this won’t be such a problem.
However, as your app grows and requires more complex and multifunctional components, your code can become challenging to read and maintain. The Composition API solves this problem by allowing you to keep logically related code in one place, resulting in greater code integrity and the ability to write truly reusable code.
As we’ve seen, Vue’s two component-building strategies developed naturally as the language evolved. Don’t let this confuse you!
Throughout the rest of this article, we’ll explore both APIs and their advantages and drawbacks in more detail. Hopefully, this will clarify your understanding and help you to choose the right API for your specific scenarios.
If you’re new to Vue, the explanations above may sound a bit abstract. So, let’s get a bit more concrete. First, let’s examine what an Options API structure looks like:
export default {
  data() {
    return {

    }
  },

  computed: {

  },

  methods: {

  }
}
In the example above, data, computed, and methods are all so-called options:
data holds all variablescomputed holds any computed variablesmethods holds all necessary app functionsThere are more options available, but we’re only showing the basic ones here.
Let’s see this in action with a simple To-Do List app example:
<template>
  <h3> My To Do List </h3>
  <div>
    <input v-model="newItemText" v-on:keyup.enter="addNewTodo" />
    <button v-on:click="addNewTodo">Add</button>
    <button v-on:click="removeTodo">Remove</button>
    <button v-on:click="removeAllTodos">Remove All</button>
    <transition-group name="list" tag="ul">
      <li v-for="task in tasks" v-bind:key="task" >{{ task }}</li>
    </transition-group>
  </div>
</template>

<script>
  export default {
    data() {
      return {
        tasks: ["Write my posts", "Go for a walk", "Meet my friends", "Buy fruit"],
        newItemText: ""
      }
    },
    methods: {
      addNewTodo() {
        if (this.newItemText != "") {
          this.tasks.unshift(this.newItemText)
        }
        this.newItemText = ""
      },
      removeTodo() {
        this.tasks.pop()
      },
      removeAllTodos() {
        this.tasks = []
      }
    }
  }
</script>

<style>
  button {
    margin: 5px;
  }

  ul {
    margin: 30px 0 0 0;
    padding: 0;
    text-align: left;
  }

  li {
    font-size: 1.2em;
    list-style: none;
  }

  .list-enter-active {
    animation: add-item 1s;
  }

  .list-leave-active {
    position: absolute;
    animation: add-item 1s reverse;
  }

  .list-move {
    transition: transform 1s;
  }

  @keyframes add-item {
    0% {
      opacity: 0;
      transform: translateX(150px);
    }
    50% {
      opacity: 0.5;
      transform: translateX(-10px) skewX(20deg);
    }
    100% {
      opacity: 1;
      transform: translateX(0px);
    }
  }
</style>
The example above contains two variables and three functions for adding and removing to-do items. All of them are used in the template.
As you can see, the code organization is pretty straightforward — well-organized and easy to understand. This is because our example here is very simple, but this might not be the case for a more complex component.
Note that I won’t explain the CSS code here. It’s included for completeness and to enhance the UX in our example.
For a complex component, using the Composition API would be a better approach. Here is a short demonstration of this API’s structure:
export default {
  setup() {
    // Composition API code
    return {
      // Composition API for use in the template
    }
  }
}
The Composition API is used in the setup() function — which, interestingly, is just another option of the Options API 🙂. This function allows us to use Vue 3’s reactivity to create reactive variables.
Let’s see this in action with an example that mirrors our previous Options API example:
<script>
  import { ref } from 'vue'

  export default {
    setup() {
      const tasks = ref(["Write my posts", "Go for a walk", "Meet my friends", "Buy fruit"])
      const newItemText = ref("")

      function addNewTodo() {
        if (newItemText.value != "") {
          tasks.value.unshift(newItemText.value)
        }
        newItemText.value = ""
      }
      function removeTodo() {
        tasks.value.pop()
      }
      function removeAllTodos() {
        tasks.value = []
      }

      return {
        tasks,
        newItemText,
        addNewTodo,
        removeTodo,
        removeAllTodos
      }
    }
  }
</script>
In this example, we use the ref function to declare reactive variables. Then, we create the necessary functions. Finally, we return all the variables and functions that we want to use in the template.
As I mentioned earlier, one of the main reasons for creating the Composition API was to enhance reusability. Vue achieves this by introducing a new type of components called composables.
Composables are chunks of code that can be used multiple times in one app and shared across different projects. In the Options API, similar functionality is provided by mixins, but they have some drawbacks compared to composables. Let’s see some examples now.
Let’s say we need a counter functionality that we want to reuse in our app’s components. Here is how we can create this with a mixin:
// CounterMixin.js
export default {
  data() {
    return { count: 0 }
  },
  methods: {
    increment() {
      this.count++
    },
    decrement() {
      this.count--
    },
    set(val) {
      this.count = val
    },
    reset() {
      this.count = 0
    }
  }
}
As you can see, a mixin is just an options object. And as we’ll see in the next example, we can inject this object into our component.
Continuing with the to-do list example, let’s change the title to contain the count variable:
<h3> My To Do List ({{ count }}) </h3>
Then swap the code in the script section with the following:
<script>
  import CounterMixin from './mixins/CounterMixin.js'

  export default {
    mixins: [CounterMixin],
    data() {
      return {
        tasks: ["Write my posts", "Go for a walk", "Meet my friends", "Buy fruit"],
        newItemText: ""
    }},
    mounted() {
      this.set(this.tasks.length)
    },
    methods: {
      addNewTodo() {
        if (this.newItemText != "") {
          this.tasks.unshift(this.newItemText)
          this.increment()
        }
        this.newItemText = ""
      },
      removeTodo() {
        this.tasks.pop()
        this.decrement()
      },
      removeAllTodos() {
        this.tasks = []
        this.reset()
      }
    }
  }
</script>
Here, we import the mixin and then register it by using the mixins option. After that, all the properties of the mixins object are merged with the Vue instance object.
Now we can use the variables and functions from the CounterMixin. We use the mounted() hook to set the initial count for the tasks.
At first glance, mixins might seem great. However, they have some significant drawbacks:
You can avoid all of these disadvantages by using composables instead. Here is a counter composable with the exact same functionality:
// useCounter.js
import { ref, readonly } from 'vue'

export default function useCounter() {
  const count = ref(0)
  const increment = () => { count.value += 1 }
  const decrement = () => { count.value -= 1 }
  const set = (val) => { count.value = val }
  const reset = () => { count.value = 0 }

  return {
    count: readonly(count),
    increment,
    decrement,
    set,
    reset
  }
}
Composables are created by using the same principles as in the setup() function.
We create the necessary variables and functions inside the exported composable function and return the parts we want to reuse later. We also use the readonly() function from the Reactivity API to prevent the count variable from getting mutated by a consuming component.
Let’s now see how this composable is applied. Replace the content of the script section with the following:
<script>
  import { ref, onMounted } from 'vue'
  import useCounter from './composables/useCounter.js'

  export default {
    setup() {
      const tasks = ref(["Write my posts", "Go for a walk", "Meet my friends", "Buy fruit"])
      const newItemText = ref("")

      const {count, increment, decrement, set, reset} = useCounter()
      onMounted(() => set(tasks.value.length))

      function addNewTodo() {
        if (newItemText.value != "") {
          tasks.value.unshift(newItemText.value)
        }
        newItemText.value = ""
        increment()
      }
      function removeTodo() {
        tasks.value.pop()
        decrement()
      }
      function removeAllTodos() {
        tasks.value = []
        reset()
      }

      return {
        count,
        tasks,
        newItemText,
        addNewTodo,
        removeTodo,
        removeAllTodos
      }
    }
  }
</script>
Here we import the composable and then extract its variables and functions by using destructuring assignment syntax. We use the onMounted() hook to set the initial count for the to-dos.
As you can see here, we can clearly see where the counter variable and functions came from and exactly which ones are available to use.
Compared to mixins, composables offer several benefits:
The good news is that you can use composables along with the Options API. If you need professionally created and ready-to-use composables, I recommend looking up an awesome collection called VueUse.
So far, we’ve seen that both the Composition API and the Options API are excellent tools with their own benefits and drawbacks. So which one should you choose for your project?
I recommend choosing the Composition API if your project is complex or you anticipate it scaling, as well as if you need to create multi-featured and highly reusable Vue components.
On the other hand, the Options API is great if your project is small and simple, and you don’t expect to scale. It’s ideal for single-featured components that don’t require much reusability, as well as if you need to inject some interactivity into an existing project.
Check out this quick comparison table for the Vue Composition API vs. the Vue Options API to help as you weigh your options:
In this article, we explored the two ways of building components provided by Vue — the Options API and the Composition API. As we’ve seen, both provide great functionality but for different scenarios.
The key takeaway here is to make the right decision about which one is the best choice for a particular project and then enjoy building it. If you have any further questions, feel free to comment below.
Debugging Vue.js applications can be difficult, especially when users experience issues that are difficult to reproduce. If you’re interested in monitoring and tracking Vue mutations and actions for all of your users in production, try LogRocket.

LogRocket lets you replay user sessions, eliminating guesswork by showing exactly what users experienced. It captures console logs, errors, network requests, and pixel-perfect DOM recordings — compatible with all frameworks.
With Galileo AI, you can instantly identify and explain user struggles with automated monitoring of your entire product experience.
Modernize how you debug your Vue apps — start monitoring for free.
Hey there, want to help make our blog better?
Join LogRocket’s Content Advisory Board. You’ll help inform the type of content we create and get access to exclusive meetups, social accreditation, and swag.
Sign up now
Not sure if low-code is right for your next project? This guide breaks down when to use it, when to avoid it, and how to make the right call.

Compare Firebase Studio, Lovable, and Replit for AI-powered app building. Find the best tool for your project needs.

Discover how to use Gemini CLI, Google’s new open-source AI agent that brings Gemini directly to your terminal.

This article explores several proven patterns for writing safer, cleaner, and more readable code in React and TypeScript.


